When you click on links to various merchants on this site and make a purchase, this can result in this site earning a commission. Affiliate programs and affiliations include, but are not limited to, the eBay Partner Network.
ashai.. Am I looking in the wrong place for a leak to cause PO1124 and Code PO1126. I am in behind the alternator changing air lines and testing change over valves. Should I be looking somewhere else for air intake leaks. Where would you check? Thanks.
ashai.. Am I looking in the wrong place for a leak to cause PO1124 and Code PO1126. I am in behind the alternator changing air lines and testing change over valves. Should I be looking somewhere else for air intake leaks. Where would you check? Thanks.
Hurdi, there are a few things you can try:
- check the oil filler tube for cracks
- check all the intake rubber boots and hose clamps
- smoke machine on the intake
- use a hand vacuum pump to test ALL vacuum hoses. Also remove the vacuum tank and pressurize it for a few PSI then spray soapy water over its bottom. Mine has a very small invisible crack
- spray carb cleaner CAREFULLY around all the intake and fuel injectors and pay attention to any engine note change. Don't spray it on any hot surfaces such as the exhaust!! Have a fire extinguisher ready at hand
- use a scanner that can read the pre-cat O2 sensor voltage in real time. Monitor that when spraying carb cleaner and see if the voltage pegs at high (1v)
- remove the regen valve and bench test it
how the hell did you manage to get to the vacuum canister Ahsai? Better still hold it in your hands. Even with the Alternator out I cant get to mine. It's hidden behind something else. I know it's there I saw it with my led lighted wand thingy. I need to test for leaks on all of my Evap lines around there including the canister. I only hope that's it is not leaking. The rest of the system I can manage to get too. Well I think I can lol. I borrowed a vacuum pump from Autozone for free. Isn't life fun?
I had my left intake manifold off at the time for AOS replacement. Have you tried removing the throttle body and the T-plenum? That should give you more space to work with.
Here are a few ideas subject to Ahsai's approval because he is the one who pioneered the Vac accumulator crack discovery:
The leak will be worst when the vacuum is highest. So at idle speed. It may be better/worse warm/old so try all permutations.
As you discovered, it is buried so deep you can barely see it and you certainly can't feel any crack - even if you could reach it - which you can't.
You can't run the engine with the alternator off so when you have finished inspecting under there for disconnected hoses/split hoses - put it back.
Try carb cleaner or propane. If you fit a small diameter hose on the propane you can be quite precise with it.
The alternative is to remove more parts and then apply a vacuum with a Mighty vac. WAtch to see if it holds/looses and start from there.
Thanks Schnell and Ashia. I changed ALL my secondary air vacuum lines for new rubber ones. Lengthened a couple of them. Used the same elbows and y junction. Sucked and blew on them and they hold vacuum on the tip of my tongue. The fish line tube I used was drawn flat with vacuum so that's why I changed everything to thicker rubber which does not flatten out with vacuum in it. The black and white one way valve that goes to the intake plenum, does that draw vacuum when the engine is running at idle? If so there maybe a small leak on the vacuum canister (which I cannot get too) letting unmetered air into the system and out via the black and white valve to the plenum which could throw codes P1124 and P1126. Even though the secondary air fan is not running after a couple of minutes. YES??? If so I need to get to that vacuum tank.
Vacuum tank = the hairline crack is usually on the bottom of the tank from what I have read. It is so awful to get to it - replace it anyway ? After all these years and heat cycles it is close to failure anyway ?
The vacuum lines - I hope you did not use "rubber" . The choice of materials is critical. Regulr silicone hoses may collapse under vacuum. The thick wall silicone hoses may be good. They are certainly much more heat resistant than the soft vacuum lines that are OEM.They are also less likely to crack than the hard-plastic lines.
The large 'S' shape hose from the SAI pump never seems to fail. I have seen lots where there is no clamp on that hose at the pump and it seems to work fine.
But most important , thanks for completing the Post.So often Posters just stop and we are left not knowing exactly what fixed the problem. There should be a way of black-marking such non-responders?How else will we improve the knowledge base for other Forum Members? Equally, bad advice given should also be noted .
Last edited by Schnell Gelb; 03-31-2017 at 05:47 PM.
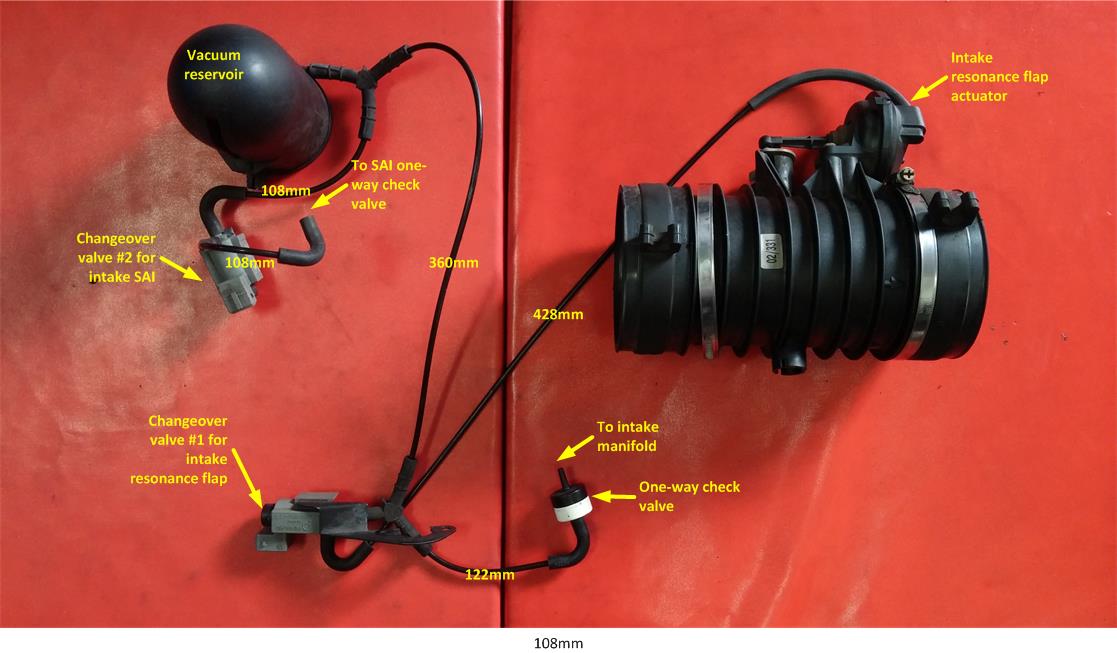
Ahsai: Thanks for taking the time to post the the vacuum diagram. It's very helpful. I love Rennlist.
I replaced my alternator a month ago. It went well except that I broke one brittle vacuum line going to the resonance flap actuator AND lost the line that goes to the vacuum reservoir.
I spliced in a new section of line to the resonance actuator using parts from Pelican:
*A straight connector 999-239-040-40-OEM
* Vacuum line (sold by the meter): 000-043-205-01-M20
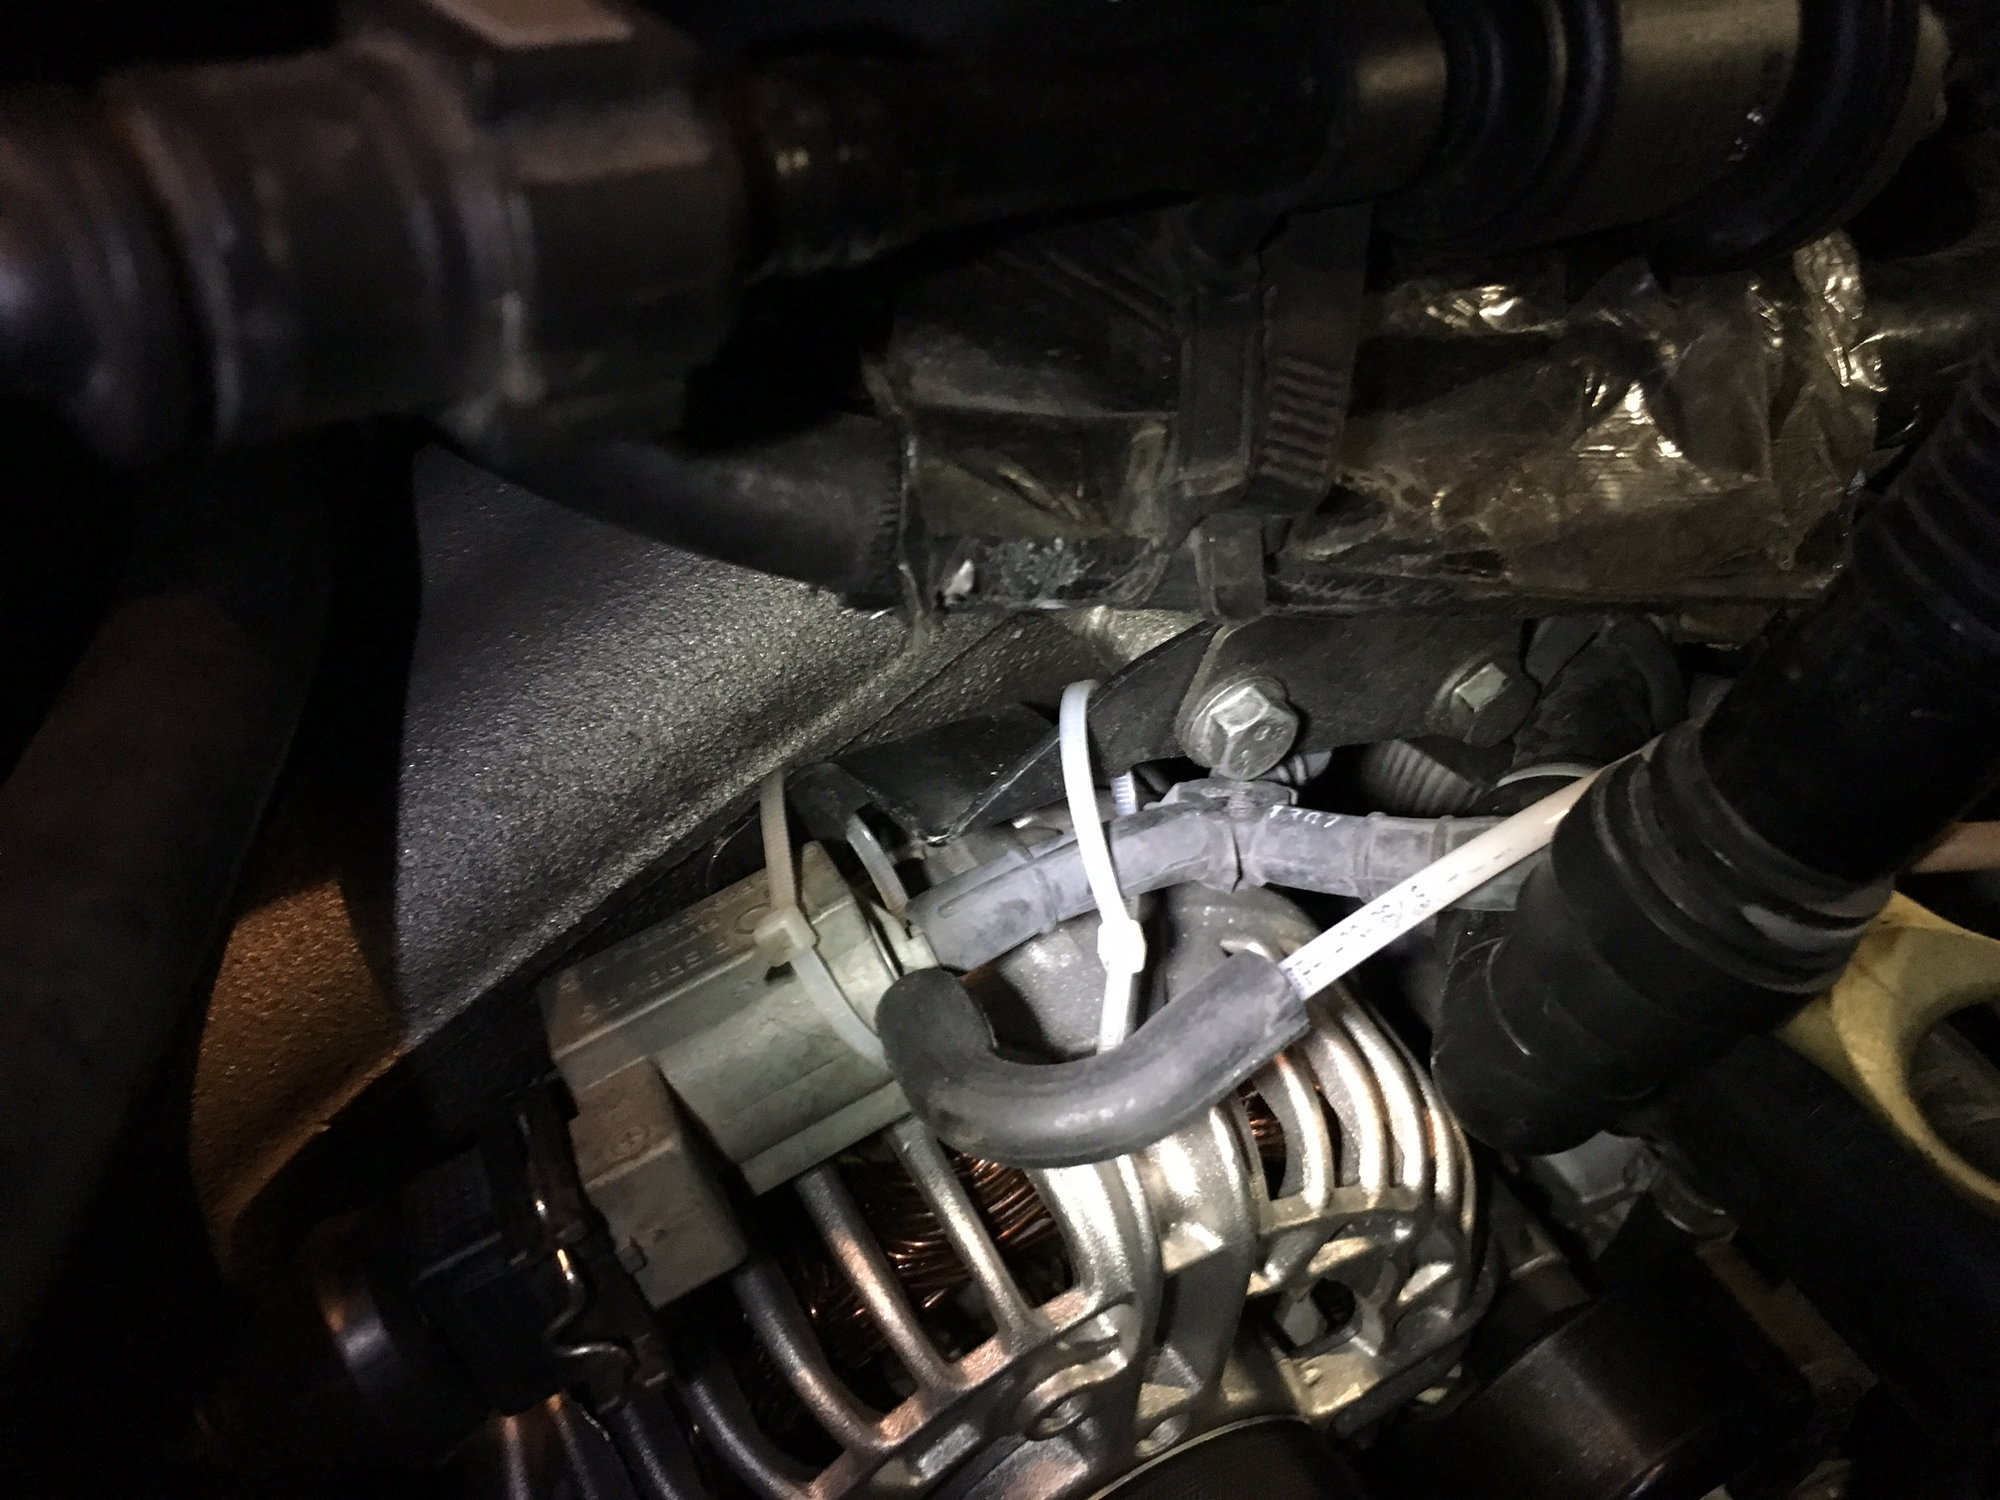
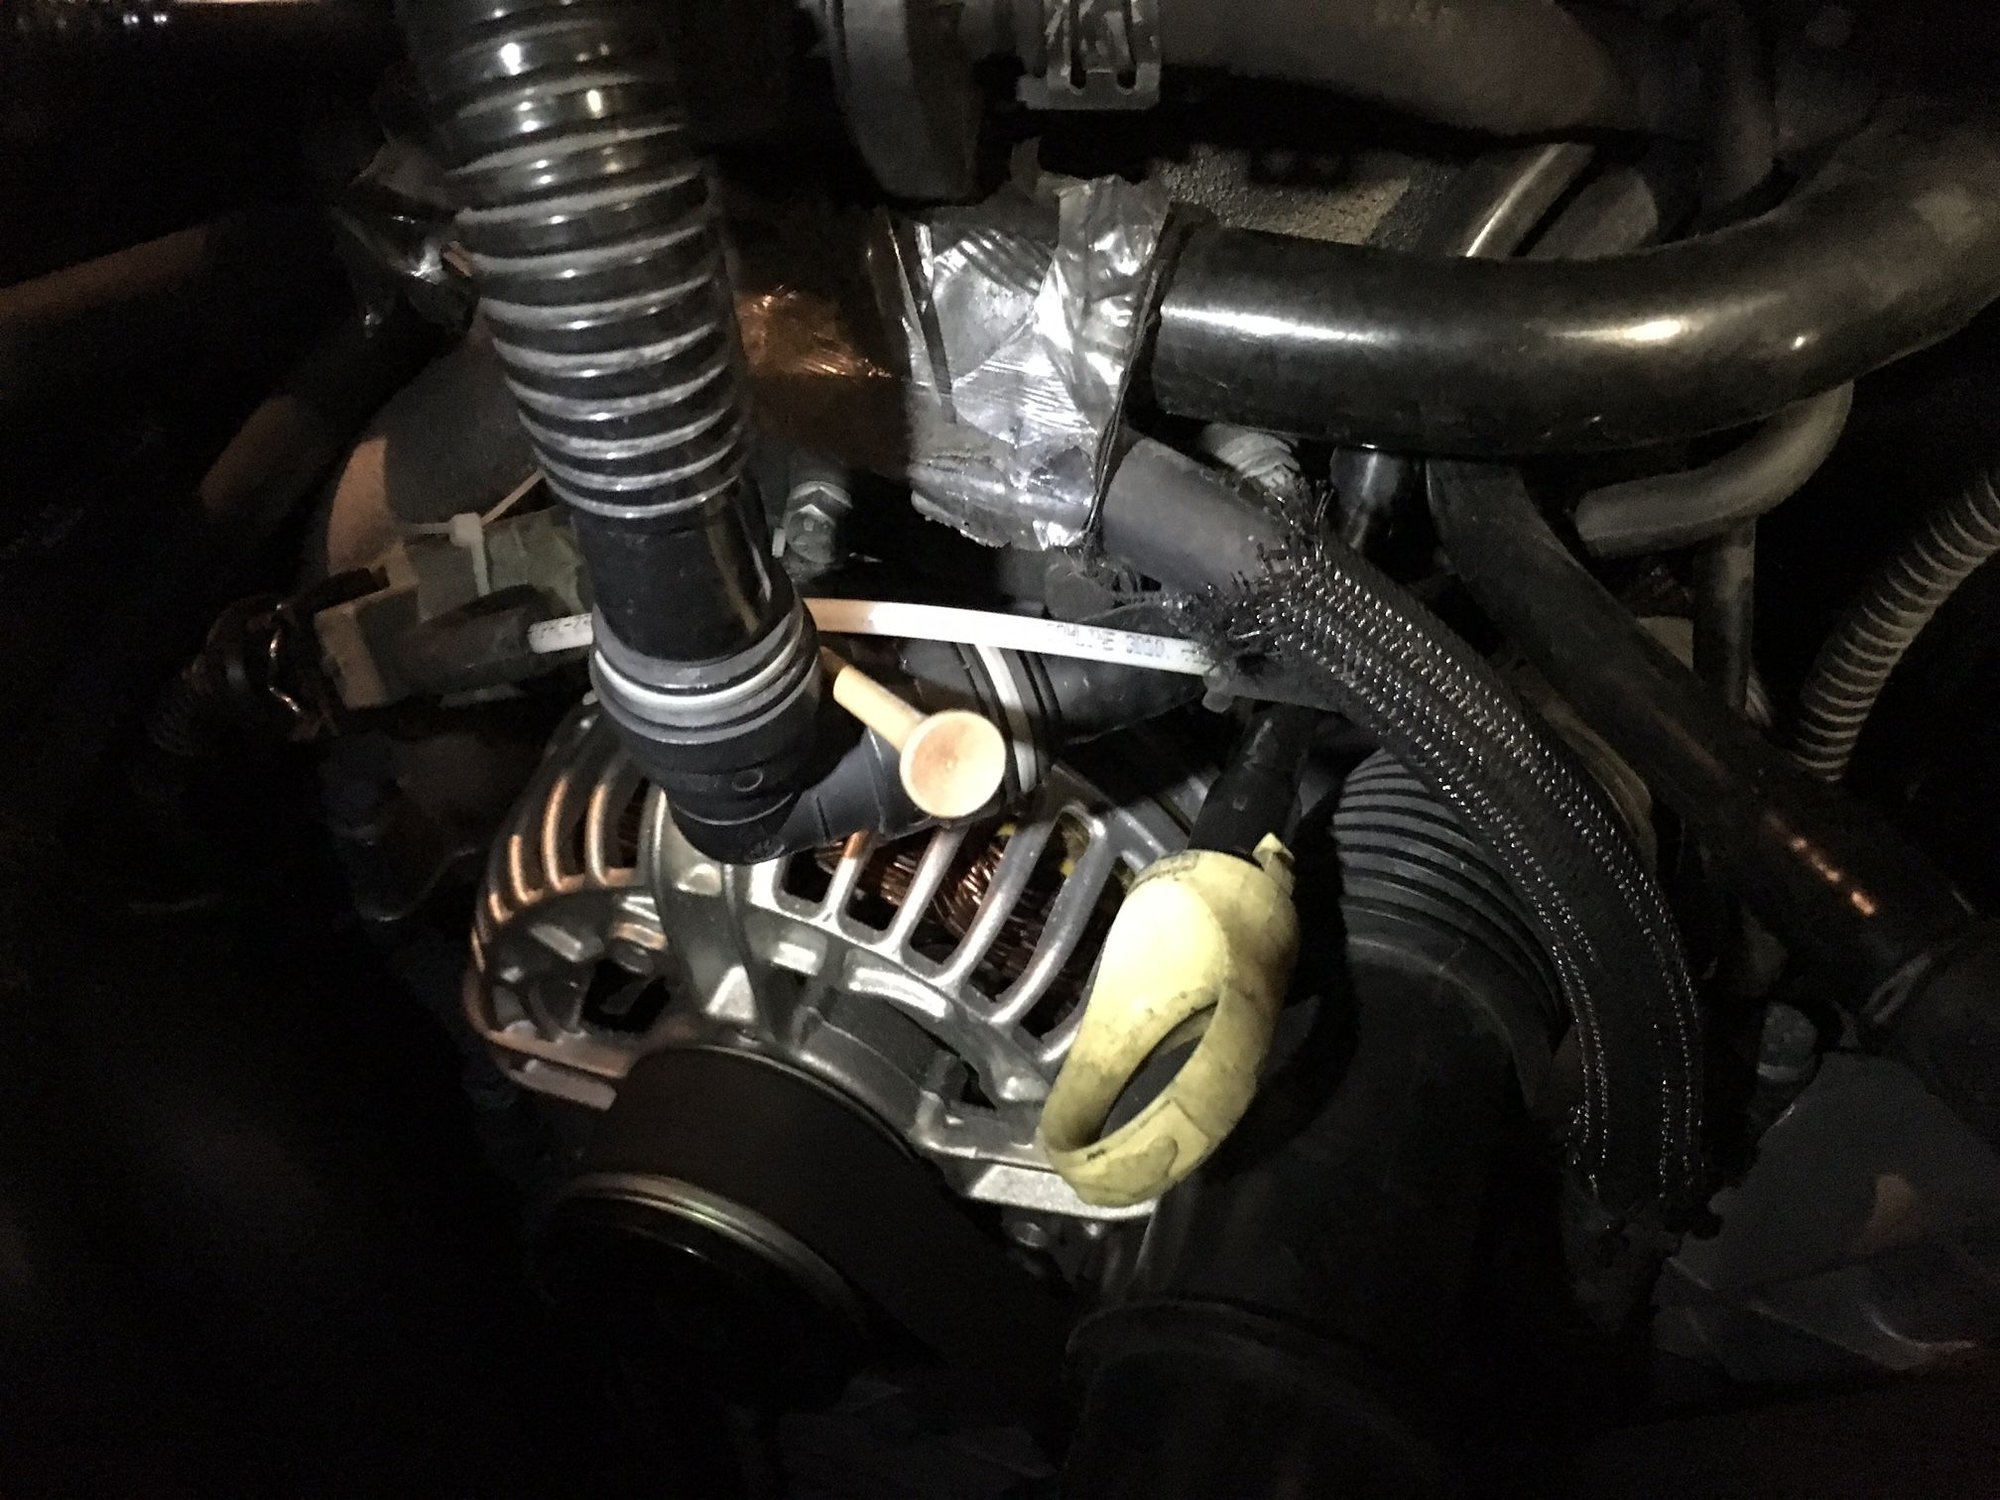
I'm getting error codes for the secondary air injector (SAI) not working. This is because the vacuum line must have pulled out of the Y connector and I can't find it. I have the Y temporarily plugged with a golf tee. See photos below.
The new vacuum line is white.
Can someone post an explanation or photo showing where the vacuum line goes from the Y to the vacuum canister?
Dr, the line from the Y to the vacuum canister runs on top of the alterantor. You can see it in the photo of the 1st post (the 360mm one). The one you plugged should connect to the black/white check valve on the T plenum left side.
How's your engine running btw? No more issues, right?
I found the missing vacuum line right where you said it should be, atop the alternator. Thanks.
There are two lines that go back into the bowels of the engine together, one for the vacuum canister and one for the vacuum flap. I think I have the right. The ECU will let me know.
My engine idles much more smoothly now that I had the valve lifters replaced and the reinstalled the old fuel injector myself. About a third of the time it's perfectly smooth. The rest of the time, it's a little rough.
Next I will investigate the source of oil on the rear barrel connecting the two intake manifolds.
After that I need to find a new oil leak somewhere near the front of the engine.
Going under the car, the leak seems to be from the engine-transmission interface, so I'm guessing the rear main seal (RMS).
For the oil on the rear barrel (toward the back of the car) connecting the two intake manifolds, could that be from a bad AOS? There is no oil inside the throttle body, but there is a thin film of oil inside the closest barrel to the throttle body.
Yea, that sounds like the RMS or the IMS flange seal.
I think you mean the intake T plenum right behind the throttle body? A thin film is fine but there should not oil drops. The throttle body would be dirty even if the AOS is bad. Best is to use a manometer to check the crankcase vacuum.
I'm in the process of replacing my AOS and the starter cable so I have the left intake manifold off the engine ('03 C2 coupe manual transmission). While I'm in there, I decided to refresh my vacuum system and replace all the vacuum lines, the rubber Y's and elbows, the vacuum reservoir, and the two changeover valves. All that for only $130. The stock vacuum line is available from Porsche for a few bucks per meter and you need about 1,200 mm. You can also replace them with your favorite vacuum hoses. I stay with stock lines since they hold up surprisingly well and they are light and less bulky.
Stock vacuum hose line P/n 00004320501 (1m)
I just want to document the info here hopefully helping the next guy.
I had to remove my alternator in order to replace the regulator. In the process, I decided to remove the bracket for the changeover valve. In the process, I managed to disconnect both of the vacuum lines that attach to the "Y" joint. I found the 122mm hose from the check valve on the intake -- no problem, just reconnected it. The 428mm line is still in place, so no problem there.
However, I seem to have lost the 360mm from the vacuum reservoir and I'm having an awful lot of trouble locating it.
I removed the alternator again, but still can't find the line in order to reattach it. Any suggestions on where to find it or how to access it? I am going crazy with this project..
Ya, I had the same problem, losing mine. It turned out to be hanging just above the alternator, back a few inches where it wasn't visible. I found that both of the long vacuum lines were a little short (especially after one cracked), so I bought some vacuum line and couplers from Pelican and a local shop and extended them. The photo below shows the new vacuum line, which is white. You might be able to infer where the lines originate from the photo.
If you can't find the original vacuum line, you could just run another one. Routing from the vacuum canister to the back of the engine, then past the alternator to the front would be really difficult with the engine in the car. I'd suggest just running it from the canister to the front. It won't be as pretty, but you can see what you're doing.
 02-14-2017, 02:02 PM


 I found the 122mm hose from the check valve on the intake -- no problem, just reconnected it. The 428mm line is still in place, so no problem there.
