When you click on links to various merchants on this site and make a purchase, this can result in this site earning a commission. Affiliate programs and affiliations include, but are not limited to, the eBay Partner Network.
Replacing my expansion tank as a preventative measure on my new to me 2000 996. Using the Airlift system I can't draw a vacuum on either of 2 new tanks I purchased above 5 PSI. The original will hold 25 PSI. If I remove the black pressure release cap and cover the opening I can get it to 25 PSI on both new tanks. Hard to believe I got 2 bad tanks or pressure release valves in a row from 2 different venders. Anyone with a similar experience or advice?
Replacing my expansion tank as a preventative measure on my new to me 2000 996. Using the Airlift system I can't draw a vacuum on either of 2 new tanks I purchased above 5 PSI. The original will hold 25 PSI. If I remove the black pressure release cap and cover the opening I can get it to 25 PSI on both new tanks. Hard to believe I got 2 bad tanks or pressure release valves in a row from 2 different venders. Anyone with a similar experience or advice?
You can pressurize the tank (not above 21 PSIG at any time) and spray soapy water on the black pressure release cap and see if the leak is there. Are those genuine Porsche tanks or aftermarket? If the latter, don't waste your time on them...
I had a similar issue and it looked like a genuine Porsche tank. Long story short it was either a fake or a reject that a shady guy in Los Angeles was selling a bunch of. It had multiple defects but did not leak ! Just buy from a reputable source.
You can pressurize the tank (not above 21 PSIG at any time) and spray soapy water on the black pressure release cap and see if the leak is there. Are those genuine Porsche tanks or aftermarket? If the latter, don't waste your time on them...
The first tank was from eBay from someone who sold over 150 of them with good reviews. The second tank came from a company who I've purchased from for years as well as most people here probably have from the west coast. I talked with them today and they will take it back with no problem. I hate to spend the big bucks on the genuine Porsche tank, but I guess I have to now. Thanks.
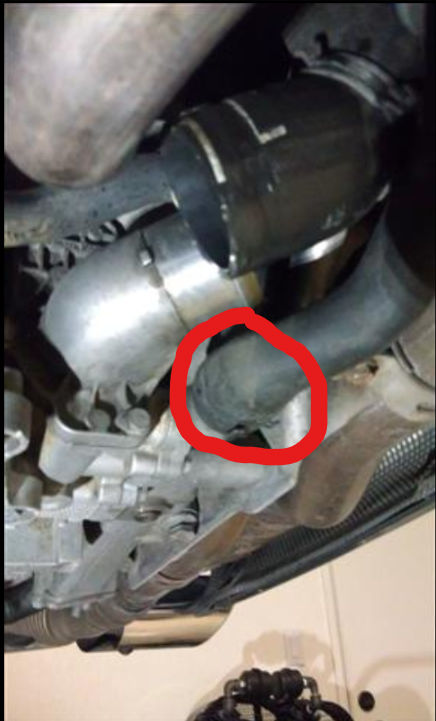
I'm resurrecting another great DIY by Ashai. I've got to replace my water pump so step one, drain the coolant. When I began, I realized I didn't have a new washer for the coolant drain. I'd rather not reuse the old one so I pulled the hose circled in red instead. I got about 2.5 gallons from there. I think I'm basically draining what I get if I pulled the drain plug. True?
I then pulled the big hose before I reattached the little hose. Getting to the big hose is a bit easier withe smaller one out of the way. I followed the procedure using low air pressure discovered by Ashai. Its a good idea to move the drain pan back under the car when you start applying pressure - OOPS - what a mess. I poured the old coolant from the pan into a five gallon pail. The coolant was very clean but who knows how old it is. Could be original for all I know. I'm replacing the coolant with the Pentosin approved stuff mixed 50/50 with distilled water.
Being a bit cheap, I bought a less expensive vacuum coolant gizmo from Amazon. I haven't used it but I did check to make sure that it fits. Its close but I can wiggle it in under the strut and spoiler mechanism. It comes with a good assortment of rubber fittings and a pretty decent plastic carrying case.
Got the water pump installed today!!!! It was pretty easy.
That vacuum coolant filler is amazing. I felt like a magician watching the coolant magically vanish from my 5 gallon pail!!!! BTW, I tie wrapped a wrench to the end of the hose to keep the suction end submerged in my 5 gallon bucket.
I bought a generic one off Amazon, but if I did it again, I�d spend the extra for a Uview Airlift. The guage on the one I got hits the spoiler lift mechamism, so is a pain to use without modifications.
I bought a generic one off Amazon, but if I did it again, I’d spend the extra for a Uview Airlift. The guage on the one I got hits the spoiler lift mechamism, so is a pain to use without modifications.
I was able to use the one I bought without removing the trunk struts. It was a tight fit but not a problem. I didn't even need to use any of the rubber adapters that came with the kit. The rubber that's permanently attached to the neck expanded in place and sealed the tank perfectly. After I got the vacuum up to 24", I went for a cup of coffee. Fifteen minutes later and it was still holding at 24".
BTW, my water pump was clearly toast. The pulley was cutting into the top water pump bolt. When I was buying the car, about a month ago, I noticed the faint sickly sweet smell of coolant so I told the mechanic doing the PPI about it. He determined that it was the three-way hose near the coolant tank. I guess it was always just the the pump going bad. Who knows. Anyway, it was the original pump so it was due. Luckily, the impeller was intact.
I do have one question: if I were to force water through the system to perform a "flush" - what would be the "best" way to do this?
I followed this DIY thread when refreshing my entire cooling system (tank, cap, tstat, pump and rubber coolant hoses) at the end of 2017, and after getting all existing coolant out using the method described in this this thread, I pressure filled with only distilled water, ran the car for 10min z(with heater on full blast) then drained completely (again using the method here) and pressure filled with the proper 50/50 mix of distilled water and Porsche branded coolant. Cooling system has worked perfectly since, good luck.
I followed this DIY thread when refreshing my entire cooling system (tank, cap, tstat, pump and rubber coolant hoses) at the end of 2017, and after getting all existing coolant out using the method described in this this thread, I pressure filled with only distilled water, ran the car for 10min z(with heater on full blast) then drained completely (again using the method here) and pressure filled with the proper 50/50 mix of distilled water and Porsche branded coolant. Cooling system has worked perfectly since, good luck.
Simple enough. I'll need to do it on a day when we don't go below freezing. Oh and I'll need some more distilled water...
Any thoughts on using a system flush product? I think I still have one or two bottles of the stuff on the shelf.
 01-10-2018, 12:48 AM