When you click on links to various merchants on this site and make a purchase, this can result in this site earning a commission. Affiliate programs and affiliations include, but are not limited to, the eBay Partner Network.
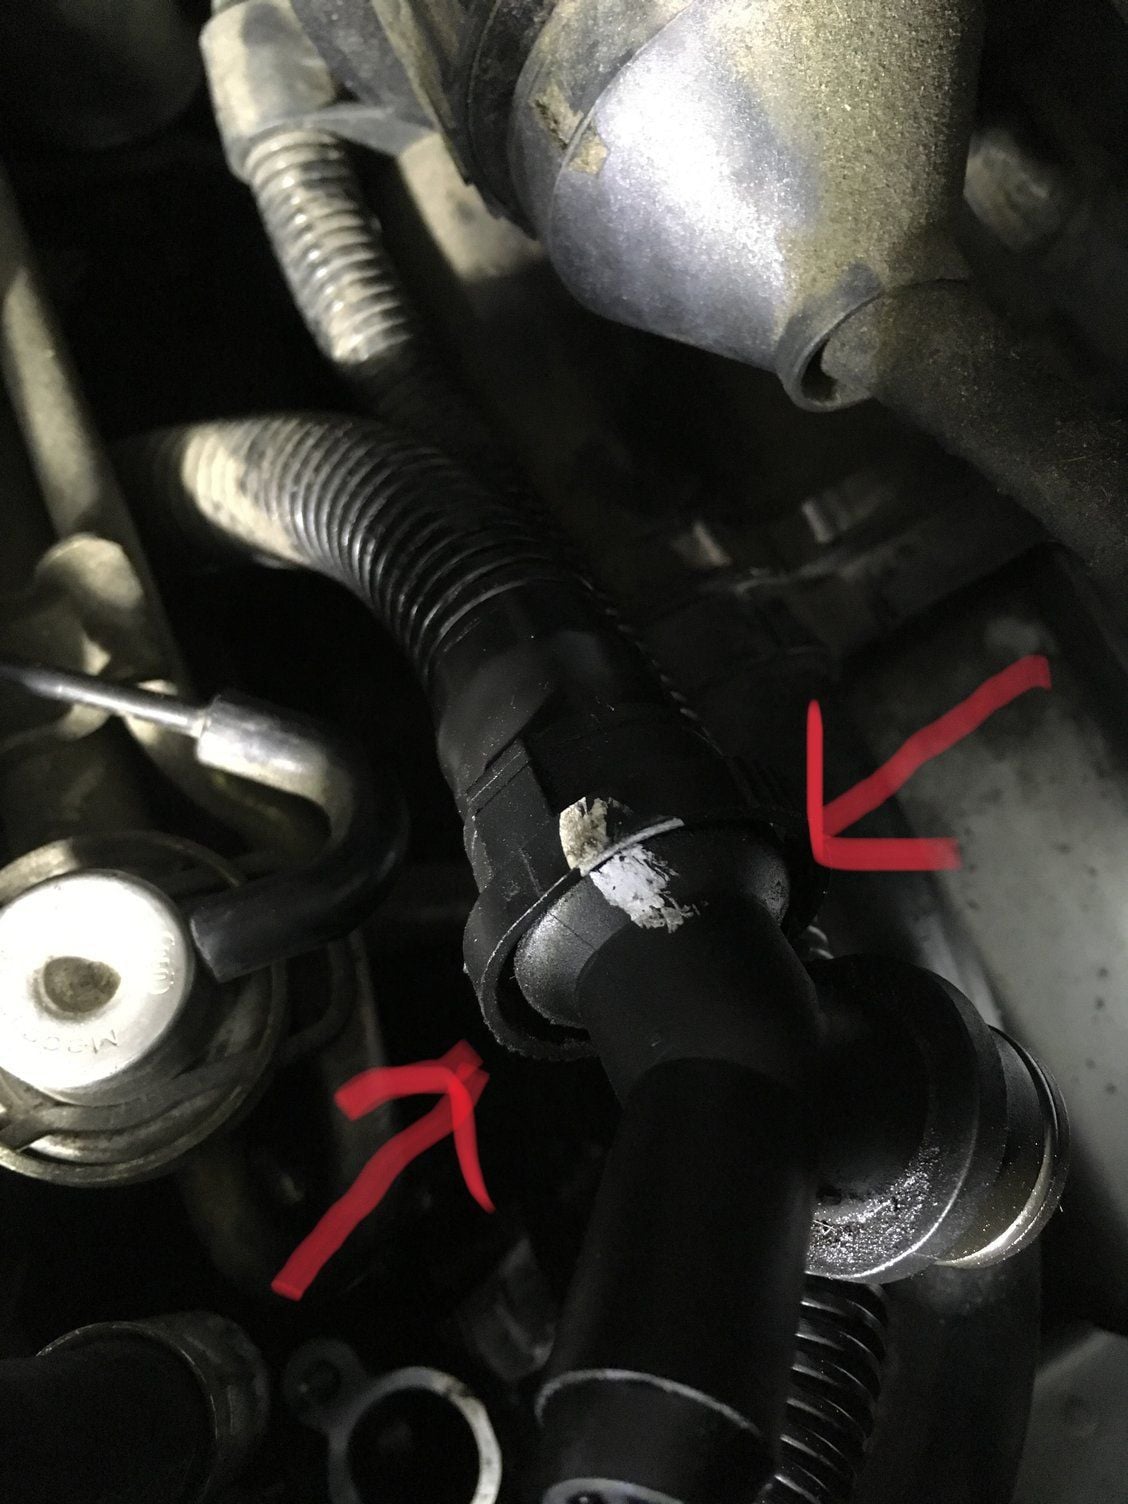
You just squeeze the oval loop where it is wider, this makes it into more of a circle, releasing the catch, so you can pull it straight back off the barb.
Whatever you do, don't damage that hose - you'll have to drop the engine and remove the entire intake plenum (and maybe some other stuff) in order to replace it... Don't ask me how I know...
OK guys. I tried pressing the two areas where the red arrows are and I still can't get this damn thing to come out. Do I need to pry this thing with a screwdriver or grab the vent with pliers and trying to forcefully pull it out or what? Maybe I need to pinch it just so that it is perfectly round?
I can turn the vent around but it won't pull out. I don't want to damage the hose. Although the space is kinda limited, I can still get enough leverage on the elbow to pull it out but it won't budge.
You would think with all the oil around that the o-ringed connection would be easy to pull apart, but it isn't. Usually takes a bit of prying with a screwdriver at the separation point to get it to break loose while squeezing the release.
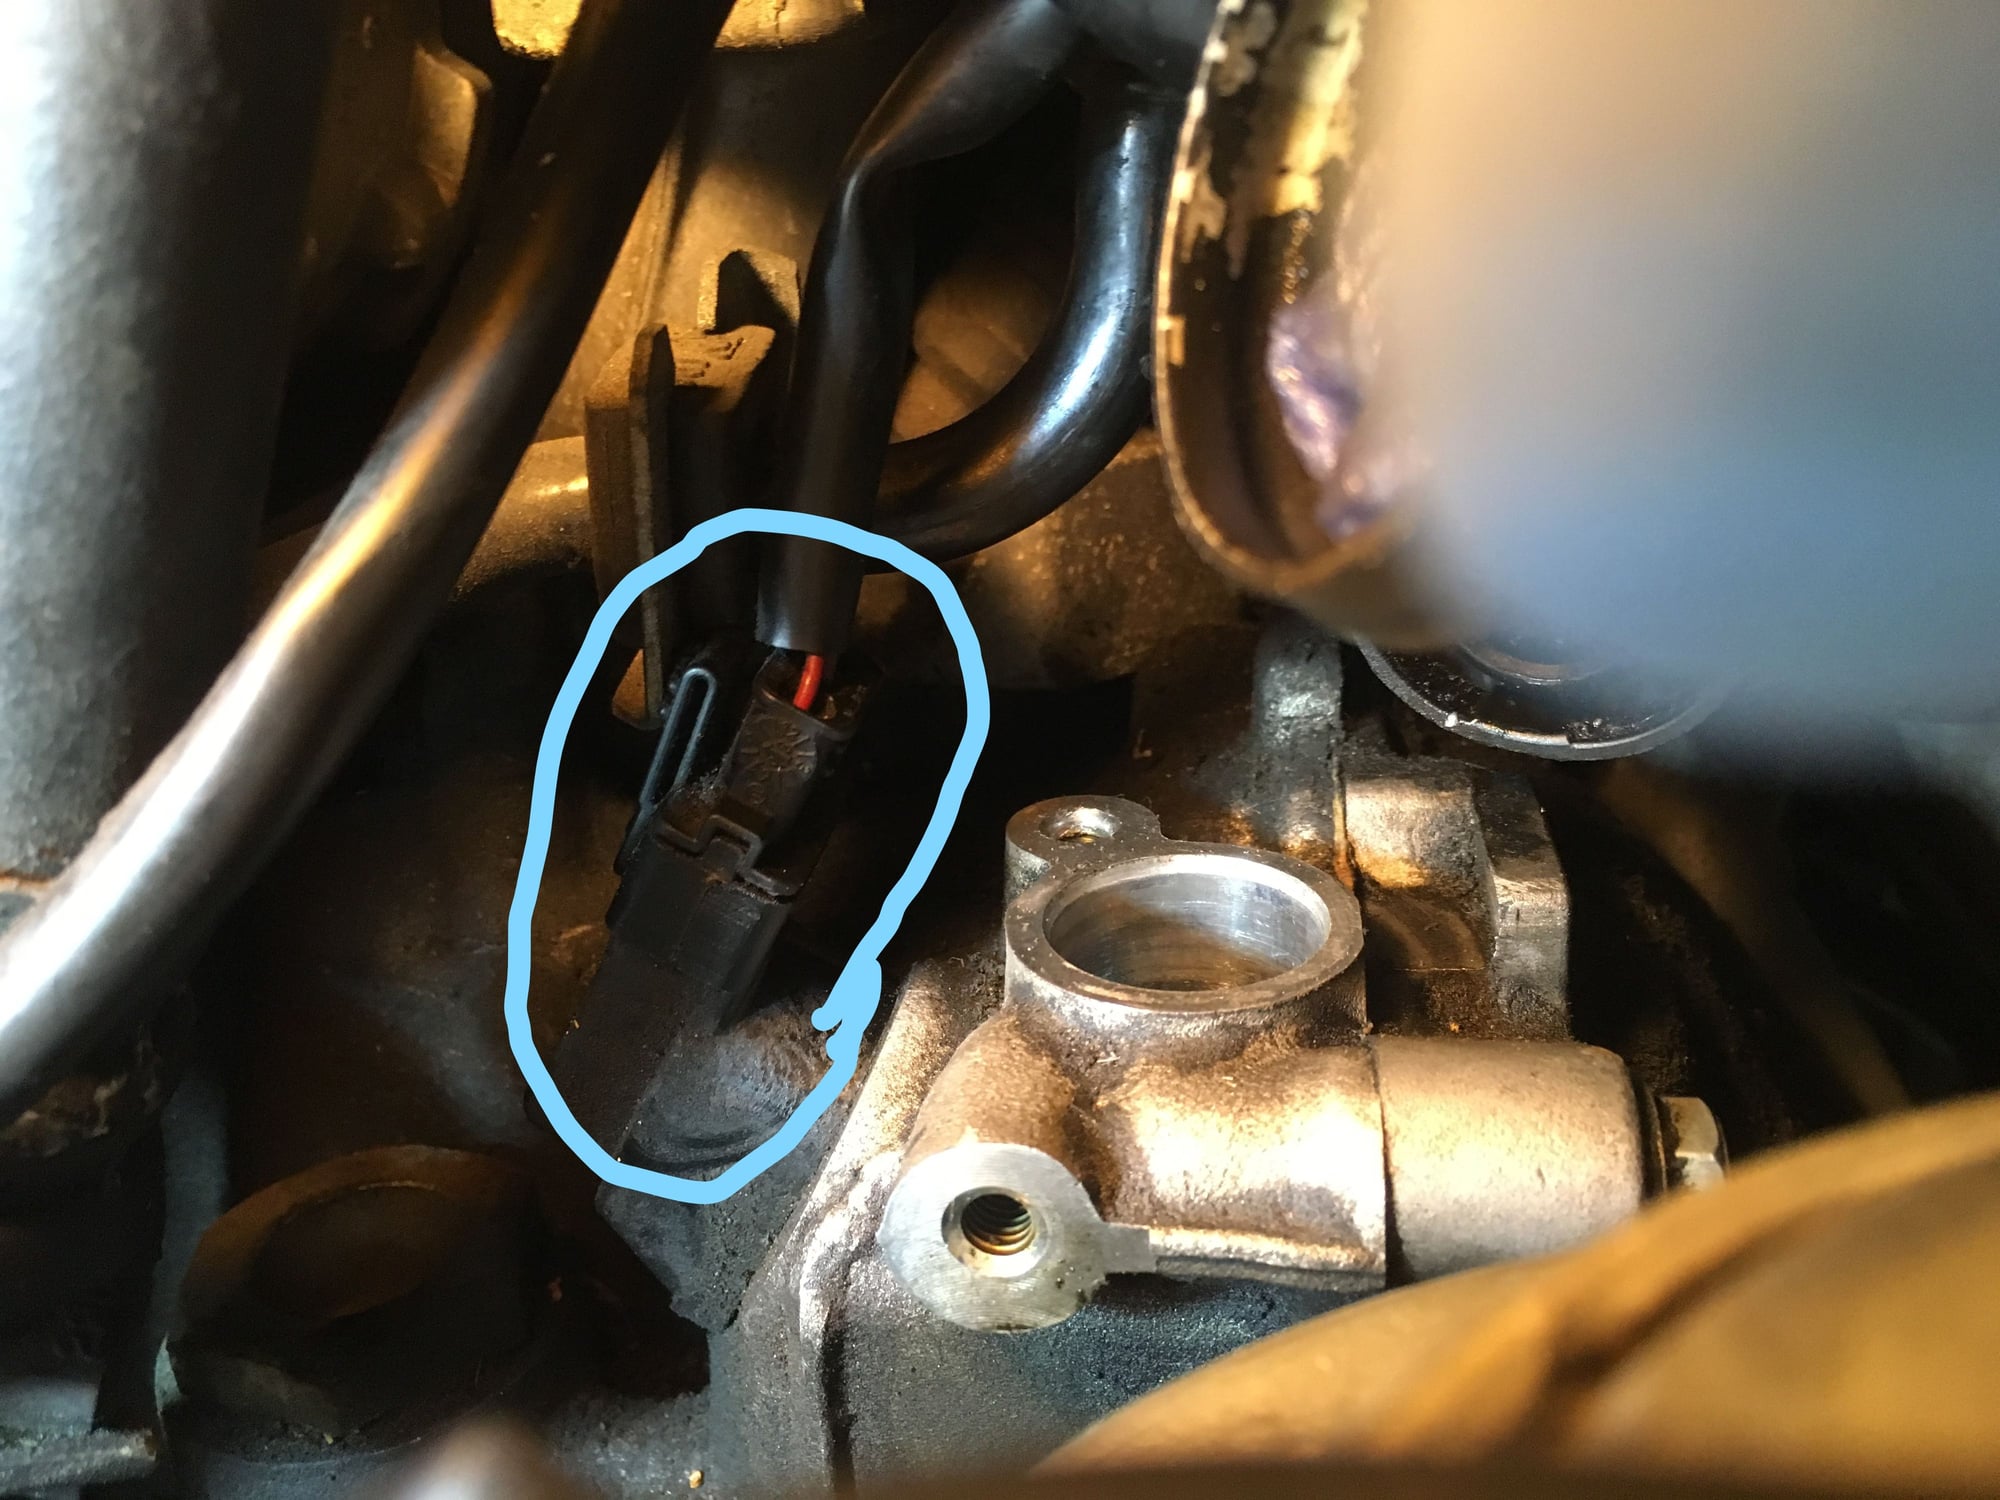
I spent 2 hours on this damn thing and no success. Rather than break something I have left the vent alone as all it is is just a plastic part. I knew I should have left this thing alone but curiosity got the best of me. Anyway, I replaced the o-ring but now I can�t get that 10mm bolt back on. There are wires and AC hoses in the way so that you can�t get a straight shot to get the bolt started. Tried all kinds of extensions, u joints, small wrenches etc. there�s just no room.
Anyone have a clever solution short of taking the compressor off?
And second question. The vent now turns freely in the hose. I�m worried that this may not be good as it may leak air? Was kind of tight when I removed it from the block but after all that finagling it now spins within the hose I�m thinking maybe it was because it had been sealed and stuck on their so long? I don�t think the hose has any replaceable o-ring?
i convinced myself that the 996 was such an easy car to work on but it�s not. Why the hell they made some of these bolts and connections so difficult is beyond me.
This frickin bolt is ready to take the top spot for me in most difficult bolts ever to remove and get back on. I thought the fuel pressure regulator 10mm bolt on my 1990 Toyota Camry All Trac was difficult years ago but this one takes the cake.
Take a break, take the night off. That bolt isn't really that tricky, but fatigue, frustration, etc. are getting the best of you. Take some time off, get some rest, and try again tomorrow.
The 996 is very easy to work on. German engineers have this stuff figured out.
Take a break, take the night off. That bolt isn't really that tricky, but fatigue, frustration, etc. are getting the best of you. Take some time off, get some rest, and try again tomorrow.
The 996 is very easy to work on. German engineers have this stuff figured out.
Yup I was thinking the same thing. Just need to clear my mind and make it simple. Today it was hotter than hell and mosquitos biting the hell out of me. Yeah I should have sprayed on some repellent but I was on a mission and couldn�t be bothered. Then combine all this with the stupid LED light that won�t stay in place and shine on the bolt. And then trying to hurry up before I have to meet my aunt for dinner. Lots of frustrating things going on at the same time make for a difficult bolt even more difficult.
Yes i I still believe the 996 is deceptively easy and simple to work on. That�s why I love this car. Everything is fairly straightforward. It just takes a lot of methodical steps to get to the actual part you want to replace.
Thanks for the positive words. Gives me inspiration when I tackle this bolt this weekend.
Finally got the elbow vent off today. Took a big slip joint plier to push the hose together (there are 2 ribbed areas where the red arrow is) and after a little wriggling the thing came right off. I used the same technique yesterday but it would not work. Guess a day to rest and think it over really helped. I thought this was just another unnecessary plastic elbow so just for kicks I decided to test it. The vent part of the elbow (not attached to anything) does have some type of valve in it. On the new one if you suck on it you can barely get any air through it. On the old one, air moved fairly freely with a grinding kind of noise so I think the valve was on its way out. There was also a small thin puddle of oil in it so I'm glad I was able to change it with a new one and I'm thinking if oil is this far away from the AOS, the AOS may be at the point of needing replacement. Part number is 996-107-047-51-M100 and it does come with the o-ring. The o-ring itself is part number 999-707-154-40-M127. Just like in the post above, the easiest way to remove the valve is to get a 10mm socket on it with a long extension and swivel joint and it will come undone. After that, you will have more room to access the hose clip.
Now I am trying to get that 10mm bolt back in but all the AC lines and big coolant pipe are interfering. The thread on the block does not start until the bolt goes in a little bit but I can't get any leverage or torque on the bolt because there is no space. Meaning the bolt has to be completely straight to go down but with the swivel socket it will only go in at an angle. Anyone know how to remove that small black wire connector to the left of the bolt hole? There is another solid pipe of some kind behind the electrical connector that will not move so I need all the room I can get.
OK got the damn bolt threaded on finally and was so happy I decided to call it a day and tighten it down tomorrow. The rigid pipe that was in the way is actually connected to the AC compressor hose that runs straight up. Just pulling up on the hose will move this little pipe just enough so that you can get the 10mm socket on to the bolt and thread it in. Make sure to snake the extension and socket in between the tangle of hoses above to get a straighter angle. I used a 1/4 ratchet with a u-joint and a very long extension. You will have to press down on the bolt just enough while threading it in simultaneously and eventually it will get started. Still could not figure out how to get that electrical connector loose...
If you thought that was a challenge, replacing the AOS with engine in the car is one of the most challenging PITA jobs I have ever done. I've wrenched on machines/cars/ships for 45 years, and this job requires every thing and then some. Read through other threads on AOS replacement. Read them carefully. A lot of good pointers from those that have done this. It will test every bit of patience you have. Your left hand and arm will take a month to heal.
 05-14-2019, 09:57 PM