When you click on links to various merchants on this site and make a purchase, this can result in this site earning a commission. Affiliate programs and affiliations include, but are not limited to, the eBay Partner Network.
I've managed to find the size of the bolts and nuts that connect the manifold to the cat here on the forum (M8) but haven't found the thread pitch anywhere. Can anyone confirm whether it's M8x1 or m8x1.5? Dealer wants $6 a nut. Nope Nope Nope.
They are non structural so just a grade 5 should be enough. If you can take one off, go to the local hardware store or Home Depot and find out what the thread pitch is. Or just buy 6 of each (1.0, 1.25 and 1.5 pitch) and return the ones that are left over. There isn't anything special about these bolts. but if you get stainless steel ones, they tent to be pretty soft.
The only thing "special" I've found about them is that a standard M8 nut requires a 13mm wrench, whereas the OEM nuts take a 12. Material seems to be carbon steel, agree that grade 5 should do the trick. Taking one off isn't such a terrible idea, easy enough to bolt back up afterward. Would still like to see if anyone here can chime in on thread pitch though. Not in a huge rush before the weekend.
I recently did this and replaced all with Marine grade stainless steel M8 bolts and nuts. I have to remount the OEM cats for the biennial smog test and don't want to deal with rusted hardware. It was 5x more expensive, so I had to shell out $10 instead of $2.
While looking for an pic example of the bolt I read the specs on the Stomski Racing manifold repair kit which states an M8 x1.25 pitch re-tap kit. PET also states the length as 28 so...
To answer your question OP size is: M8 x 1.25 x 28
I recently did this and replaced all with Marine grade stainless steel M8 bolts and nuts. I have to remount the OEM cats for the biennial smog test and don't want to deal with rusted hardware. It was 5x more expensive, so I had to shell out $10 instead of $2.
I think I got 40mm. No issues on the installation, but need to remove the OEM studs if using the OEM cats. I also reversed the direction for easier access from the back.
Ahhhh I've completely misread this thread! I've been talking about the block to manifold bolts not cats to manifold bolts!!
Okay - sorry I've provided the wrong size M8 x 35 x 1.25 is the correct size - When I installed my cargraphic x-pipe I used some good quality steel bolts. I agree - no need for genuine in this scenario!
No worries, mate! I can see how the size for the header/cat pipe flange might have sounded odd....
just an update, and bit of advice for anyone else who intends to embark on this project.
Confirmed that M8x1.25 is in fact the correct size and pitch. $2 galvanized nuts from big orange got the job done. confirmed this is a driveway saturday morning job, especially after watching this guy do it on youtube:
Now the lesson learned...
1. Apart from a decent metric wrench set and socket/ratchet set, get yourself a set of flex head wrenches, even better if they're the ratcheting type. I broke my self imposed "no chinese crap" rule and got the harbor freight stuff since (after using a 20% off coupon) it was $4 more for a set than 1 wrench from home depot or lowes. Link here:https://www.harborfreight.com/5-pc-m...set-60592.html
2. Hit all nuts with PB blater or another penetrating oil a few times before you even think about trying to break those nuts loose.
3. Use an impact gun on the clamp bolts.
4. MOST IMPORTANT! In order to drop the left side cat, you NEED to drop the right. This set me back by about 2 hours as I hadn't prepped any of those fittings with PB blaster and spent a good 20 minutes fiddling to try and drop the left without removing the right. total waste of time.
5. Have a friend handy who can help you run the wires for the 02 sensors. These can be fitted before installation without much hassle, but the aftermarket ones I got don't quite line up on the OEM cable clips due to having a longer body. Cable ties solved the issue of chafing.
6. If you don't have a mechanic handy you can reset the computer by disconnecting the positive battery cable for a bit. You'll lose radio presets but that's easily corrected, especially if you have an aftermarket radio as I do.
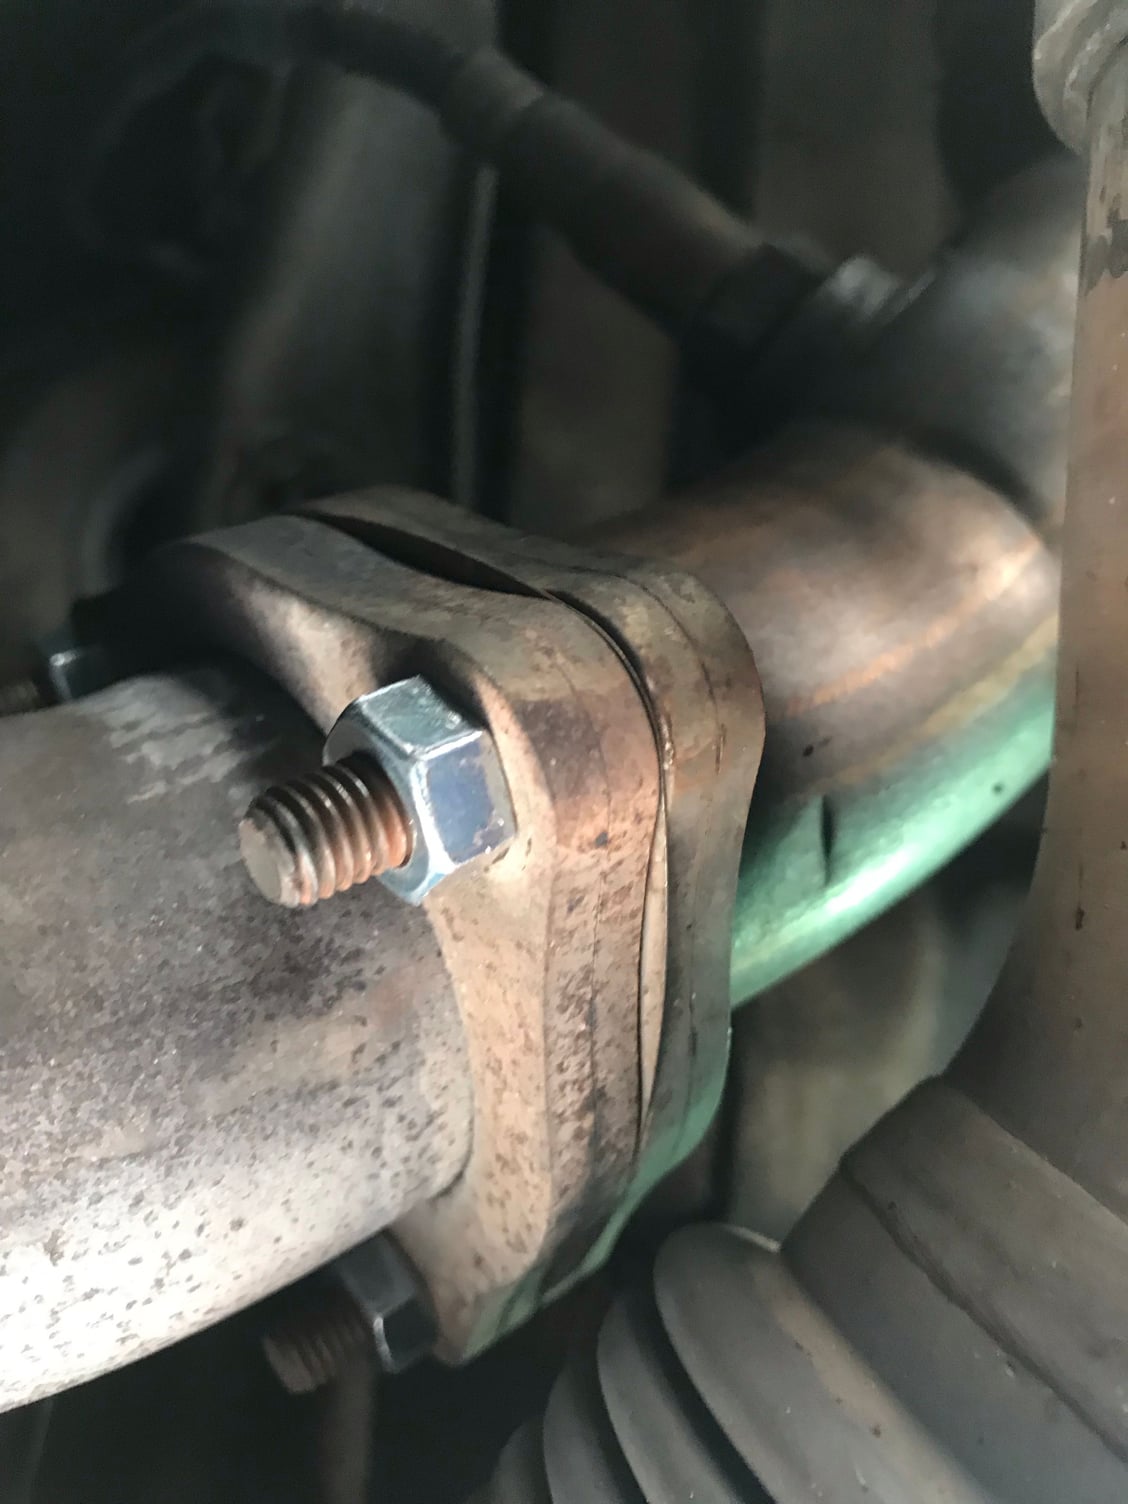
So that's it. here's a shot of one of the new nuts on the junkyard CAT I installed. Thanks for the help. I'll post more as I fix more. Next up is replacing the struts and figuring out what the rattle is in the front A arm.
 02-06-2019, 04:34 PM