When you click on links to various merchants on this site and make a purchase, this can result in this site earning a commission. Affiliate programs and affiliations include, but are not limited to, the eBay Partner Network.
So I picked up a Boxster M96.25 case and some pistons and rods so that I could practice the wrist pin procedure.
Everything worked fine on the work bench(yeah I got cocky!)
But my first attempt to install the #6 cylinder wrist pin ended up looking like this:
That's why I'm practicing with some used pistons, wrist pins, rods, clips, engine case with oval cylinders.
If I screw something up, I'll just tear it apart and try it again.
BTW, anyone got a junk crankshaft and/or crankshaft carrier?
Also anyone got some used bolts for the engine?
I want to do the full rebuild eventually, but this will never be a running engine so bolts don't need to be fully torqued and stuff.
I'll use it for my auto maintenance education classes.
Nothing better than showing people what's inside their car and why it needs to have the oil changed...even if they're driving a 1993 Toyota.
Last edited by TexSquirrel; 01-12-2019 at 01:37 AM.
Finally got a chance for try number 2.
I�m using the used wrist pins that came with my pistons.
They have been clipped.
The second try the clip ended up in the correct groove, but the small tail in the wrist pin failed to end up in the notch.
I�m going to try using a brand new unclipped wrist pin clip for try number three, which will likely be tomorrow afternoon.
Hopefully I�ll get a chance to pick up a new engine stand and then I�ll be able to work standing up.
Does anybody know if the factory ever clipped wrist pins?
with all of them clipped, I wonder if someone had used these pistons in a rebuilt engine before.
Also I hope to have more time to practice a bunch of times this upcoming week.
The factory clips come with ears, which serve no purpose other than adding frustration to the process. Definitely cut off the ears.
Aren't you going to Jake's class?
Thanks.
I may need to clip off a little more of the ears.
I’m still working on raising the funds.
Unfortunately the class is earlier this year than I expected.
I‘ll have the money in early March.
Since I don’t do debt, I have to wait for the funds.
I’m looking at selling some stuff to be able to go this year.
If I can’t get funds this year, I may have to wait for 2020.
I’m hopeful that there will be a class in 2020 with the renewed interest in the 101 and 102 classes this year.
In the meantime I’ll practice on my own and hope to go this year.
Ok if your having another go try this method , it's how I did mine and it works !
Firstly I used clips with the ears on them and in a way you can use them to tell when your on the piston properly
Number one is get the rear clip installed on the bench and make sure it's in properly, so with the outer tube of the tool , install the clip with the little ear in the notch on the tube and make sure the clip sits square in the tube close to the end, if it's not straight when you get it in there, slide the insertion part of the tube in gently to push it straight not going all the way obviously as you would push it out but just square it up near the end.
Then take the outer tube with the clip installed and offer it up to the hole in the piston then slowly turn the tube until you feel it go in just a little, that's when the ear has become aligned with the little notch in the piston and dropped in there
Now whilst holding the tube in place slide the inner part of the tool in and whack the end, pull the tool away and the clip should be in the groove in the piston
Now install you piston in the bore ensuring your crank is set to the right location on the pulley , use the plastic tool to align the con rod with the piston then insert the wrist pin with oil, all the way until it stops, it will now be slid in all the way up the that rear clip
Now again get the outer tube of the tool with you clip inserted an aligned inside and slot it in the end of the block and onto the end of the piston, again when firm up to the piston slowly rotate until you feel the ear engage into the notch, then slide in the inner part of the tool and whack it, the clip will now be in, use an inspection mirror to check the clip is seated
Thanks, I'm up for trying all the different ways.
I have some brand new wrist pin clips, and the old clips on the pistons, so I can practice all different ways and can also clip some of my own clips to see if getting the ears completely off helps.
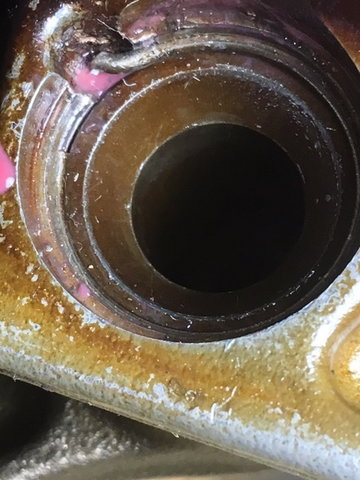
So here's my third attempt:
That looks like a failure, I can see too much of the clip, right?
I was positive that was a huge third FAIL!
I yanked the piston out and guess what, I didn't fail at installing the clip the third time...but I did fail at reading the borescope.
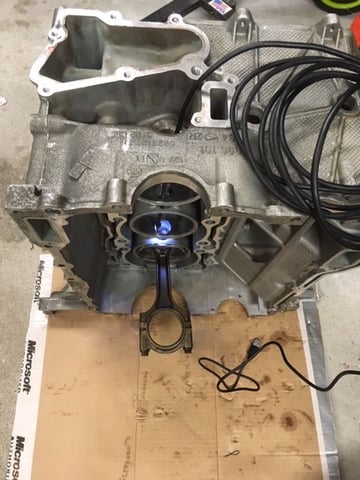
iPhone of the piston setting on the workbench:
In case you're wondering, here's how I'm practicing.
I'll either be grabbing an unused engine stand later this week, or I'll be buying another one from Harbor Freight for my garage.
I'm using the Depstech endoscope/borescope to check the clip.
The first two attempts were photos from an iPhone stuck in cylinder 5, but I decided I needed to practice using the borescope the way I'll do it when I do this for real.
I'll be practicing this dozens(hundreds?) of times later this weekend and beyond.
So far I've only practiced with used clips, so I still need to try this with new ones.
Once I have an engine stand, I'll be doing this over and over again.
If any of y'all are in the Houston area and wants to hang out and practice wrist pin installs, let me know!
You should practice with the con rod connected to the crank. This way the piston and wrist pin is exactly where it supposed to be and is not slightly rotated in the bore. Maybe that's the reason for your struggle.
Practice makes perfect with this, with my method you can do this in the dark. I have done it in front of a class using a 20' projection screen, in the dark back in the old days. That sucked!
So I've been practicing my wrist pin installation some more.
Occasionally the very tip of the wrist pin install tool will get stuck in the piston and come loose which require my separating the case to retrieve it.
I've found that slightly bending the tip makes it stay on the tool more often, but still occasionally it still stays behind.
It's not a big deal for my practice, but if it were a sealed case it would really suck opening the case and starting over.
Is there any reason why I shouldn't permanently attach the end?
JB Weld it or...?
I know it makes inserting the wrist pin into the tool easier, but I'd gladly give that up to not have to worry about leaving it behind and having to split the case when I'm no longer practicing.
These tips should have never been made removable. The ONLY reason they were, is because the factory tool has them removable.. Why? So as thousands of engines are built, and thge tip wears, all they have to do is toss the tip away and replace it. Also, the tip has a light heat treat, and the tube does not.
In the classes we instruct attendees to use green loctite to lock this in place. Coat both surfaces and bake it at 150F for an hour, and you�ll never lose it again,
That said, if the tip is getting stuck in the piston relief, then the piston is too tight. One key to assembly that l instruct is to make all the pistons fit the tool with no interference between the tool and the piston relief.
All these tricks, and silver bullets are just a taste of how l teach people to do this.
Thanks for the tip. Pun intended!
I can't wait for the next hands-on class (after the one in February) so I can learn the other bits of knowledge!!
Thanks for the tip. Pun intended!
I can't wait for the next hands-on class (after the one in February) so I can learn the other bits of knowledge!!
My tool was slightly oversized and tended to be a really tight fit in the end of the piston so I took it down a little with some fine emery paper to give it a bit more clearance , aswel as fixing the top in this may help you also!
My tool was slightly oversized and tended to be a really tight fit in the end of the piston so I took it down a little with some fine emery paper to give it a bit more clearance , aswel as fixing the top in this may help you also!
I plan on doing both this weekend.
Green Loctite is arriving today from Amazon.
 01-11-2019, 11:36 PM