When you click on links to various merchants on this site and make a purchase, this can result in this site earning a commission. Affiliate programs and affiliations include, but are not limited to, the eBay Partner Network.
This is a product review with install tips for the Lathe Werks Shifter Orb. I learned of this product from another Rennlister several weeks ago. I checked out the product line and was suitably impressed, so I ordered a brushed steel orb with a 1’’ extension and laser-etched pattern. Prices range from $150-$200. This is the new redesign with set screws hidden under cover. Install, start to finish, is 20 minutes.
BACKGROUND
Over the last few weeks I was feeling too much give from my OEM 996 shifter handle. I had trouble crisply shifting from 2nd to 3rd, mostly. This OEM stalk is 17 years old and made of high-density rubber, so not too surprising the unit wasn’t 100% up to the task. I looked for reasonable solutions (both function and price) and decided on the Lathe Werks product line ( www.LatheWerks.com ). A nice group of options are available and the design is pure.
PRODUCT DESCRIPTION
Specifications are on the website, so this is a synopsis. Finish is superb. Weight is correct. Feel is excellent. Etching is of superior quality. Items with curved surfaces are difficult to etch properly without very good equipment. This is a brand new redesign with the two set screws hidden under the leather. The website may not have new photos of this change uploaded when you check. I ordered my orb with a 1” extension to raise my hand height about ˝” above OEM. The unit comes with an SAE ⅛” Allen key. A 3mm will work in a pinch (pun intentional).
INSTALL Required Items:
⅛” Allen key (provided) or 3mm
trim tool for shifter cover removal
4” (10mm) cable tie (the skinny ones)
Exacto knife or similar
20 minutes of time
CLIFFNOTE INSTRUCTIONS
Remove shifter cover
2nd gear
Twist and pull off existing shifter stalk (not at your face!)
Cut leather cover at spot shown with Exacto (photo 1)
Clean exterior cover then turn cover inside-out (photo 2)
Run about 6mm (1/4”) of leather past mounting channel at base of orb, secure with zip tie and trim excess plastic from tie tip (photo 2). I put the cable tie lock to the front (when installed) and made certain the leather is shrouded the way you want before completely tightening and snipping the cable tie.
Place orb over shift lever and align. The orb will rotate independent of leather.
Tighten the two set screws, alternating left/right until tight (8 N m) while holding leather cover up to expose screws
Replace shifter cover trim (Photo 5)
PERSONAL CONCLUSION
Remarkable customer service
Reasonable price for the upgrade
Highest quality material and production, stunning to look at
Improved my shifting accuracy: ergonomics, mass and rigidity
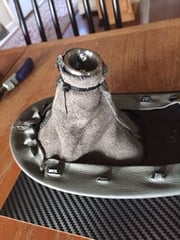
Photo 1 OEM. Cut line of leather shown
Photo 2 Reversed cover leather. Note the cut end of leather is flush with stalk end.
Cable tie is positioned in channel and 'knot' is placed near thick seam before trimming. Set screws are visible.
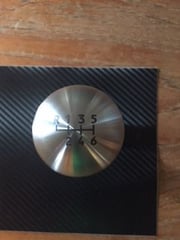
Photo 3 Top shows laser-etched shift pattern.
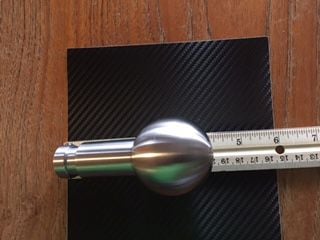
Photo 4 Tale of the tape. This new version has the set screws below the leather mounting channel.
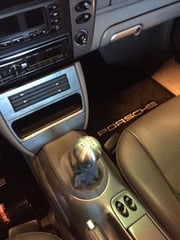
Photo 5 Completed installation. I love it!
Last edited by hatchetf15; 08-01-2018 at 05:11 PM.
Reason: Old English sensitive readers
Stripped and painted Seal Grey to match exterior and center console/horseshoe. So just an illusion due to weak lighting. I need to sand again and hit them with paint and clear to improve luster.
Looks nice! It's a slightly more expensive than the Function First alternative (which I did in my car - and I'm extremely happy with), but looks like it's a solid really well made shifter. Good luck with it
 08-01-2018, 02:50 PM