When you click on links to various merchants on this site and make a purchase, this can result in this site earning a commission. Affiliate programs and affiliations include, but are not limited to, the eBay Partner Network.
Rob Dickinson spent 2 years cutting and shaping fender flares and caught no flack so no reason you should catch any. Hats off to you. ***** must be made of steel too to take a sawzall to your sheet metal!!
Love your fab so far. Can't wait to see the final result. Awesome project. I remember you post when you bought it, and I think I saw you around with your boxster on the forum.
wow guys lots of response and great comments.... thank you!!!!! I have a lot of pics to post today and I'll reply to all the comments first so bear with me
Originally Posted by sapman
I never saw that RUF CTR3 before. Your post made me google it. Striking.
Looks like a cool project you are doing. Looking forward to seeing the result.
ya that's a sick car. its something like 700hp if I'm not mistaking as well. my motor will be the next project after I'm done with the body work
Originally Posted by pete95zhn
Steel's good. Did you straighten the inner fender too (to clear wider tires)?
I was cheap, I got them made in CF...
Yes. I still need to weld in the inner wells to the outer fenders. I will post up pics of that but that will be a little down the road as my main goal is to get the outside done and paint on. I think the rigidity of the handling will suffer if I don't tie those inner wells in.
Originally Posted by Dr_Strangelove
Subscribed! I like everything about this except for your plan to use a green from the Camaro and not one of the 100's of beautiful greens that our very own Porsche has come up with
Serious, though, no criticisms here. Roll on, sir!
I'm open to suggestions. I'm looking for a bright (not neon bright) popping green. we were originally thinking sapphire metallic blue but it just looks like ... stock, plain etc.
Any plan on selling/producing the side skirts?
I would love to see your car when you are done as you are not too far away.
Yes!! I thinking I might offer this as a kit or individual parts. my older brother has a couple exotic cars but no Porsche and he is liking what I'm doing with mine and mentioned he might go get a Porsche so I could do the same for him. which got me thinking I wanted to make the molds sturdy enough to get multiple pops. sorry for the longer answer but yes I am going the extra mile on the molds to able to make more parts for those interested.
"Rob Dickinson spent 2 years cutting and shaping fender flares and caught no flack so no reason you should catch any. Hats off to you. ***** must be made of steel too to take a sawzall to your sheet metal!! "
lolol ya the fear and hesitation I had standing next to the Porsche with the my cutting tool was intense lol it took me two weeks of thinking about it and then after I decided to do it I kind of had that "crazy giggle" as I cut into the car lol
getting flack... I did this exact same thing to my corvette two summers ago and literally with all seriousness and anger had a guy tell me on the corvette forum that "their is a special place in hell for people like you who change the stock look of your car" ya he was crazy.. than some more crazy chimed in and agreed with him I had my share of defenders but wow it really made me sit back and face palm the stupidity of some people. its a car!!!!!!!! lol anyway lol
"Love your fab so far. Can't wait to see the final result. Awesome project. I remember you post when you bought it, and I think I saw you around with your boxster on the forum."
thank you, yes I did a wide body on my boxster as well but after I had done all that work and made those molds... I messed up and ended up throwing it all away. to much to explain but this time.. I learned from my mistakes with that boxster
"Great project! Really excited to see how this turns out. Maybe I missed this, but what are you doing to the sunroof and interior?"
thanks.
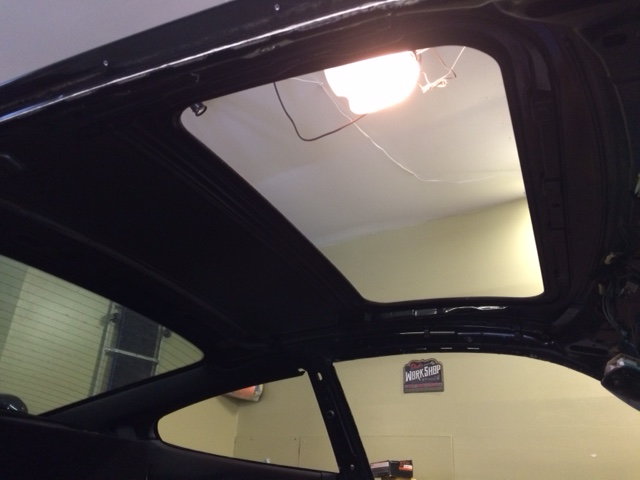
sunroof delete, welding in the panel and getting rid of the track and motor for the sunroof. I'm lightening up the car a bit (where I can) and the sunroof I was not a fan of plus I want to do a roof scoop and that would have interfered with it.
interior... not sure yet. I have a Lamborghini diable replica interior (favorite interior of all time to me) in my storage unit that I'm tossing around the idea of putting in there. but that will be next winter when I do the drivetrain. for now I pulled it out to clean, get new seats and rears recovered, possible some paint scheme matching etc. we'll see on interior.
so the first set of pics is for the forming I did.
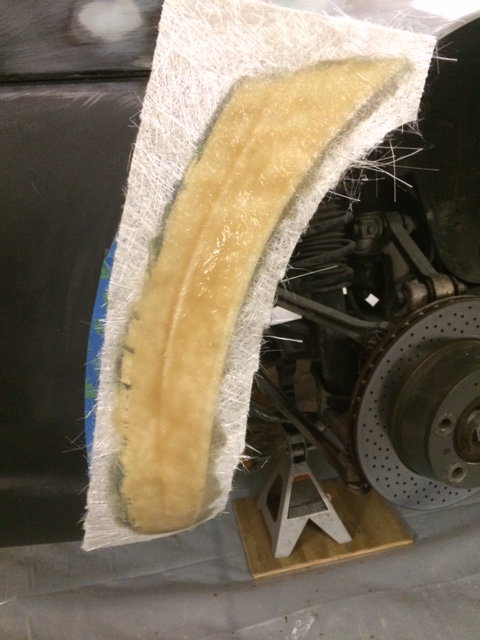
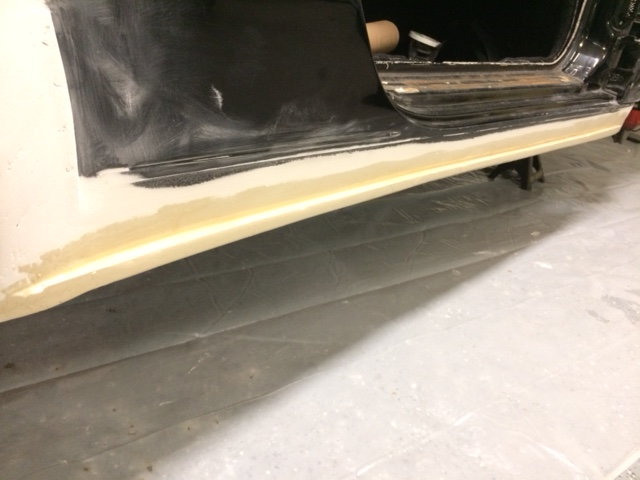
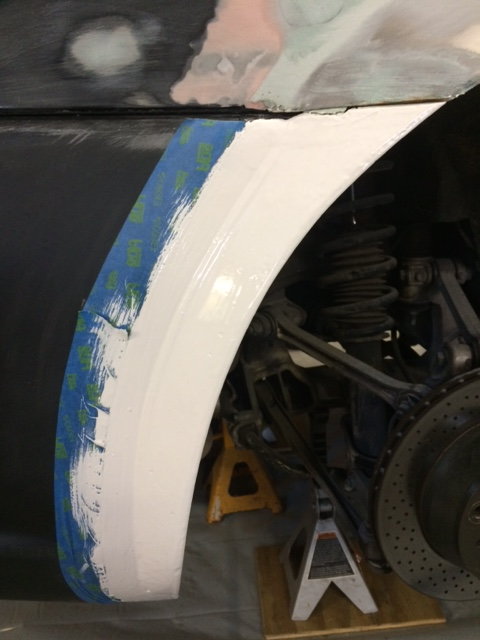
last night I did some forming of the drivers side rear bumper and side skirt. I use "plus 3" dry wall mud for forming. it goes on so easy, sands even easier and holds its shape quite well. after I get it formed to the way I want and make the exceptions for where I will need to build up with bondo for the actual part, I put on a layer of poly, let that dry then lightly sand it smooth and wax it with carnuba wax(probably spelled wrong) let that dry than spray 4 to 6 layers of peridial wax(also probably spelled wrong lol) on and let that dry. once that's all dried up its time for gelcoat(2 layers) than fibgerglass (layers depend on part im making) I like to use the cheap walmart then fiber glass for my 1st layer as it forms the corners better and when sanding on the parts I feel I get less rogue fibers pupping out that can be annoying. then I usually go with 2 to 3 layers of 1.5 chopped mat glass.
below is just a few quick snap shots of the forming and then of the gel coat, fibgerglass and poly over dry wall mud. keep in mind this is the beginning phase of the process. feel free to criticize, ask questions or just or what ever
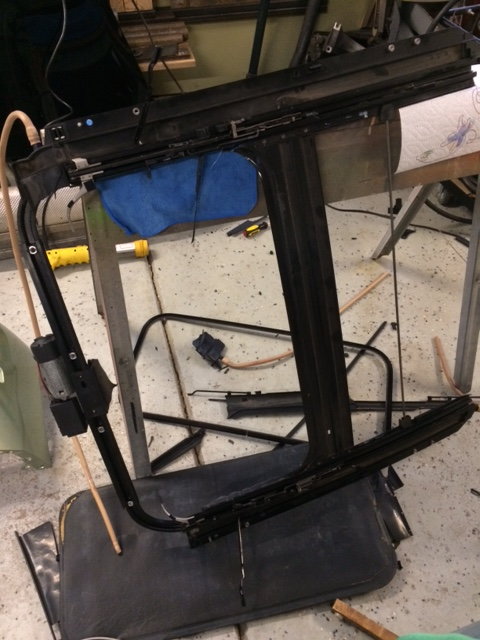
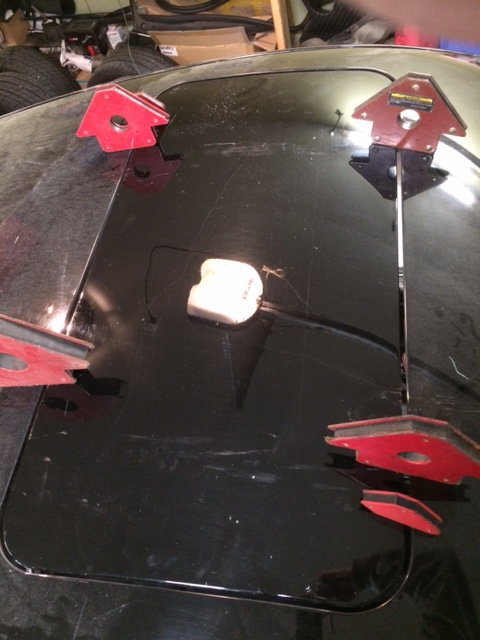
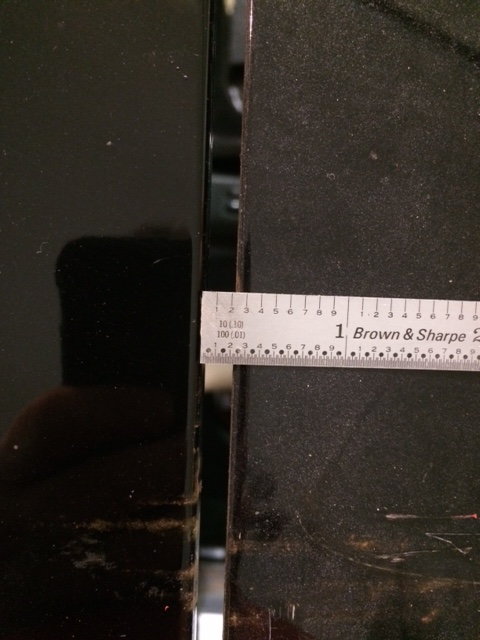
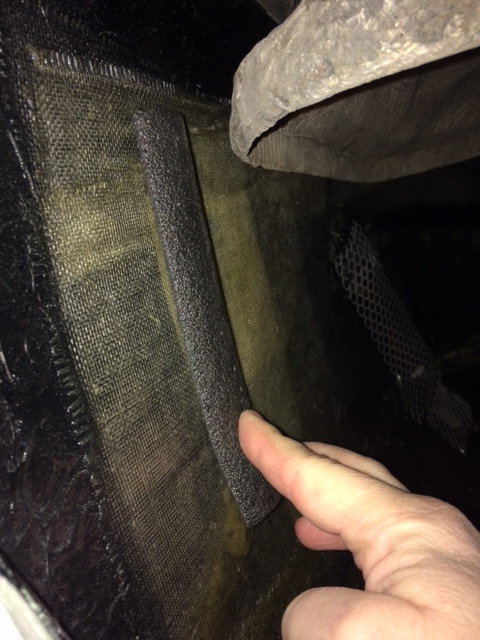
ok so sunroof pics. I ruined my headliner getting this out couldn't find any tutorials on getting it out so I just winged it... broke a wing in the process lol anyway the track I pretty much destroyed pulling it apart after I had it all out of the car but it didn't work so well to begin with so no tears shed for me. the cover(part I'm going to weld back in) looks like its two layers of stamped steel glued or spot welded together. I have looked to closely yet but I might try to separate them as that cover is heavier than you might think. holding it up in the car with magnets so I can see how wide the fill piece is going to need to be looks to be about .200 gonna head to local store tonight and see what I can find.
in this post I want to revisit that rear bumper and I have a quick question.
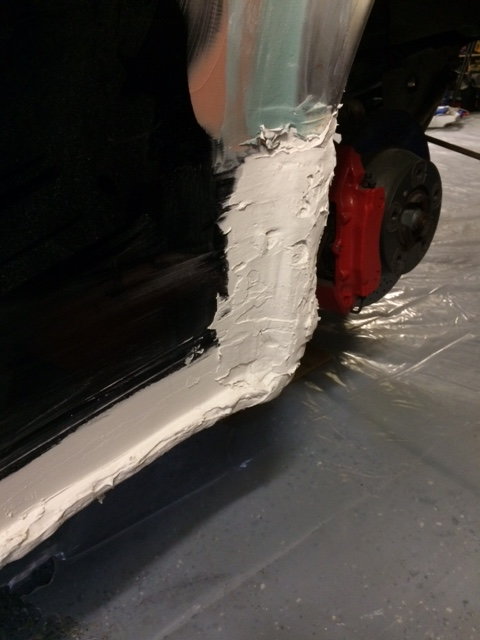
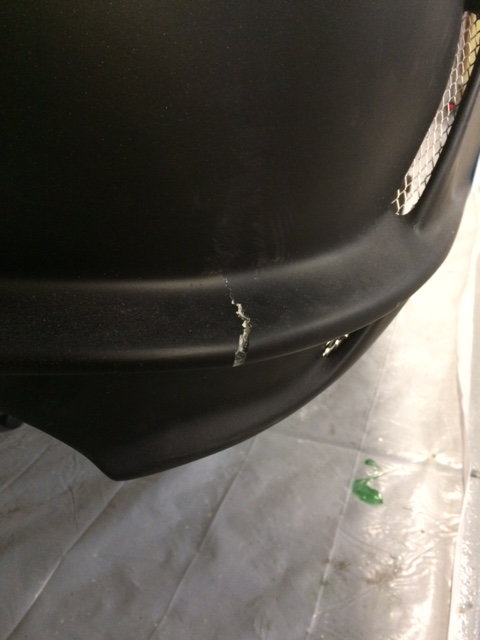
I took a pic of that crack I mentioned in an earlier post from getting the bumper to bend in so it could mount to the car. also a pic of the inside of the bumper so you can see the fiberglass I put on. also last night I took some foam water line covering and cut it into quarters. I'm going to soak them in poly, stick them to the inside of the bumper and then cover them with fiberglass adding some curves/tangents which I'm thinking/hoping will add some more strength to the bumper before I pull it back off.
I just don't want to run into the same things that happened on my boxster with the durafless bumpers I bought for that car. sun, heat and vibrations really seem to mess the after market bumpers up. so this is my attempt to minimize that.
oh that quick question I have is does anyone know what kind of glue is used to hold that bolt feature onto the rear quarter glass. mine pulled off when I was getting them out of the car. fyi..... there is three bolts holding that rear glass in ... not two so don't tug on it till you get all three off lolol
That's a lot of gap to try to close in the sunroof... To eliminate the sunroof, it might be worthwhile/easier/cleaner to drill out the spot welds and replace the roof skin with one without a sunroof hole. I believe you can buy them new from the dealer at a reasonable price. It's a lot of drilling and rosette welding, but you end up with a perfect roof.
That's a lot of gap to try to close in the sunroof... To eliminate the sunroof, it might be worthwhile/easier/cleaner to drill out the spot welds and replace the roof skin with one without a sunroof hole. I believe you can buy them new from the dealer at a reasonable price. It's a lot of drilling and rosette welding, but you end up with a perfect roof.
ya I also found the fiberglass roof online as well. I did think about going that route but it just seems like wasting money when I can put in a little more elbow work for free. I don't mind spending the money but I wont lie... I'm trying to reserve as much as possible for the motor build. when I do the motor weather it's as wild as I can get this 3.4 or a monster charged ls swap... I want it to live up to the look of the car. Plus.. my big brother has a bmw that was tuned and had some goodies installed at fabspeed and he smokes me so I have to be able to beat him when I redo this motor lolol sssstupid BMW lol
Plus.. my big brother has a bmw that was tuned and had some goodies installed at fabspeed and he smokes me so I have to be able to beat him when I redo this motor lolol sssstupid BMW lol
ya but us mortals will never come by a $5500 tt motor lolI don't know what route I'll go. ls swap.. $20k , built 3.4l $20k, tt motor $20... not much for options lolsooo wish a mechanic would step out of the norm and just start building these motor for cheaper than everyone else. I suspect as the 996 gets into the cheaper price range and more and more back yard mechanics can afford them.. more options will pop up eventually. I picked my 911 up for $16k and they don't look like there going to go back up. every time I talk to someone whos non Porsche, they bring up "ya but I heard those motors.. bla bla bla"
I picked my 911 up for $16k and they don't look like there going to go back up. every time I talk to someone whos non Porsche, they bring up "ya but I heard those motors.. bla bla bla"
I'm on the other side of that fence. I think we're at the bottom of a curve. That's why I got into mine.
We know all the problems at this point and we know all the fixes. Besides the aficionados that are just disgusted by the headlights, mechanically, once the IMS/RMS issue is spoken for with documentation, these engines seem to be likely to run high miles pretty easily. And they will always have the race/track audience. Maybe I'm just a romantic optimist. :-)
They're still 18 year old cars that need every plastic and rubber piece replaced, engine internals in the higher mileage cars need to be addressed too...No to mention there are hundreds of them for sale on any given day.
 01-03-2018, 09:11 PM


 I had my share of defenders but wow it really made me sit back and face palm the stupidity of some people. its a car!!!!!!!! lol anyway lol


 couldn't find any tutorials on getting it out so I just winged it... broke a wing in the process lol anyway the track I pretty much destroyed pulling it apart after I had it all out of the car but it didn't work so well to begin with so no tears shed for me. the cover(part I'm going to weld back in) looks like its two layers of stamped steel glued or spot welded together. I have looked to closely yet but I might try to separate them as that cover is heavier than you might think. holding it up in the car with magnets so I can see how wide the fill piece is going to need to be looks to be about .200 gonna head to local store tonight and see what I can find.


 sssstupid BMW lol
