When you click on links to various merchants on this site and make a purchase, this can result in this site earning a commission. Affiliate programs and affiliations include, but are not limited to, the eBay Partner Network.
fabricating and installing front bumper grills on a 996
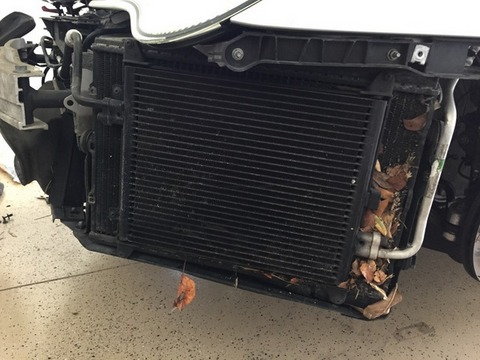
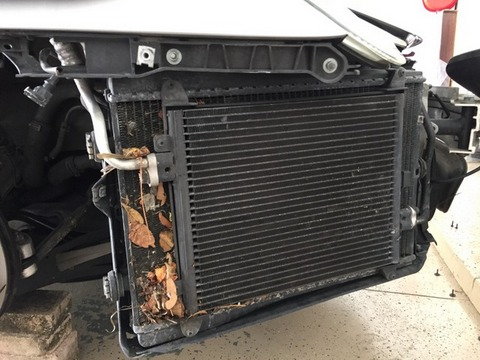
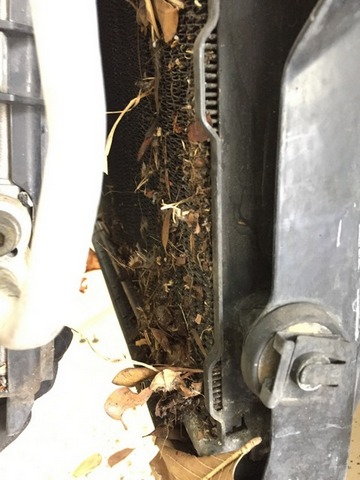
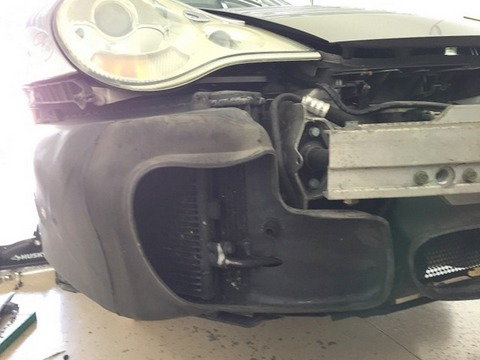
I always thought that vacuuming inside the front bumper was sufficient to keep the radiators clean. I did not realize how much leaves/bugs/debris accumulates in between the radiators and condensers. You cannot clean this unless you remove the bumper.
This shows how vacuuming with the bumper on only addresses the area immediately in front of condenser & radiator and towards the center of the car.
This is what it looked like between the condenser and the radiator:
Best way to protect the radiators and condensers is to install a grill or mesh. Porsche started doing that now on the high performance 991s (GT3 or RS). I am not sure why they don�t do it on all the models which in my opinion is a significant omission on their part.
I watched many YouTube videos and it seems everyone has a different approach. It is great to see so many owners taking an active interest in dealing with this issue. I decided to get good quality mesh and do a somewhat permanent installation using automotive glue. You can purchase pre-fabricated grills from Rennline however where is the fun in that? The hardest part of the entire installation is the removal & re-installation of the bumper. It is simple but tedious. Overall this is a very simple DIY project and can be done in a few hours. I purchased Small Diamond Aluminum Grill Mesh, Black Gloss, 12x48" sheet, $48.99 and Automotive GOOP $8.99 from CustomCarGrills.com. (There is a good video on their website on how to fabricate a grill.).
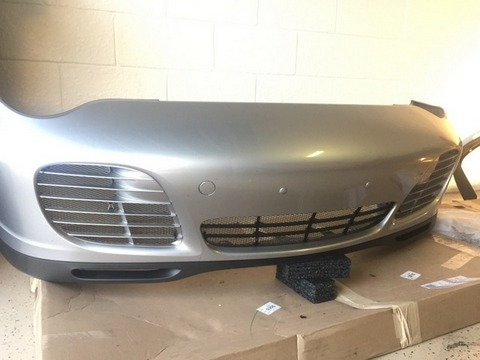
My car is the 996 40th Anniversary edition and its front bumper is similar to the Turbo/C4S bumper. Carrera 2/4/GT3 have a different front bumper however the same methodology applies.
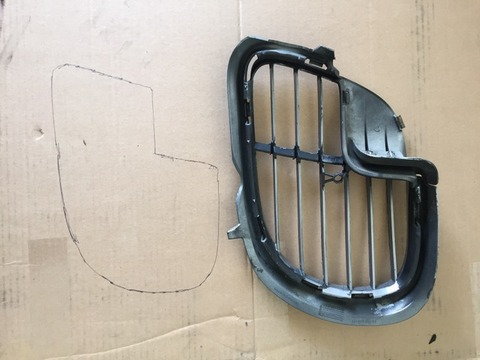
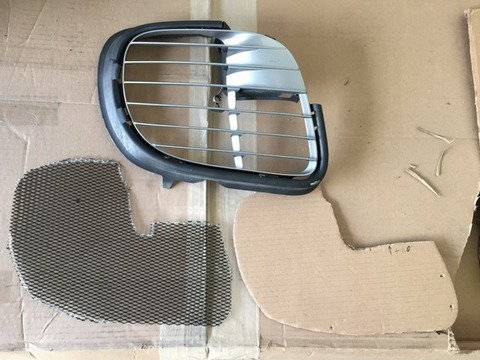
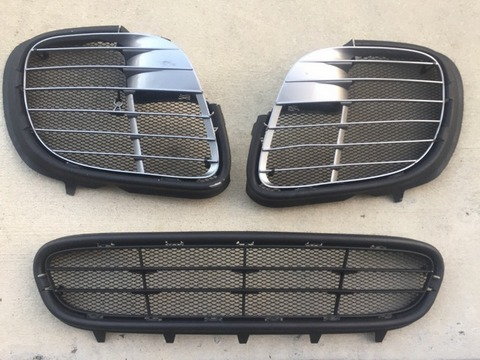
Next, remove the existing intake panels (they simply snap out) and trace their outline onto the cardboard.
Cut the cardboard template out and trim to fit the panel but do not over-trim, the template should overlap the inside of the panel opening by about 1/4"-1/2". Once you're happy with the fitment of the cardboard template transfer it onto the mesh. Since my mesh was black and I couldn't use a sharpie I used white nail polish instead.
I used basic metal snips to cut the mesh and they worked ok. It is best to wear gloves when trimming mesh as the cut edges can be razor sharp.
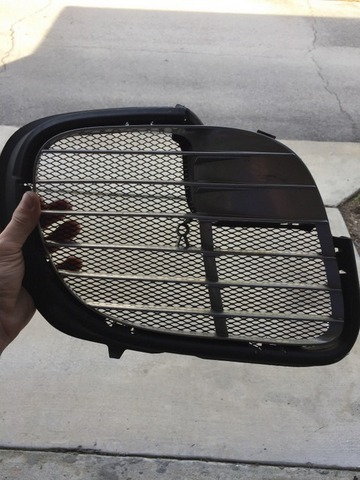
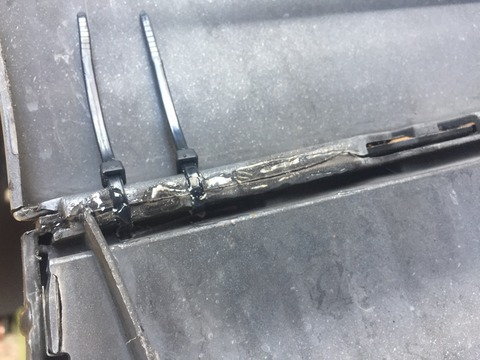
Once all the trimming is done and you're happy with the fitment, attach the grills to the panel with cable ties. Ensure the mesh is held tightly in place but not bent.
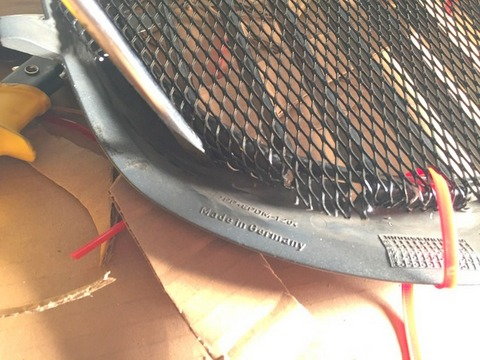
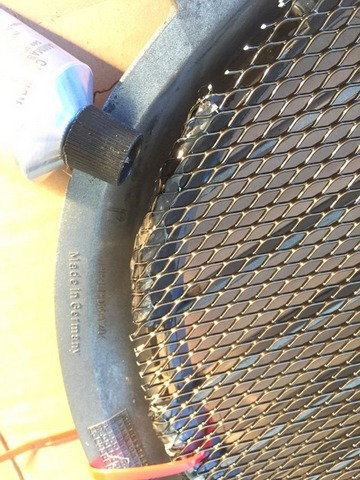
Next, use a flat head screwdriver to bend the 1/4"-1/2" overlap around the perimeter of the grille to conform to the shape of the panel. Then apply GOOP around the perimeter ensuring that it does not drip onto the inside of the panel which would be visible once the panel goes back in the bumper. You may choose to skip the somewhat permanent GOOP method and instead use little screws, clips, or zip ties to attach the grills however I chose the glue as I do not plan to take these off (after I re-installed the bumper I decided to use additional zip ties to hold the grills in place for extra security since I was going to be using the car at the track.)
leave it to dry for 24 hours
Next, remove the zip ties and your panels are ready to be re-installed on the bumper.
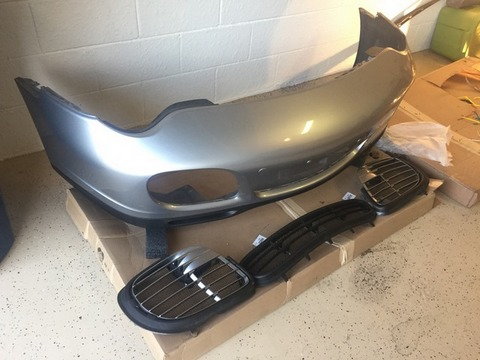
I also used this opportunity to replace the lower lip spoiler with the original 40th Anniversary one and do some additional bumper repairs while it was off.
During re-installation of the bumper remember that you will need to trim an opening for the temperature sensor and somehow fish it through. I used painters blue tape but I'm sure there are many other options. Also, when re-installing the bumper I ran into an issue with a sagging rubber duct.
This is not a problem when reinstalling a bumper without the grills because you can just reach inside the bumper and push the rubber up, however you need to get a lot more creative when the grills are blocking your way. I placed a screwdriver inside the duct to push it up but then had to fish it out after the bumper was installed. Here is the finished product:
I've had these on for a year now and they are holding up very well. I have done multiple DEs at Sebring and Roebling, taken the car to the FIRM and autocross events, and have done thousands of miles on various road trips. I have not had any issues with cooling, and cleaning the debris out is very easy now. This is a must do modification for any watercooled Porsche 911 or Boxter/Cayman owner.
Materials:
> mesh (Small Diamond Aluminum Grill Mesh, Black Gloss, 12x48" sheet, $48.99 at CustomCarGrills.com) > automotive glue (eg GOOP $8.99 from CustomCarGrills.com) > sharpie > white nail polish
> cardboard
> scissors > metal snips > zip ties > flat head screwdriver > gloves
I always thought that vacuuming inside the front bumper was sufficient to keep the radiators clean. I did not realize how much leaves/bugs/debris accumulates in between the radiators and condensers. You cannot clean this unless you remove the bumper.
This shows how vacuuming with the bumper on only addresses the area immediately in front of condenser & radiator and towards the center of the car. This is what it looked like between the condenser and the radiator:
Best way to protect the radiators and condensers is to install a grill or mesh. Porsche started doing that now on the high performance 991s (GT3 or RS). I am not sure why they don�t do it on all the models which in my opinion is a significant omission on their part.
I watched many YouTube videos and it seems everyone has a different approach. It is great to see so many owners taking an active interest in dealing with this issue. I decided to get good quality mesh and do a somewhat permanent installation using automotive glue. You can purchase pre-fabricated grills from Rennline however where is the fun in that? The hardest part of the entire installation is the removal & re-installation of the bumper. It is simple but tedious. Overall this is a very simple DIY project and can be done in a few hours. I purchased Small Diamond Aluminum Grill Mesh, Black Gloss, 12x48" sheet, $48.99 and Automotive GOOP $8.99 from CustomCarGrills.com. (There is a good video on their website on how to fabricate a grill.).
My car is the 996 40th Anniversary edition and its front bumper is similar to the Turbo/C4S bumper. Carrera 2/4/GT3 have a different front bumper however the same methodology applies.
Next, remove the existing intake panels (they simply snap out) and trace their outline onto the cardboard.
Cut the cardboard template out and trim to fit the panel but do not over-trim, the template should overlap the inside of the panel opening by about 1/4"-1/2". Once you're happy with the fitment of the cardboard template transfer it onto the mesh. Since my mesh was black and I couldn't use a sharpie I used white nail polish instead.
I used basic metal snips to cut the mesh and they worked ok. It is best to wear gloves when trimming mesh as the cut edges can be razor sharp.
Once all the trimming is done and you're happy with the fitment, attach the grills to the panel with cable ties. Ensure the mesh is held tightly in place but not bent.
Next, use a flat head screwdriver to bend the 1/4"-1/2" overlap around the perimeter of the grille to conform to the shape of the panel. Then apply GOOP around the perimeter ensuring that it does not drip onto the inside of the panel which would be visible once the panel goes back in the bumper. You may choose to skip the somewhat permanent GOOP method and instead use little screws, clips, or zip ties to attach the grills however I chose the glue as I do not plan to take these off (after I re-installed the bumper I decided to use additional zip ties to hold the grills in place for extra security since I was going to be using the car at the track.)
leave it to dry for 24 hours
Next, remove the zip ties and your panels are ready to be re-installed on the bumper.
I also used this opportunity to replace the lower lip spoiler with the original 40th Anniversary one and do some additional bumper repairs while it was off.
During re-installation of the bumper remember that you will need to trim an opening for the temperature sensor and somehow fish it through. I used painters blue tape but I'm sure there are many other options. Also, when re-installing the bumper I ran into an issue with a sagging rubber duct.
This is not a problem when reinstalling a bumper without the grills because you can just reach inside the bumper and push the rubber up, however you need to get a lot more creative when the grills are blocking your way. I placed a screwdriver inside the duct to push it up but then had to fish it out after the bumper was installed. Here is the finished product:
I've had these on for a year now and they are holding up very well. I have done multiple DEs at Sebring and Roebling, taken the car to the FIRM and autocross events, and have done thousands of miles on various road trips. I have not had any issues with cooling, and cleaning the debris out is very easy now. This is a must do modification for any watercooled Porsche 911 or Boxter/Cayman owner.
Materials:
> mesh (Small Diamond Aluminum Grill Mesh, Black Gloss, 12x48" sheet, $48.99 at CustomCarGrills.com) > automotive glue (eg GOOP $8.99 from CustomCarGrills.com) > sharpie > white nail polish
> cardboard
> scissors > metal snips > zip ties > flat head screwdriver > gloves
Nice writeup! I've put this off because I vacuum out the front and it looks spotless in there. But maybe this winter I'll have to take the bumper off and see what I'm missing.
Very nice writeup. I installed the Rennline grill kit on my C2. I also cut open the wheel wells behind the radiators (per the Pelican write up) ala 997 to get more airflow thru and also to the brakes. I used a similar material and made screens for the wheelwell side.
Nice write up, just keep an eye on coolant temps as you just blocked off a 1/4 0f your opening with the mesh.
Really? 25% ? How did you come up with this # ? I've been thinking about this, but my "guestimate" was more like 5 - 10 % of actual area...The difficulty comes in estimating the disruption to airflow/pressure caused by the mesh. Without a wind-tunnel and some sophisticated measuring devices it's a shot in the dark...
Actually CustomCarGrills shows an open area for the small diamond mesh of 65%. I do agree that it's not necessarily the volume of air that's restricted but the change in airflow/pressure. In practice I have done 2 DE days at Sebring, 4 DE days at Roebling, 2 days at the FIRM and thousands of road miles in Florida and other states and have not had a single issue with the coolant temperatures.
Thank you bumerang911. Very nice DIY work. Consider posting it on Renntech DIY. After I cleaned my rad's and did my own screens, my temps were down 8 deg, according to Durametric. Mine were so-so dirty.
Great write up, and timely! Upon seeing that thread on the "official unofficial" grill kits being on sale by one of the sponsored vendors, I almost ordered, but just couldn't justify the asking price knowing how much materials actually cost. Now that i see how the oem vents come off, this is an easy DIY, your images are invaluable for someone who's never had the front bumper off.
Originally Posted by bumerang911
Actually CustomCarGrills shows an open area for the small diamond mesh of 65%. I do agree that it's not necessarily the volume of air that's restricted but the change in airflow/pressure. In practice I have done 2 DE days at Sebring, 4 DE days at Roebling, 2 days at the FIRM and thousands of road miles in Florida and other states and have not had a single issue with the coolant temperatures.
And you have data to back it up... the thread that keeps on giving. While I've read countless cautions on this grill mesh decreasing air flow to the rads, I can't help but think that's it's FAR LESS restrictive than a bunch of wet leaves! I for one don't live in a major metropolitan area, so I've been vacuuming out my vents on the weekly... and that's just to the parts i can reach w/ an extension. This is happening, thanks!
Really? 25% ? How did you come up with this # ? I've been thinking about this, but my "guestimate" was more like 5 - 10 % of actual area...The difficulty comes in estimating the disruption to airflow/pressure caused by the mesh. Without a wind-tunnel and some sophisticated measuring devices it's a shot in the dark...
Way too many variables to draw a conclusion. A laboratory analysis would not reveal anything of practical value. As practical matter , driving a 996 under typical or even atypical conditions , gauge differences would not be detectable
Thank you bumerang911. Very nice DIY work. Consider posting it on Renntech DIY. After I cleaned my rad's and did my own screens, my temps were down 8 deg, according to Durametric. Mine were so-so dirty.
^^ This is something to think about I guess! My question would be how long were they that dirty for? I've cleaned out my rads/condensers the last two winters - and removed a fair amount of debris - my temps haven't really changed. I also installed a center radiator last winter - overall temps are exactly the same except when driving over 65mph, where they seem to drop around 10 degrees or so (middle of the 8 in 180)...
Thank you bumerang911. Very nice DIY work. Consider posting it on Renntech DIY. After I cleaned my rad's and did my own screens, my temps were down 8 deg, according to Durametric. Mine were so-so dirty.
^^ This is sonmething to think about I guess! My question would be how long were they that dirty for? I've clean out my rads/condensers the last two winters - and removed a fair amount of debris - my temps haven't really changed. I also installed a center radiator last winter - overall temps are exactly the same except when driving over 65mph, where they seem to drop around 10 degrees or so (middle of the 8 in 180)...
I was so surprised when I cleaned mine out with how much debris there was. I installed screens as well. It was tight getting the ducts into the vents correctly. All is well.
 11-14-2017, 09:28 PM