When you click on links to various merchants on this site and make a purchase, this can result in this site earning a commission. Affiliate programs and affiliations include, but are not limited to, the eBay Partner Network.
Thanks for the toque specs. No contact between the lower ring and the perch. Front and rear hats arrived today so hopefully I will be able to make some progress tomorrow.
The experience of the OP, along with this thread, will help myself, along with countless others. So don't sell yourself short. :-)
I ordered these a while ago, to secure my perches. They never moved, so I was in no hurry to pull EVERYTHING apart, to do it. I believe they are what is needed. Verify with Bilstein, before you order. Aloha
Richard Attachment 1118323
This could be be really useful info in this thread if they turn out to be be the correct ones. For the price of a Pss10 kit, I think they should really include these preinstalled on the body.
Here is an interesting thread on not having the lock ring. personally I'd have to be pretty bored to dissamble mine to add them but if I had them new on the bench I for sure would.
Progress today: All new top hats installed and torqued. Fronts are in, rears to go in a few days. Did the install by myself, not a problem.
I decided to go with the height adjustment recommended in the instruction manual provided. I remember the rear setting was 210mm, and the front setting was somewhere in the middle of the range. After speaking with my chosen alignment shop about this issue I felt much better. Getting the rear perch/bottom of the drop link, as well as the bottom mounting point of the shock is key...BEFORE you put the assembly in place. Whether you plan to track the car or not he also strongly recommends a bottom lock ring as pictured before. If for nothing else it will prevent possible damage if the car is driven hard in the future.
As for the proper "angle" of the perch. Based upon professional alignment shop recommendation I left mine relatively loose with the thought that once the entire assembly is installed I can fine tune the approximate angle, tighten the bottom ring and the ring above...then the rest of the assembly...and then the alignment shop will make any final adjustments during corner balance and alignment.
As for torque of the 14mm top hat nuts, especially in the rear, "guttentite" is my plan based on how the front ones "feel". As we all know clearance in the back is limited.
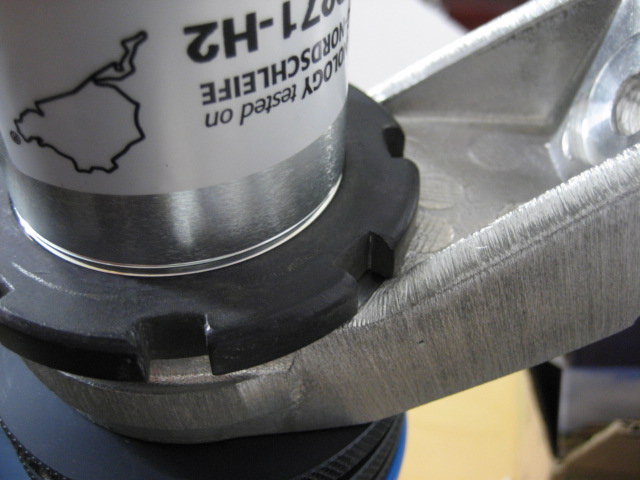
There is a rubber gasket between the top hat and the body up front that will have to be purchased separately from the top hat if you need one. I was able to salvage mine with a bit of care, and used contact cement to secure it in place on the new top hat.
The other tip about using a "bent nosed pic" to push out the center round tab on the plastic part is also good stuff.
As for the proper "angle" of the perch. Based upon professional alignment shop recommendation I left mine relatively loose with the thought that once the entire assembly is installed I can fine tune the approximate angle, tighten the bottom ring and the ring above...then the rest of the assembly...and then the alignment shop will make any final adjustments during corner balance and alignment..[/QUOTE]
The perch just needs to sit, centered, facing directly inward, towards engine. It shouldn't need to have any "angle" other than 90� (Inward) off the longitude of car.
Progress today: All new top hats installed and torqued. Fronts are in, rears to go in a few days. Did the install by myself, not a problem.
Whether you plan to track the car or not he also strongly recommends a bottom lock ring as pictured before. If for nothing else it will prevent possible damage if the car is driven hard in the future.
As for the proper "angle" of the perch. Based upon professional alignment shop recommendation I left mine relatively loose with the thought that once the entire assembly is installed I can fine tune the approximate angle, tighten the bottom ring and the ring above...then the rest of the assembly...and then the alignment shop will make any final adjustments during corner balance and alignment.
As for torque of the 14mm top hat nuts, especially in the rear, "guttentite" is my plan based on how the front ones "feel". As we all know clearance in the back is limited.
Outstanding progress!
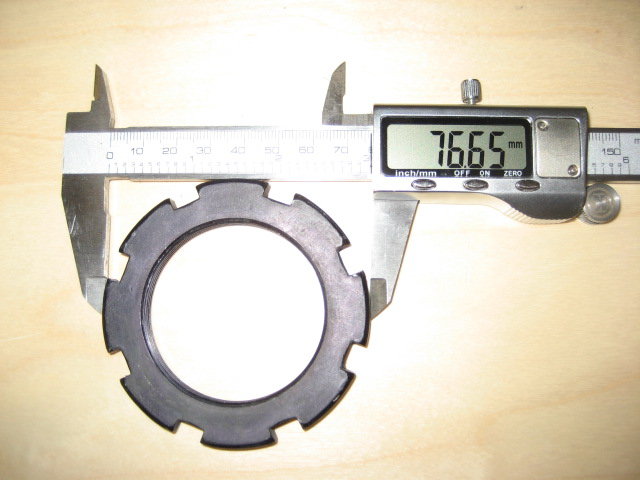
Before you put the rears in, can you measure the OD of the lower rings you have (assuming you have a digital caliper)?
I'm 99% certain that the ones I have are the same ones you are using. If so, I may put those on while the car is apart.
Originally Posted by F18drvr
Two other points.
There is a rubber gasket between the top hat and the body up front that will have to be purchased separately from the top hat if you need one. I was able to salvage mine with a bit of care, and used contact cement to secure it in place on the new top hat.
The other tip about using a "bent nosed pic" to push out the center round tab on the plastic part is also good stuff.
Good to know about that gasket. I'll keep that in mind if I ever replace my top hats.
There is a rubber gasket between the top hat and the body up front that will have to be purchased separately from the top hat if you need one. I was able to salvage mine with a bit of care, and used contact cement to secure it in place on the new top hat.
The other tip about using a "bent nosed pic" to push out the center round tab on the plastic part is also good stuff.
I was PM'ing with the_bg and he pointed out that this looked like a part you'd want to order before doing the front suspension so I got a couple. They aren't expensive, so probably a good idea for anyone doing this work.
Since I seem to have the correct collars sitting here unused, and I've yet to finish installing the suspension, I've changed course and will go ahead with the belt-and-suspenders approach and install the extra collars.
Notice that they either "barely" or "perfectly" fit depending on your world view. Regardless, I see no real downside to adding them at this point.
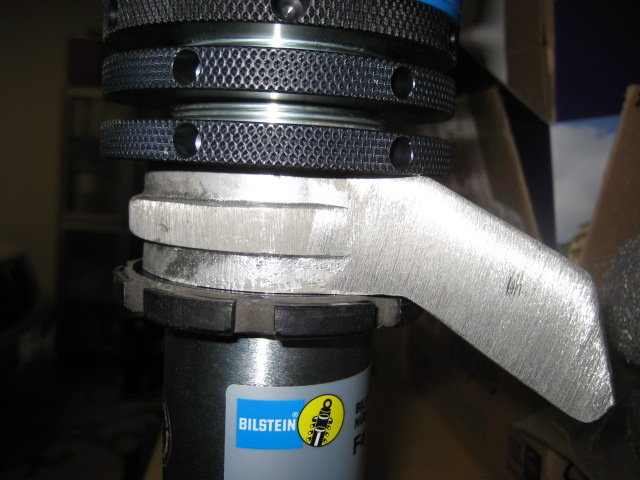
Yep, it's the black anodized smaller locking collar for the front spring perch. Note that this is the old style B6 shock and may be different from the newer fully-threaded B6s that many have around here.
Sorry, but I think this is overkill...here is why:
The bottom perch threads/screws upwards, the 3rd locking collar screws downward. These two pieces tighten and lock against each other...What's the point of putting an additional ring from the bottom that won't tighten against the perch since it's threaded in the same direction?
What if a twisting force is applied to the drop link perch that acts to loosen just that piece? The collar above won't be able to resist, but a lower collar could.
What if a twisting force is applied to the drop link perch that acts to loosen just that piece? The collar above won't be able to resist, but a lower collar could.
They are locked against each other, without brute force on the spanner wrenches, these two pieces are locked and not going anywhere. The theory of a possible twisting force on the drop link would only happen one way in order for these two to come loose. I can only see this happening if there was a huge wreck and the sway bar broke, before the droplink ball joint pop out..
I may be wrong, but I logically cannot see how this can possibly come undone when the 3rd ring and the bottom perch are locked against each other.
 12-19-2016, 09:08 PM