When you click on links to various merchants on this site and make a purchase, this can result in this site earning a commission. Affiliate programs and affiliations include, but are not limited to, the eBay Partner Network.
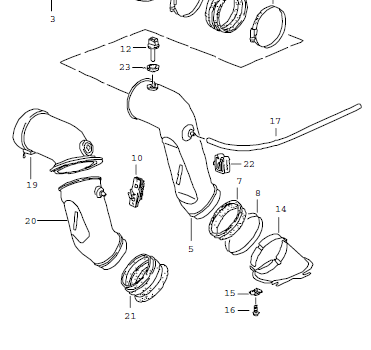
I did the search.... I am finishing up reinstalling the alternator and the associated air ducting for cabin heating (see PET illustration 108-10). The Rubber Sleeve (item 21) is suppose to fit in and around the Socket (item 14). The socket sits low in the engine bay screwed to the sheet metal. The rubber sleeve will not fit onto the socket. The socket has four small 'fingers' that go to the inside of the sleeve, while most of the sleeve fits over the outside of the socket.
I tried to stretch the sleeve by cranking out the jaws of a 6' vice, WD-40, long thin screwdrivers, my fingers, etc... with no luck.
There must be a trick to do this!!! This is driving me nuts...
Any knowledgeable people out there who can point me in the right direction? Your help would be most appreciated!!!!
Thanks!!!!!!!!!!
The parts in the picture you site seem to have notations for a different motor than the US 96' Carrera 6 speed.
For my 96' 993 C2 6 speed I seems to recall the sleeve (7) and the upper duct (5) fit inside the lower duct (14). The clamp (8) band goes on the outside. The fit is snug but not too difficult to fit in.
The USA engines use the duct arrangement on the right of the illustration
Outside of all US, certain Canadian and UK engines the arrangement on the left is shown.
I seem to recall the upper duct must be rotated into the correct position to easily slip over/onto the lower duct section. I would attach the lower side of the vent duct first while turning it in position the attach the upper end.
I did the search.... I am finishing up reinstalling the alternator and the associated air ducting for cabin heating (see PET illustration 108-10). The Rubber Sleeve (item 21) is suppose to fit in and around the Socket (item 14). The socket sits low in the engine bay screwed to the sheet metal. The rubber sleeve will not fit onto the socket. The socket has four small 'fingers' that go to the inside of the sleeve, while most of the sleeve fits over the outside of the socket.
I tried to stretch the sleeve by cranking out the jaws of a 6' vice, WD-40, long thin screwdrivers, my fingers, etc... with no luck.
There must be a trick to do this!!! This is driving me nuts...
Any knowledgeable people out there who can point me in the right direction? Your help would be most appreciated!!!!
Thanks!!!!!!!!!!
you're right, it's not fun.
in fact is pretty much a blind PITA
Can't offer and helpful advice other than to use silicone spray (a lubricant) on the slidey bits, not WD-40 (a solvent)
If you rotate the bottom of the upper duct to fit in the lower section first and then attach the upper end it may make it easier. It could be keyed and as you rotate it it lines up and slips in.
I should have included these pix in the first post. I have the TPC Supercharger kit installed on my car. It has a special air duct made by TPC. I have had this installed for a number of years now. I don't remember how I originally got the sleeve on to the lower socket. The TPC air duct does fit the sleeve very nicely. The rubber engine tin seal is a pain as it is hard to hold it out of the way while trying to get the sleeve onto the lower socket piece.
Not sure what changed and I doubt the sleeve shrunk at one end only.
I have some Teflon lubricant that I will try. Still open to suggestions on this!!
I should have included these pix in the first post. I have the TPC Supercharger kit installed on my car. It has a special air duct made by TPC,
The pluming section in your local home improvement store offers a whole series of rubber pipe adapters with clamp rings on each end some are same size on each end some are step-up / step-down all have rubber OD/ID on each end that can be easily force fitted internally or externally or even cut short to adapted for your issue.
Could end up with a better solution than was originally designed by TPC:
The fingers were part of the OE designed interface. Clearly the aftermarket TPC part was not designed to use them. A purely OD or ID fit with a little more robust ring may do the trick. Since the pipe is there to provide cabin heat any variance in the ID as a result of a rubber adapter is not going to be relevant in the function of the duct.
 11-14-2016, 11:35 AM