Headlight Connector Disassembly
 08-27-2013, 01:00 AM
#1
Pro
Thread Starter
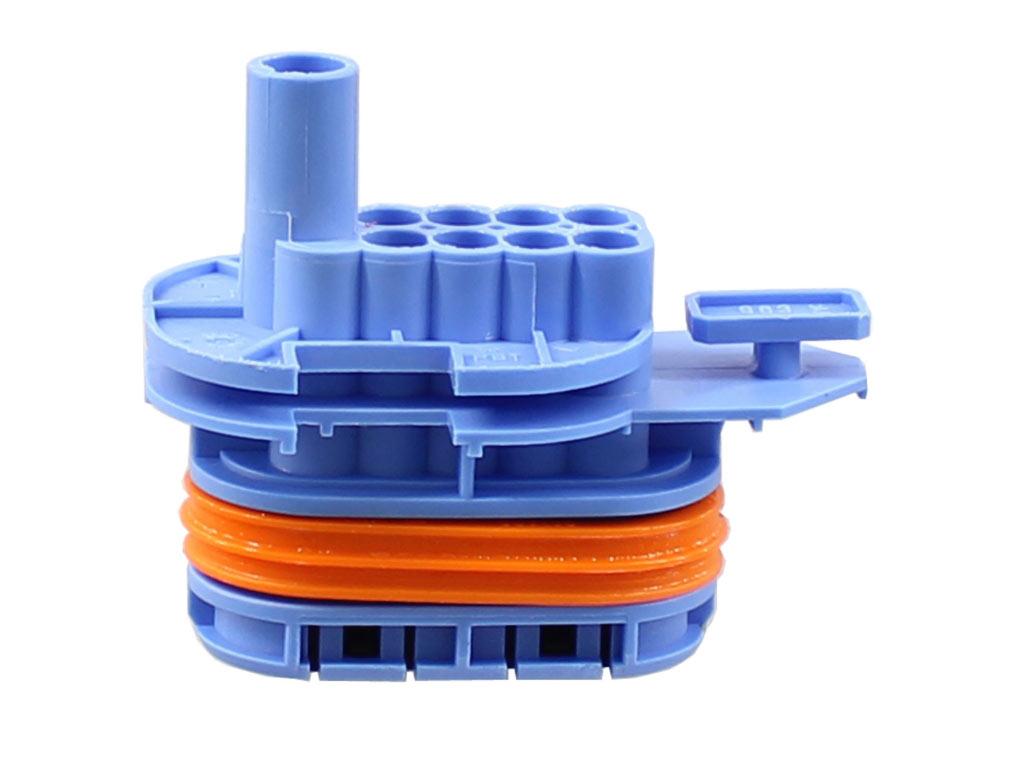
trying to replace my headlight connectors but I am lost as to how to disassemble the piece...
I have notched the two red tabs sideways but not sure what to do next...I've tried pulling on the wires on the back but they will not budge...
has anyone replaced these before?....thanks
I have notched the two red tabs sideways but not sure what to do next...I've tried pulling on the wires on the back but they will not budge...
has anyone replaced these before?....thanks
 08-27-2013, 02:20 AM
#2
Instructor

Let me preface this by saying I have not actually worked on this particular connector, everything I say below is based on my experience with similar VW/Audi housings.
It's a bit hard to tell but it looks like the black insert can be slid out from the white housing. You might want to do that first. I think you might also need a wire extraction tool similar to the one in this listing http://www.ebay.com/itm/360565265964?item=360565265964&pt=Motors_Car_Truck_Parts_Accessories&cmd=ViewItem&hash=item53f35d562c&vxp=mtr. (I have no affiliation with the listing, it's just the first applicable picture I found with a web search). The electrical terminals usually have a little spring tab that locks them into place on the connector housing. Here's a picture of a terminal so you can see the tabs. http://www.ecstuning.com/Volkswagen-...tors/ES470511/ The tool pushes the tabs down from the front of the connector so that the terminal can then be pulled out the back of the housing. I know some people have had luck using paper clips to do the same thing so you might give that a shot. I believe the two red tabs you indicated are a secondary locking mechanism that slides behind the terminals and prevents them from being pulled out. You might have to get the black central housing out of the white shell in order to make sure that the two red tabs are completely out of the way.
GC
08-27-2013, 07:56 AM
#3
Rennlist Member
First - to remove the white cover, there are silicone plugs inserted around each cable from the back, you have to slide those out and back, if not, the white casing won't go back.
Unclip the white housing and slide it back.
Unlock the two red tabs on the plug facia, and introduce the porsche terminal removal tool to flatten the two whiskers holding the metal terminal.
I have purchased this tool kit long time ago for $60ish, make sure it includes the 1" micro metal tubes visible on top right of picture. There are the same kits, without the mini tubes.
beside the first screwdriver on the right, there is a small cavity with three metal tubes. You will need those on the 993 (heated window washer terminal for example)
http://www.ebay.com/itm/BGS-Tools-11...item43bb84aed7
impossible for any paper clip to enter the tabs, very hard to do it without the tool.
Don't even try with inserting something , and pulling on the cable, There will be Blisters and broken whiskers
08-27-2013, 01:24 PM
#4
Pro
Thread Starter
geolab, u r amazing...I wish I could work for you or something!
so I need to slide the silicone plugs out of the back?...do I just pull on the wires to slide these out?
so I need to slide the silicone plugs out of the back?...do I just pull on the wires to slide these out?
08-27-2013, 02:05 PM
#6
Banned

Join Date: Aug 2011
Location: 6feet under snow of CANADA
Posts: 3,665
Likes: 0
Received 0 Likes
on
0 Posts
terminal release tool set. click the little red or pink tabs over to unlock the wires - Sometimes it helps to push the wire into the connector alittle while inserting the release tool. As they say above it can be tricky but once you pull the first wire correctly it all works it self out.
I just replaced these connectors myself. The new connector hosing didn't come with rubber plugs to fill the remaining holes. transfer the 4 wires over and be sure to transfer the little rubber plugs also.
as stated above its easy so just take your time. Porsche offers repair wires if you make a mestake so don't be too nervous on your first one. The little fingers can be quite finiky and someone tilting the wire side to side helps get the release tool down far enough to release the fingers.
best of luck. Everyones advice above is spot on. Goodluck
08-27-2013, 02:28 PM
#7
Pro
Thread Starter
terminal release tool set. click the little red or pink tabs over to unlock the wires - Sometimes it helps to push the wire into the connector alittle while inserting the release tool. As they say above it can be tricky but once you pull the first wire correctly it all works it self out.
I just replaced these connectors myself. The new connector hosing didn't come with rubber plugs to fill the remaining holes. transfer the 4 wires over and be sure to transfer the little rubber plugs also.
as stated above its easy so just take your time. Porsche offers repair wires if you make a mestake so don't be too nervous on your first one. The little fingers can be quite finiky and someone tilting the wire side to side helps get the release tool down far enough to release the fingers.
best of luck. Everyones advice above is spot on. Goodluck
I just replaced these connectors myself. The new connector hosing didn't come with rubber plugs to fill the remaining holes. transfer the 4 wires over and be sure to transfer the little rubber plugs also.
as stated above its easy so just take your time. Porsche offers repair wires if you make a mestake so don't be too nervous on your first one. The little fingers can be quite finiky and someone tilting the wire side to side helps get the release tool down far enough to release the fingers.
best of luck. Everyones advice above is spot on. Goodluck
Trending Topics
 03-20-2014, 10:50 PM
#9
Banned
Join Date: Aug 2011
Location: 6feet under snow of CANADA
Posts: 3,665
Likes: 0
Received 0 Likes
on
0 Posts
ahhhh so nice and new, my replacement plug came in blue also!
Its nice to have the little clip that holds the plug into the fender
so the wires come out correctly when the headlight is removed using the metal retainer
I used to have to reach behind the headlight and unplug the connector as the little tab was broken off,
Porsche sure knew what they were doing when they designed this as its really hard not to scratch the paint around the headlight without the tabs.
Great design p, thanks for being so smart.
04-12-2014, 11:52 PM
#10
Drifting
In my attempt to replace this connector I now need some wire terminals that will plug into the connector. Apparent our car use something not very commonly available today.
Just curious has anyone bought these before? My search came up with nothing.
Just curious has anyone bought these before? My search came up with nothing.
04-13-2014, 01:13 AM
#11
Instructor
Does it have spring tabs on two sides or just one? Can you post the dimensions of the terminal? I have some extras from a VW project that have tabs on both sides. If I have one that might fit I can send it your way.
If I don't have one you might try the shop where I got my terminals, TGS special tools in Germany (http://shop.t-g-s.de/index.php). They have a search engine where you can type in the connector part number and it will pull up the matching terminals. If this specific connector isn't in their database you might just have to search by the connector manufacturer and compare the pictures and dimensions against the one you have. I suspect that this connector is probably made by AMP, it would be stamped on the housing somewhere. Unfortunately if you go this route you will probably have to buy more than you need and the shipping can take some time.
GC
04-13-2014, 02:11 AM
#13
Drifting
Does it have spring tabs on two sides or just one? Can you post the dimensions of the terminal? I have some extras from a VW project that have tabs on both sides. If I have one that might fit I can send it your way.
If I don't have one you might try the shop where I got my terminals, TGS special tools in Germany (http://shop.t-g-s.de/index.php). They have a search engine where you can type in the connector part number and it will pull up the matching terminals. If this specific connector isn't in their database you might just have to search by the connector manufacturer and compare the pictures and dimensions against the one you have. I suspect that this connector is probably made by AMP, it would be stamped on the housing somewhere. Unfortunately if you go this route you will probably have to buy more than you need and the shipping can take some time.
GC
If I don't have one you might try the shop where I got my terminals, TGS special tools in Germany (http://shop.t-g-s.de/index.php). They have a search engine where you can type in the connector part number and it will pull up the matching terminals. If this specific connector isn't in their database you might just have to search by the connector manufacturer and compare the pictures and dimensions against the one you have. I suspect that this connector is probably made by AMP, it would be stamped on the housing somewhere. Unfortunately if you go this route you will probably have to buy more than you need and the shipping can take some time.
GC
Yes it does have spring tabs on both sides and I just looked very closely at the terminal, your correct it's made by AMP. Dimensions approximate 0.86 x 0.11, based on my pics.
I actually need 5 of them, since I pretty much removed my old connector entirely.
Here is another shot with the spring tabs top and bottom as reference. I went thru that website you suggested and the search criterias are beyond my knowledge, any chance you still have the link please post.
Anyone attempting to change this connector, it's def not easy. Removing the silicone plugs was a real PIA for mine.
04-13-2014, 06:17 PM
#14
Instructor
Front end of terminal to end of the spring tab: 10 mm.
Width across terminal at the end of the spring tab: approx. 6.5 mm
Width across front of the terminal: approx 4.5 mm
Height of terminal not including spring tab: approx. 3 mm
Height of terminal including spring tab: approx 5 mm.
If yours seems to match up let me know, I can send 5 or 6 your way. You will need a crimp tool that is capable of making a "W" crimp not the usual bullet style crimp tool available at most parts stores. I have one that looks like the one at the top of this page http://www.currenteffects.com/2011/0...wire-crimpers/.
GC