How To Adjust The Brake/Gas Pedal To Any Position You Want
 06-03-2011, 01:31 PM
#1
Instructor
Thread Starter
In desiring to learn the vaunted Heel/Toe downshifting technique in my 993 it occurred to me that it might be easier if the brake and gas pedal were within sight of each other. I wanted them to be easy to adjust, so that I could dial them in, but change settings between street and track if desired. This isn�t a project you can do in fifteen minutes, but it�s not all that hard and gives you total flexibility in pedal position.
Obligatory warning in the form of a stream-of-consciousness run-on sentence: You need to be smart about this or you may set the brake pedal too low and the gas pedal too high and then when you try and stop the brakes won�t work and the throttle will open and you�ll careen across six lanes of traffic, forcing a bus load of Carmelite nuns off a cliff, incurring the Wrath of God, making the national news in an embarrassing way, shaming your family and making future progeny change their last name and if you�re this kind of person and hopefully you know who you are don�t ever even mess with your car and maybe you shouldn�t drive it either so take up knitting instead and don�t forget the eye protection and tetanus shot.
Okay, now that�s taken care of. This is what I did:
Brake Pedal
I wanted to lower the brake pedal but couldn�t adjust it much because of the brake light switch. It had lots of adjustment in the direction I didn�t need and none in the direction I wanted. I tried bending the switch bracket a little (it�s very soft) and this would work if you were only adjusting the brake rod perhaps half a turn, but bend the bracket any more than that and the switch won�t be pointing at the needed contact point. So I decided to take the switch apart. With a few small flat blade screwdrivers and three hands you can pry the top off and this is what you find.
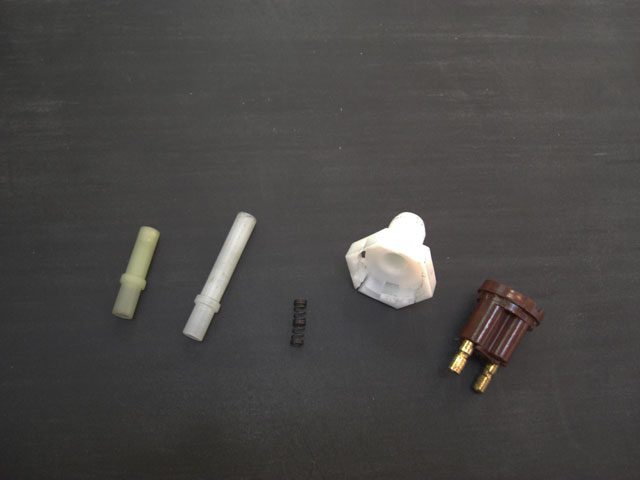
The solution was to make a new plunger. The original is on the far left and the one I made is next to it. I made it about .35� longer. Now to do this, it�s true it�s not just something you can run and get at AutoZone. But don�t all Real Men have a lathe? Or know someone who does? Or have a kid taking metal shop? Or at least know where a local machine shop is? This job can be quickly done on a manual lathe and doesn�t have to cost a fortune. Take some plastic rod to the machine shop, along with the original plunger and a simple sketch of what you want and when you pick it up bring them a six pack of beer, or soda if you live in Utah (assuming you don�t want to burn in Hell eternally). Actually let�s clear up this thing about Hell. There are two doors. One says �Eternal Fire.� On the other is written �Drive a Ferrari.� But once inside you find the timing belt service is due every day!
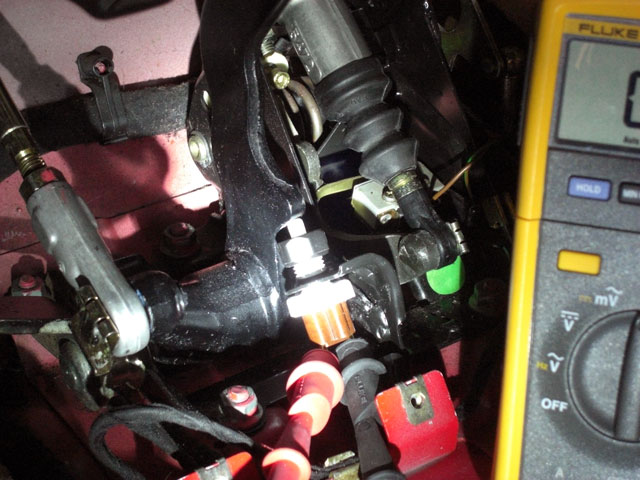
I reassembled the switch with the new custom plunger and installed it. Now I have plenty of adjustment to experiment with the pedal height and it�s very easy to change. I started with one and a half turns of the brake rod and this lowered the pedal height around half an inch. I used a multimeter to set the switch, but obviously you can just watch the brake light.
Gas Pedal
This is easy to adjust, but the problem is that if you raise the pedal, you�ll have more travel than you did before and so you could be straining the throttle cable. It�s a skinny little thing that isn�t meant for this; the gas pedal should hit the hard stop on the floorboard when you have WOT, but shouldn�t go past it. I read that some people said you could adjust the pedal higher, then adjust the cable at the engine to lengthen it and avoid stretching. But doing this will lower the pedal again. Think of it this way: There is a designated amount of pedal travel to actuate the throttle. The cable will probably survive small adjustments, but in general, if you raise the pedal height you should also stop the pedal at a higher point so the total travel stays the same.
All this is a good argument for the common practice of just using an overlay pedal or attaching some kind of block to raise the height. Those are fine, as are the totally adjustable replacement pedals, although they look a bit like car design by the Terminator. Something like this is the easiest to do. In fact I had considered a full aluminum pedal set but found I preferred the grip of the rubber brake and clutch pedals and so I wanted to also keep the stock gas pedal, but be able to adjust it however I wanted.
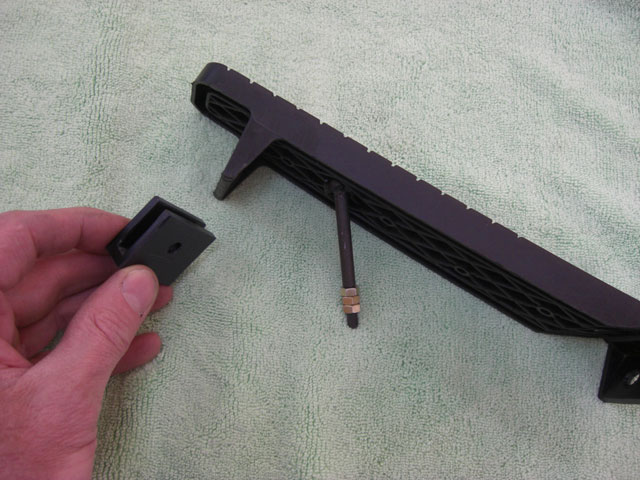
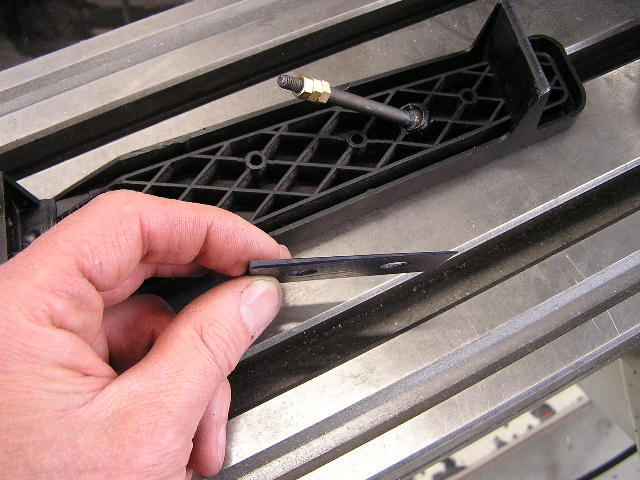
To raise the pedal height you simply loosen the locknut and unscrew the rod. I added several more nuts because it made it easier to gauge how much I was adjusting it. Then I wanted to raise the stopping point so the total travel remained the same. There are two ways to do this. First, there is a stop plate screwed to the floorboard and you can make a new, thicker one. Or, if you�re only raising the pedal a little, you could just put a couple of washers under it to lift it up a bit. The second option is to make a bracket that attaches to the gas pedal itself that in effect lengthens the part of it that hits the stop on the floorboard. Here�s what that looks like:
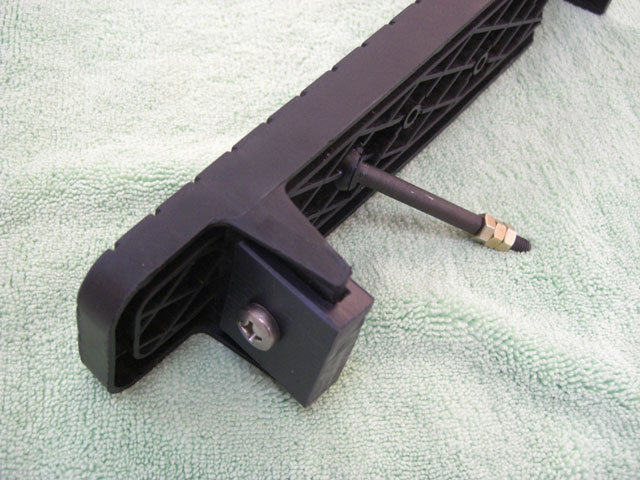
How do you make these parts? Well, doesn�t every Real Man have a mill? Okay, sorry, maybe you don�t. But anyone that can drill and tap a hole and cut and sand some plastic can make a floorboard stop. For me, I found that after lowering the brake pedal I only wanted to raise the gas a small amount. So currently I just raised the gas pedal stop on the floorboard with some washers, about .09�.
I also wanted the gas pedal to lean a bit more toward the brake pedal. This helps the right side of your foot to not miss the gas when you roll to blip it. But I don�t think you want them too close and I�ve seen really good drivers do just fine with standard pedals, so I didn�t want to go too radical with wings and things just yet. So I made a thin plastic shim. Holding thin parts like this is a challenge. I used double stick tape to hold the plastic on a metal block, then I clamped it at an angle and milled it off. If you don�t have a mill, it would also work to sand it to a wedge shape. Or, I�ll admit this, it works just as well to simply put a washer under one side of the pedal. The wedge I made was thicker on one end by .08�. This moved the top of the pedal by just over ��, which is a subtle yet noticeable change, but I might increase it a little in the future. Note that I have a size 11 foot and if it was smaller I�d want it to lean more. Here�s the wedge I made:
Heel/toe doesn�t work well unless you are braking hard. With my current setup I can practice heel/toe on the street during spirited driving. On the track the brake pedal would be depressed farther, so I will raise the brake pedal a little and probably leave the gas pedal alone. Getting the floorboard off to do this is easy except for the one screw that is inconveniently located under the gas pedal. You could probably drill an access hole through the pedal, but I just left the screw out. Changing the brake pedal height and adjusting the brake light switch can now easily be done in five minutes. Just double check to make sure you get the pivot clip on securely and tighten the brake rod locknut to keep those nuns safe�
Obligatory warning in the form of a stream-of-consciousness run-on sentence: You need to be smart about this or you may set the brake pedal too low and the gas pedal too high and then when you try and stop the brakes won�t work and the throttle will open and you�ll careen across six lanes of traffic, forcing a bus load of Carmelite nuns off a cliff, incurring the Wrath of God, making the national news in an embarrassing way, shaming your family and making future progeny change their last name and if you�re this kind of person and hopefully you know who you are don�t ever even mess with your car and maybe you shouldn�t drive it either so take up knitting instead and don�t forget the eye protection and tetanus shot.
Okay, now that�s taken care of. This is what I did:
Brake Pedal
I wanted to lower the brake pedal but couldn�t adjust it much because of the brake light switch. It had lots of adjustment in the direction I didn�t need and none in the direction I wanted. I tried bending the switch bracket a little (it�s very soft) and this would work if you were only adjusting the brake rod perhaps half a turn, but bend the bracket any more than that and the switch won�t be pointing at the needed contact point. So I decided to take the switch apart. With a few small flat blade screwdrivers and three hands you can pry the top off and this is what you find.
The solution was to make a new plunger. The original is on the far left and the one I made is next to it. I made it about .35� longer. Now to do this, it�s true it�s not just something you can run and get at AutoZone. But don�t all Real Men have a lathe? Or know someone who does? Or have a kid taking metal shop? Or at least know where a local machine shop is? This job can be quickly done on a manual lathe and doesn�t have to cost a fortune. Take some plastic rod to the machine shop, along with the original plunger and a simple sketch of what you want and when you pick it up bring them a six pack of beer, or soda if you live in Utah (assuming you don�t want to burn in Hell eternally). Actually let�s clear up this thing about Hell. There are two doors. One says �Eternal Fire.� On the other is written �Drive a Ferrari.� But once inside you find the timing belt service is due every day!
I reassembled the switch with the new custom plunger and installed it. Now I have plenty of adjustment to experiment with the pedal height and it�s very easy to change. I started with one and a half turns of the brake rod and this lowered the pedal height around half an inch. I used a multimeter to set the switch, but obviously you can just watch the brake light.
Gas Pedal
This is easy to adjust, but the problem is that if you raise the pedal, you�ll have more travel than you did before and so you could be straining the throttle cable. It�s a skinny little thing that isn�t meant for this; the gas pedal should hit the hard stop on the floorboard when you have WOT, but shouldn�t go past it. I read that some people said you could adjust the pedal higher, then adjust the cable at the engine to lengthen it and avoid stretching. But doing this will lower the pedal again. Think of it this way: There is a designated amount of pedal travel to actuate the throttle. The cable will probably survive small adjustments, but in general, if you raise the pedal height you should also stop the pedal at a higher point so the total travel stays the same.
All this is a good argument for the common practice of just using an overlay pedal or attaching some kind of block to raise the height. Those are fine, as are the totally adjustable replacement pedals, although they look a bit like car design by the Terminator. Something like this is the easiest to do. In fact I had considered a full aluminum pedal set but found I preferred the grip of the rubber brake and clutch pedals and so I wanted to also keep the stock gas pedal, but be able to adjust it however I wanted.
To raise the pedal height you simply loosen the locknut and unscrew the rod. I added several more nuts because it made it easier to gauge how much I was adjusting it. Then I wanted to raise the stopping point so the total travel remained the same. There are two ways to do this. First, there is a stop plate screwed to the floorboard and you can make a new, thicker one. Or, if you�re only raising the pedal a little, you could just put a couple of washers under it to lift it up a bit. The second option is to make a bracket that attaches to the gas pedal itself that in effect lengthens the part of it that hits the stop on the floorboard. Here�s what that looks like:
How do you make these parts? Well, doesn�t every Real Man have a mill? Okay, sorry, maybe you don�t. But anyone that can drill and tap a hole and cut and sand some plastic can make a floorboard stop. For me, I found that after lowering the brake pedal I only wanted to raise the gas a small amount. So currently I just raised the gas pedal stop on the floorboard with some washers, about .09�.
I also wanted the gas pedal to lean a bit more toward the brake pedal. This helps the right side of your foot to not miss the gas when you roll to blip it. But I don�t think you want them too close and I�ve seen really good drivers do just fine with standard pedals, so I didn�t want to go too radical with wings and things just yet. So I made a thin plastic shim. Holding thin parts like this is a challenge. I used double stick tape to hold the plastic on a metal block, then I clamped it at an angle and milled it off. If you don�t have a mill, it would also work to sand it to a wedge shape. Or, I�ll admit this, it works just as well to simply put a washer under one side of the pedal. The wedge I made was thicker on one end by .08�. This moved the top of the pedal by just over ��, which is a subtle yet noticeable change, but I might increase it a little in the future. Note that I have a size 11 foot and if it was smaller I�d want it to lean more. Here�s the wedge I made:
Heel/toe doesn�t work well unless you are braking hard. With my current setup I can practice heel/toe on the street during spirited driving. On the track the brake pedal would be depressed farther, so I will raise the brake pedal a little and probably leave the gas pedal alone. Getting the floorboard off to do this is easy except for the one screw that is inconveniently located under the gas pedal. You could probably drill an access hole through the pedal, but I just left the screw out. Changing the brake pedal height and adjusting the brake light switch can now easily be done in five minutes. Just double check to make sure you get the pivot clip on securely and tighten the brake rod locknut to keep those nuns safe�
 06-03-2011, 02:16 PM
#3
Instructor
Thread Starter
06-03-2011, 02:22 PM
#4
Rennlist Member
Great job with the DIY.
Keep in mind that the optimal position for heel-toe on the street may be different than on the track. Don't forget to re-adjust when you go racing.
Keep in mind that the optimal position for heel-toe on the street may be different than on the track. Don't forget to re-adjust when you go racing.
06-03-2011, 02:59 PM
#5
Race Director

You don't have to make a custom plunger for the brake light switch.
the sensor threads in...just thread it in or out depending on what you do to the pedal. Test with the brake lights and you're done.
the sensor threads in...just thread it in or out depending on what you do to the pedal. Test with the brake lights and you're done.
06-03-2011, 03:18 PM
#6
Pro
Join Date: Dec 2007
Location: was: CA, 956XX now: Bavaria 910XX
Posts: 556
Likes: 0
Received 33 Likes
on
22 Posts
Great mod but how about just trying to bend your heel a bit further over when on the brake. I found out that I was always a bit too careful with the reach from one side to the other until I saw a great video on how other pro's do it. I just copied it and found out that the pedals are actually OK for my foot size.
I'm not sure if you're starting to limit the travel on the gas pedal with that adjustment. Do you still get WOT? You can check with a scan tool if you still get to 80% on the TPS.
Good luck with that mod.
Ed
I'm not sure if you're starting to limit the travel on the gas pedal with that adjustment. Do you still get WOT? You can check with a scan tool if you still get to 80% on the TPS.
Good luck with that mod.
Ed
06-03-2011, 03:32 PM
#7
Instructor
Thread Starter
No, I couldn't do that. The switch was already adjusted almost all the way in so when I lowered the pedal it was impossible to adjust the switch to match. An experienced tech I know told me the switch was often like that and was the limiting factor in adjusting the pedal.
Trending Topics
06-03-2011, 03:38 PM
#8
Instructor
Thread Starter
Great mod but how about just trying to bend your heel a bit further over when on the brake. I found out that I was always a bit too careful with the reach from one side to the other until I saw a great video on how other pro's do it. I just copied it and found out that the pedals are actually OK for my foot size.
I'm not sure if you're starting to limit the travel on the gas pedal with that adjustment. Do you still get WOT? You can check with a scan tool if you still get to 80% on the TPS.
Good luck with that mod.
Ed
I'm not sure if you're starting to limit the travel on the gas pedal with that adjustment. Do you still get WOT? You can check with a scan tool if you still get to 80% on the TPS.
Good luck with that mod.
Ed
And, yes, I still get WOT. The pedal is slightly higher, but I was careful to make sure I still have the exact same amount of cable travel.
 06-03-2011, 05:00 PM
#10
Race Director
No, I couldn't do that. The switch was already adjusted almost all the way in so when I lowered the pedal it was impossible to adjust the switch to match. An experienced tech I know told me the switch was often like that and was the limiting factor in adjusting the pedal.
06-03-2011, 05:37 PM
#11
Instructor
Thread Starter
Stock my brake and clutch pedal were just about the same height. But the brake light switch was already screwed in almost all the way, so lowering the pedal more than about 1/8" was not possible because the switch couldn't be correspondingly adjusted. I have a '96 Turbo; there's probably some variation in the switch bracket, welding, etc.
 06-03-2011, 08:30 PM
#13

the problem with this project is the low cost, the slippery slope should be steep and expensive.
isn't there a new snap-on tool or pedal assembly that needs to be purchased for this to work?
isn't there a new snap-on tool or pedal assembly that needs to be purchased for this to work?
06-04-2011, 02:39 AM
#14
Instructor
Thread Starter
Don't worry. I buy expensive tools at the slightest excuse. The latest was a 1/2" $400 digital torque wrench to check my lug nuts (I already had two smaller digital torque wrenches). In the immediate future I've got my sights set on a new garage floor, a full set of Moduline cabinets and a 2-post lift. I can slide down the slippery slope with the best of them...