Notices
993 Forum 1995-1998

993 steering rack DIY rebuild tutorial

Thread Tools
 
Search this Thread
 
Old 05-03-2016, 09:03 AM
  #91  
BesideTheBox
Rennlist Member
 
BesideTheBox's Avatar
 
Join Date: Dec 2011
Posts: 761
Received 11 Likes on 10 Posts
Default

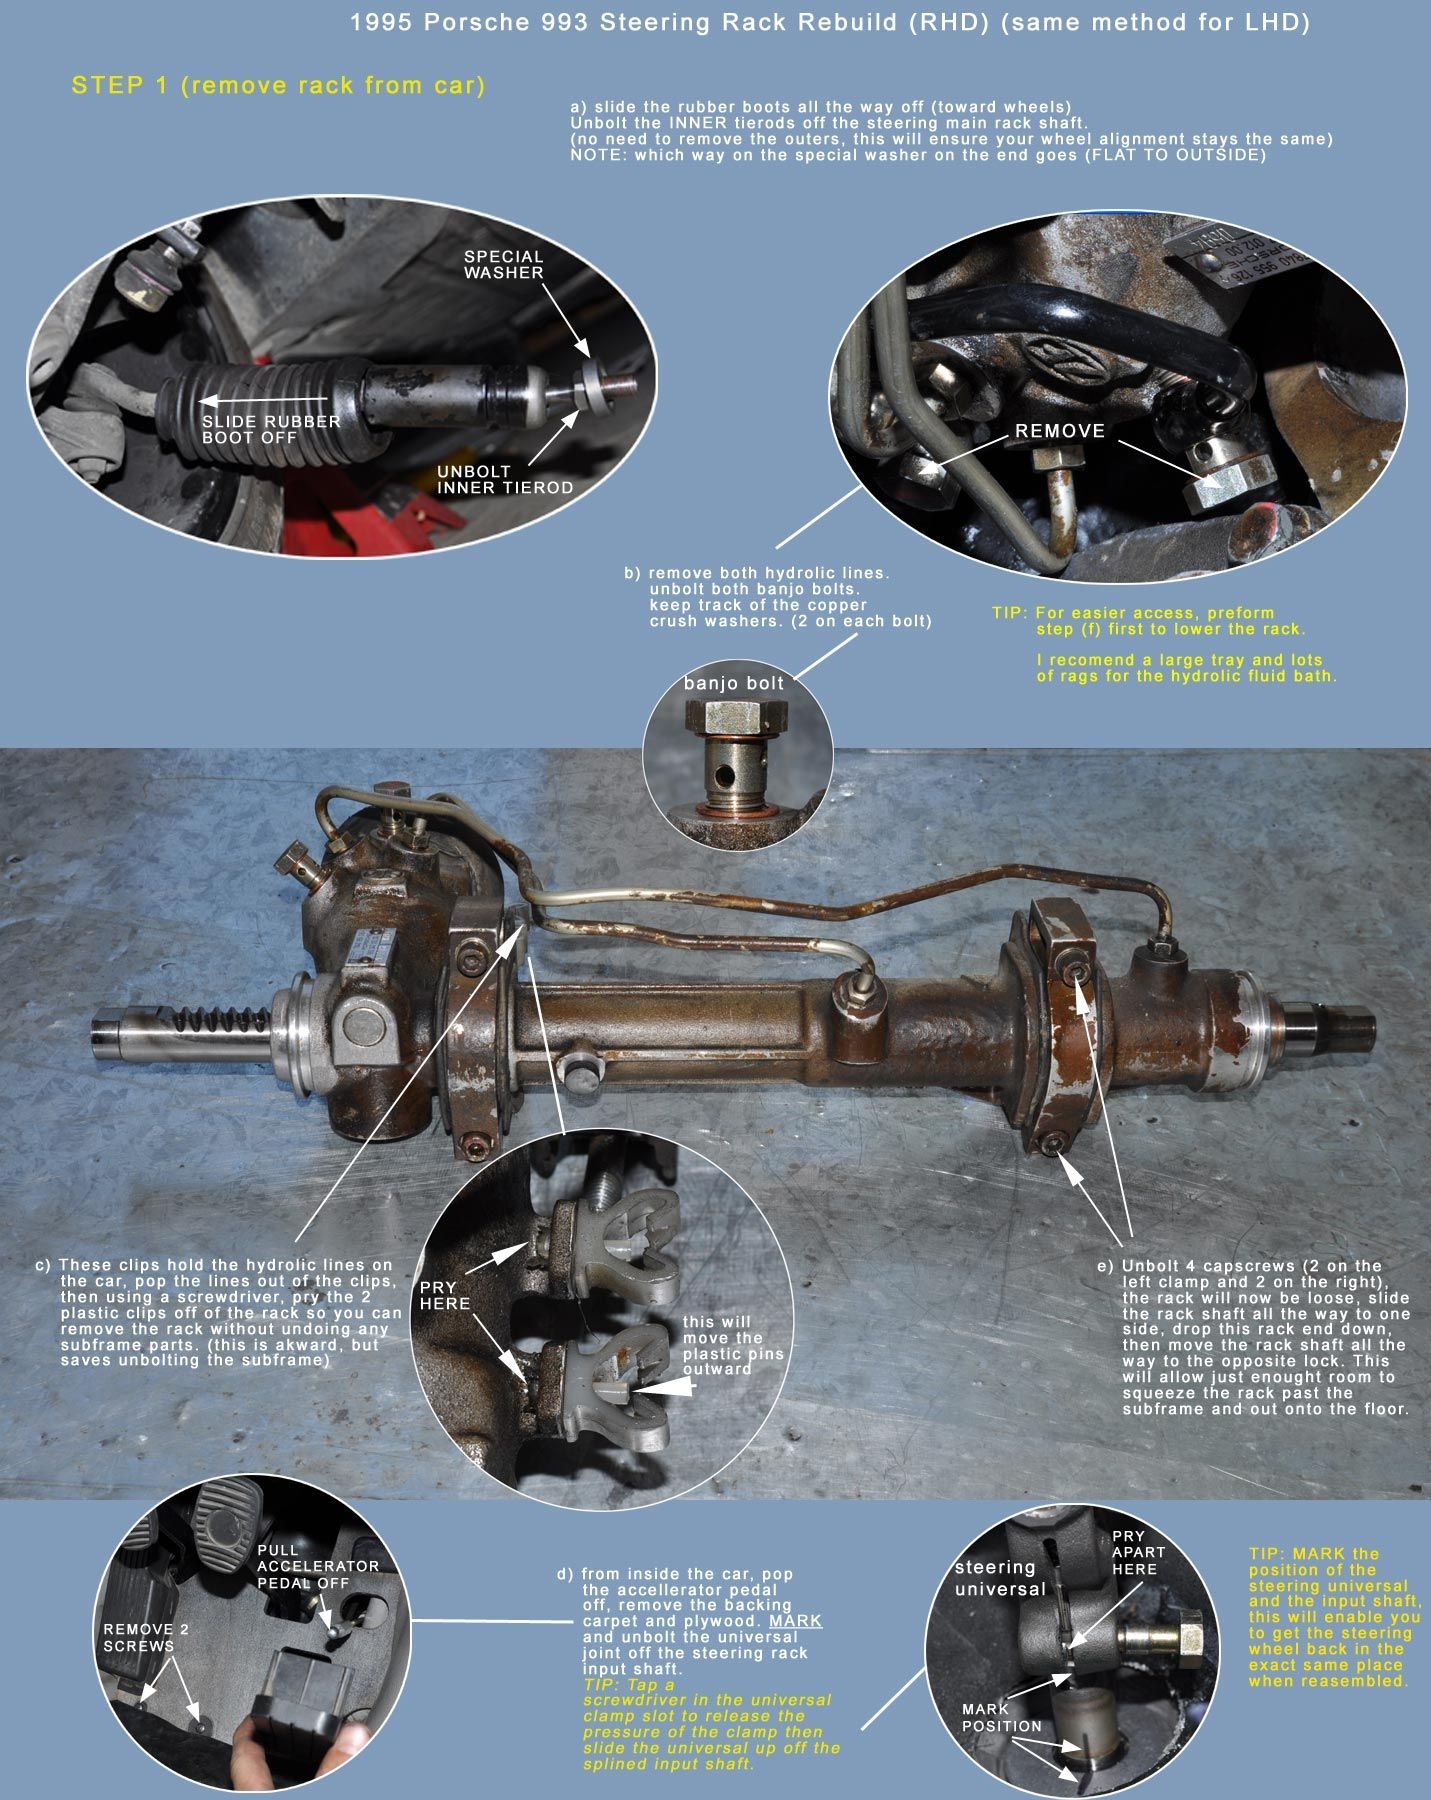
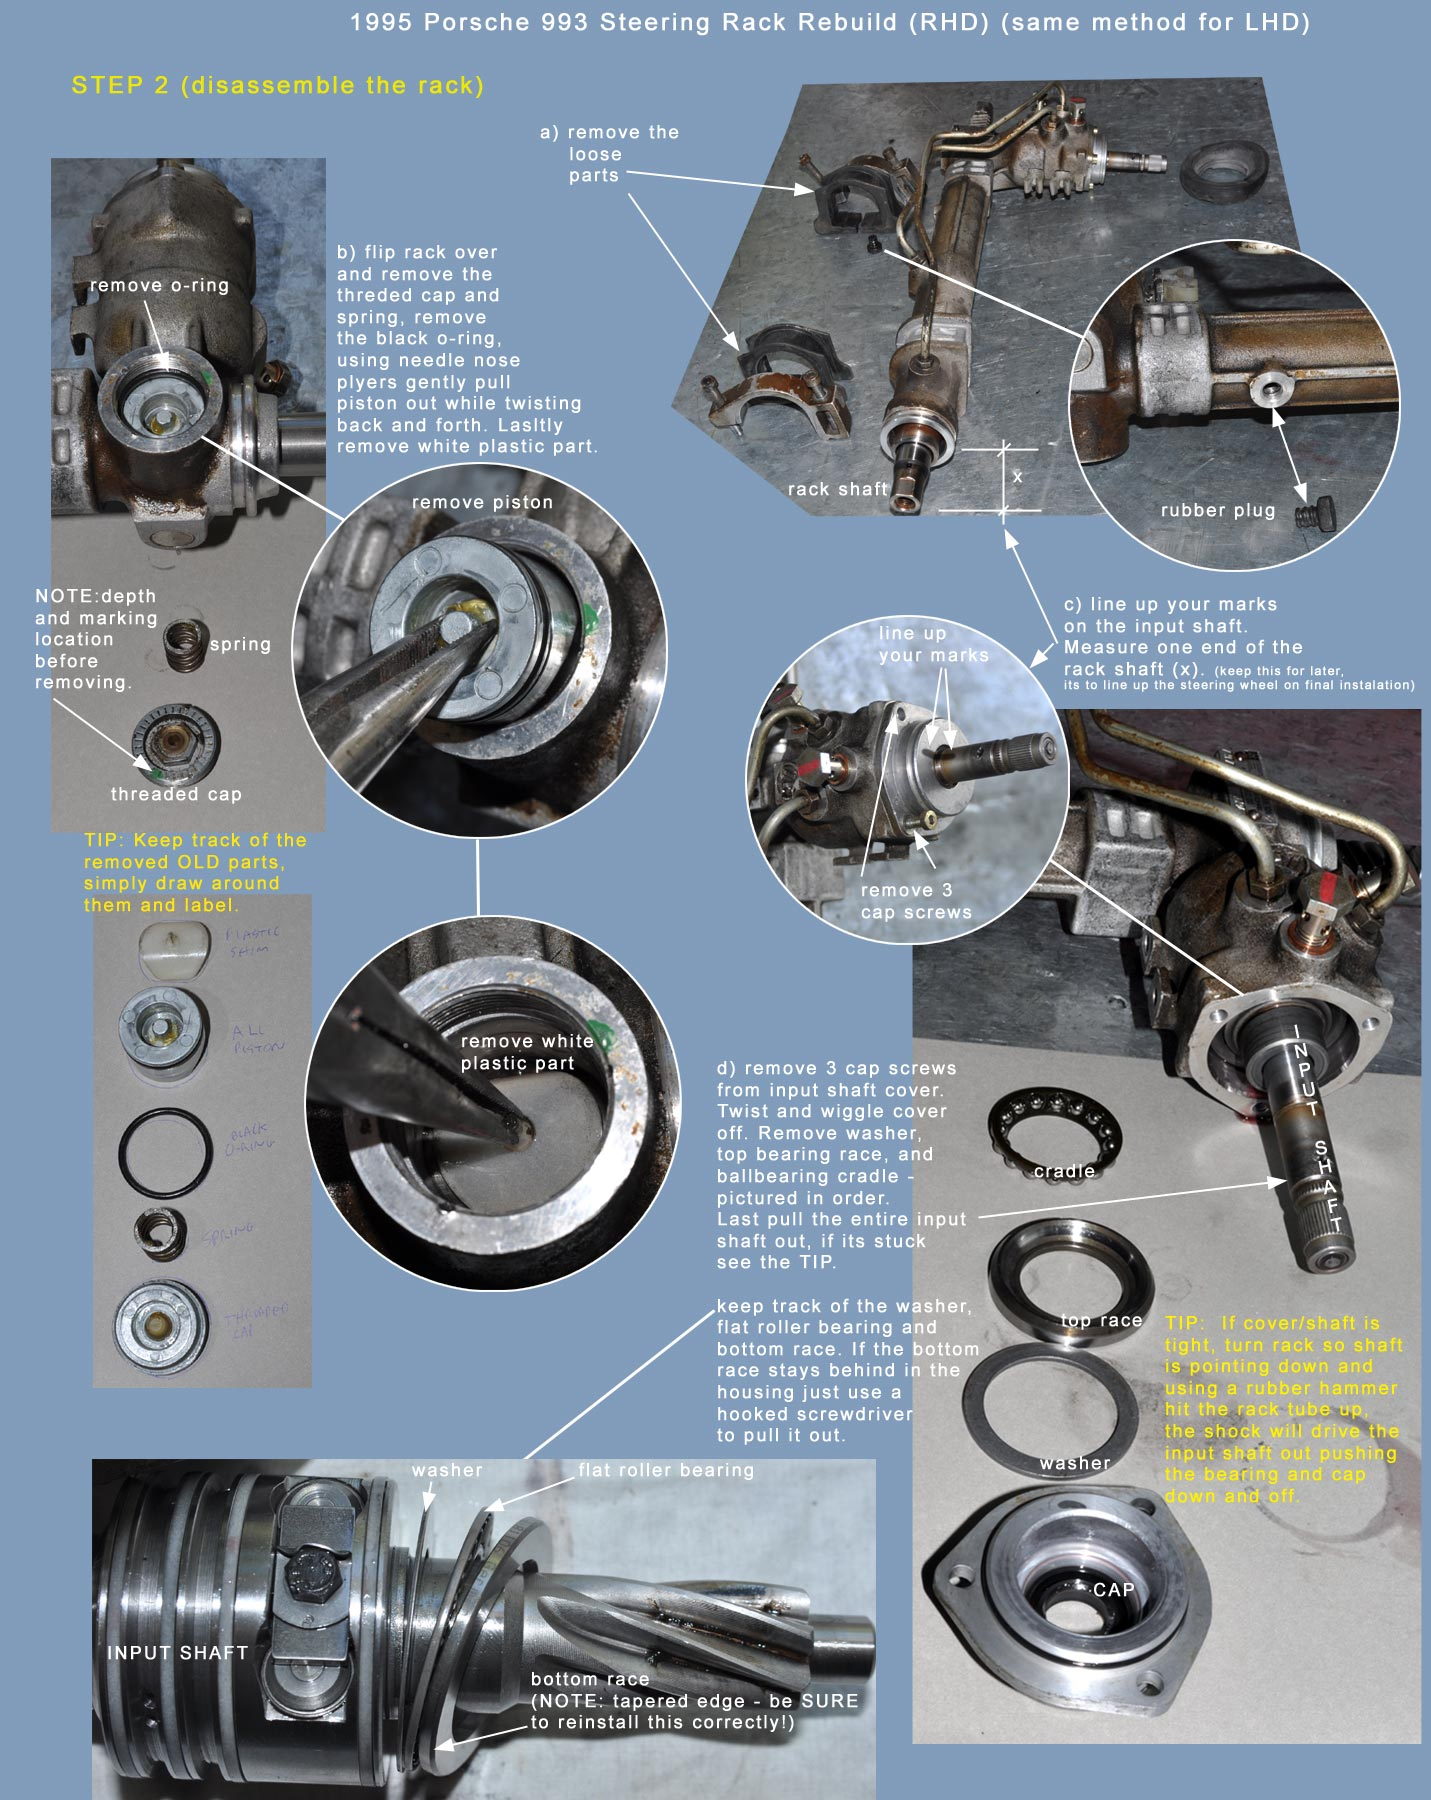
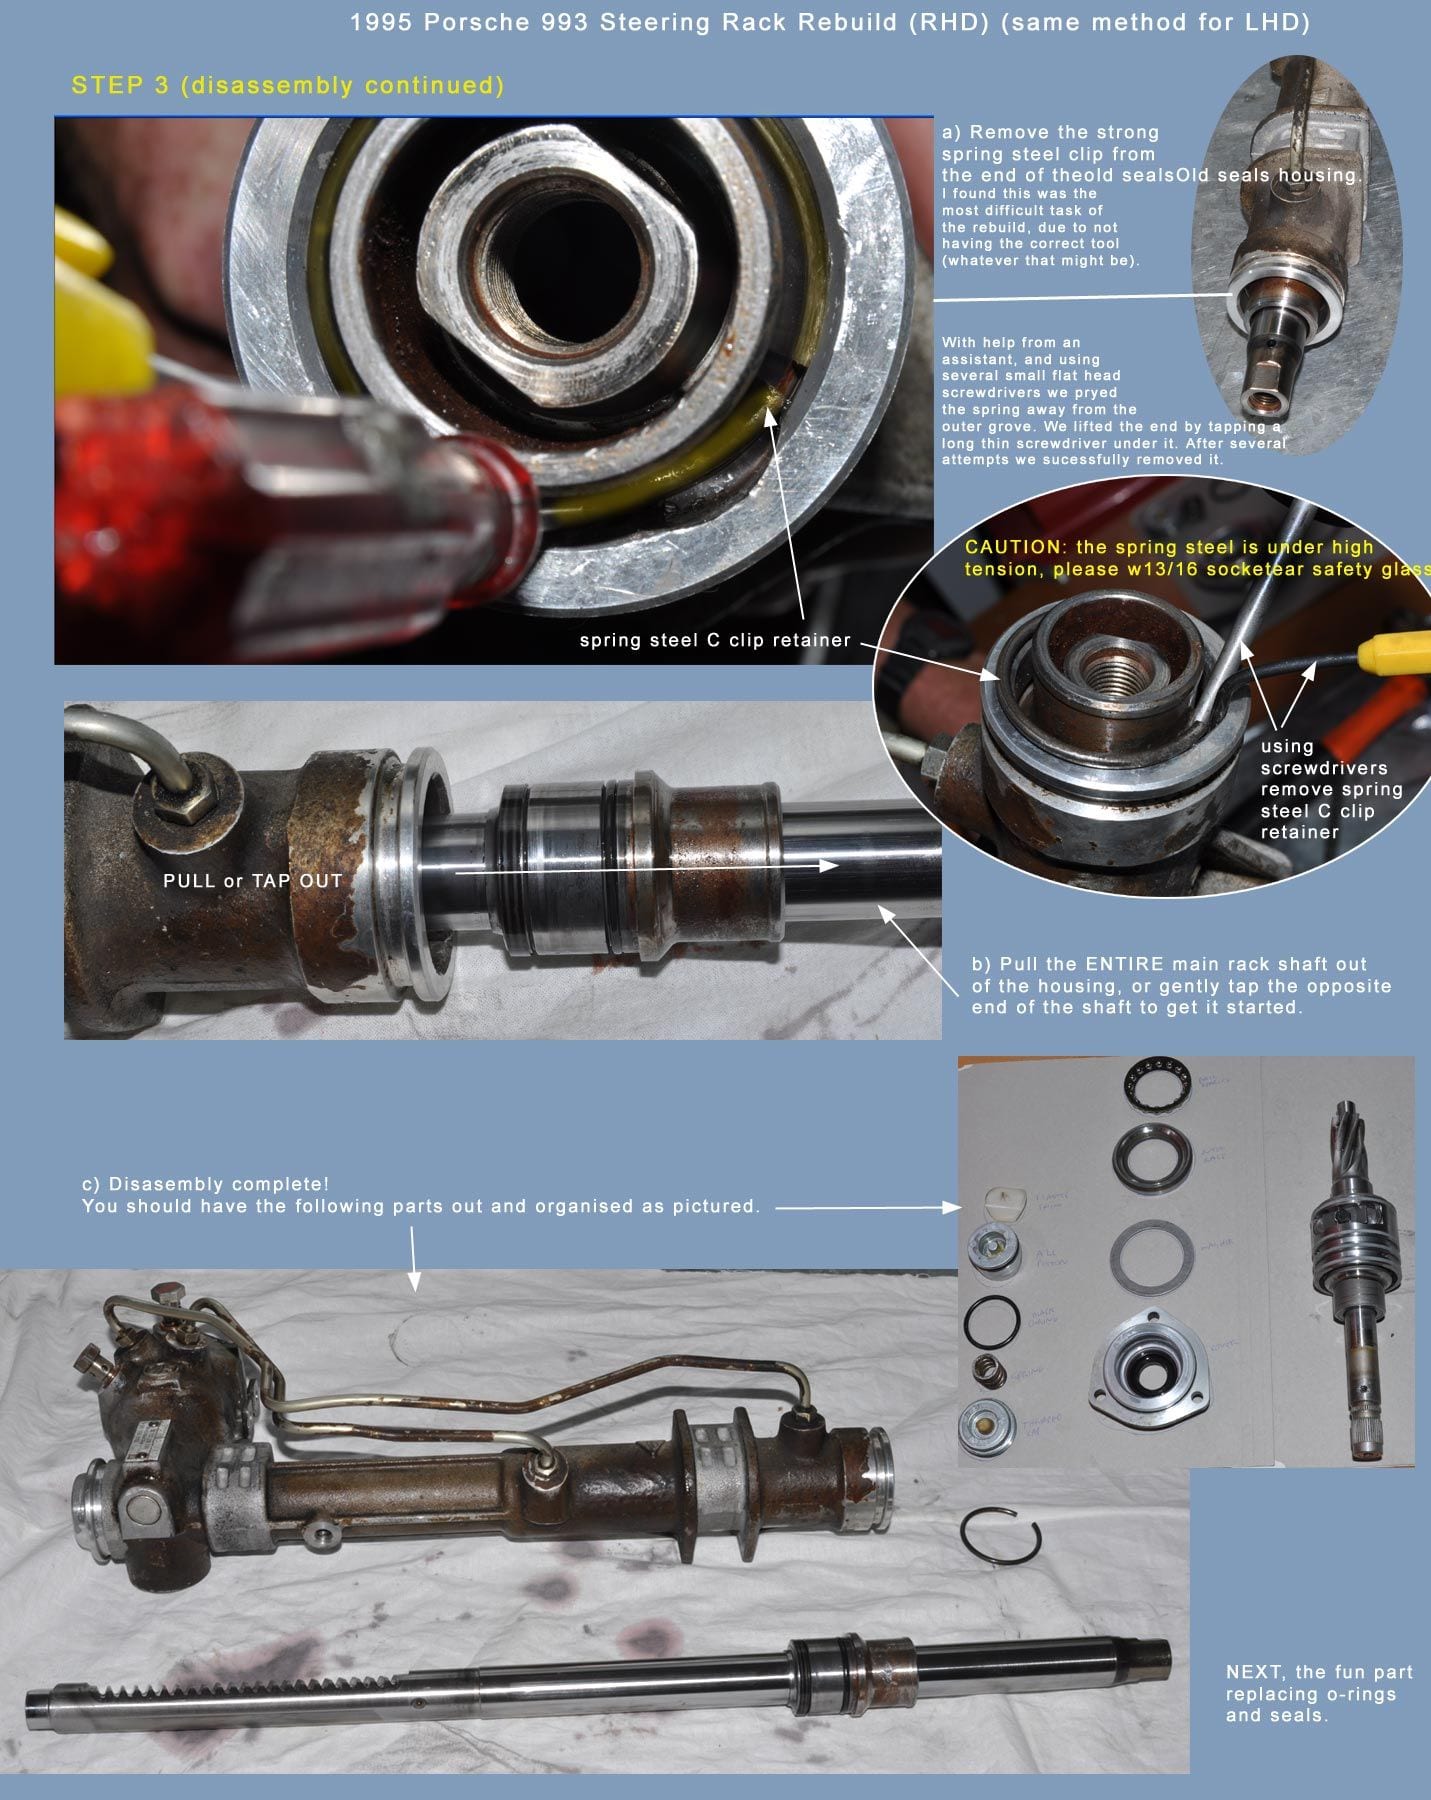
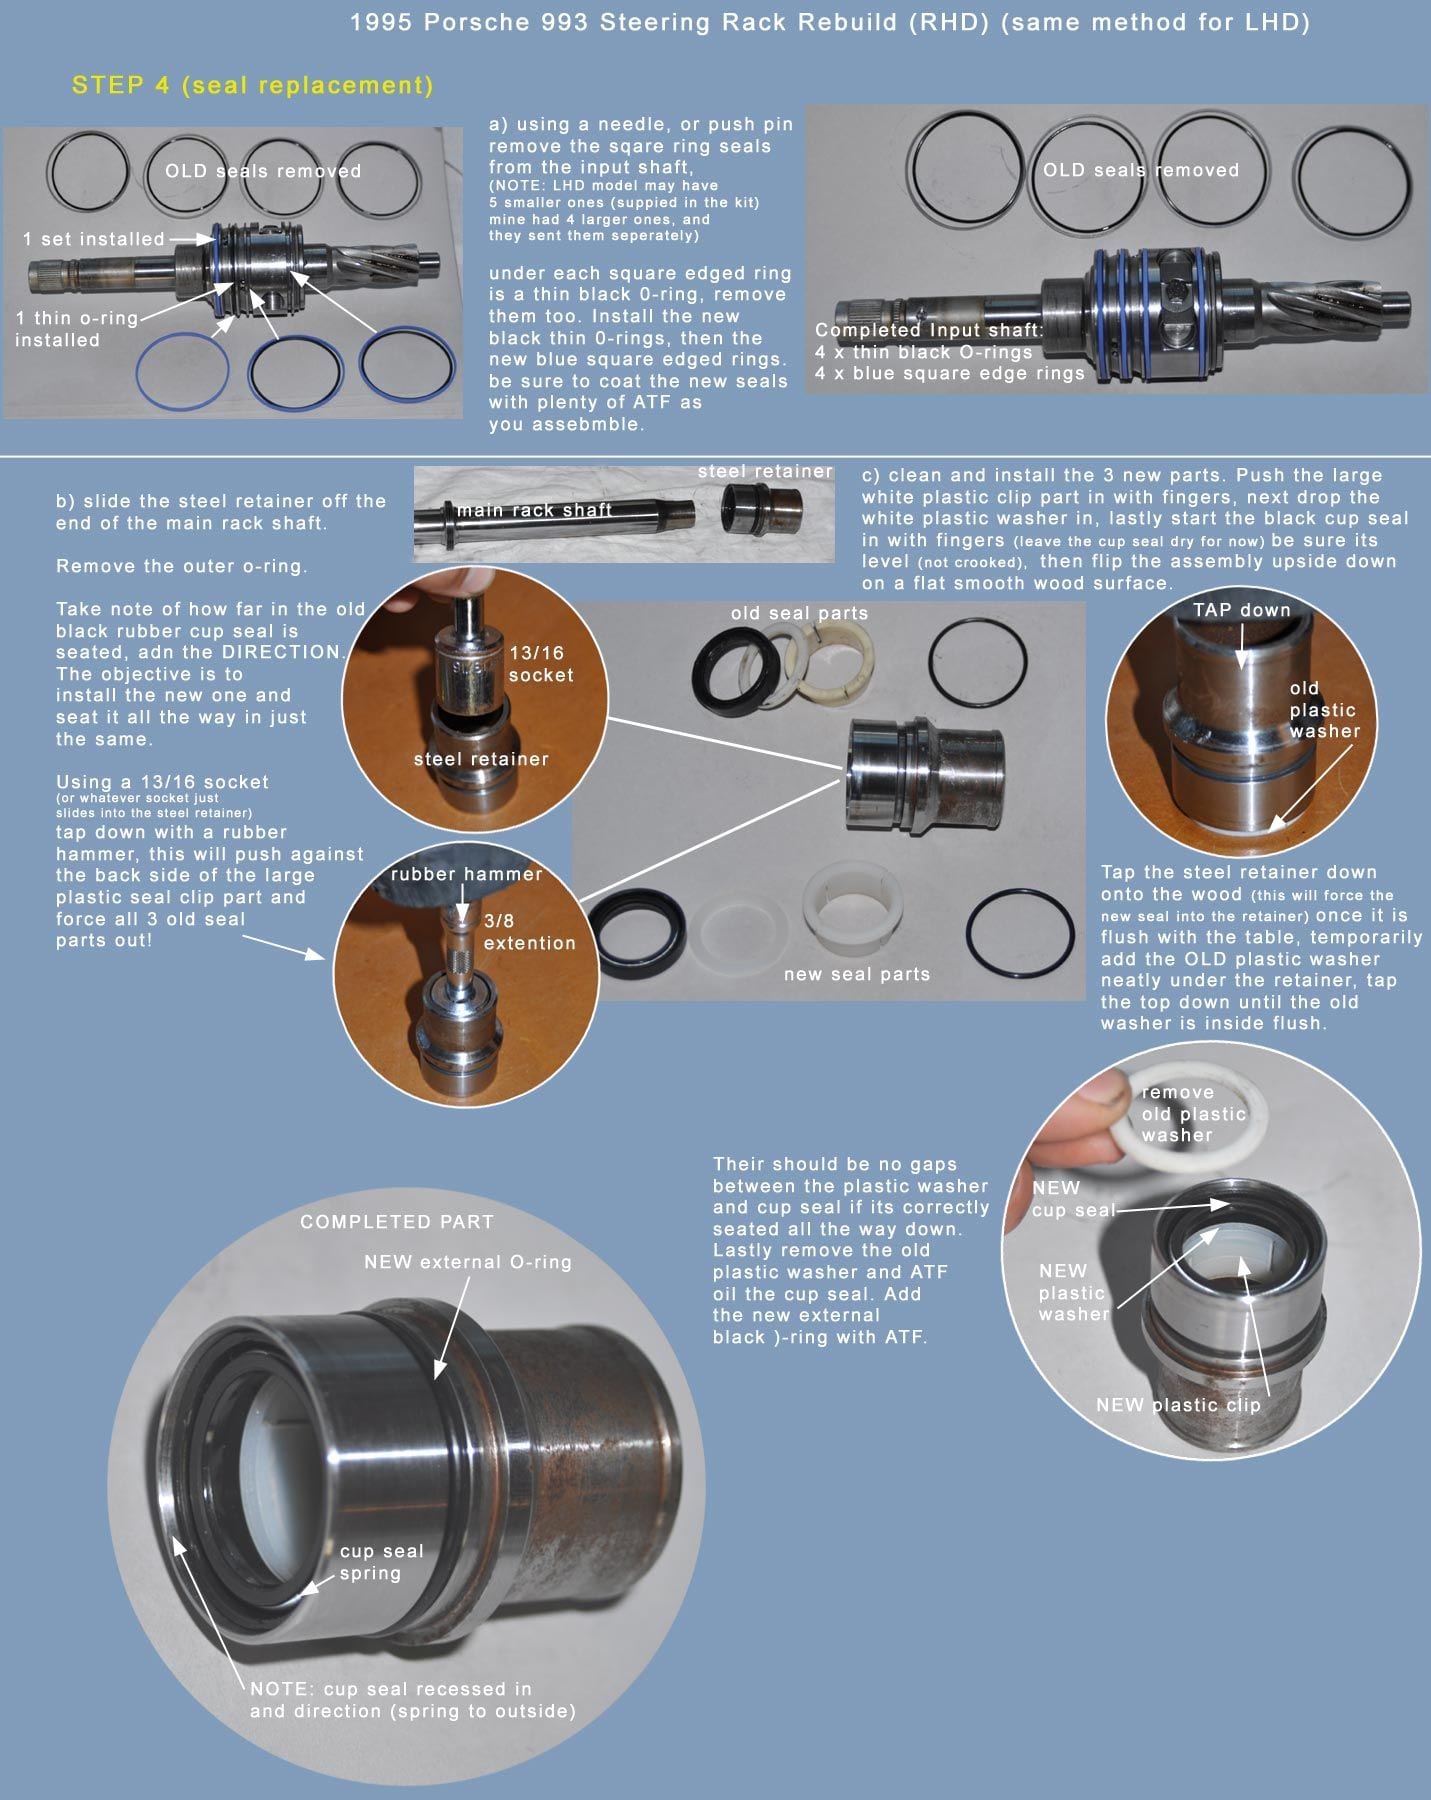
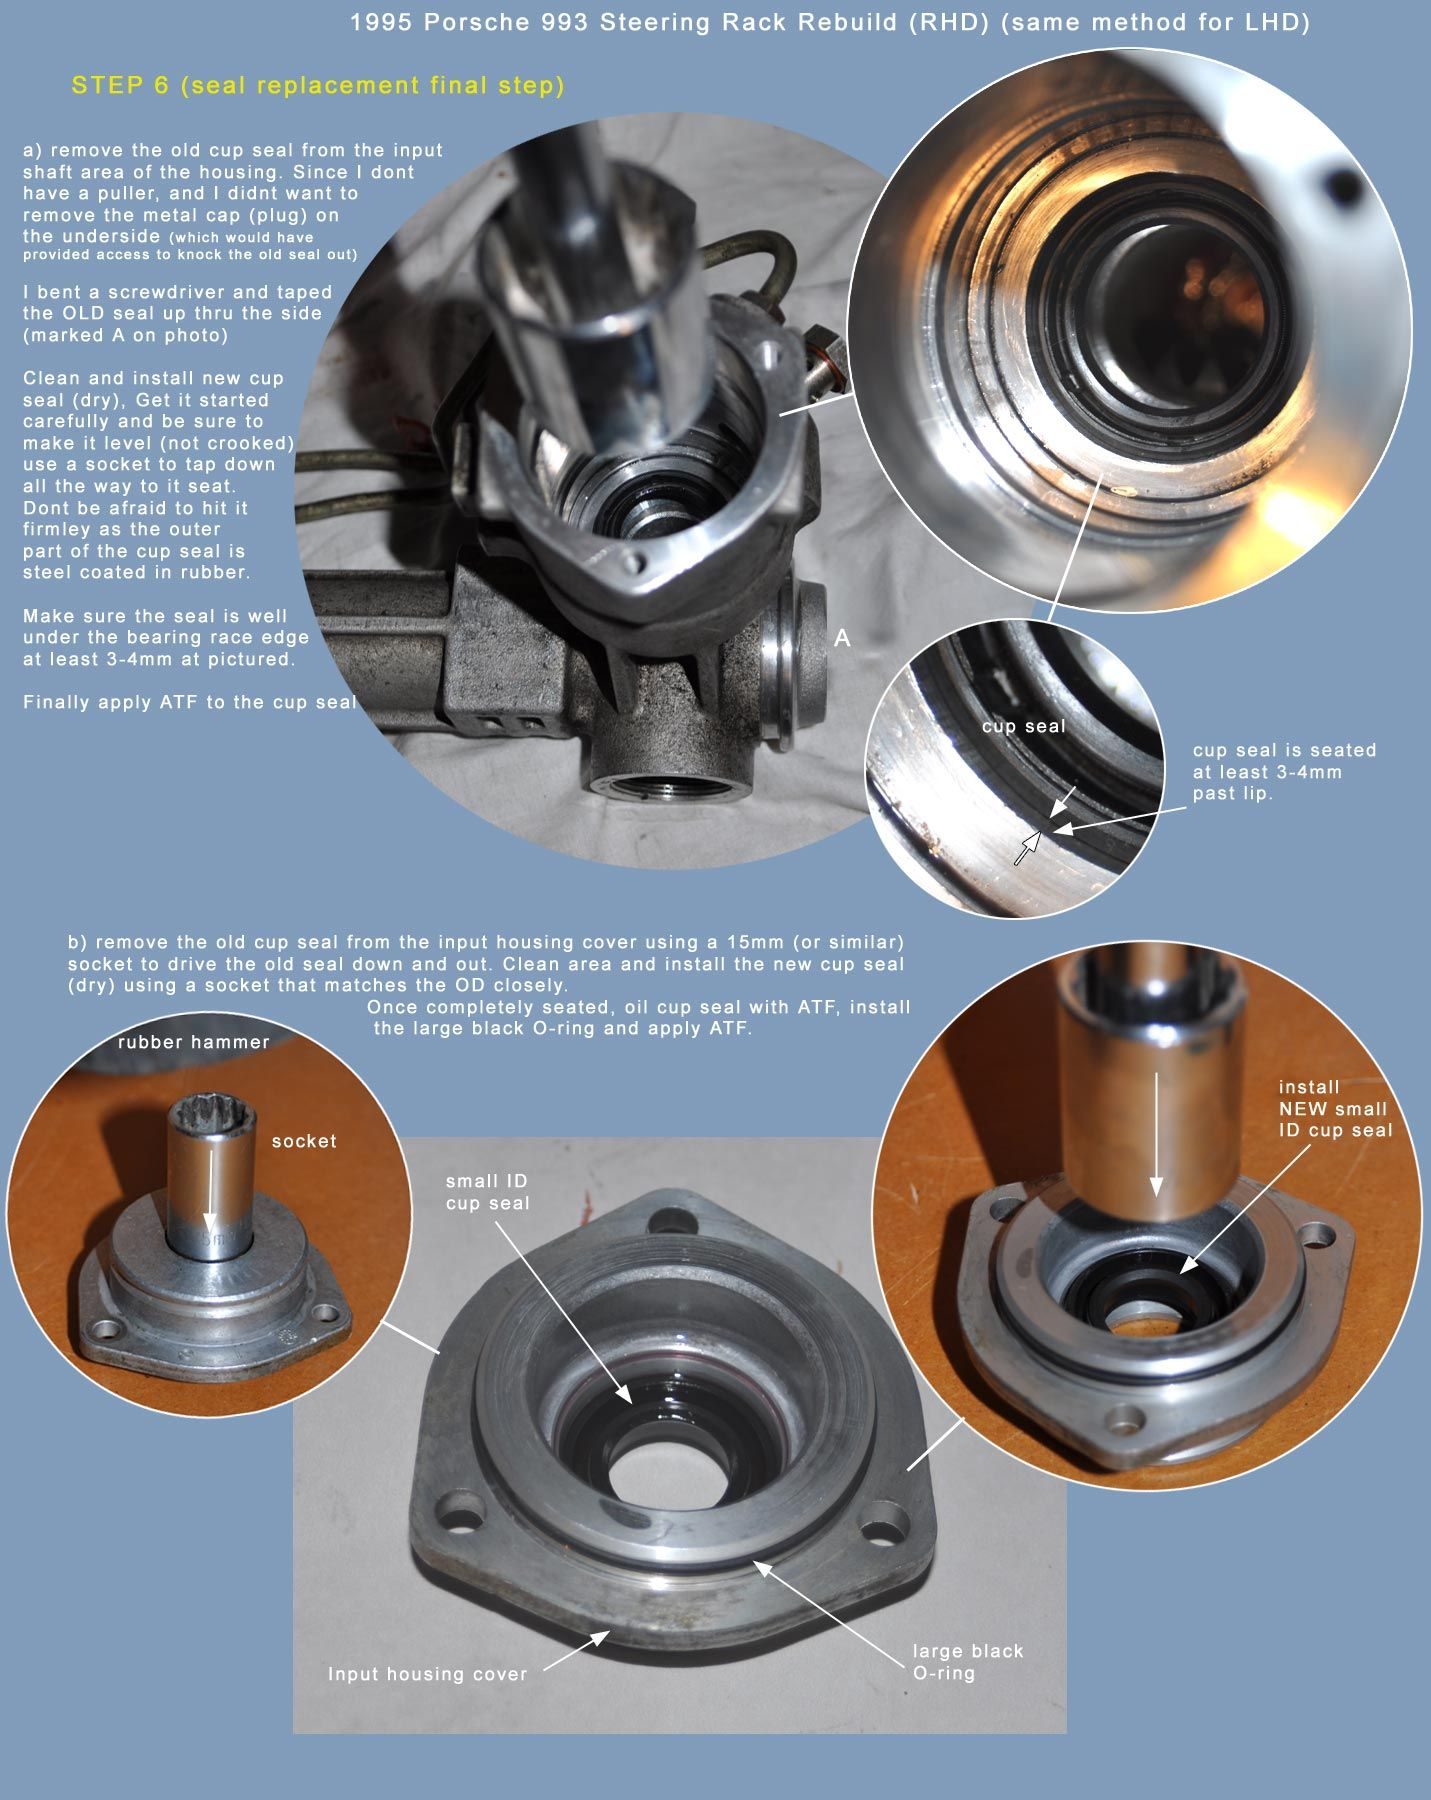
You won't be able to replace any seal without removing the rack and taking it apart. All 'seals' are inside the rack.
You could replace the left steering rack boot though. And this may keep fluid off the garage floor for a while, but it too will fail and start leaking again at some point.

Originally Posted by dsetty
That's kind of my plan, but I was also hoping to replace the left outer seals while the rack was still installed. I can't tell from the instructions or exploded views if they can be replaced without complete disassembly of the rack. I was hoping it would be like replacing a seal on a transmission output shaft or engine crack shaft.
Old 05-03-2016, 09:13 AM
  #92  
dsetty
Intermediate
 
dsetty's Avatar
 
Join Date: May 2004
Location: Madison, WI
Posts: 27
Likes: 0
Received 0 Likes on 0 Posts
Default

No shortcuts for me. I'll get it done this weekend. Thanks for the help!
Old 05-17-2016, 11:43 AM
  #93  
dsetty
Intermediate
 
dsetty's Avatar
 
Join Date: May 2004
Location: Madison, WI
Posts: 27
Likes: 0
Received 0 Likes on 0 Posts
Default done

Rack rebuilt, installed, and tested - no leaks. I'll give it a couple of weeks of driving to be 100%. Meanwhile, my suspension guy will finish up the rear shocks, ride height an alignment.

If you are ever in Madison, WI and need an alignment or suspension work - try Jim at Accurate Alignment. He is truly a master at his craft.
Old 05-17-2016, 11:50 AM
  #94  
dsetty
Intermediate
 
dsetty's Avatar
 
Join Date: May 2004
Location: Madison, WI
Posts: 27
Likes: 0
Received 0 Likes on 0 Posts
Default o-rings

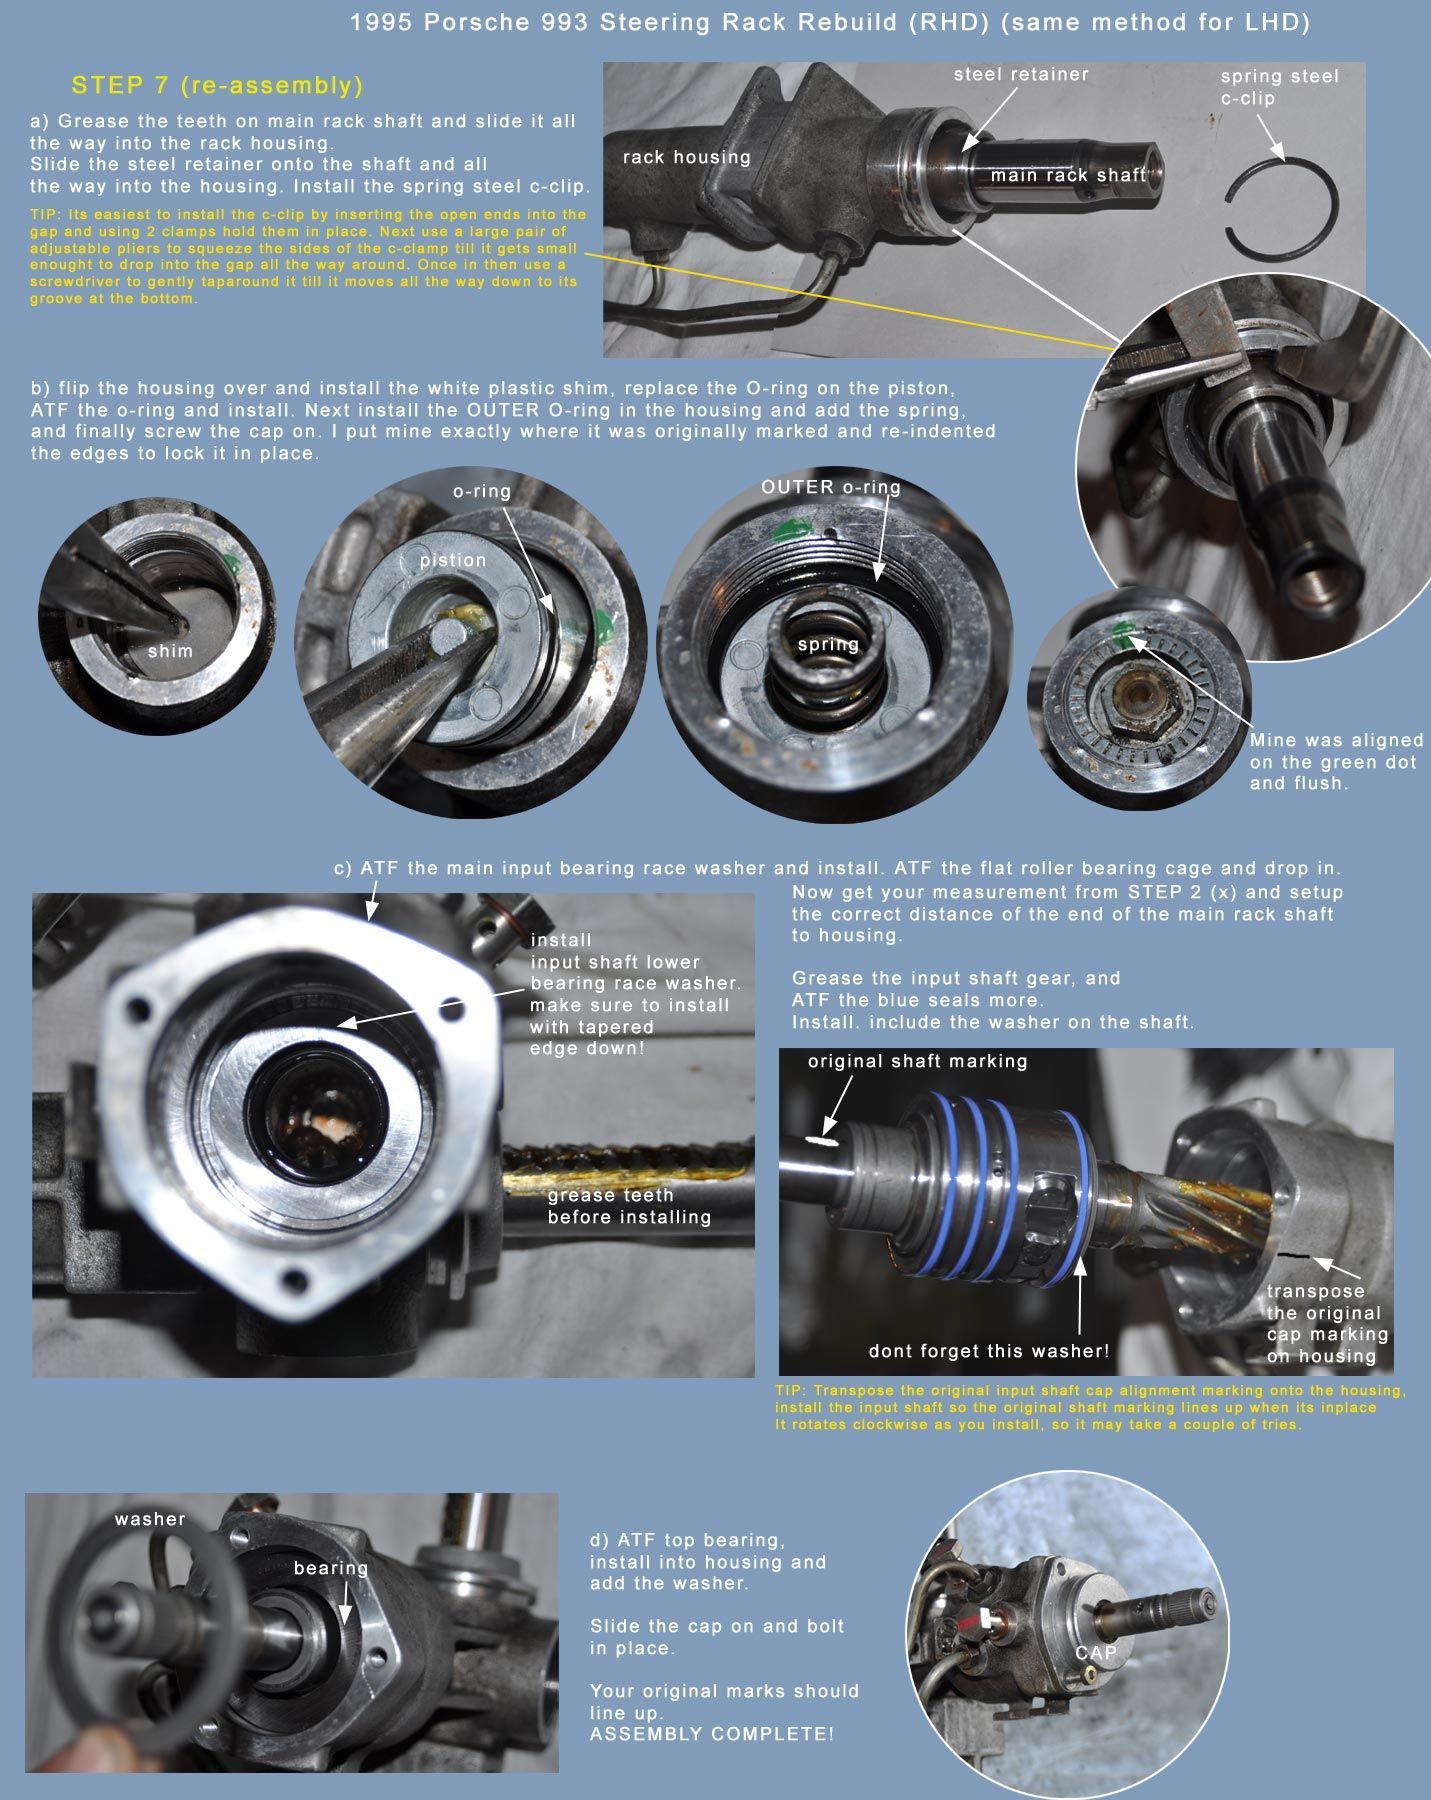
One more thing - if any one knows the part number of the o-rings on the pressure lines that move fluid across the outside of the rack, they are not in the kits and can leak. I struggled to find the exact size, but what I did find was close. I also replaced the 4 washer gaskets at the rack that seal the input\output lines from the pump. Pelican Info:

Copper Sealing Ring, D12 x 15.5
Part #: 12-X-16-X-1.5-CU-M131
Old 05-17-2016, 11:54 PM
  #95  
IainM
Rennlist Member
 
IainM's Avatar
 
Join Date: Jul 2012
Location: Santa Cruz, CA
Posts: 2,101
Received 300 Likes on 231 Posts
Default

I had same problem and bought a selection from McMaster. Picked the one that seemed a bit fatter, smaller ID and larger OD than the ones I took off. Hard to say how much they shrunk in 20 years. But so far, my rebuild has been solid. 7000 miles and counting.
Old 05-18-2016, 03:06 AM
  #96  
magic maker
2nd Gear
 
magic maker's Avatar
 
Join Date: Apr 2016
Posts: 2
Likes: 0
Received 0 Likes on 0 Posts
Default

Great post! I did a swap out a bit ago and have the original rack laying around. Now I think I'll rebuild it with the help of this post.

95 993 current (200K + and still pulling strong)
78 SC past tense (320K +)
74 Carrera past tense (90K ish +)
Old 08-14-2016, 07:43 PM
  #97  
Pichu
Instructor
 
Pichu's Avatar
 
Join Date: Apr 2015
Location: Alberta, Canada
Posts: 211
Likes: 0
Received 0 Likes on 0 Posts
Default

Adding my 2 cents

https://rennlist.com/forums/993-foru...-easy-way.html

Basically remove the 2 metal lines and turn the rack so the driver side rack end is almost hidden. Easy removal!
Old 08-16-2016, 12:38 AM
  #98  
IainM
Rennlist Member
 
IainM's Avatar
 
Join Date: Jul 2012
Location: Santa Cruz, CA
Posts: 2,101
Received 300 Likes on 231 Posts
Default

Update: 10K miles and alls well
Old 10-31-2016, 01:42 AM
  #99  
squidge
Rennlist Member
 
squidge's Avatar
 
Join Date: Sep 2016
Location: Raleigh, NC
Posts: 556
Received 86 Likes on 45 Posts
Default

Cross-posting with my build thread for my suggestions: 1 2
Old 11-08-2016, 08:24 PM
  #100  
PelicanParts.com
Basic Sponsor
Rennlist
Site Sponsor

 
PelicanParts.com's Avatar
 
Join Date: May 2001
Posts: 4,022
Likes: 0
Received 32 Likes on 18 Posts
Default

If anyone has more DIY tech articles with excellent details like this one; check out the below link - we will review the submission and if published on our site, we will give you 10% off and a credit. Please let me know if you have any questions!

DIY PROJECT EXPERT SUBMISSIONS


-Dmitry
__________________
Your Trusted Source For DIY and Parts
FREE SHIPPING over $99 click here
Porsche Parts | DIY Tech Articles | Facebook | Twitter | Instagram | YouTube | Promos
888.280.7799 | 6am - 5pm PST
Old 04-02-2019, 08:01 PM
  #101  
jhg41977
Three Wheelin'
 
jhg41977's Avatar
 
Join Date: Nov 2007
Location: Durham, NC
Posts: 1,670
Received 1 Like on 1 Post
Default

Thanks for putting this together! Mine blew both sides last night. KLA still has these seal kits and he was kind enough to overnight them to me so I can get the car repaired in time for the track next week!
Old 09-13-2021, 04:05 PM
  #102  
Sdgg993
Rennlist Member
 
Sdgg993's Avatar
 
Join Date: Apr 2021
Posts: 109
Received 32 Likes on 15 Posts
Default

Does anyone have working links to all of the steps listed in this write up? I am getting a "page not found error" when clicking all of the links.
Old 09-13-2021, 09:14 PM
  #103  
krish
Instructor
 
krish's Avatar
 
Join Date: Jan 2002
Posts: 243
Received 10 Likes on 3 Posts
Default

Woah, resurrected thread...

You're in luck. I kept a copy of bcaway's clearly documented process on my laptop. Bear in mind it's instructions for a RHD. Very similar to LHD but with some differences in both parts and process which have been documented in this thread.

It's a solid fix, mines been good for going on ten years now.

Good luck.

cheers,
Krish


The following 2 users liked this post by krish:
Kein_Ersatz (09-20-2021), nk993 (09-14-2021)
Old 09-14-2021, 11:02 AM
  #104  
BesideTheBox
Rennlist Member
 
BesideTheBox's Avatar
 
Join Date: Dec 2011
Posts: 761
Received 11 Likes on 10 Posts
Default

Thank you to krish for posting the information.
The information is also still available on the KLA industries website.
https://www.klaindustries.net/techni...rack-instr.htm
The following users liked this post:
krish (09-14-2021)
Old 09-15-2021, 05:16 PM
  #105  
Sdgg993
Rennlist Member
 
Sdgg993's Avatar
 
Join Date: Apr 2021
Posts: 109
Received 32 Likes on 15 Posts
Default

Thanks everyone.. Now I have one more question. Unfortunately I didn't have the Universal joint tied down well enough in the footwell and the entire piece came out. I got that back in place with no issue.

The problem is I am pretty sure I over rotated my steering wheel and potentially broke the Airbag contact pin. Does anyone know the best way to figure out (without opening up the steering wheel) if its broken, AND also figure out where the straight or neutral steering wheel position should be?


Quick Reply: 993 steering rack DIY rebuild tutorial


All times are GMT -3. The time now is 09:03 PM.