help with plug wire DIY w/pic
 10-10-2007, 08:42 PM
#1
Instructor
Thread Starter
Join Date: Dec 2006
Location: Daytona Beach, FL
Posts: 241
Likes: 0
Received 0 Likes
on
0 Posts
Started the plug, wires, caps, and rotors DIY this week and things are progressing with only a few bumps. So far was able to get the cap screws lose hardest was the bottom one but none stripped!
Next changed all the plugs out. Was unable to get the muffler bracket and engine shroud off easily so aborted that in fear of stripping or breaking off bolts that are in very bad locations to extract etc. (I am finally learning my lesson with these things and know when to say when). I was able to get all the plugs changed out despite this. Not sure how old they were but looked pretty good still. Removed Beru 14FR-5DTU. Replaced with Bosch FR-5DTC. I was having some trouble keeping the socket extension attached even with electrical tape so I came up with another idea that others here might find useful. For the really tight access plugs on the PAX I used a swivel plug socket and attached a 3 inch extension. I used some silicone adhesive to hold them together and let it dry overnight and it no longer came apart even when trying to dislodge the socket from the plug which you want to be very snug. I dropped this all into the valve cover hole and the extension stuck out about 1 inch when completely on the plug. Then attached my stubby 3/8" rachet handle.
Now moving on to the wires but have a few questions before removing the old ones. I'm following Robins DIY but it's done on a V-ram car and mine is a my95 non-V-ram and things are located somewhat differently. There seems to be less room under the intakes than with the varioram. Even if I remove the intakes it may not help the situation on the drivers side.
I am haviing trouble figuring out how to remove and replace the wires running over the engine behind the alternator fan. There appears to be two mounting blocks there with screws but there is not enough clearance to get even a very small ratchet screwdriver as suggested in the DIY between the intake and the screw. Before I damage something I wanted to ask if anyone has any suggestions here.
Also, the PAX wires go over and under the AC bracket. If I I remove the front bolt can I get this bracket to move to get more room here? Here is a pic not the best but those who have been there will recognize the problem.
Thanks!
Last edited by mbb993; 10-10-2007 at 09:44 PM.
 10-10-2007, 11:54 PM
#3
Rennlist Member
I have been told that it is a viable option to loosen the intake manifold and lift it up a few inches to gain more access. I have been procrastinating on this job though.
10-11-2007, 09:19 AM
#5
Instructor
Thread Starter
Join Date: Dec 2006
Location: Daytona Beach, FL
Posts: 241
Likes: 0
Received 0 Likes
on
0 Posts
And I thought by doing the plugs FIRST I was getting the hard part out of the way! HA
 10-11-2007, 10:02 AM
#6
Addict
Rennlist Member
Rennlist Member
I think messing with the intake makes this job even more complex and is rife with oppotunity to really cause bigger problems. I don't think it's necessary.
10-11-2007, 10:32 AM
#7
Here are pics of how the ignition wires are routed with the intake off. It's for a 95. I think you would have to remove the intake to replace the wires. It's not too difficult, except for couple of vacuum hoses in the back.
Trending Topics
10-11-2007, 11:28 AM
#8
Addict
Rennlist Member
Rennlist Member
I found a way to do this on my 95 without taking off the intake.
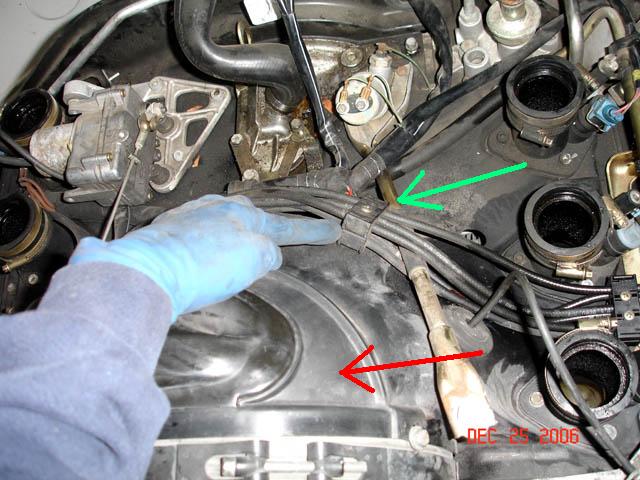
Remove the fan shroud - red arrow.
With an offset screwdriver, loosen the mounting screw on the wire clip just one of two turns. Green arrow (there are two clips attached to the shroud.)
With a large screwdriver, pry the clip from the plastic shroud. Very easy.
Pop it back in once you have the new wires fitted.
I did not originate this method but it saved a lot of work.
10-11-2007, 11:37 AM
#9
Addict
Rennlist Member
Rennlist Member
I did not reinstall those clips with my new wires. Once they were off, I wanted them off forever. I used those wire clips from regular car parts stores to keep the wires together and just fed them behind the fan. I made it pretty tidy too. Will be much easier to deal with in the future.
10-11-2007, 11:48 AM
#10
Drifting
I found a way to do this on my 95 without taking off the intake.
Remove the fan shroud - red arrow.
With an offset screwdriver, loosen the mounting screw on the wire clip just one of two turns. Green arrow (there are two clips attached to the shroud.)
With a large screwdriver, pry the clip from the plastic shroud. Very easy.
Pop it back in once you have the new wires fitted.
I did not originate this method but it saved a lot of work.
10-11-2007, 12:19 PM
#11
Marlon,
It was a big case of "while you're in there". I pulled the engine to look at a sticky clutch. Well, while I'm in there...a lightweight flywheel. And as long as I'm in there, two of the cylinders have more leakdown than I'd like....so apart comes the engine for valve works and re-ring.
Yes, I spent my Christmas rebuilding my engine.
10-11-2007, 12:24 PM
#12
Instructor
Thread Starter
Join Date: Dec 2006
Location: Daytona Beach, FL
Posts: 241
Likes: 0
Received 0 Likes
on
0 Posts
I found a way to do this on my 95 without taking off the intake.
Remove the fan shroud - red arrow.
With an offset screwdriver, loosen the mounting screw on the wire clip just one of two turns. Green arrow (there are two clips attached to the shroud.)
With a large screwdriver, pry the clip from the plastic shroud. Very easy.
Pop it back in once you have the new wires fitted.
I did not originate this method but it saved a lot of work.
Remove the fan shroud - red arrow.
With an offset screwdriver, loosen the mounting screw on the wire clip just one of two turns. Green arrow (there are two clips attached to the shroud.)
With a large screwdriver, pry the clip from the plastic shroud. Very easy.
Pop it back in once you have the new wires fitted.
I did not originate this method but it saved a lot of work.
Ok, thanks axl911 these pics are a great help. WOW, with the entire intake off this looks like a piece of cake!
A few questions. First how does removing the fan cover help and how do I do it? Second, were you able to get the wires under the AC bracket or did you have to unbolt that to do it?
BTW Dudly, how do you do that great trick drawing arrows on those pictures?
10-11-2007, 12:59 PM
#13
Addict
Rennlist Member
Rennlist Member
Mark, Just 3 bolts release the Fan Shroud -BTW - I bet yours is cracked around the boot and needs to be replaced (they all crack after 10 years or son as the rubber drys out). As I remember, you may not even need to remove the shroud. I did to compress the pastic achors of the harness clip with a pair of needle nose pliers as I pried them out from above. Looking back, I think you could skip this step.
I forgot - To mark the photos, I import them in to a paint program and draw arrows.
I forgot - To mark the photos, I import them in to a paint program and draw arrows.
10-11-2007, 01:39 PM
#14
Instructor
Thread Starter
Join Date: Dec 2006
Location: Daytona Beach, FL
Posts: 241
Likes: 0
Received 0 Likes
on
0 Posts
Mark, Just 3 bolts release the Fan Shroud -BTW - I bet yours is cracked around the boot and needs to be replaced (they all crack after 10 years or son as the rubber drys out). As I remember, you may not even need to remove the shroud. I did to compress the pastic achors of the harness clip with a pair of needle nose pliers as I pried them out from above. Looking back, I think you could skip this step.
I forgot - To mark the photos, I import them in to a paint program and draw arrows.
I forgot - To mark the photos, I import them in to a paint program and draw arrows.
I got it now. The fan shroud came off easy and is in fine shape. Was likely replaced by PO, looks too good. Had that problem on my 964 as well. Anyway, removing it gives more visibility and now I can see how the plug wire clip holders are attached. I did not really understand before, now it is very clear. I seems they can be pryed out with a flat screwdriver. I will try to loosen the screws a few turns to reduce the chance of enlarging the mounting holes in the plastic. I think I might now be able to sneak the wires/boots under the AC bracket w/o unbolting it. I'll keep you posted.
Last edited by mbb993; 10-11-2007 at 02:05 PM.