Engine removal update (oil return tubes)
 02-22-2005, 04:38 PM
#1
Three Wheelin'
Thread Starter
HI all,
today I replaced 3 out of the 4 engine oil return tubes. Two were in really bad shape, and the third one was not looking good. The fourth one didn't need replacement as it was still in good shape. The reason is that cylinder 4 was replaced, probably by the previous owner or may be the factory before they sell the car. I discovered that when I saw "Neu cyl" written beside the cylinder.
So yesterday following the DIY on pelican parts I removed the three tubes without any problem.

This morning I started replacing the tubes the more to the front, because they were easier to access and I thought this would be a good training before replacing the last one situated between the engine and the heat exchanger. Heat exchanger I din't want to remove to avoid braking a stud in the cylinder head.
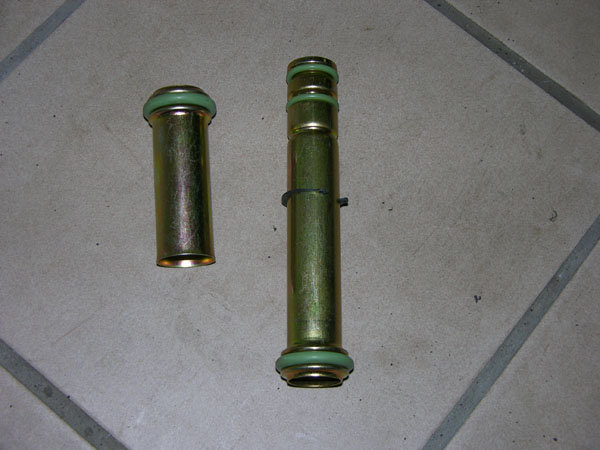
Here is the kit:

and the details of an expandable tube:
I tried different tools without success. Went downtown to find a tube clamp or something more useful and small enough!!!
I used a kind of tube pliers with long arms. And with it I finally placed the two first tubes quite easily.

Then I tried the rear left tube. I initially placed it with the big tube on the engine side like the other one I did. This looks more logical seen the oil flow direction. But after spending all my afternoon trying to expand it, I was close to give up.
I finally decided to place the big tube on the cylinder head side.
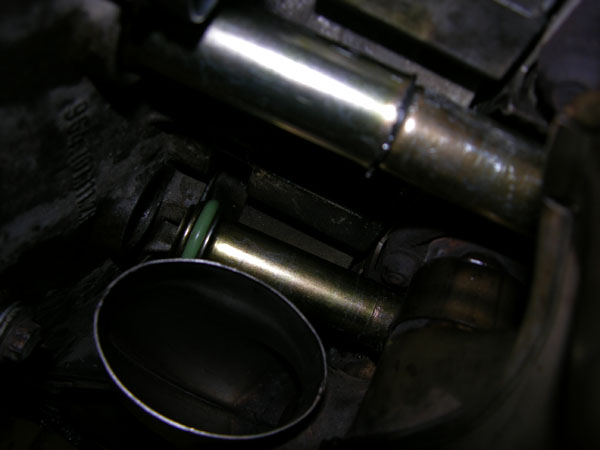
I was then able to use the heat exchanger to push the tube in place with a screw driver pushing on the big tube lip . On the other side I used my pliers to maintain the small tube in place. It worked perfectly and in 10 minutes the tube was in position!!!

In conclusion: it took me half an hour for the two front tubes, and all the afternoon for the rear one. The fact that I finally decided to place it reverse shouldn't have negative effect as far as the seals are in good shape. The part of the small tube which slide inside the big one has a lip wich protect the seal from a direct flow. So...we'll see how this will work when aging.
I then put the heating tubes back in place, the oil lines to the tank in the rear right wing, and this is how the car looks now

Tomorrow there is not much left to do: the rear cross member, the suspension...and the car should be on its wheels!
today I replaced 3 out of the 4 engine oil return tubes. Two were in really bad shape, and the third one was not looking good. The fourth one didn't need replacement as it was still in good shape. The reason is that cylinder 4 was replaced, probably by the previous owner or may be the factory before they sell the car. I discovered that when I saw "Neu cyl" written beside the cylinder.
So yesterday following the DIY on pelican parts I removed the three tubes without any problem.
This morning I started replacing the tubes the more to the front, because they were easier to access and I thought this would be a good training before replacing the last one situated between the engine and the heat exchanger. Heat exchanger I din't want to remove to avoid braking a stud in the cylinder head.
Here is the kit:
and the details of an expandable tube:
I tried different tools without success. Went downtown to find a tube clamp or something more useful and small enough!!!
I used a kind of tube pliers with long arms. And with it I finally placed the two first tubes quite easily.
Then I tried the rear left tube. I initially placed it with the big tube on the engine side like the other one I did. This looks more logical seen the oil flow direction. But after spending all my afternoon trying to expand it, I was close to give up.
I finally decided to place the big tube on the cylinder head side.
I was then able to use the heat exchanger to push the tube in place with a screw driver pushing on the big tube lip . On the other side I used my pliers to maintain the small tube in place. It worked perfectly and in 10 minutes the tube was in position!!!
In conclusion: it took me half an hour for the two front tubes, and all the afternoon for the rear one. The fact that I finally decided to place it reverse shouldn't have negative effect as far as the seals are in good shape. The part of the small tube which slide inside the big one has a lip wich protect the seal from a direct flow. So...we'll see how this will work when aging.
I then put the heating tubes back in place, the oil lines to the tank in the rear right wing, and this is how the car looks now
Tomorrow there is not much left to do: the rear cross member, the suspension...and the car should be on its wheels!
Last edited by Toga; 12-31-2006 at 11:55 AM.


