When you click on links to various merchants on this site and make a purchase, this can result in this site earning a commission. Affiliate programs and affiliations include, but are not limited to, the eBay Partner Network.
I didn't read through all the posts, so forgive me if this was already mentioned, but as an FYI, you can remove the rubber mounts from the newer style frame they sent you and install them in the old frame.
Of course, this just started happening on my 95 Cab....it strikes me there are 6 options:
1) Stick some compressible substance on the frame of the airbag retaining frame (silicone, rubber tubes, shrink wrap, etc)
2) Order the new "wrong sized" frame for the 96 and up models and pry out the rubber grommets
3) Order the replacement grommets from Zim at 22 bucks the grommet. (Really???)
4) Replace the entire wheel with a nifty 3 spoke or 4 spoke wheel.
5) Order the entire "new" airbag assembly from Porsche for the low, low cost of $2,200
6) Or my favorite....ask my fellow Rennlisters....any idea of from whom Zim is sourcing the grommets? They are surely not making them. Dimensions? Identifying marks on them? Then we can point people to the grommet maker!!! They look as though they are diaphragm grommets.
If my grommet maker approach fails, I suppose I'll resort to prying the new grommets out....bah.
After researching the issue on this wonderful forum, I decided to order the replacement bushes/ grommets from Zims, figuring that I don't know which airbag bracket my '95 cab has in it, and if it's the early one, I'll have to go down the Zims route anyway (because I'm not spending $2K+ on the new design airbag that will fit in the current shaped airbag bracket, which is the only one now available).
It turns out that my airbag frame is actually the current one and so I decided to remove the old grommets and fit the new ones.
Not a great idea. For starters, the old grommets have an aluminium bushing in them, and are very, very well glued to the original aluminium ring which was pressed into the frame at the time of manufacture. The upshot, is that even with the tedious removal of the old grommets with a scalpel etc, I am going to end up with a much better outcome by buying a new bracket with the correct grommets properly fixed into place.
In summary, I would only look to go down the Zims route if I had one of the old brackets and didn't really have any choice.
Also, those users who are trying to source the OEM for the Zims grommets, I say forget it - they look like they are custom made to match the existing (although judging by their slight crudity, probably a very low volume run). Also, although Zim are expensive at $20+ each grommet, I think that they're entitled to charge a premium for the initiative and effort of manufacturing what will be an essential, but low demand component for us enthusiasts.
Last season I bought a new frame and removed the grommets and pressed into my old '95 frame. Was quite easy to remove new ones with the right sized socket as a drift. The fix worked fine on the street but at autocross with cornering forces approaching 1G the horn would go off. At first it was fun, a happy car with an audible G meter but it got old in a hurry.
I have the frame off again and I'm filling the rubber disc channels with a flexible adhesive - E6000 was the one available at OSH. Won't know if the fix works until AX starts again in March but thought I'd share this experience. Cut to the chase and fix your existing rubber grommets.
Quick update: horn is almost too stiff now. I used to be able to honk with a single thumb without moving my hands. Now I need to press hard in the center
if I was doing it again, I'd only fill the channel on one side of grommet
however, still haven't pulled any 1G turns......
If you have a volt meter you can test your fix before putting the aigbag and battery back. Once you remount the frame with your fix, test continuity between the frame and any metal area of the steering wheel while pressing down the frame (as you use the horn). This should let you know if it's too stiff or still too soft.
The areas around the mounting holes are bare metal and with failing grommets, the frame and the steering wheel can easily make contact. Beside adding spacers as a fix, i also put selfstick foam (or electrical tape) paper to cover these areas. This way the contact is made only from the nubs as designed.
Hello all, I just worked on this fix using spongy foam tape and it seems to produce satisfactory results. Someone asked for a DIY with pictures so here it is:
993 Airbag frame rubber grommet fatigue quick fix
Symptoms: Horn honks under hard braking Cause: Rubber grommets weaken over time and allow inertia of airbag to close contacts with horn mechanism on the back of the frame. Early 993 frames are hard to find and grommets are difficult to replace because they are very securely attached. Materials: Torx T30 screwdriver, 17mm socket, Firm or Super Firm Sponge Tape (closed cell 3/16� thick, cut 4 squares at least �� x ��) Safety Risks: electric shock, airbag deployment if not disconnected Heads up: do not test this fix with the ignition key on until you get the airbag reconnected because it will throw an airbag fault code that will require resetting. If needed, use a continuity meter to test, or just listen to the contacts when you press on the horn. Time: 30 min or less if you learn from my mistakes. . .if I can do it, anyone can do it.
DIY Procedure:
Disconnect battery as per the manual and ensure energy is dissipated before proceeding. I disconnected both terminals and then briefly touched the cables together to ensure no remaining stored energy in the car. Remove the 2 airbag fasteners using a Torx T30 screwdriver bit. They are accessed from the reverse side of the steering wheel as you are looking at it from the driver�s seat (i.e. side that faces the dash board). One fastener per spoke in my car. Turn the steering wheel so the spoke is pointing down toward the floor and feel for the hole. Poke the T30 bit in and feel around until it engages with the fastener head. Don�t bother extracting the fastener from the steering wheel spoke. It�s captive by a washer that won�t pass through the back plastic. Once completely loosened, rotate the wheel 180 degrees and do the same for the other fastener. Be careful not to let the airbag fall or you could break the wires.
Now sit in the driver�s seat and remove the airbag, but remember it�s connected with wires. Carefully remove the red plug in the center on the back side of the airbag unit. . .pull straight out on the plastic plug and it will come loose. You might need to wiggle or gently pry if it�s stuck. Now you can set that aside to access the frame. Disconnect the horn wire (attached to terminal just left of the center hole on the metal frame. Another wire connector just right of center can be disconnected if it�s in the way. Now use a 17mm socket to remove the 4 bolts holding the airbag frame in place. Remember those two T30 Torx you unscrewed? They are just hanging through the back of the frame so be sure to put them somewhere safe. . . you�ll need them later. Turn the frame around and look at the 4 grommets. Notice that next to each one is a little metal nub. Those are the horn contacts for each of the 4 corners so you can push it from any position. When the rubber gets old, it loses resistance and the inertia of a fast stop carries the frame forward and honks the horn. What we want is something that is deformable and spongy that assists the rubber in resisting that inertia, but still allows you to press the horn and make contact when needed. It also needs to extend a little beyond the rubber grommet to cushion the frame around it, because presumably the rubber is not going to hold forever. Too much resistance from excess thickness and you have to punch the airbag to honk the horn, too little and it will automatically honk at every hybrid car (you know which one) that causes you to brake sharply . . .hmmm, that could be marketed as a feature.
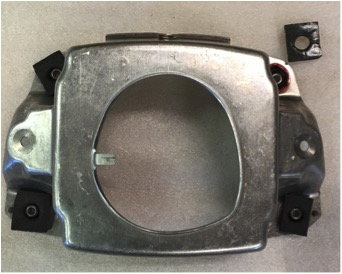
Cut some of the 3/16� thick sponge tape (Figure 1) into squares about �� x �� . Cut or punch some center holes to allow them to slip over the grommet spacer tubes (Figure 2). Be sure you stick these on the correct side of the frame that has the horn contact nubs because it won�t do any good on the other side. For the center holes, it might work to just poke a hole with a screwdriver and rely on the bolt to compress it, but I was concerned it would add additional distance between the frame and horn contacts. Make the horn contact nubs are clean (could even apply electrical grease if needed) and be sure the foam tape doesn�t overlap and interfere with them. Figure 1. Foam tape works quite well because it�s spongy
Figure 2. Airbag frame shown flipped over top to bottom to show back. Horn wire connector at left. Note that the metal spacer tubes in the grommets are still original height. The foam tape simply provides a little more spring/cushion to resist movement between the frame and the steering wheel. Be sure to leave the horn contact nubs uncovered near the grommets.Warning. . . do not test this fix with the ignition key on until you get the airbag reconnected because it will throw a fault code that will require resetting. If needed, use a volt meter to test, or just listen to the contacts when you press on the horn.
Now, sit in the driver�s seat and get put frame in the correct orientation to fit up. But before you do, push those Torx T30 through the back of the frame toward you, in the same orientation as you removed them, so they can be tightened when the frame is set back into the steering wheel. They will not go in through the back of the steering wheel spoke because the plastic access hole is smaller than the metal washer on the fastener. If you forget, you will have to remove the airbag fit them back in place. I know this from experience. Tighten the 17mm socket head bolts to secure the frame to the wheel. Once secure, push the corners and test it for feel. You should hear the horn contacts touch at each of the 4 corners with moderate pressure. You shouldn�t have to apply excessive pressure though.
Reconnect the horn wire and other wire if removed, then bring the airbag close and push the red wire connecter into the back center. Take care to orient it so it doesn�t pinch, and tuck it in as you refit the airbag. Turn the steering wheel to access the airbag fastener holes and use the Torx T30 screwdriver to hunt for the airbag fasteners and get them to align with the threads. It takes a little patience. Reconnect the battery and test it out in the garage and in a safe place on the road. If you use your horn frequently (i.e. New Englander or New Yorker) or brake heavily to avoid collisions with lozenge-shaped hybrid cars, you might need to renew the foam every few years. Now celebrate with a toast to money saved!
Hi forum, I just wanted to say thanks as I replaced my horn grommets this weekend. I bought the Zim's grommet and used the socket punch out method. Worked like a charm. A few notes. Disconnect the airbag wire from the airbag. I was trying to pull the plug from the steering wheel hub and its locked on there pretty good. Easier to pull from behind the airbag. It pulls straight out. The Zim's are actually metal with the rubber moulded into them. When I first got them I thought they were all rubber. No wonder they were so hard. After I buttoned everything back up, there was very little play when pushing down on the airbag. At first I thought I made everything too tight, but I think that's how it was when new, and the play I got used to was just because the old rubber was worn. Anyway I push on the airbag and the horn works, so all went well. Now I can pass the Texas State inspection! Thanks again for all those that did the hard work of figuring out the procedure.
 10-04-2011, 02:02 PM