When you click on links to various merchants on this site and make a purchase, this can result in this site earning a commission. Affiliate programs and affiliations include, but are not limited to, the eBay Partner Network.
With the aftermarket trim rings, sometimes people use an adhesive and to much to boot - they are then very hard to get off.
Chances are some of the adhesive bonded to the CF panel.
A light tab of bathroom caulk is best used - easy to get off and won't take the paint off the gauges if a customer decides he doesn't lie them any more.
Oh no. That's probably it. Perhaps going around the outside of each gauge with a plastic tool of some sort might break the glued connections. Gauge bulbs do burn out regularly, so at some point this unfortunate project will have to be tackled. Yuk.
Seems like the best bet is remove the clock again then just keep pushing the speedo from the back until it surrenders. Same for the others. You *might* be able to replace the fuel gauge bulbs without removing if you're good at working blind. I'd say 50-50 chance of destroying the CF piece.
EDIT: I just realized the CF is probably OEM, because my prior 993 looked exactly like that, except without the trim rings. I don't recall if I ever removed the gauges, so I'm not sure if there's any special trick.
With the aftermarket trim rings, sometimes people use an adhesive and to much to boot - they are then very hard to get off.
Chances are some of the adhesive bonded to the CF panel.
A light tab of bathroom caulk is best used - easy to get off and won't take the paint off the gauges if a customer decides he doesn't lie them any more.
+1 Yes, I painted to match trim rings added to my car. held in by three very small dollops of silicone bath calk behind them, Have stayed in place for ten years now and can be easily removed at any time. I know this because I had to remove the odometer once to fix the crumbling gear issue.
Something like this:
Follow,up:
My attempts to remove the instruments were done with the Carbon Fiber and the trim rings REMOVED.
The carbon fiber trim (from 1998) is designed to go over the instrument gaskets. There is a cut away groove on the backside of the facia around each opening for the gasket. There is no adhesive used to hold the trim rings
I am in California, so it is not cold here.
I do appreciate all the points of view and ideas and I will try again at some point. The instruments are visible with the factory lights bulbs, but The LEDs make for a big improvement.
The carbon fiber was an experiment. I just had it in the car for a few hours to photo for an ebay listing.
It is out now.
update: my independent mechanic said to bring the car to him. He is confident he can safely remove the 4 stuck instruments (the clock is half in/out at the moment).
I was planning to add LED lights to my 96 993 instruments. It took me an hour to get the clock out. I could not budge the speedometer and gave up after another hour plus trying from the front and back of the instrument. I do not want cause damage.
Is there a technique I am not aware of?
BTW, while I had the clock out I tested the clock with the LED lights and compared to my other instruments ... they were considerably brighter.
I am curious what type of LED light bulbs you ordered?
I had a set of the B8.4D-W from SuperBrightLeds and they just don't have enough of the sideways spread to illuminate the dials properly.
Interesting. When I had the clock out I tried the LEDs and the brightness was a big improvement and the dispersion seemed fine. Granted the clock is a smaller device than the tach or speedo. I would hate to go through all the effort and not be pleased with the results. Did you go back to incandescent?
Interesting. When I had the clock out I tried the LEDs and the brightness was a big improvement and the dispersion seemed fine. Granted the clock is a smaller device than the tach or speedo. I would hate to go through all the effort and not be pleased with the results. Did you go back to incandescent?
The ones you got are different then the ones I got 5 years ago and are similar to this style. (see pic on the right) SuperBright don't sell them anymore. They had a viewing angle of 100�.
Yours have a viewing angle of 120� so you may experience better results.
I still have the original bulbs but just ordered a set of new incandescent ones, so yes going back to the stock bulbs.
The incandescent bulbs have a spread of beyond 180� so they may just work better in the "air-cooled" dials I think.
All my gauges look great with bulbs I got from superbright. Except the tach, so I addded 5 more LEDs. I documented it with pictures on this forum recently.
Cant recall the bulbs I used but they were b4 something or other.
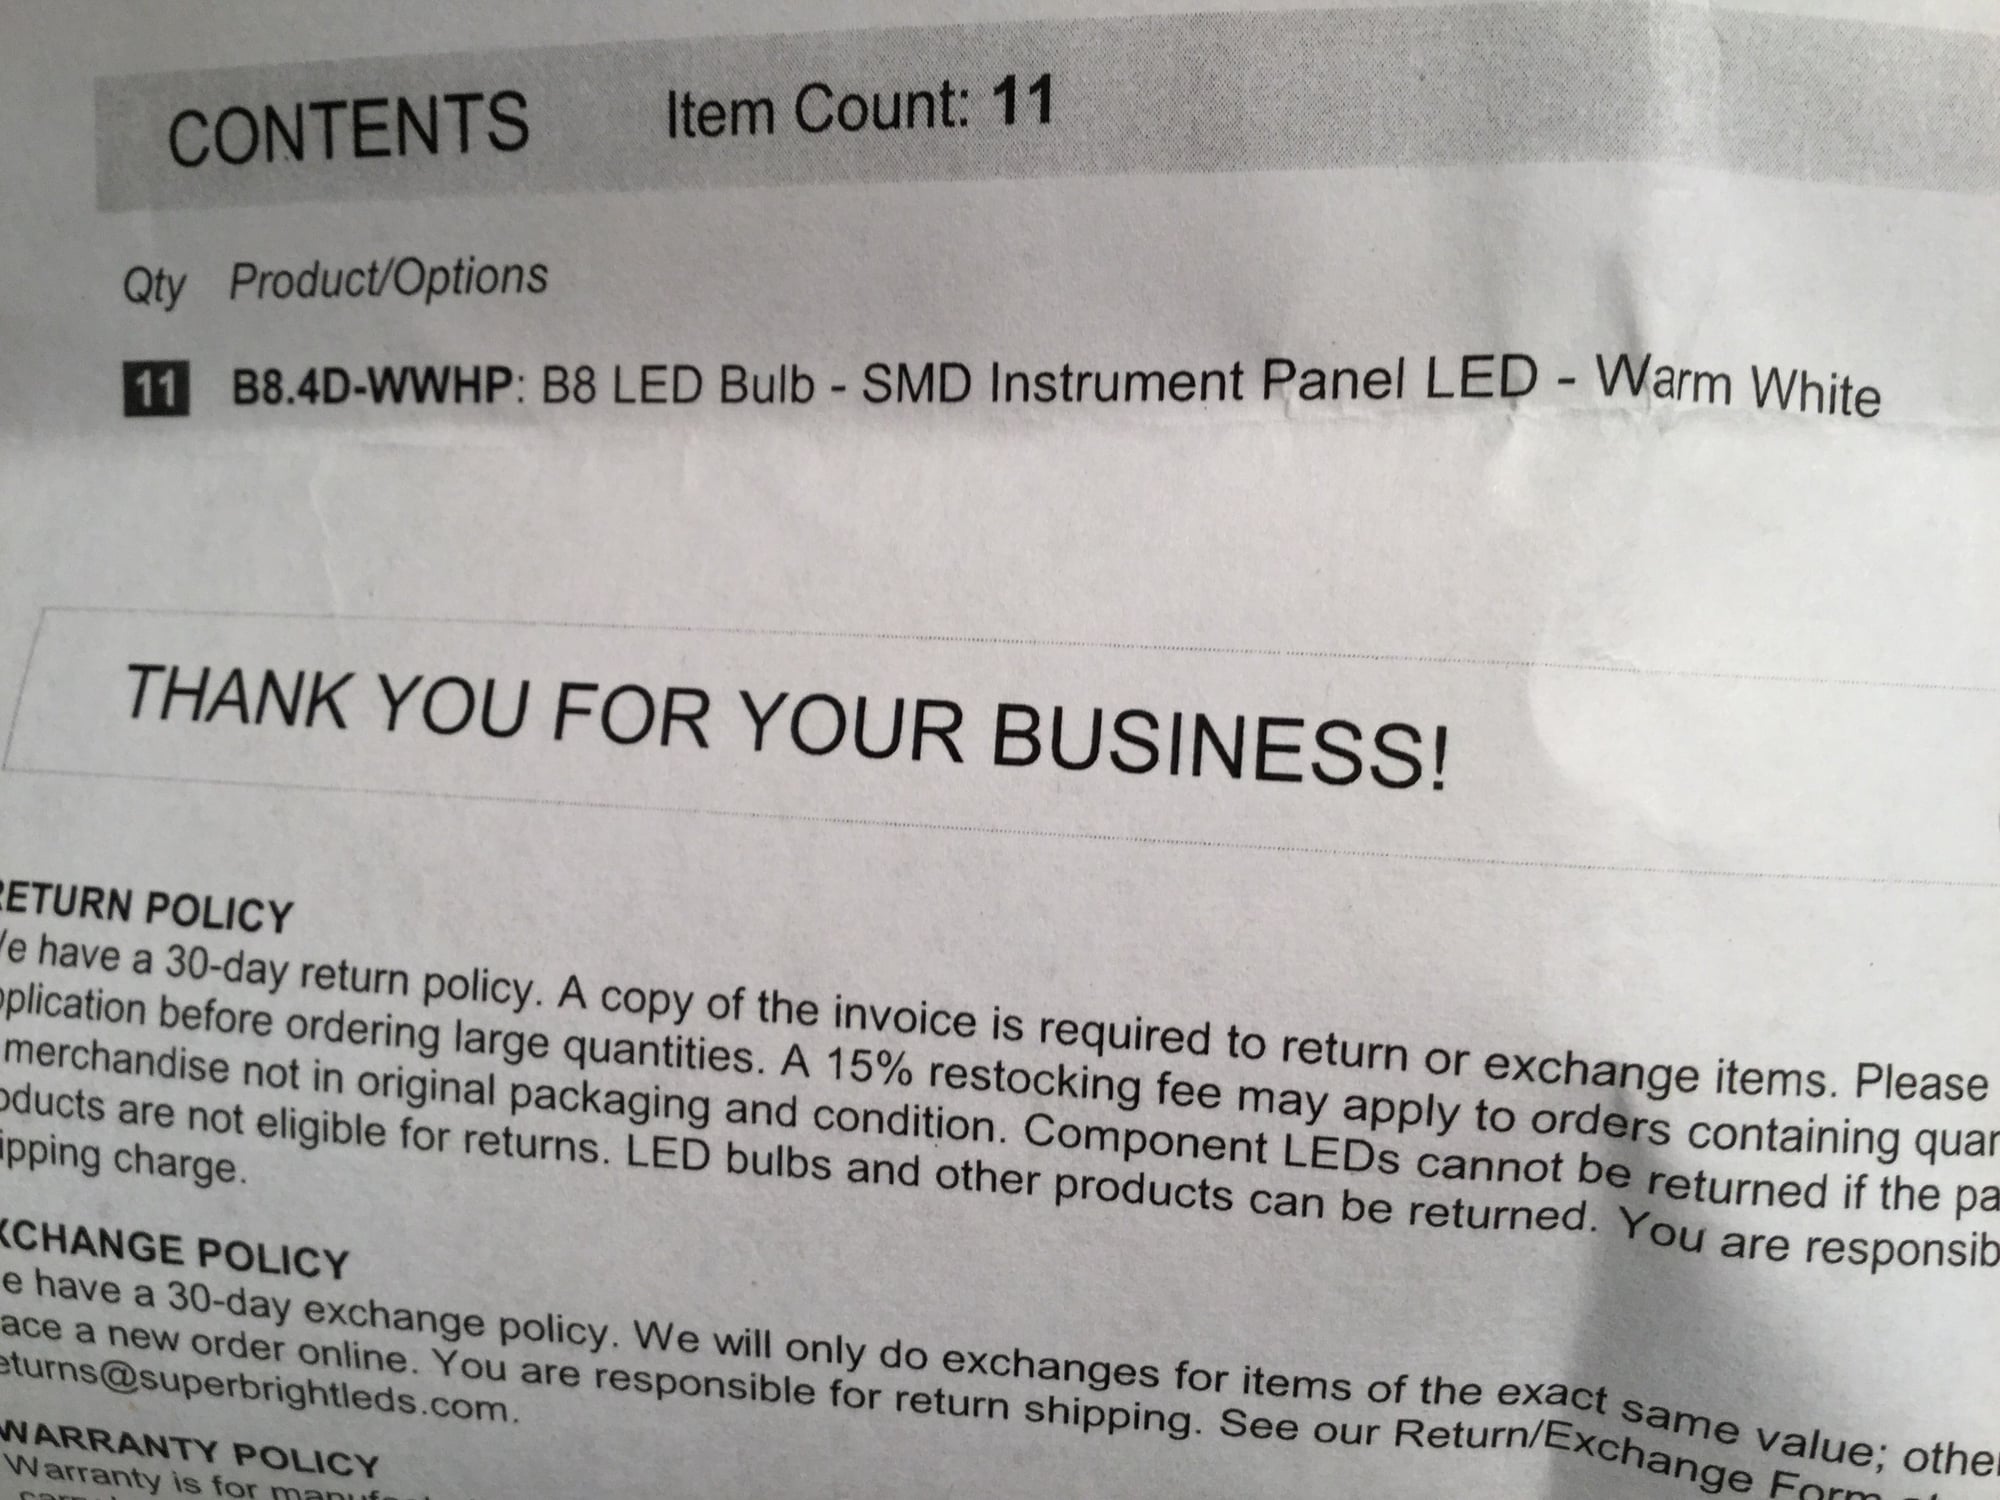
I finally got the instruments out of my 993. I found the right pry tool and took my time. I had to remove the steering wheel and hub housing to get the tachometer out. Also, the instruments took 11 lamps, not the 10 that is mentioned on this forum (I luckily ordered 11 so I would have a spare).
The instruments are noticeably brighter and the new lamps from superbright illuminate the entire instrument. A lot of work for an old guy, but a good result.
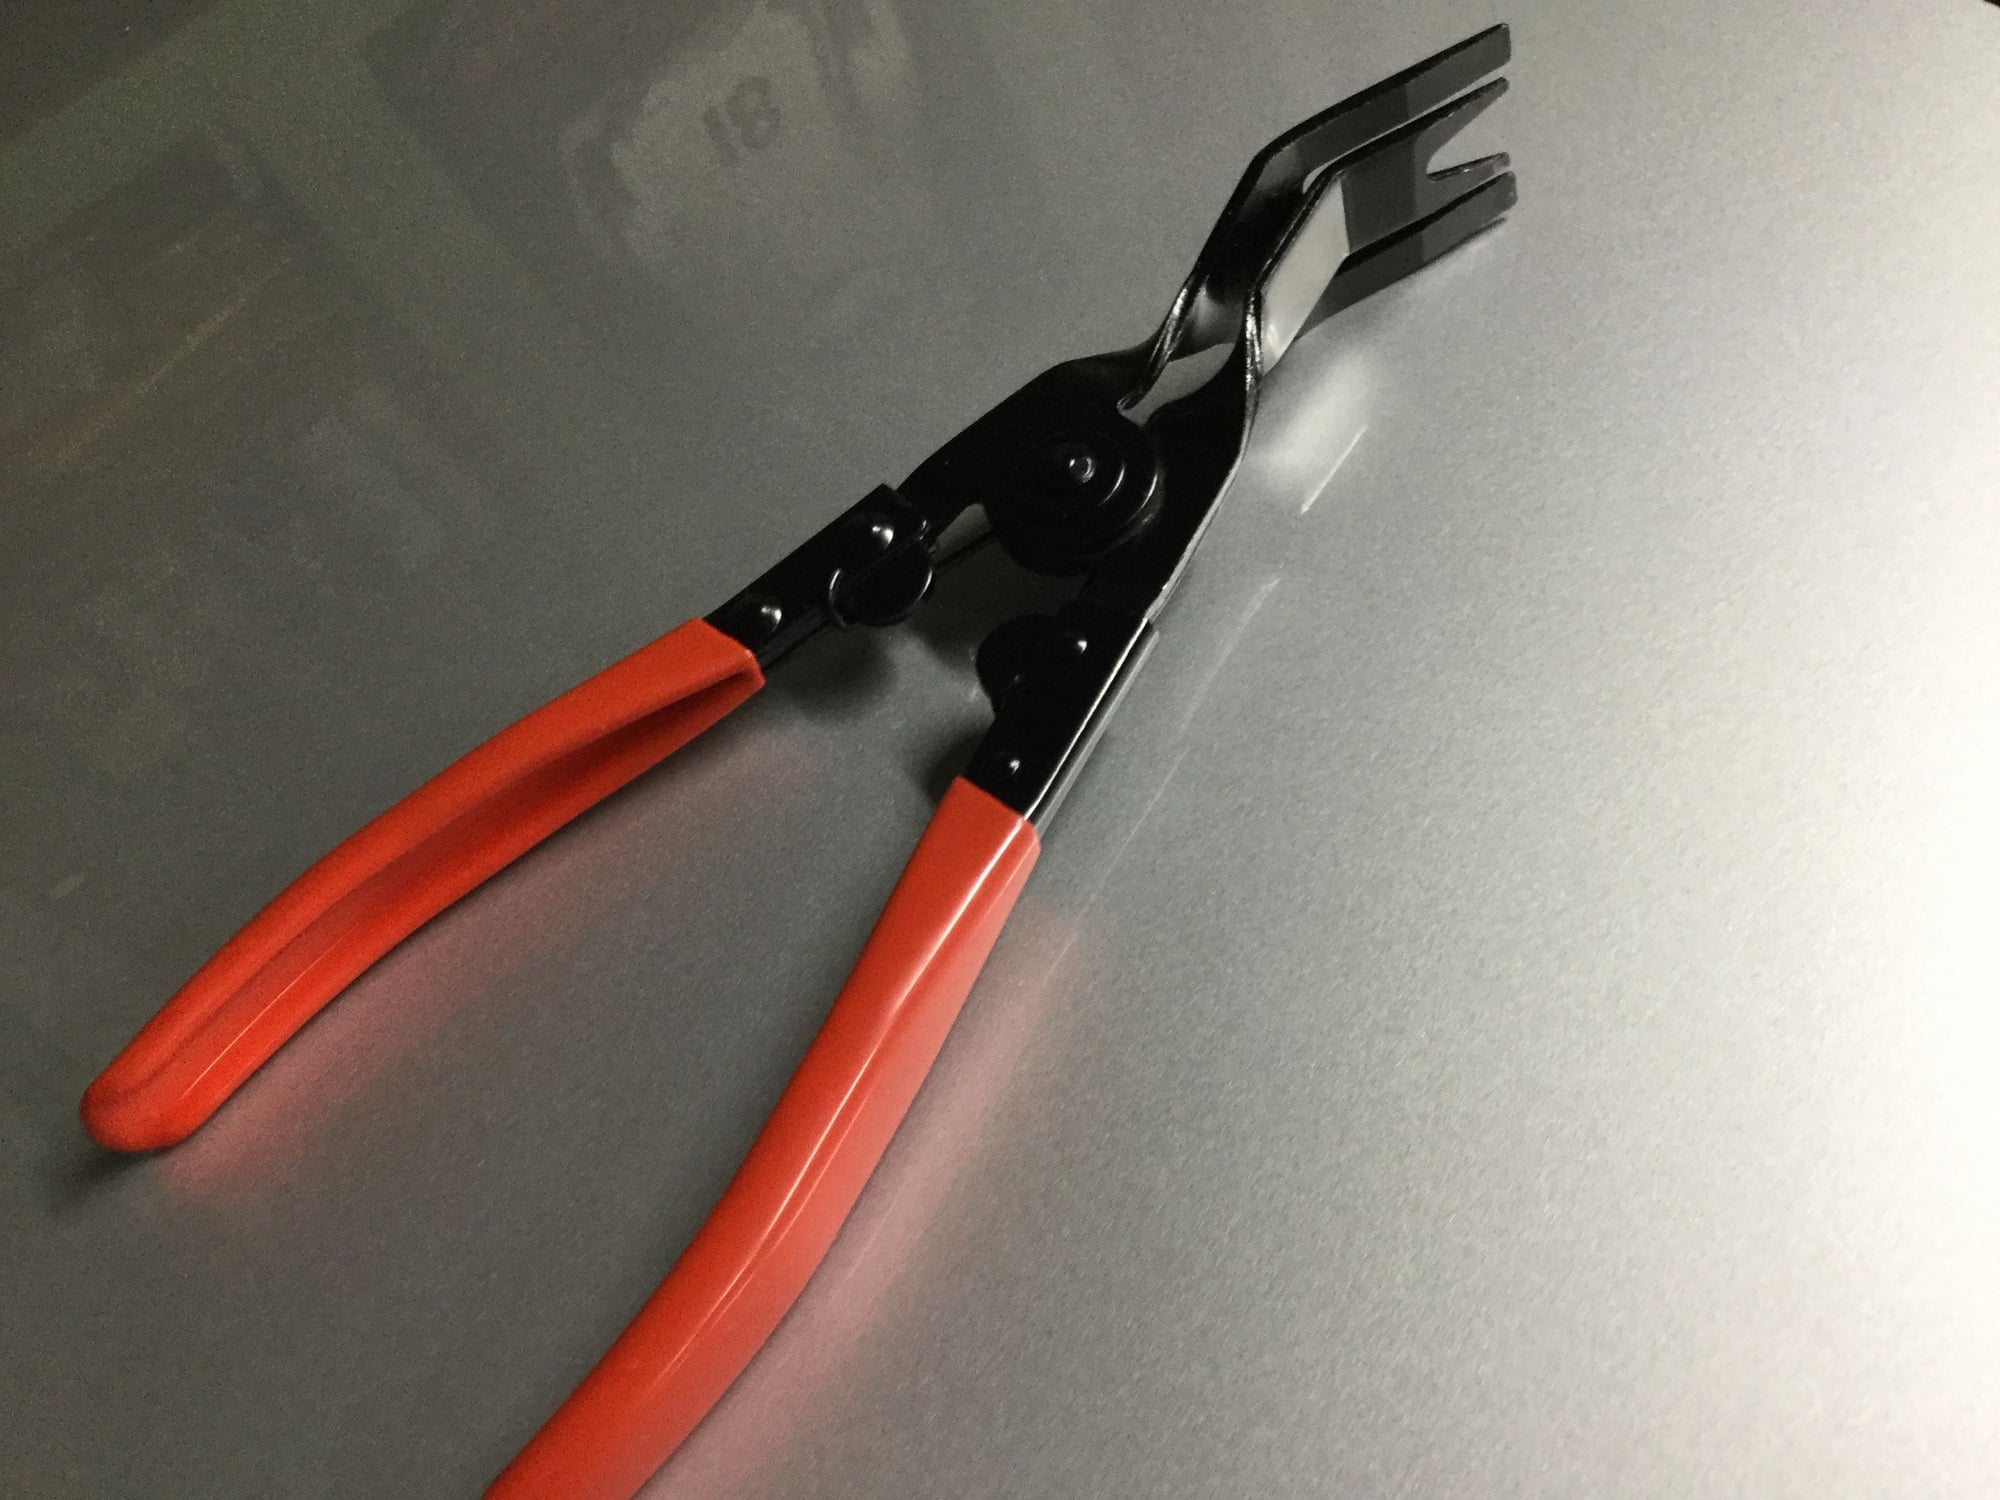
Here is the pry tool I used:
I finally got the instruments out of my 993. I found the right pry tool and took my time. I had to remove the steering wheel and hub housing to get the tachometer out. Also, the instruments took 11 lamps, not the 10 that is mentioned on this forum (I luckily ordered 11 so I would have a spare).
The instruments are noticeably brighter and the new lamps from superbright illuminate the entire instrument. A lot of work for an old guy, but a good result.
Here is the pry tool I used:
I only had to remove the hub housing - with a bit of wiggling the tach comes out. Just put a rag on the steering column to protect both.
Now you have to deal with an airbag warning light reset, and I hope you followed the airbag safety discharge procedure, unless you didn't completely remove the steering wheel?
I couldn�t get the housing off. Took out six screws and it wouldn�t come apart. I found a way to get the tach out and in without removing it. Hint, rotate.
Curious how your tach looked after the change to LED. I added a bunch of lamps to even it out.
Skyboy,
i saw your post. Nice job. Luckily the new lamps have wider dispersion and the entire tach is bright (maybe not as bright as yours after your additional LEDs).
Is there a way you could try to take a "dark time" photo so we can see the spread on the dials?
The interior is the next stop on the LED conversion and I've already got light spread issues with replacement dials.
 04-01-2019, 06:22 PM