When you click on links to various merchants on this site and make a purchase, this can result in this site earning a commission. Affiliate programs and affiliations include, but are not limited to, the eBay Partner Network.
Guys
Need some help.
Found a puddle of fluid under the front of the car.
Tunnel tray was dripping fluid - could see the drops of fluid hanging on.
Fluid is red/pink. Power steering reservoir is half empty.
Jacked the car up and took off the covers under the car at the front to inspect.
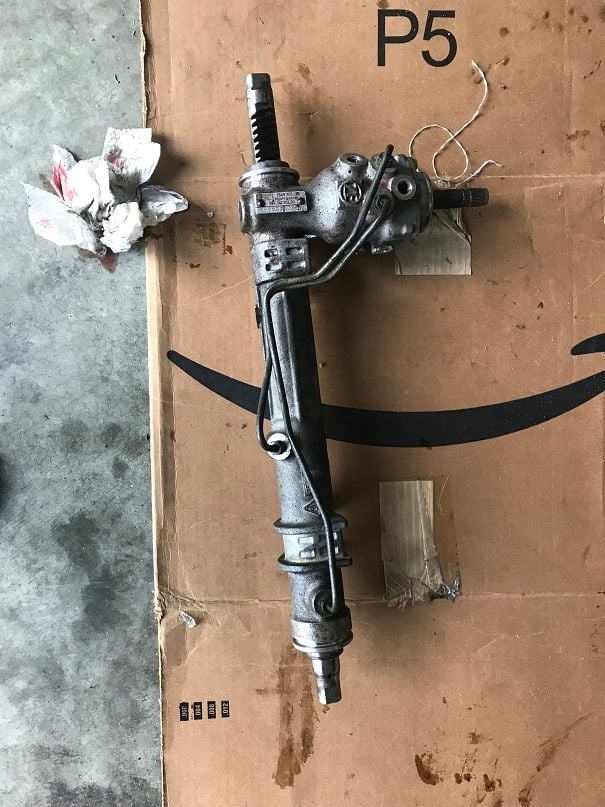
Looks like fluid is coming from the power steering rack.
So what's the deal with 993 power steering racks?
My cars done about 125,000 km's or about 77k miles.
Normal for the rack to fail around this time?
Leaking rack seems to be an age-related issue.
There is a service life advantage to sending your rack out for rebuilding vs one made from a rebuilder's core.
Here are my notes on replacing the rack: Replacing Rack
The job is a two half-day jobs involving one day to take the rack out and send it off for rebuilding and one to reinstall the rack when it is returned,
It is not technically difficult but is very messy, time-consuming and can be physically demanding. I did the under car activities on jack stands, not so much fun. Next time I would let someone else do it except the cost difference is big as the labor will probably run you $1000. I'd give it a 5 for a home DIY and a 3 or 4 if one has a lift.
Andy
I used the KLA rebuild kit with great success: http://www.klaindustries.net/993rack/993rack.htm
search for great DIY threads here
While you're in there: control arms, tie rod ends, PSS10 etcetc
I used the KLA rebuild kit with great success: http://www.klaindustries.net/993rack/993rack.htm
search for great DIY threads here
While you're in there: control arms, tie rod ends, PSS10 etcetc
I seem to remember I paid a rebuilder $300 for the rebuilding service to my original rack. Seeing that most of the labor is getting it in and out, it is a once in the life of the car servicing and the potential subsequential/consequential issues I may have encountered opening up a complex hydraulic component, I was not as bold as you doing your own actual rebuild of the rack.
Andy
Ok - steering rack is out. Not a difficult job.
Needed 2 x 19 wrenchs, 6mm hex bit, 17 wrench.
I didn't need to remove the tie rods from the upright to get the rack out.
Here is the next questions - tie rods - I'll post a new thread.
Guys
Need some help.
Found a puddle of fluid under the front of the car.
Tunnel tray was dripping fluid - could see the drops of fluid hanging on.
Fluid is red/pink. Power steering reservoir is half empty.
Jacked the car up and took off the covers under the car at the front to inspect.
Looks like fluid is coming from the power steering rack.
So what's the deal with 993 power steering racks?
My cars done about 125,000 km's or about 77k miles.
Normal for the rack to fail around this time?
What options do I have?
Easy to DIY repair?
Thanks in advance.
Ken
Well if You ask Me? It's pretty obvious that a car with power steering could develope a leak after more than twenty Years! The expected life time of any car is far less than 20+ years probably around ten years!
Verdict: A leak is normal after 20+ years and 125.000 km! Pretty uncomplicated to fix as well.
Ok here is the feedback from completing the job just a few hours ago.
Man - this job was one pain in the **** DIY. Expect lots of swearing and cursing.
After you finish it you realize it is an easy job. So doing another one will be easy as you know the tricks.
But if this is your first time doing it - man - it can be difficult. Hopefully these notes might help the next person.
PP830's notes are great. I will add a few things from my experience.
I didn't need to remove both tie rods from the wheel carrier. I took one end off and was able to remove the entire rack when the inner tie rod joint was unscrewed.
The guys who rebuilt the rack said the shaft on my rack had some rust on it and recommended it be sent out to be hard chromed. This cost me another $500 AUD.
Rolling the boots back to install onto the rack worked well.
Getting the smaller section of the boot over the tie rod was made simple by applying grease to the mounting area and then heating the rubber up with a hair dyer - which made slipping the boot on by hand possible.
I tried to mount the rack a few times, and later realized this combination worked best for me:
installed 1 rubber boot onto the rack and left 1 off - installed on the side that I did not remove the tie rod from the upright - otherwise difficult to get the entire rack in
installed both rubber bushes and also the metal u clamp - they are tight and to get them fully in is too difficult when you are on your back under the car
to get all 4 rack bolts in the exact position to fit on I needed to use a few clamps to pull the rack back as the new rubber bushes made it difficult - I could not do this with the force from my arms - had to use 3 clamps.
pp830 mentioned that my rack was slightly different to his - so this might not apply to everyone's rack, but I found it so difficult to get the feed and return lines back in. What I eventually did was to disconnect both of the return and feed lines from the main pipe work near to the middle of the transmission tunnel.
By doing this I could feed the lines back in the tight cavity with ease. For the return line I could bolt this onto the rack before installing and ensure the pre and post copper washers with the banjo bolt was already bolted on while the rack was being fitting back up on the car.
For the feed line, since it was disconnected, I could feed it reverse ways back into the tight area around the other two lines on the rack with ease. I don't know how you can get this line in any other way.
To get the front copper washer to stay on I applied a tiny drop of super glue to the end and inserted the banjo bolt to ensure it was fixed in the correct spot. This made sure that the washer did not fall down when trying to install the last banjo bolt. The location of the bolt makes it very difficult to get the bolt fitted.
at the end of all the testing for leaks I found that 1 litre of power steering fluid was more than enough - the measure shows about 5mm over the guides on the reservoir cap.


 11-08-2018, 07:09 AM