When you click on links to various merchants on this site and make a purchase, this can result in this site earning a commission. Affiliate programs and affiliations include, but are not limited to, the eBay Partner Network.
Has anyone personally installed a PSE exhaust on a 991S?
I can't seem to find out any good, reliable information on what it takes to install the Porsche Sport Exhaust (PSE) on a 991S that did not come equipped with it. I've spoke with Suncoast Porsche that sells the kits - they're not sure. I spoke with the Service Advisor at my local dealer - he wasn't sure just that "its a lotta work". I can easily install the pipe myself. I've already had an AWE Switchpath on the car and removed it, so hardware is easy, a 90 minute job. I also know that the PSE switch in the console has to be coded with the dealership computer as it hooks into the A/C Module control. What I don't know - and am trying to find out - is if the console button requires running wiring through the firewall and into the engine bay. I've heard some say it does, and others say it doesn't need it. And if there is a wiring run required, how difficult is it? Does it require gutting most the interior of the car to gain an access point?
Yes, I know I can run the PSE unswitched, too. So my question is what is involved with installation of the PSE switch in addition to having to code the unit? Anyone done one personally and can say for sure? TIA
I had PSE installed by my dealer on my 991S. They charged me 4 1/2 hours labor as per the shop manual plus the parts.
The total price was $3,231.00 plus tax. The factory option price for PSE is 3,390.00 in Canada. The parts were discounted a little more than 10% and the labor rate was $118.00 per hour.
I think the S model is pre wired for the on off switch because it was 8 hours labor for installation on the base model and the parts kit was $400.00+ more than the S.
In the end you are maybe better off working a deal with your local dealer to do the whole thing.
It should cost you less in the US because the parts are cheaper due to currency exchange.
I have not done one.
But look at it this way.
Your Base S exhaust has working valves that open at 3xxx RPM.
So the wiring for that is already there.
I would guess its just a matter of imstalling the switch and programming it.
I heard that whole switch console is on CAN bus and the switches don't have their own wiring.
Honestly there is no need for the PSE switch, since the exhaust opens at 3xxx anyways.
I find I only use the switch to turn off PSE which has no effect on the above 3xxx sound. It just gives me quiet mode until then which is same as not having the switch.
I looked at this for my C2 (base). Its way harder on this car than a C2S as the vacuum lines, etc aren't there. I don't really understand why the cost of the sport exhaust upgrade is so expensive on the S model. Isn't it just a the center muffler and a button? Perhaps just order the center muffler for the sport exhaust from somewhere like Gaudin Parts (just checked its around $700) and bolt it up. Maybe get the button kit and have the dealer program it, I can't imagine its that expensive.
I've just ordered the parts to install the PSE on my 2012 991 C2S. Since I have no patience, I've already started by removing my regular exhaust. It was very easy. I'm a real amateur, and it took me about an hour.
My question is: can anyone describe how these new parts will be used to connect the new front muffler to the vacuum lines? If looking at the car from the back, it appears the main vacuum line from the engine comes down to feed the non-PSE's right valve. And then there's a splitter that then runs another tube behind the plate to which the front muffler mounts with the 2 straps. That tube eventually reappears to plug into the non-PSE's left valve.
My questions are: will I leave this long tube that runs from right to left side? I can't figure out how I would remove it. Do I just grab from the right side and pull?
When installing the PSE, will I remove the splitter on the right side, and then use the long tube from the PSE kit to run the tube to the center of the PSE? Do I run the tube on the near side of that plate that the front muffler mounts to?
I won't list the rest of my questions, which all have to do with how to run the new vacuum lines. Thanks for any help.
Did you get the PSE Vacuum lines?
They are different, due to the different valve locations.
In addition, PSE Lines have a stainless jacket, which I assume is for heat resistance.
I believe PSE lines penetrate the bulkhead, requiring the bulkhead fitting and the assorted lines.
Otherwise you need to make up your own lines.
I think there were some PET diagrams posted, showing the vacuum lines.
If you can't find them, PM me your email and I'll send you the diagrams that I have.
A few installation points that you might find helpful...
The PSE "kit" should have come with both a 80mm steel flexi-line (991.111.491.00) and 1,000 mm (~40 inches) Tekalan line (900.918.005.40). The Tekalan line is the actual vacuum tubing whereas the steel flexi-line is used in specific locations to protect the Tekalan tubing. You'll pull the existing vacuum line off and replace with these two parts. The flexi-line protects the plastic tubing connecting the two center PSE flap valves and out to the COV, but the Tekalan line is run to the COV valve directly without any flexi-line protective tubing...
To install the new lines, you will re-route, and to do that you'll have to drill out a hole in the heat shield on the engine carrier ( I think it is diameter 7mm...). Let me know if you need instructions for doing this part....
Finally, and I am assuming you know this already but just in case I'll mention it here --- once you have reassembled everything, for the PSE button to work (you purchased the switch console bits, right?) you will have to have the dealer or someone with official PIWIS tool code the switch console keypad assignment. Otherwise, no PSE control from the console....
Good Luck!
I'll take whatever instructions you have. Thanks!
I did order both those parts. I found a post on another forum that says the 991-111-491-00 is used to connect the valves to each other. It didn't say anything about plastic tubing running inside this part. Are you saying that I need to insert a plastic tube into 991-11-491-00 before I use it to connect the two valves? Where would this plastic tubing come from? The kit's part list included only one length of plastic tubing (900-918-005-40), which you say runs from the COV to the first exhaust valve.
I'll check my car again this morning, but I'm also not sure how I'll be able to get access to remove the old plastic tubing from the COV and the length that runs to the left exhaust valve.
If you've removed everything else (exhaust, etc.) which required disconnection of the existing line from COV, you should be able to simply pull the existing tubing out through the engine carrier (pulling short-end through towards the front of the car for reference). I don't recall there being any clamps, connectors, or fix-points that would prohibit pulling freely from the car.
As for the flexi-line and Tekalan tubing.... You need to cut a piece of the Tekalan and use short piece to insert within the flexi-line that runs between the valves on the PSE as you've mentioned. Then from there you run the remaining tubing out to the COV.
As of now, I've removed the old exhaust, but that didn't require that I disconnect the vacuum line from COV. All I had to do to remove the stock front muffler was disconnect the vacuum lines from the muffler's valves.
Here's a picture that shows the vacuum line that was connected to the right valve. As you can see, the line that runs to the COV disappears into the engine bay.
In order to see where the line connected to the COV, I had to partially remove the entire airbox. I still don't know how I'm going to get my hands in there to disconnect the existing line, let alone plug in the new line.
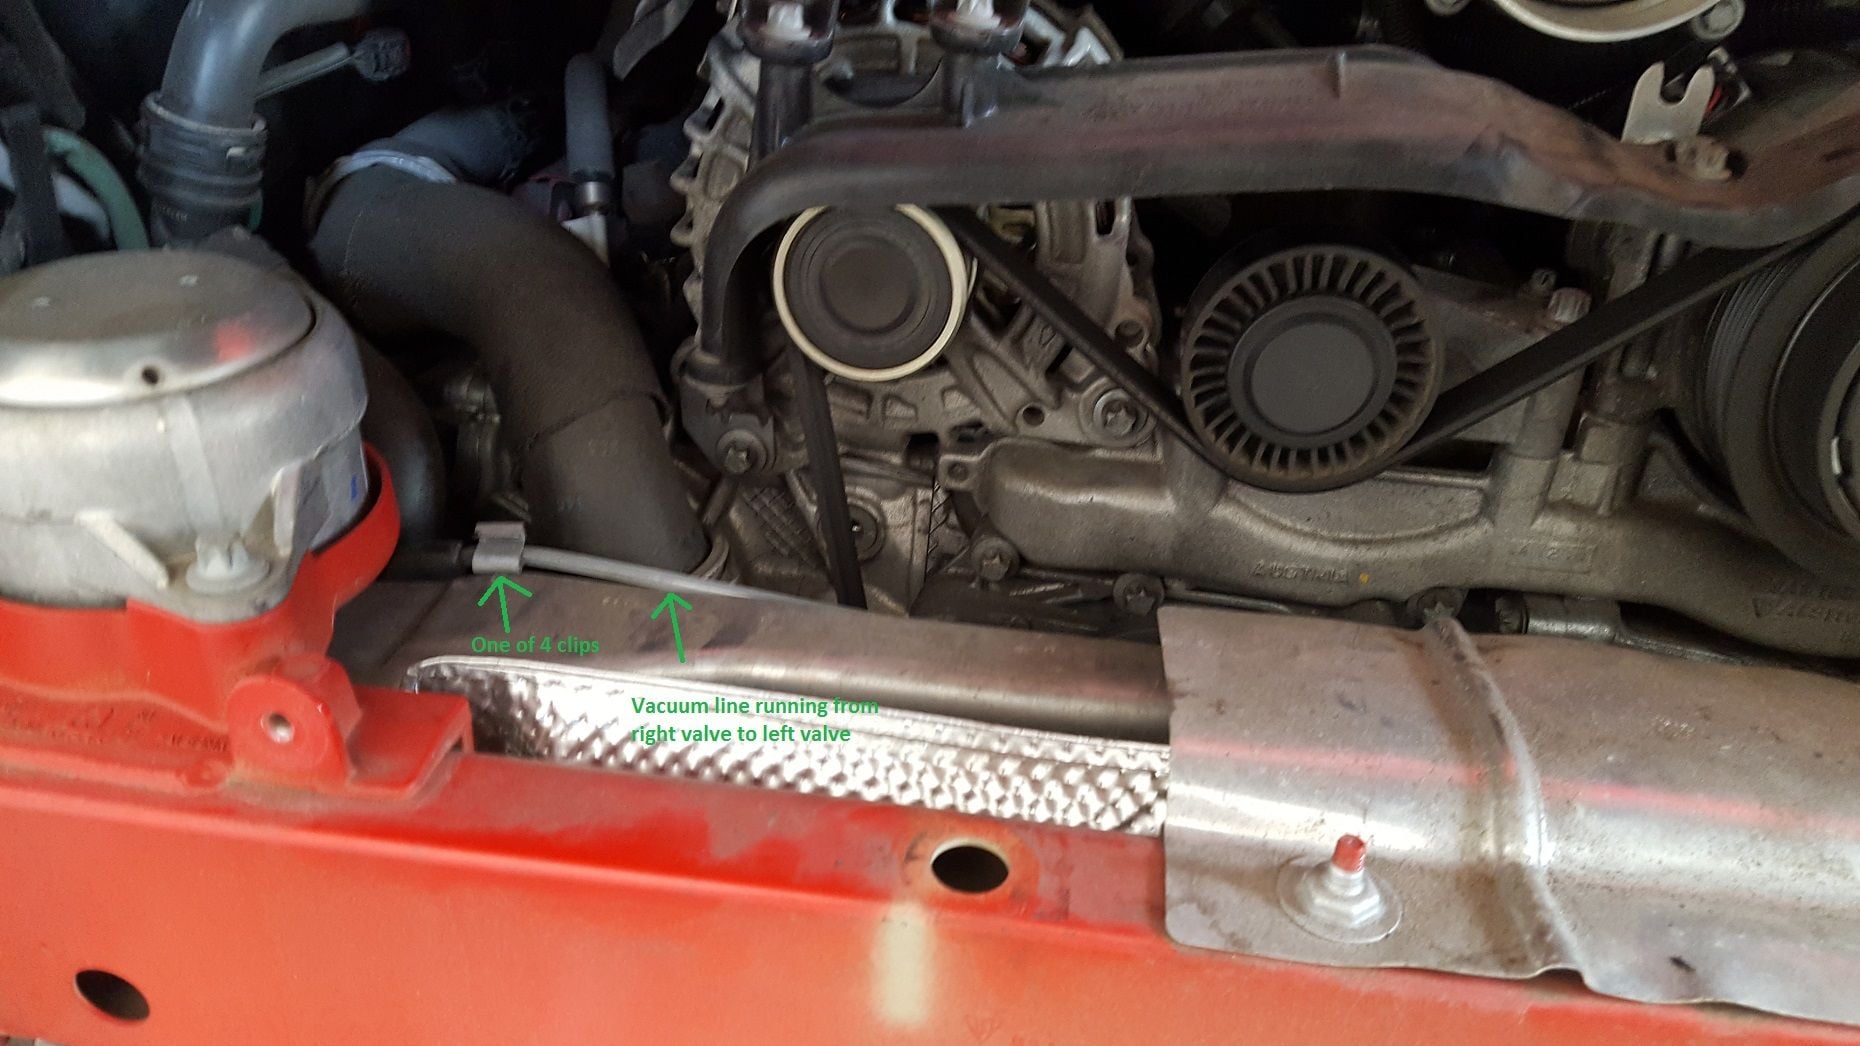
In this picture, I drew a white line to show approximately where the line runs from the Y adapter near the right valve, all the way behind that red piece of the frame, over to the left valve. The line appears to be held in place with a couple clips. Are you saying I can just pull on this from the right and it will come out?
Correct, if the vacuum line is disconnected from the left (driver-side) exhaust flap you should be able to pull-out from right (passenger) side. There shouldn't be any clips, unless it was a "fix" for a line that was moving or getting too close to hot elements. The non-PSE line runs through the engine carrier (where you've drawn the white line...). The new line go through the heat shield on the engine carrier (the oval shape just below the white sticker in your picture). Whereas you currently have a T and two lines going to the two flap/valves from the COV, with the PSE it is a reverse config where the two exhaust flaps are joined together, then a single line goes out to the COV.
And you should remove the air boxes/guide as well, not just try to push them partially out of the way. This will make it a lot easier to see the line.
I took your advice and was able to remove the entire airbox. Now its MUCH easier to get access to the line that ran to the left valve, and it's a little easier to be able to unplug the line from the COV. Although, I think I'm going to leave it plugged in until I get the parts late next week.
Here's a picture showing that the line running to the left valve did have 4 little clips holding it to the under-side of the frame (picture shows the far left clip).
Here's a picture after I removed all 4 clips and pulled the line out from under the frame.
Perfect! And thanks for posting the pictures.... For the life of me I don't recall the clips being there, and don't even think the official WM mentions them either!
One thought about that existing line connecting to the COV directly.... you may be able to simply leave it connected, clip and using a tubing connector fitting simply tie the existing (COV-terminating) line to the new tubing that you ordered with your PSE. I can't recall, but the tubing may be same type/diameter etc. So in the end perhaps you can avoid having to pull the COV-end off? Just a thought..... so maybe I just don't know what I'm talking about....

 06-08-2014, 04:01 PM


