When you click on links to various merchants on this site and make a purchase, this can result in this site earning a commission. Affiliate programs and affiliations include, but are not limited to, the eBay Partner Network.
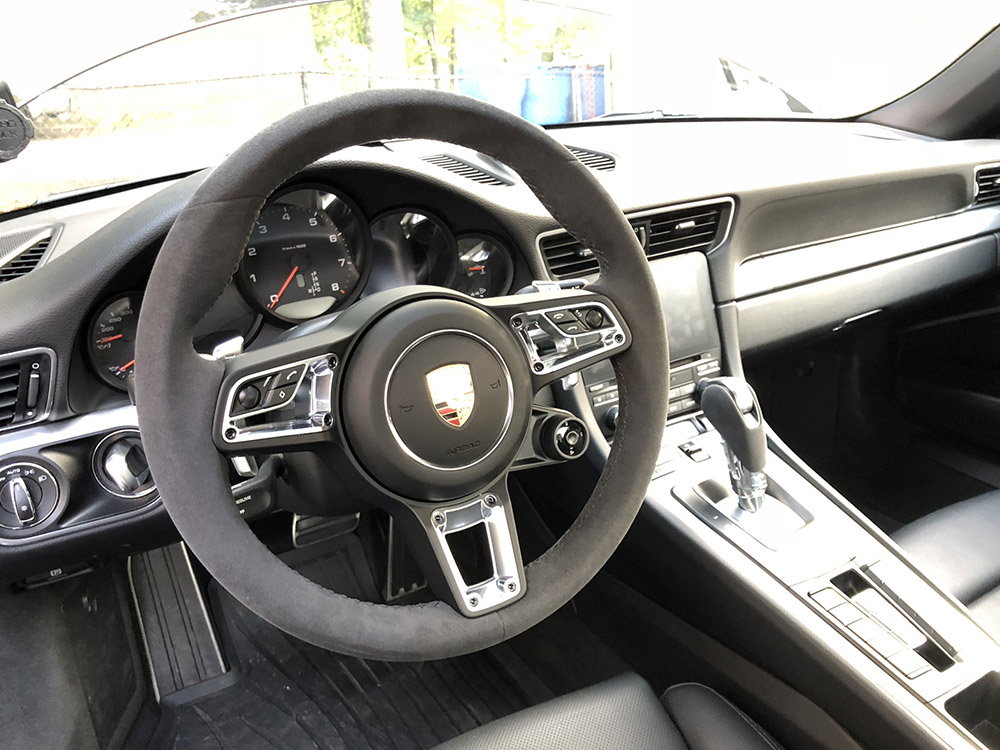
If I were to have built my car, I'd have gone for the heated multifunction GT wheel in Alcantara. Yeah, the leather wears better and is the stock multifunction heated wheel is great, but I dislike the shiny silver and had Alcantara in my old P31 C63 and I always just liked the way it feels. So I bought a wheel and a shifter ****. Then I went looking for DIY's on this and found a 991.1 video on the Youtube, but nothing for the 991.2. I hope this helps.
This is super easy, but you do need a few tools.
10mm ratchet to disconnect the negative of your battery.
Small screw driver or allen wrench to pop out the air bag.
Small screw driver to get the airbag connectors off.
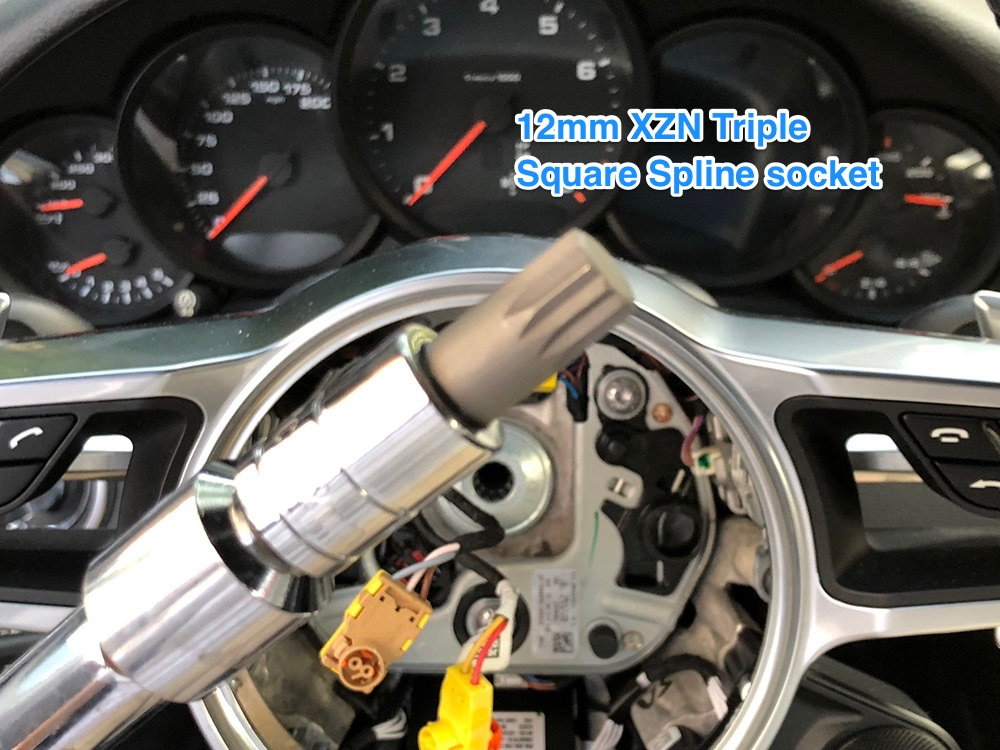
12mm XZN Triple Square Spline socket to get the bolt for the wheel out.
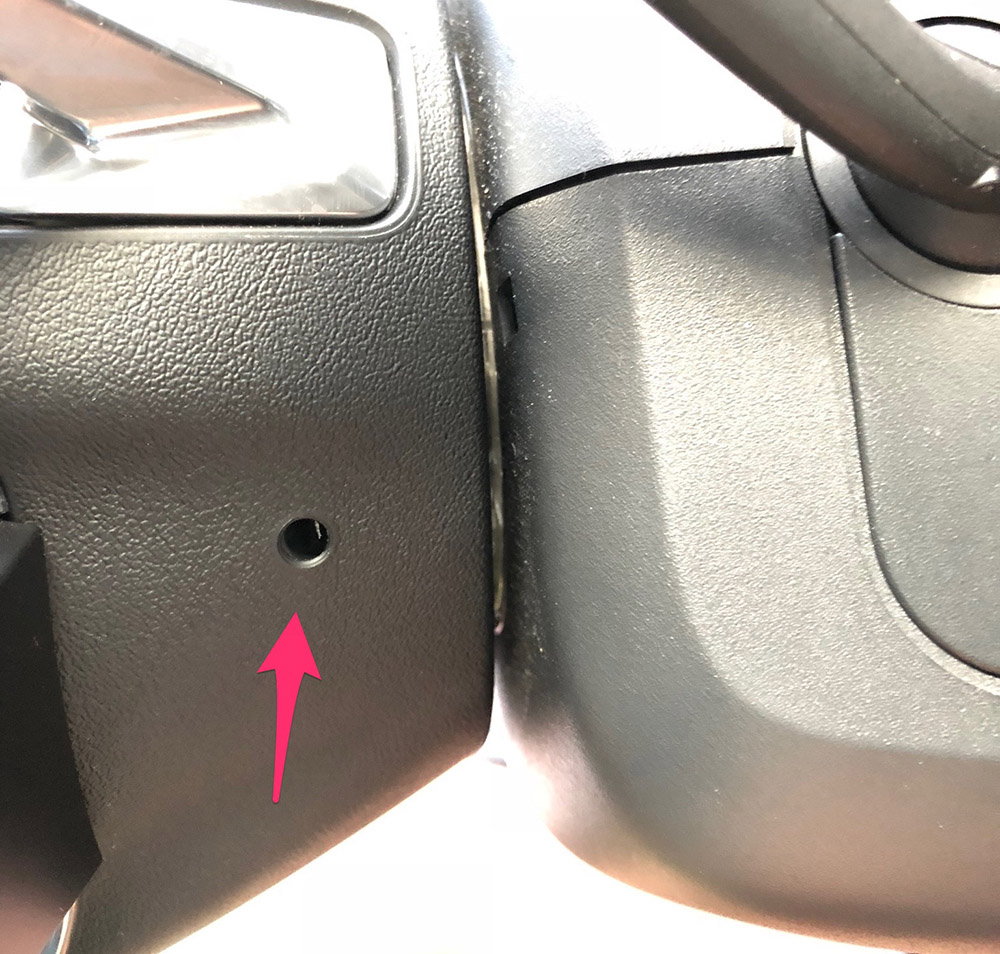
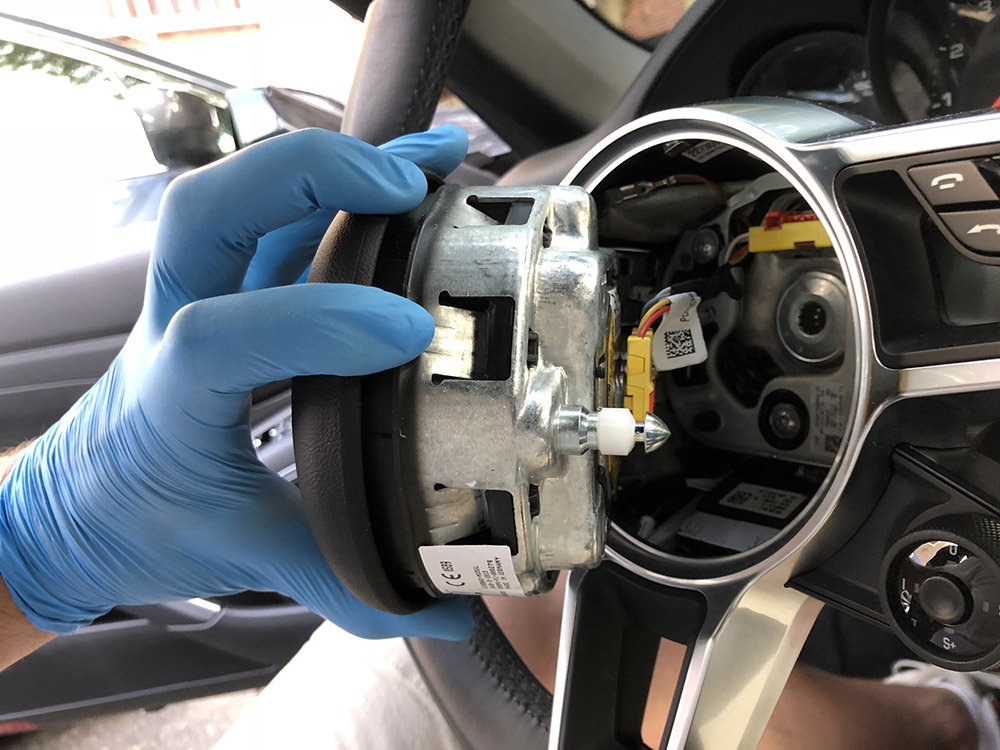
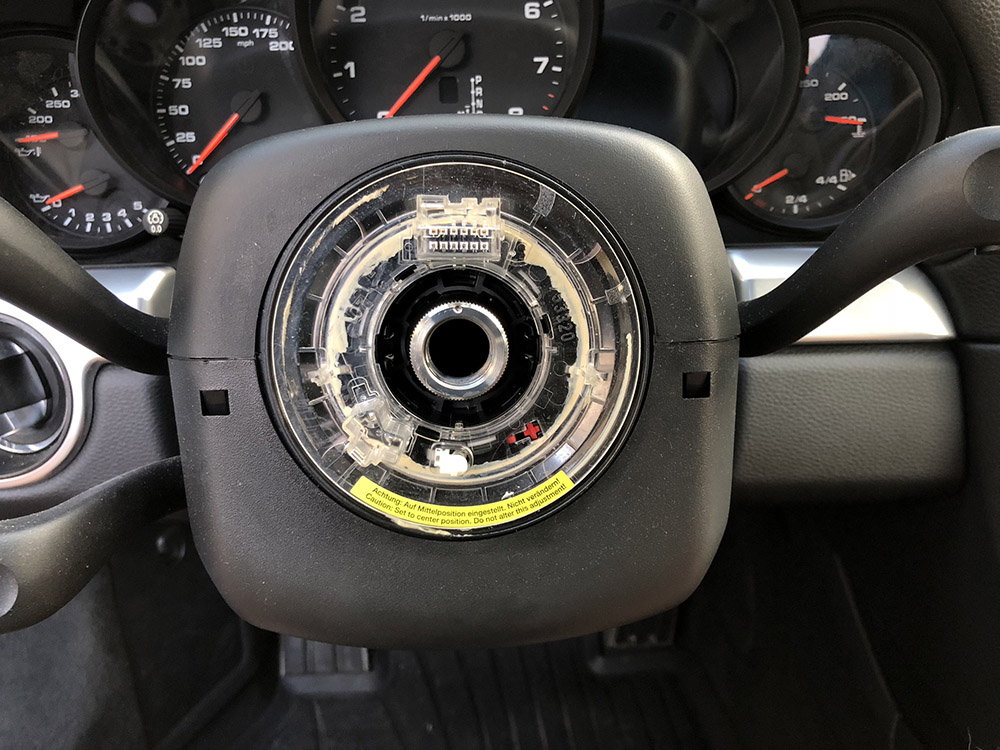
Before we get started, it makes sense to show quickly show you how the airbag is held in for the 991.2. The 991.1 has a single release hole / spring setup at the 6 0'clock. The 991.2 has two, at like 4 and 8 o'clock. Ours also doesn't have any fidgety springs to get lost or pop out of space.
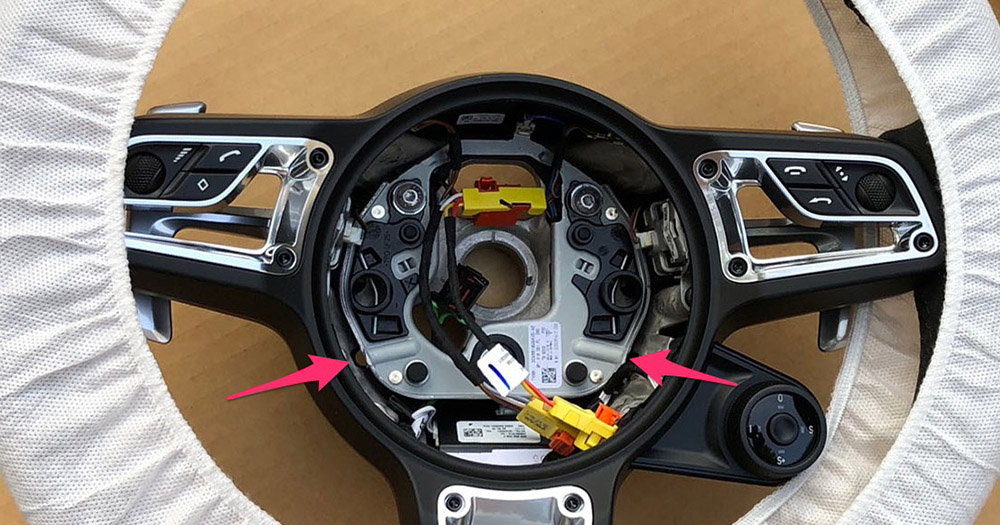
If you look in the new wheel, you can see where the two holes are and the mechanism that Porsche came up with to hold the airbag in.
Ok, now that we know how we're going to get the wheel off, let's get at this.
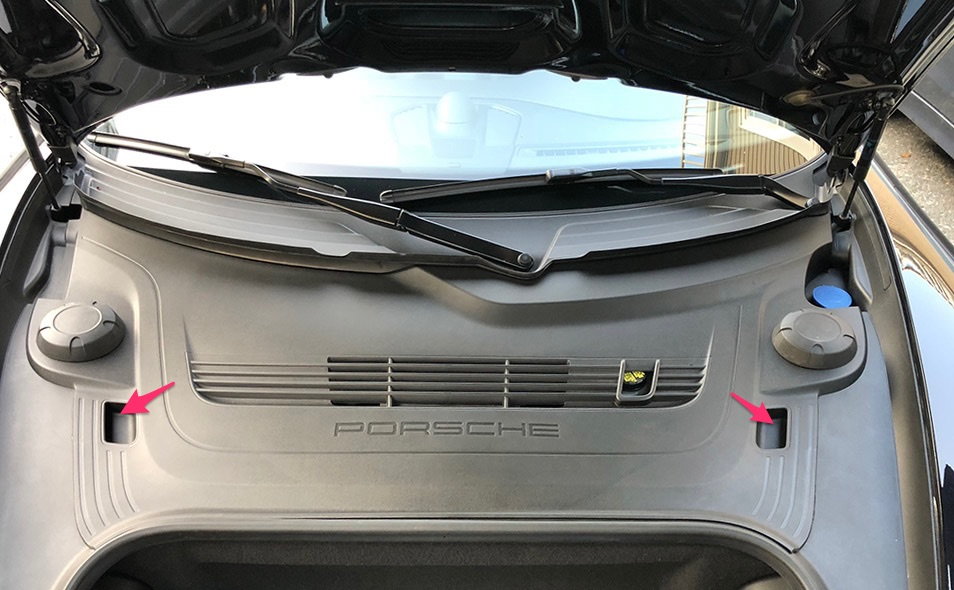
Step 1. Remove the negative battery terminal. I left it off for a good 15 or so minutes before going further. First remove the cover by pulling up at the hand holds.
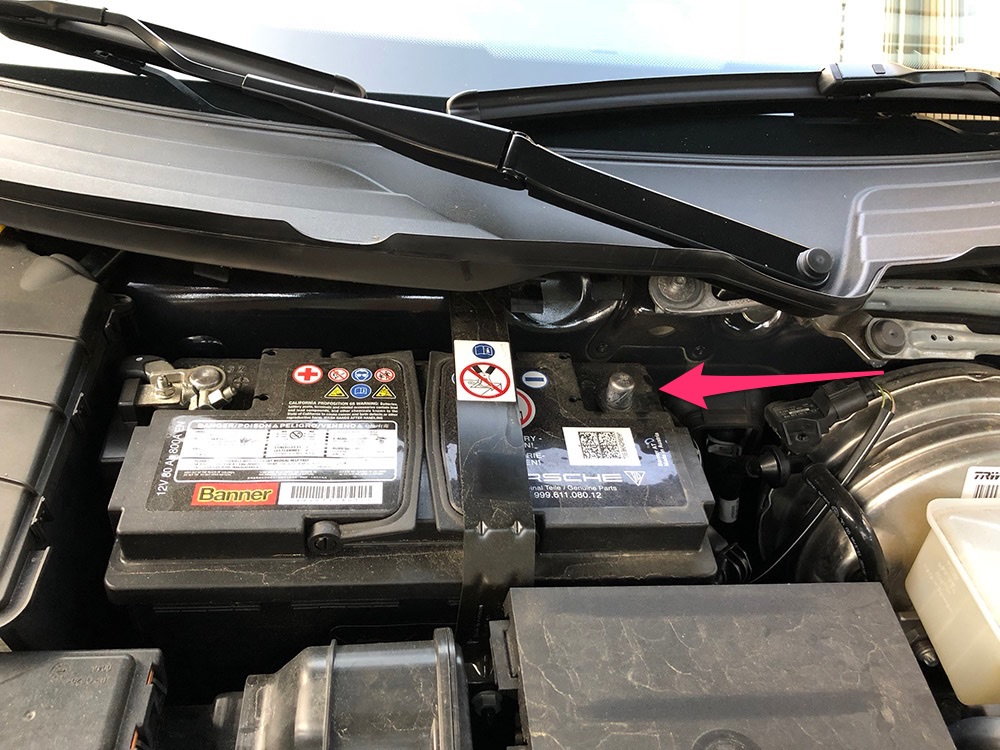
Next remove the negative terminal. A deep 10mm socket will help here. Make sure it's not resting against anything.
Step 2. Remove the airbag. Pick a side and push your screw driver or in my case, allen key into the release hole. One side will pop out. Then to the other side. Easy peasy.
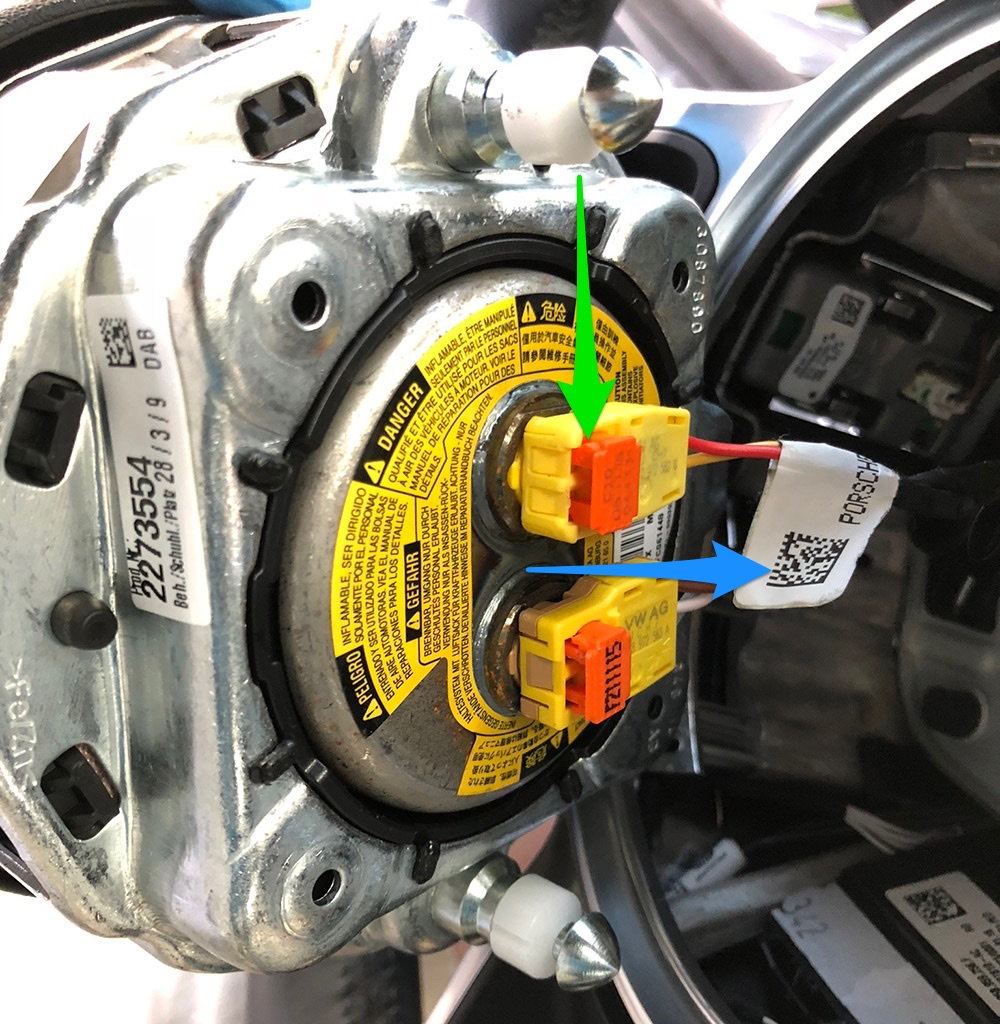
Now you've got to remove the two airbag clips. Be careful here. To do this, you just put a thin flathead screw driver between the yellow part and the little orange release lever thing (green arrow). In this pic, the orange clips are in their out position. You want them to move in the direction of the blue arrow.
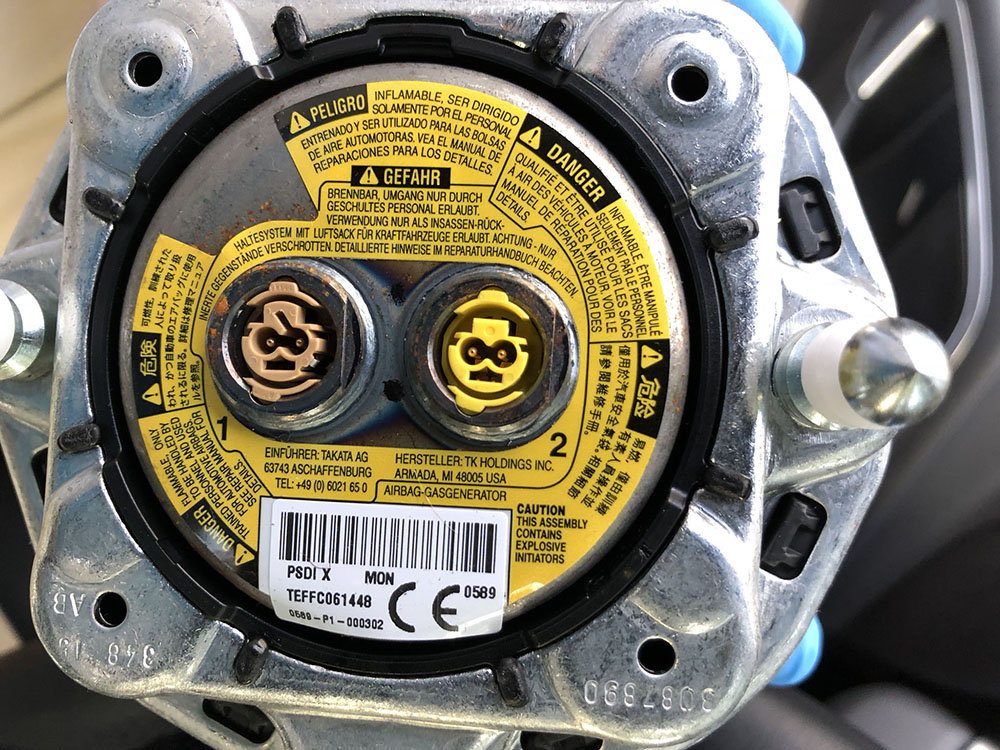
The airbag is free. Now put that aside somewhere where you won't scratch that nice crest. You can see there is a beige connector and a yellow one, and while they're close, they're not the same. So you can't mess up with which one is which when you reassemble. Thanks Porsche. You folks think of everything!
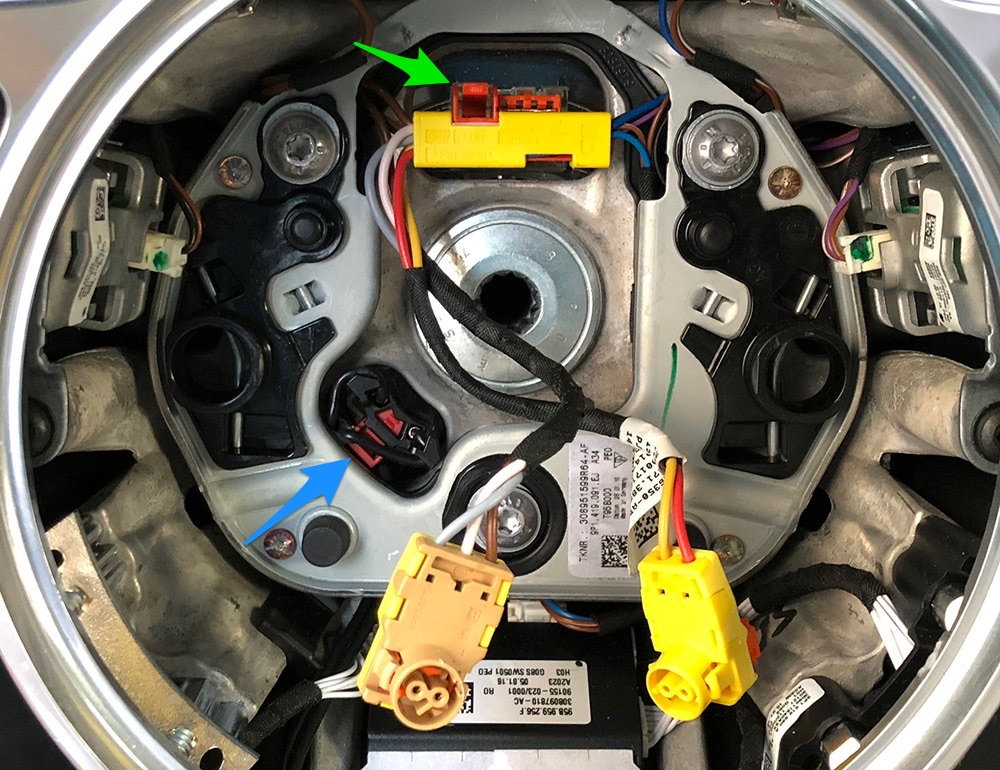
Step 3. Removing the two connections inside the wheel. The green arrow shows the main connector that you need to squeeze right on the orange part. It'll come right out. Squeeze that top part down towards the yellow body.. The second one, with the blue arrow is easy to miss. It pulls right out.
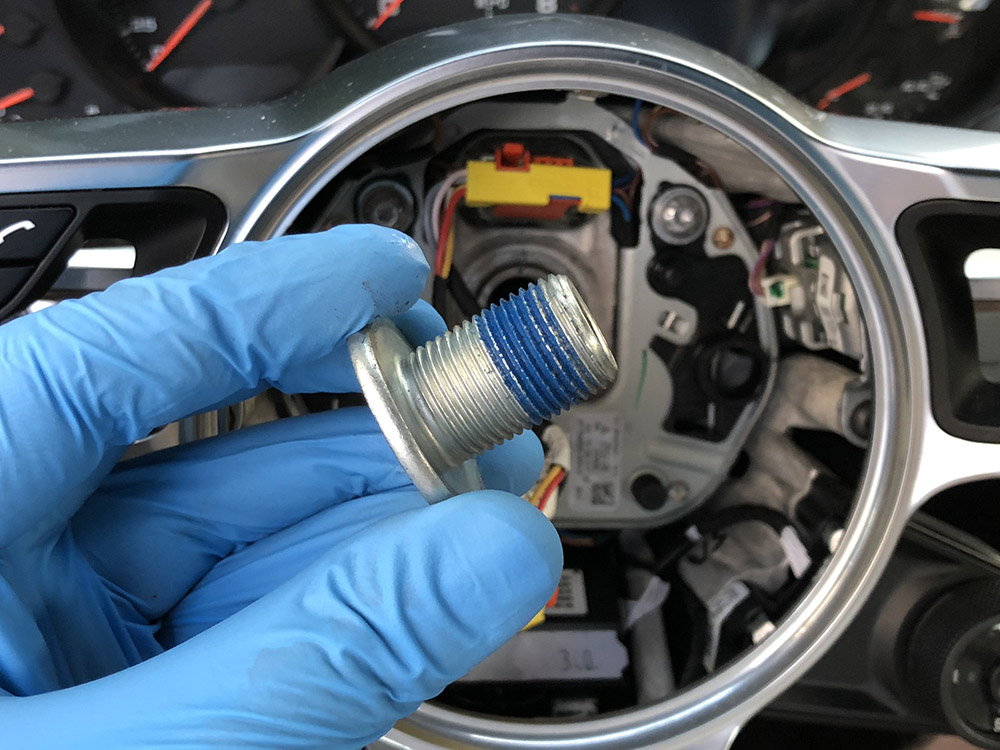
Step 4. Unscrew the retaining bolt. Here's where you need that special 12mm XZN Triple Square Spline socket I mentioned. I found a set on Amazon. I checked locally and didn't have any luck. Apparently a T55 might work, but I'm all about not screwing up something as major as this, so I just got the correct socket. It does fit perfectly. This was easy for me, but others have said they needed someone to hold the wheel.
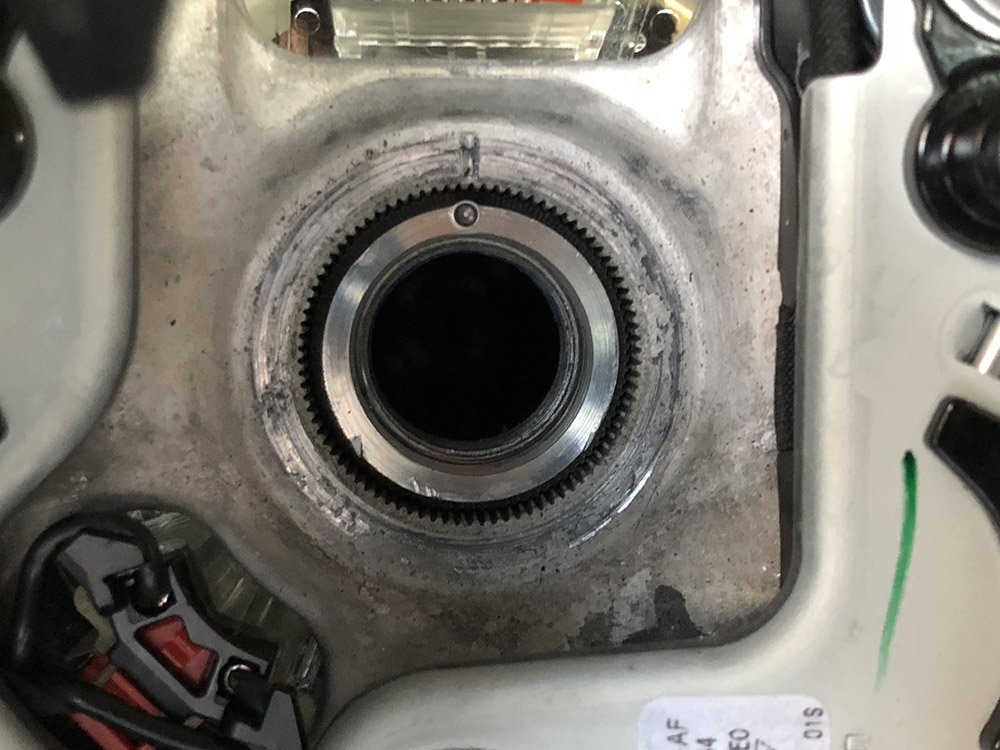
At this point, the wheel will just slide off easily. Before you do though, take note of the two notches for the wheel / shaft alignment.
Now you can just tug the wheel gently and it'll come right off.
If I cared, now would be a good time to put a nice leather covered cover over that plastic steering column. Good thing I don't care. Just saved myself $700!
Step 5. Reassembly.
No need to weigh the thread down with more pics here.
Install the wheel, get it aligned properly and snug it down with the bolt.
Reattach the two connectors in the wheel.
Reattach the airbag's two connectors. Make sure they are fully seated and that the orange tabs are pushed all the way in for each.
Now slide the airbag in. If you have it roughly aligned, it'll slide right in correctly and center it self. Push lightly on each side (3 and 6 o'clock) until you feel the click. You'll see that it's nice and snug.
Reattach your negative battery terminal and put your frunk all back together.
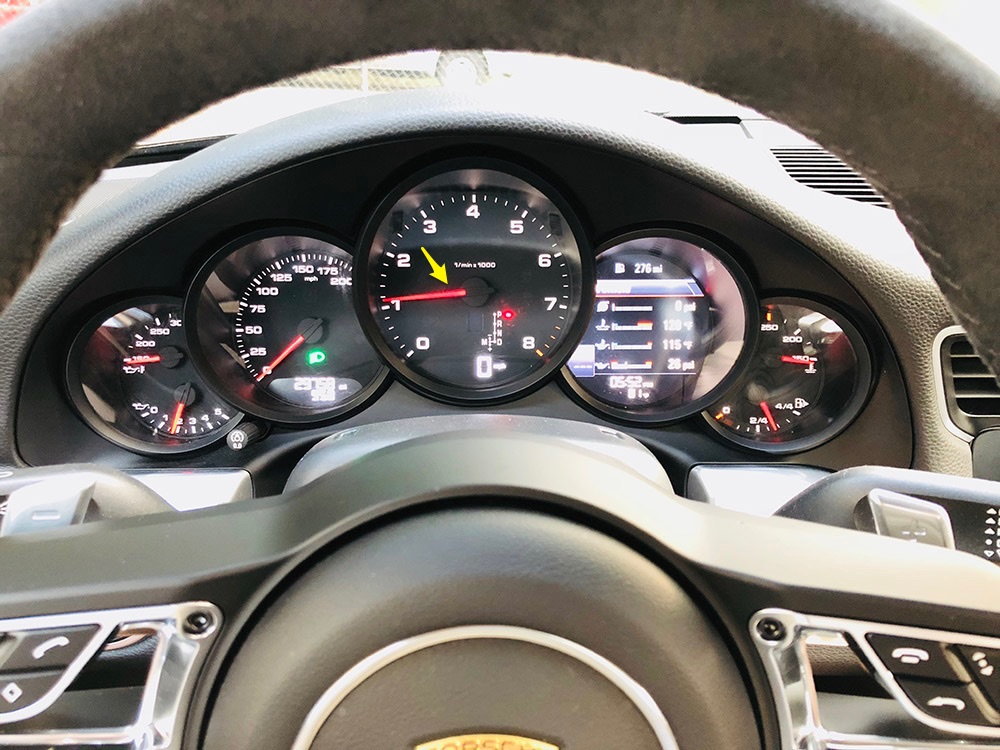
Step 6. Turn it on and check for the dreaded check airbag light. If something went wrong, it'll be right where that yellow arrow is. Nothing went wrong for me.
Overall, this is a super easy job once you have the correct tools and know how the release works for the airbag. Just don't forget to remove the neg from the battery.
Great install video. Has anyone out there chged a normal wheel to a heated multifunction steering wheel on a 991.2. I'm sure some extra steps involved, any help appreciated.
Can you please tell me the part # for the GT Sport Steering wheel? I might want it in leather.
I would like to replace mine as well. My 2017 911 base has multi-function, heat, sport Chrono and PDK. Did you bring it back to the dealer to programming after installation. Thanks
If I were to have built my car, I'd have gone for the heated multifunction GT wheel in Alcantara. Yeah, the leather wears better and is the stock multifunction heated wheel is great, but I dislike the shiny silver and had Alcantara in my old P31 C63 and I always just liked the way it feels....
-Tom
Thanks for posting. I�m about to order a T. For a retrofit, is it better to equip the car with regular steering wheel or Heated MF wheel?
Great install video. Has anyone out there chged a normal wheel to a heated multifunction steering wheel on a 991.2. I'm sure some extra steps involved, any help appreciated.
My dealer did that for me as part of the car purchase. They said there was reprogramming required.
They gave me the take-off parts, so I know there were at least two change-outs required in addition to the wheel itself.
Hi Tom, since you have done this and may still have a spare steering wheel. Can you elaborate on how to remove the multifunction trim pieces?
the ones in shinny silver. I can see one screw on the inside but not the other and seems like it would be hard to get to.
Hi Tom, since you have done this and may still have a spare steering wheel. Can you elaborate on how to remove the multifunction trim pieces?
the ones in shinny silver. I can see one screw on the inside but not the other and seems like it would be hard to get to.
I didn�t remove any multifunction trim pieces. They�re different from the stock wheel to the GT wheel and the GT wheel included everything from the factory.
Hi Tom, since you have done this and may still have a spare steering wheel. Can you elaborate on how to remove the multifunction trim pieces?
the ones in shinny silver. I can see one screw on the inside but not the other and seems like it would be hard to get to.
I changed the trim on my GTS from silver to black,so mine did not have the MF switches, but I assume it is similar. It is a bit more involved in that you need to remove a circular plastic trim piece from behind (3 Torx screws). This piece also retains a small control box that is connected to the mode switch in a sport chrono car. There is a cover also over the lower trim, about the same size as the lower chrome trim, that pops off the back then. Next remove 4 more torx screws, 2 at 8:00 and 2 at 4:00 when looking at the back, that attach the front 3 spoke trim. Carefully move it out of the way because it also holds the mode switch in place with 2 of the screws you just removed. Once the 3 spoke trim is off, it reveals 2 small torx screws (T9) at the top of each trim piece securing them in place along with a tabs on the bottom. All of this is done from the back of the wheel so place something soft for the leather to rest on.
The new black trim pieces I used just pop in and then the 2 small screws are re-used on each to secure them. The allen head ones you see on the front are fake. Not sure on a MF wheel if the switches are part of the trim. In that case there could more wires before the trim can be removed. My car only had the one orange connector at the top of the whee that needed to be disconnected in order to remove the wheel. I assume the other one shown is for the MF switch connection. Place the mode switch back in place where 2 of the torx screws go through it and tighten all 4 of the spoke trim screws. Then snap the control box into the rear circular trim, snap the lower trim back cover in place, and re-install the 3 screw that hold it in place.
I should have taken photos, but had assumed this was already documented. Please ask questions if what I wrote is not clear.


 08-26-2018, 10:39 PM