When you click on links to various merchants on this site and make a purchase, this can result in this site earning a commission. Affiliate programs and affiliations include, but are not limited to, the eBay Partner Network.
So it was my first track day ever and I had a lot to learn but by the fifth session I had enough down to go out first and hold the lead the entire way. I never had to signal pass and only once the instructor let me know the ZL1 was behind me. The ZL1 driver came up afterward and said he was trying to get close enough but every time I would coast and he would catch up, I got going again and of course he had no chance on the straights. The back stretch is lot's of fun. There is another member here who was out there in a wrapped black 2015 Turbo S.
Speed on the Granstand Straight is 130 before braking and on the back stretch is between 155 and 160 but closer to 155 by the end of the day when it was hot. The brakes never got soft but they smelled after that last run, the tires got welts on them. I really was able to push the car some on the last run. There is another run Sep 5,6 which I will be going to. This is a great track and there are lot's of good cars to watch while you wait for your next run and plenty of owners and drivers to talk to.
Probably the most fun day I have had in my entire life.
Thanks wrs. Looks a great day. Youtube is working now.. Looks fast! Does your camera have a feature which can show speed rpms and gears etc?
I just have the raw data type of Performance Box. I was looking around for something that could integrate the two but you need a Video Vbox which only records SD to do that. I just ran out and bought the Hero4 the day before I went to the track but before I go again on Sep 6, I think I will try to figure out what I can do beforehand to integrate the two. You can't tell on youtube how good the HD video is that I got from the Hero4 gopro but it's like being in the car it's so good. I might even put one on the roof looking back for the next time. I could also mount one that looks over my shoulder at the dash and then merge the two, I have seen those done.
There is a program called RaceRender that will do it if I can get the data from the .dbn files transformed properly. The export feature doesn't seem to work correctly on Windows 8 though. However, the Circuit Tools that come with the Vbox recognizes the course and shows me my lap times and speeds at every point but I don't have any data from the car so it can't give me RPM.
Thanks for the details wrs. And you are right, the footage is really sharp. I've been considering for some time now which camera to get as over the past year I've been fortunate enough to have done some awesome drives with friends of like mind, and therefore would like to have something to review later on. The hero appears to be quite a popular choice but I've always wondered whether there is an option which allows the speedo, rpms and gear to be shown in the footage. I looked into the Vbox a while back but it is a little costly for the 4 camera model plus you have a lot of wires to accommodate for inc the exterior antenna for the gps. I was looking for something more set and forget. I've also heard there is some sort of wireless device that can be plugged into the OBD port that can talk with certain cameras so to show these details. Do you know if the hero is one of them? I also see there is a new hero just out called the session.....super small.
In case this is useful to you, here's a lap I did in my 991TT last Friday as Pacific Raceways...not quite the track that COTA is by any means but it's a video example with the kind of virtual dashboard instruments you mentioned included.
The video is produced with an AIM SoloDL and a Smartycam GP HD (bullet cam). The SoloDL is connected to the camera's video recorder element and provides telemetry from the inertial and GPS sensors in it and from the data the SoloDL sniffs from the car's CAN bus.
The really neat part about this system is that the video comes off the SD card in the video recorder with all the overlay gauges working as you see them in the video with no extra effort. In other words, I can pull the card when I get to the paddock area and within a moment be looking at the video for review purposes. No effort post processing required.
Of course that "ease of use" comes at a certain price...the SoloDL/Smartycam set up is a bit more spendy than a GoPro and Race Renderer (or equivalent).
Last edited by boxer-11; 07-13-2015 at 05:20 PM.
Reason: ok, guess I don't know how to make YT vids work directly in the post here :/
In case this is useful to you, here's a lap I did in my 991TT last Friday as Pacific Raceways...not quite the track that COTA is by any means but it's a video example with the kind of virtual dashboard instruments you mentioned included.
The video is produced with an AIM SoloDL and a Smartycam GP HD (bullet cam). The SoloDL is connected to the camera's video recorder element and provides telemetry from the inertial and GPS sensors in it and from the data the SoloDL sniffs from the car's CAN bus.
The really neat part about this system is that the video comes off the SD card in the video recorder with all the overlay gauges working as you see them in the video with no extra effort. In other words, I can pull the card when I get to the paddock area and within a moment be looking at the video for review purposes. No effort post processing required.
Of course that "ease of use" comes at a certain price...the SoloDL/Smartycam set up is a bit more spendy than a GoPro and Race Renderer (or equivalent).
Thanks Mark. Some good advice there. Is there many wires laying around he cabin still or is the obd plug in a wireless connection? And the bullet camera, is that cabled or wireless? Are you using an external mic? TIA.
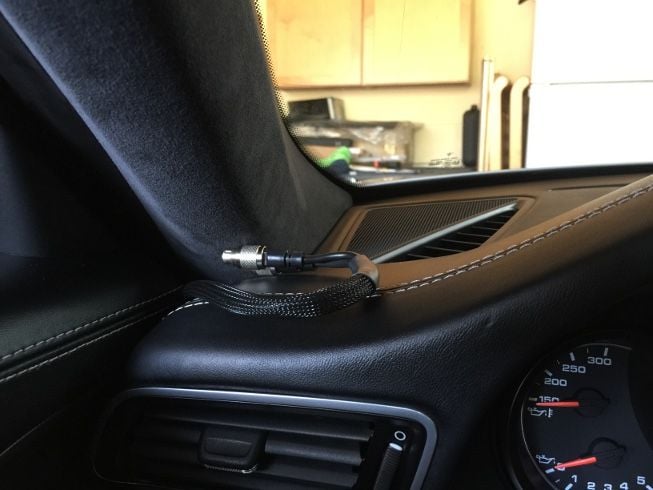
The SoloDL is mounted on a RAM mount stuck on the inside of the front windshield so that it sits to the left of the steering wheel just above the front dash. It has two wires coming from it. One goes to the fuse box in the drivers foot well. Two conductors from that wire taps directly into the wiring harness to get at the CAN bus and then two tap into one of the unused fuse points to give the SoloDL a power and ground connection. The other wire goes to the video recorder unit.
Now I didn't want loose wires all over the place. I talked to the installer that did the radar/laser countermeasures install for me and they figured out how to run both cables down the left edge of the dash and thence to the required spots by running behind elements of the trim.
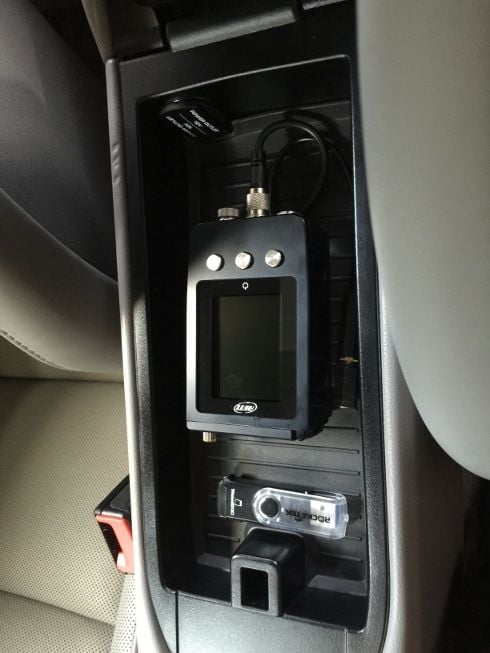
We decided to mount the video recorder in the storage compartment under the central arm rest so that wire for that runs through the center console/tunnel and up into the storage area. The recorder itself is "permanently" mounted by bolting it through the base of the rubber mat in the storage area -- that's enough to hold it soundly even under 1.3G (ish ) braking and so forth.
For the CAN bus and power taps and running the wire to the storage compartment the goal was to be as unintrusive as possible. Said another way, if I want to pull the additions out at some point the only part I'd need to replace to put it back to factory condition would be to replace the rubber mat in the storage area...everything else is secure in the structure now but easily removable without compromise...no extra holes drilled etc.
[some folks advise soldering the CAN bus tap but on my installers' advice we went with a tap that's good electrically but easily removable]
Oh, I should say I went for the CAN bus tap direct instead of the OBD-II plug because the data rate delivered through the OBD-II is lower. As I understand it you can get less signals and each of those less often going that way compared with the direct tap that gives you all the available signals at once, some of them as many as 20 times a second (...and moving at the speeds our cars can get to that resolution is a Good Thing(tm) ).
The bullet camera is mounted on the underside of the glass sunroof that I have in my car using another RAM mount. Who knew the roof would be so handy?? Most people that have internal camera mount to roll cage structure I'm told...but this is my daily driver so the roof is a way better option. The only trick to the camera is that I started with the shorter of the two RAM mount stem parts and with that set up the driver mirror was really in the way. What I have now -- and what you see in the video above -- is the extra long RAM mount arm and that's pretty much perfect for field of view.
[incidentally, the video I uploaded looks pretty grainy but that's just my incompetence with YT - first ever upload - the video comes out nice and crisp like the one the OP posted]
That camera does have a wire that goes to the video recorder box. I run that wire down the back of the passenger seat and then between the seat and the center console tunnel on the tunnel side of and below the seat belt latch and then it peeks up for just and inch or two to dive into the storage area -- there's a spot near the latch of the storage lid where there's a gap that's perfect for running this wire into the storage area without crushing the wire casing.
That camera wire does have a companion wire -- that's for the external mic. The mic is mounted on the rear shelf by where the symposer opening is and then I tack the wire to the carpet there with masking tape, run the rest of the wire round the edge and underside of the rear seat padding to meet up with the video cable.
The good part about running the video and mic wires this way is they are 2 minutes work to remove. I'd have set them up more permanently maybe but I couldn't really figure out a reasonable way to run the video cable to hide it given the choice of mounting point for the camera. That goes double since I obviously don't want to leave the camera there because I actually open the roof quite a bit now the summer is firmly here in the PNW
The most untidy part of this is the head end of the wires at the left from dash. If I remove the SoloDL -- which I do most of the time for daily driver purposes -- then the wire and two plugs are loose. I don't find it too annoying though, I just curl the cableform around ounce and jam the plugs lightly between the dash and the A pillar covering. That's more than enough to keep things out of the way and tidy enough for my sense of aesthetics (YMMV of course).
Here's a couple of pics of the video recorder in it's permanent spot and the wires that go to the SoloDL up by the dash area which might help explain the mumbo jumbo above.
Oh and for bonus points, my audio set up is a bit more complicated than you need for video as you see it alone...my helmet has an IMSA helmet kit with mic hard mounted inside and a socket for my earbuds. I run that to a TVC15 box mounted on the back of the driver seat that is actually where the external mic plugs in. That box can be hooked into a radio or to a chatterbox depending on what I'm up to and the box mixes all of the audio sources, me, the radio and the external mic, onto the videos via the recorder's external mic input jack.
That sounds like a lot of threash but the result is I have me and my instructor recorded on the tape (or my own audio annotations if I'm solo) so that I can review what was said as well as looking at what I'm doing with the car. It's amazing how helpful that is...I guess I miss some things instructors try to impart as I'm zipping along
^ Thanks so much for the finer details. Much appreciated! I've always wondered what is entailed and how it all looks as a working set up. It all looks quite tidy actually. Would there be any noticeable drill holes if I opted to remove it when I sell the car at a later stage?
The video is produced with an AIM SoloDL and a Smartycam GP HD (bullet cam). The SoloDL is connected to the camera's video recorder element and provides telemetry from the inertial and GPS sensors in it and from the data the SoloDL sniffs from the car's CAN bus.
The really neat part about this system is that the video comes off the SD card in the video recorder with all the overlay gauges working as you see them in the video with no extra effort. In other words, I can pull the card when I get to the paddock area and within a moment be looking at the video for review purposes. No effort post processing required.
Of course that "ease of use" comes at a certain price...the SoloDL/Smartycam set up is a bit more spendy than a GoPro and Race Renderer (or equivalent).
Actually, it's a little cheaper when you consider what I spent on the individual components that don't automatically integrate. The Performance Box was $550 and the GoPro was about $700 with all the stuff I bought, carrying case, extra battery, small frame, suction mount and SD card. I think the Performance Box has an external input for car data from OBDII if you can get it but that is another recorder as well. Then it all has to be integrated which now I found another tool called DashWare that claims to do it. I am still working on getting the video and Performance Box data to work with DashWare. So definitely the integrated solution is the way to go but I already had the Performance Box which I have used for the last year doing acceleration testing on various different cars. It's very useful for evaluating mods doing quarter miles or other acceleration tests. Your video looks pretty nice and easy too!
@speed21: there were no new holes drilled for the installation of the two cables and the video recorder permanent installation. The exception is a hole in the rubber mat in the storage compartment. So, if I want to remove the parts later I just need a new mat and it would be back to stock condition. The cables can be pulled back out the way they were put in.
@wrs: I guess I underestimated the cost on the GoPro route then. The AIM system certainly makes it falling-off-a-log easy. The dealer I bought the kit from pre-programmed it with local tracks and the video overlay setting to the point I really only had to mount things in the car and it was turnkey from there.

 07-06-2015, 11:16 AM


 ) braking and so forth.
 ).
).