When you click on links to various merchants on this site and make a purchase, this can result in this site earning a commission. Affiliate programs and affiliations include, but are not limited to, the eBay Partner Network.
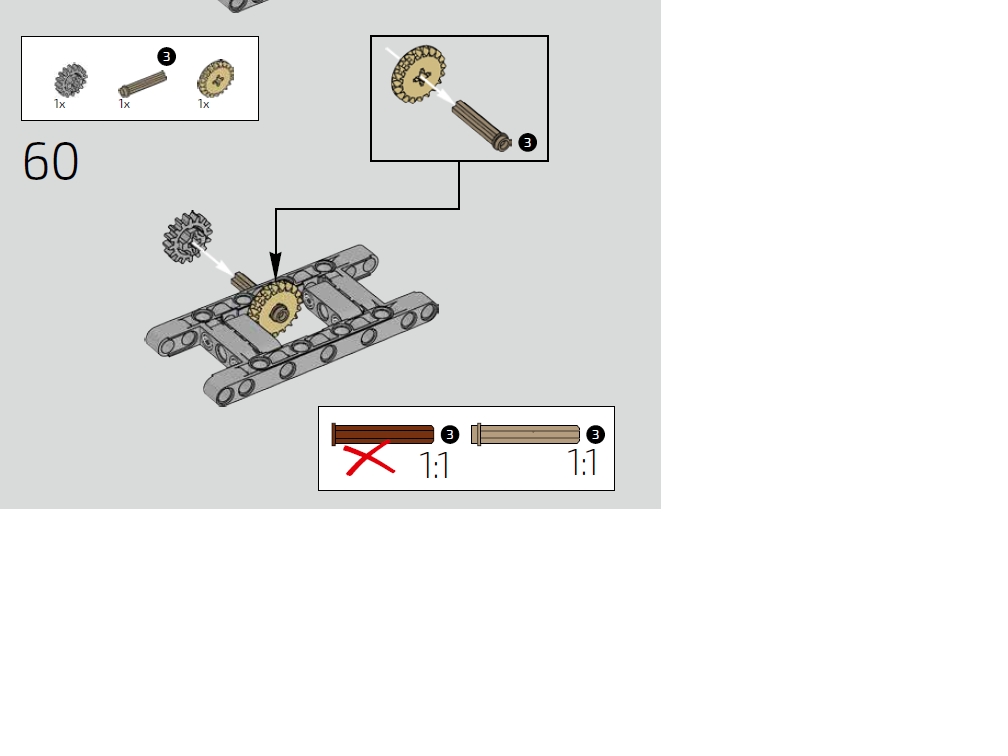
Out of curiosity, did anyone else get burned on step 60 like I did? The revised instruction manual on their website tells you not to use the 3 bar brown pin that I used because my book was a first revision and did not have the warning. Evidently it was a common enough mistake that new books have the warning. By the time I figured it out I was 190 steps in and wondering where the pin I needed to complete the suspension was - and it was too late to fix it without hours of disassembly. I was able to switch the parts, but it bugs me to know it so I am having Lego send me another one
Out of curiosity, did anyone else get burned on step 60 like I did? The revised instruction manual on their website tells you not to use the 3 bar brown pin that I used because my book was a first revision and did not have the warning. Evidently it was a common enough mistake that new books have the warning. By the time I figured it out I was 190 steps in and wondering where the pin I needed to complete the suspension was - and it was too late to fix it without hours of disassembly. I was able to switch the parts, but it bugs me to know it so I am having Lego send me another one
Yes definitely spent a long time messing with that part. In the end I know it's not perfect, but like horseshoes and hand grenades it's close enough Afterwards I searched online and realized the error. It's all good, it still looks great and I'm just content to understand it wasn't my error on a model allegedly designed for 16 year Olds.
I haven't built mine yet either. I curious to see if I got burned too.
Lego sends the right parts in the kit, just make sure you use the light tan pin with the open end, and not the dark brown pin. My book does not have this warning box:
If you use the brown pin, it will be at the end of box 1 before you realize it. By then it's too late to fix it.
Lego sends the right parts in the kit, just make sure you use the light tan pin with the open end, and not the dark brown pin. My book does not have this warning box:
If you use the brown pin, it will be at the end of box 1 before you realize it. By then it's too late to fix it.
Finished mine a couple of nights ago. Found this thread too late...
Lego should put a warning sticker on older boxes...
I got my set back in July 2017 but am still on box 2, shopping for my real 911 took up my free time. Anyway, I got a cool LED headlight and tail light set for the car. I will post pictures if I ever get it built.
I also built a 997 GT3 RS in the LEGO Speed Champions style ad a larger LEGO mosaic (pics attached).
I did a my 997 and a 934.5 in LEGO, with a 2017 RSR to be completed soon. Here is a link to some of my builds....
I just finished my GT3 RS, and got a set of custom LED lights for the exterior and interior. I also bought some extra parts and put orange plates under the headlights to fill in the gap below them. I wasn't sure about the interior light at first, but it really allows you to see all the interior detail even if the car isn't in a well lit room. I wedged the battery box up under the car and used extra LEGO Technic parts to pin it in place. You can roll it around as before without getting snagged on a wire.
 01-30-2017, 06:30 PM