Red alcantara seat inserts are IN: My spyder is complete
 03-28-2012, 06:36 PM
#16
Three Wheelin'

 03-28-2012, 06:51 PM
#17

 03-28-2012, 08:17 PM
#18
Khooni: I don't think the guy is making anymore of them but I really don't know for sure.
https://rennlist.com/forums/997-gt2-...rotectors.html
Saludos,
Eduardo
https://rennlist.com/forums/997-gt2-...rotectors.html
Saludos,
Eduardo
03-28-2012, 09:07 PM
#19
Instructor

Join Date: Aug 2008
Posts: 111
Likes: 0
Received 0 Likes
on
0 Posts
orthojoe,
regarding your install on the covers, if you retie the drawcords, you can get the covers to lay more flush with the seats. take one end of the draw cord and loop it into the gromets from the front of the covers. tie a knot at the back. Then take the other end loop it through one of the cut outs on the side mounts and loop it back out another cut out. Then put the drawcord through the other gromet from the front of the cover, pulling the drawcord giving it a little tension and tie another knot. cut off any excess drawcord. the end result should look nice and flush like the below.

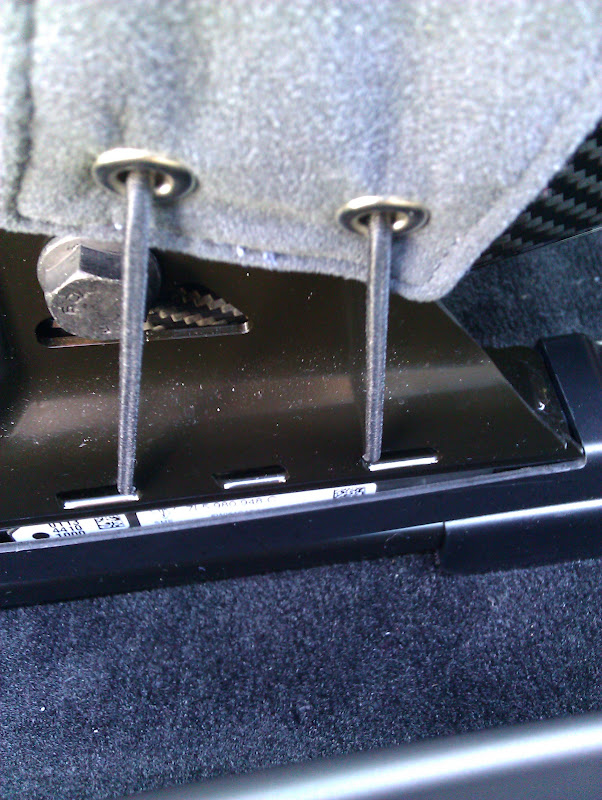
regarding your install on the covers, if you retie the drawcords, you can get the covers to lay more flush with the seats. take one end of the draw cord and loop it into the gromets from the front of the covers. tie a knot at the back. Then take the other end loop it through one of the cut outs on the side mounts and loop it back out another cut out. Then put the drawcord through the other gromet from the front of the cover, pulling the drawcord giving it a little tension and tie another knot. cut off any excess drawcord. the end result should look nice and flush like the below.
03-28-2012, 11:56 PM
#21
Nordschleife Master
Thread Starter
orthojoe,
regarding your install on the covers, if you retie the drawcords, you can get the covers to lay more flush with the seats. take one end of the draw cord and loop it into the gromets from the front of the covers. tie a knot at the back. Then take the other end loop it through one of the cut outs on the side mounts and loop it back out another cut out. Then put the drawcord through the other gromet from the front of the cover, pulling the drawcord giving it a little tension and tie another knot. cut off any excess drawcord. the end result should look nice and flush like the below.
regarding your install on the covers, if you retie the drawcords, you can get the covers to lay more flush with the seats. take one end of the draw cord and loop it into the gromets from the front of the covers. tie a knot at the back. Then take the other end loop it through one of the cut outs on the side mounts and loop it back out another cut out. Then put the drawcord through the other gromet from the front of the cover, pulling the drawcord giving it a little tension and tie another knot. cut off any excess drawcord. the end result should look nice and flush like the below.
03-29-2012, 02:49 AM
#22
Instructor
Join Date: Aug 2008
Posts: 111
Likes: 0
Received 0 Likes
on
0 Posts
np! just make sure the drawcord are not connected together at the cover, otherwise when you tighten it, it'll cause the cover to scrunch up.
03-29-2012, 01:37 PM
#24
very nice...awesome looking Spyder!
03-31-2012, 11:03 PM
#26
Lookin' good Joe!!
03-31-2012, 11:46 PM
#27
Nordschleife Master
Thread Starter
Thanks for all the nice comments, everyone! Now I just need to sit down and figure out the best way to wire the seat heaters to the stock switches.
04-01-2012, 11:45 PM
#29
Nordschleife Master
Thread Starter
I got around to doing the wiring for the heated alcantara inserts. Here's my findings:
1) The heating elements that Heritage installed included one in the back padding, and one on the bottom padding. The switch between high and low works by running the 2 elements in serial on low, and in parallel on high.
2) The OEM heated seat switch does NOT work in the same way. There is only 2 wires coming from the OEM seat heater switch (+ and -) Using a voltmeter, I discovered that on the high setting, output is a full, constant 12V. However, on the low setting, the voltage output switches on/off every 5 seconds.
3) Since the mechanisms for hi/lo on OEM vs aftermarket is different, I wired the aftermarket switch to stay permanently on high, and then sourced the power through the OEM power output for the heated seats
4) Result: I now have heated carbon bucket seats that use the OEM seat heater switches. My only complaint is that the high setting is not quite as hot as my original P77 sport heated seats.
12-20-2012, 04:38 PM
#30

Just got my inserts from Heritage. Appx. 3 1/2 months from initial contact. Went with their size specs on diamond stitching and will probably have to have it removed and/or redone locally. Otherwise OK for what you pay.