Product Review & Installation Tips: Boxster Spyder Ducktail Replica by Spoiler Nation
 09-26-2017, 07:45 PM
#1
Racer
Thread Starter
DISCLAIMER: I do not have any affiliation with Spoiler Nation. I'm just a satisfied customer who likes testing new stuff and wanted to share my results and experience with this product for the benefit of other Porsche enthusiasts. So please pardon this post (and mods feel free to amend it) if parts of it are accidentally in violation of any rules.
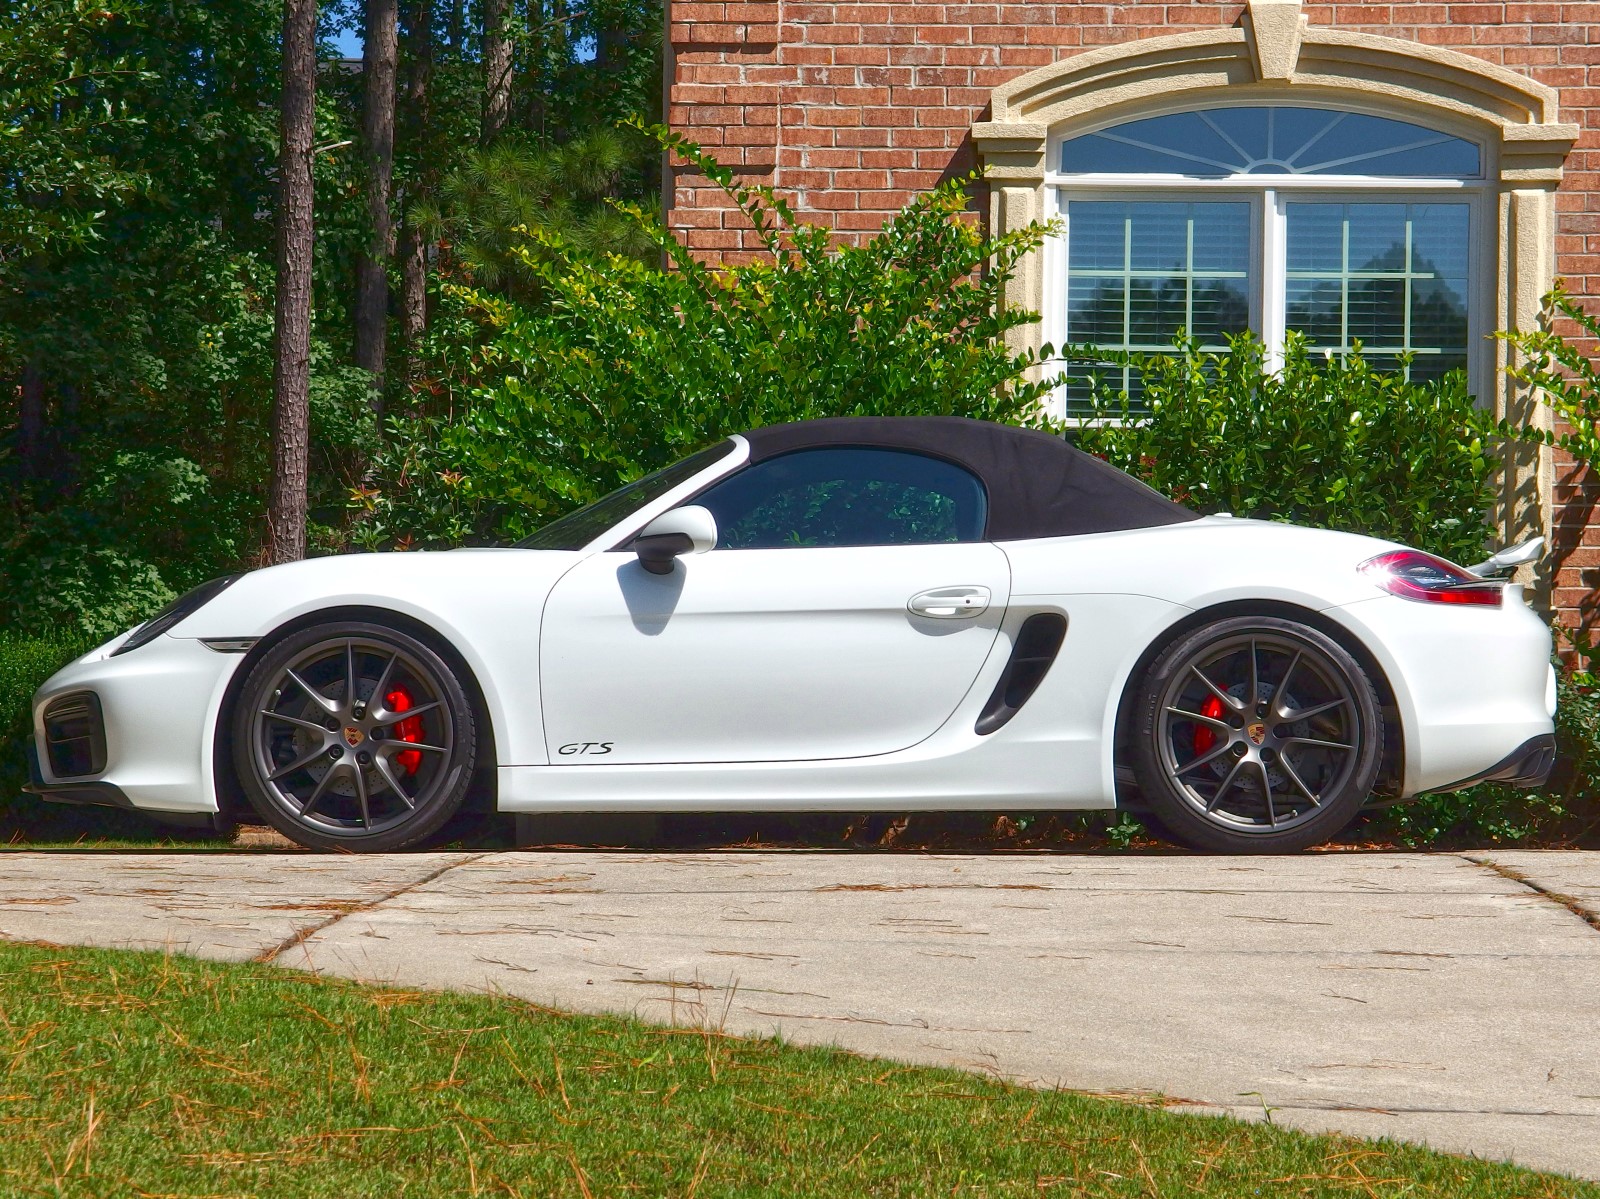
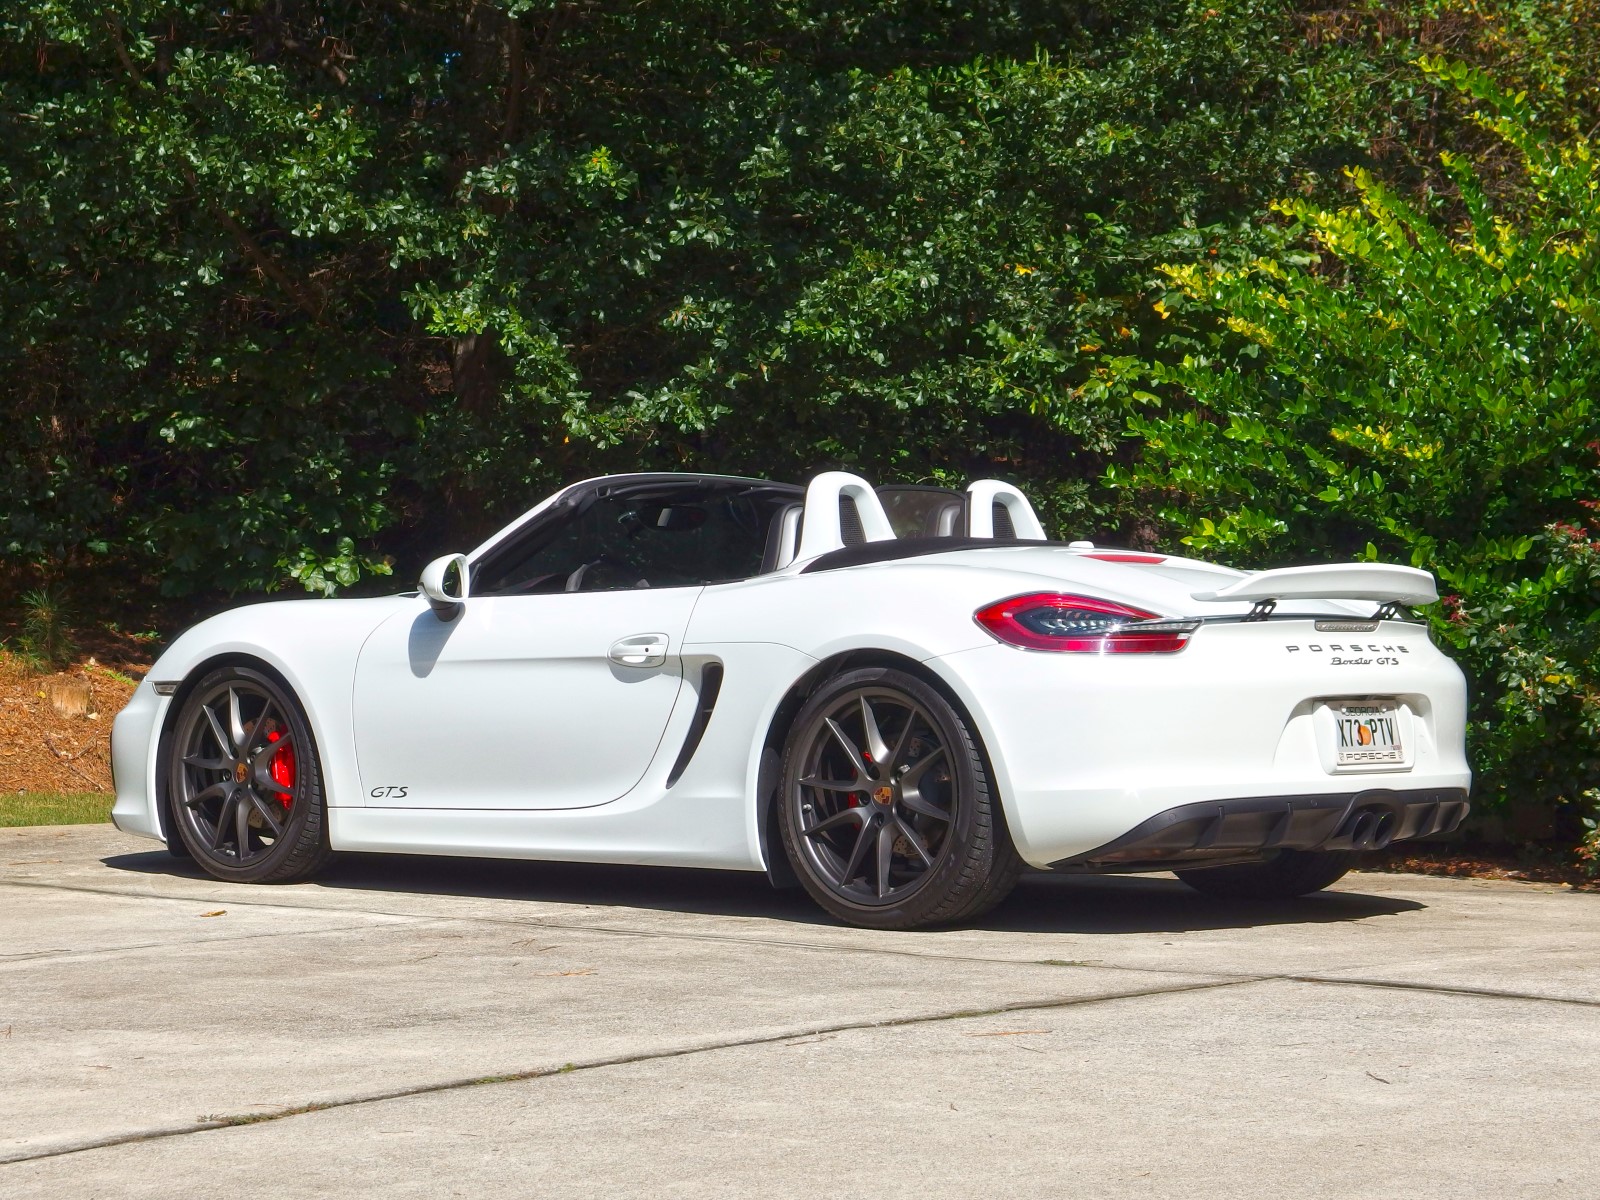
Ever since the 981 Spyder was released, I've loved the look of its rear ducktail spoiler. One of the most distinctive features of every 981 is the crescent-shaped integrated spoiler "shelf" that spans from each taillight, as if formed by someone who pinched the tapering rear end of the 981 between their fingers and pulled a graceful arc straight outward like hot taffy. The Spyder's ducktail was just pinched and pulled further and taller, giving it more visual presence and attitude. I think my Boxster GTS looks great in stock form, but the idea of adding the Spyder ducktail to my car appealed to my sensibilities as a fan of tasteful and restrained modifications that result in an OEM+ look. The only problems were: Cost (the OE Spyder ducktail is at least $700 plus the cost of shipping and painting, bringing the total cost closer to $1,000), and my aversion to taking my car anywhere near an auto body shop to have one painted to match or installed by someone else (I illogically loathe going to those shops as much as some people loathe going to the doctor--it's probably because I am always fearful of collateral damage, even though having a spoiler painted up wouldn't really require my car go "under the knife.") It turns out that somebody already makes an affordable bolt-on solution for paintwork-phobic people like me: Spoiler Nation's 2013-2016 Porsche Boxster Ducktail Rear Wing Spoiler. Here are the product specs:
The painted option is the one that obviously appealed to me the most, as the product arrives already painted to match my factory paint color based on my VIN and color code. This includes 2-3 base coats and 2-3 coats of 2:1 "high solid" clear coat, which is wet sanded and polished to match the factory finish. Because of the time required to prep, paint, and polish the product (and to allow the paint the cure), the painted option takes 3-6 business days to build-to-order.
Considering that the known alternatives are more expensive and genuine OE quality may not be dramatically different or noticeable (to the naked eye), I decided to take a chance on Spoiler Nation's replica product. The product shipped in a few business days, and 2 days later this showed up on my doorstep.
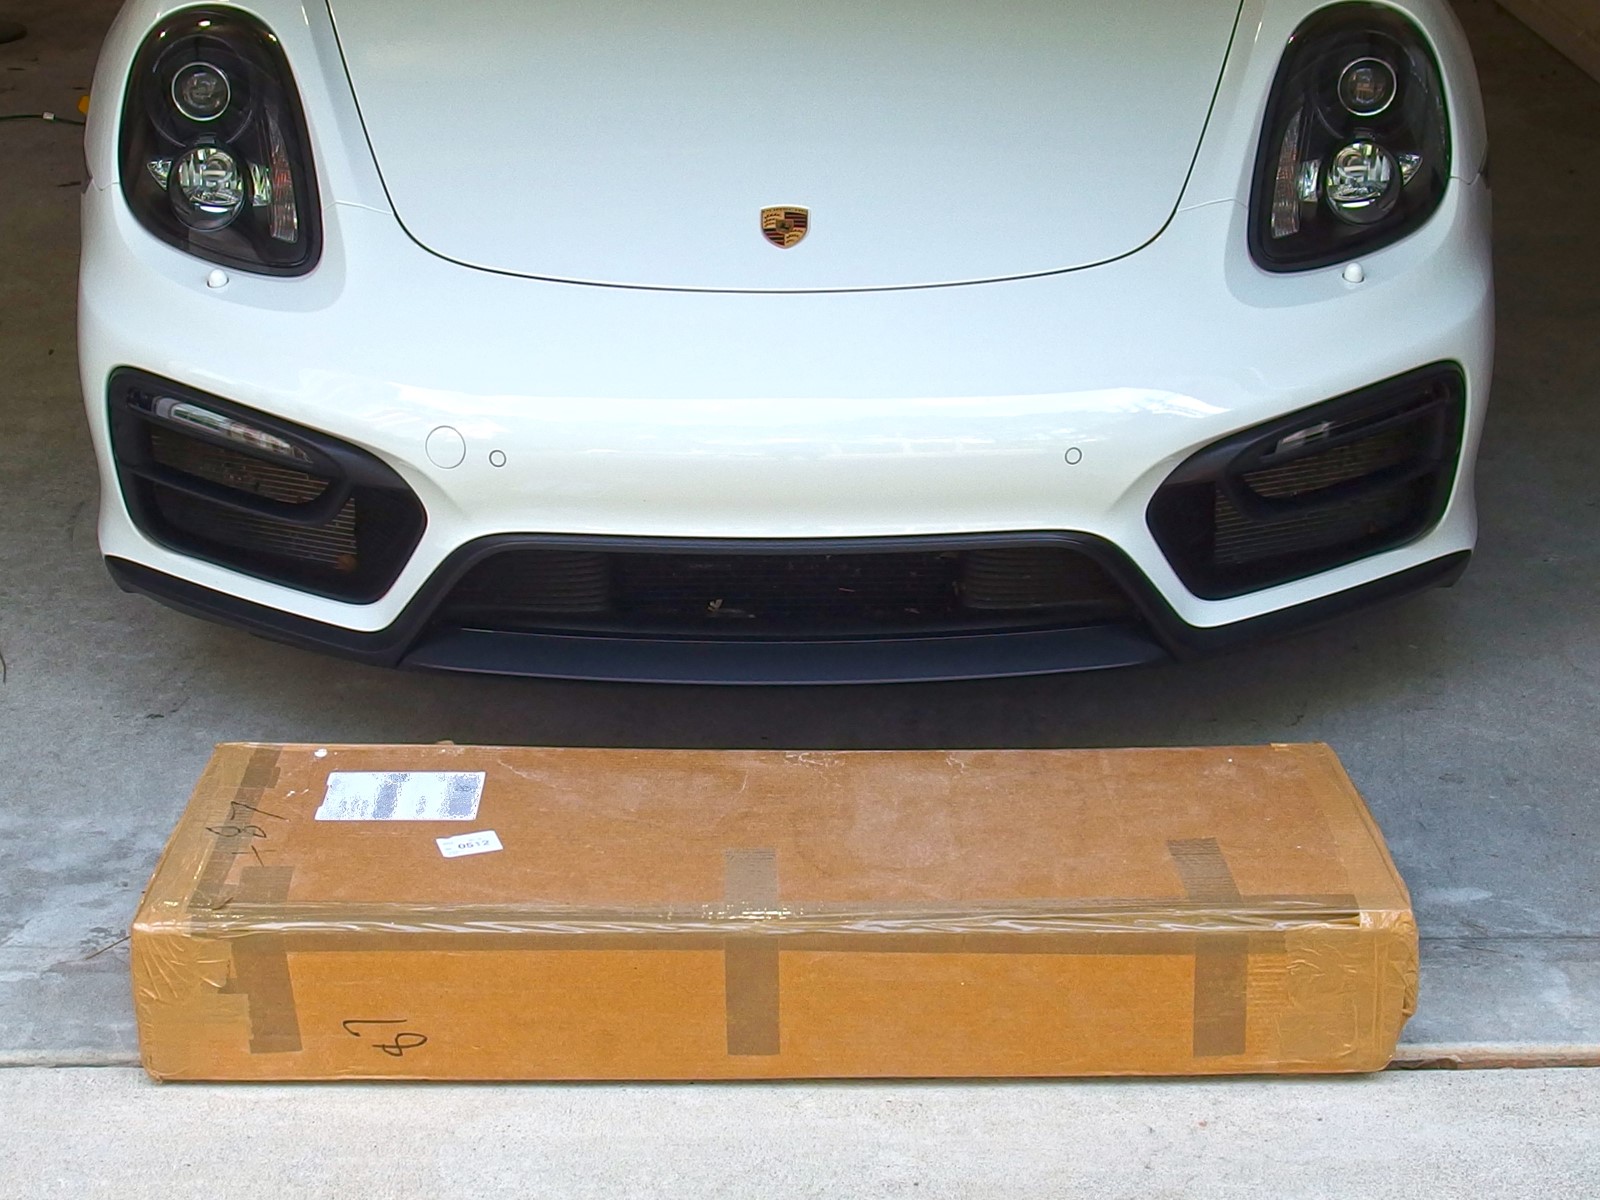
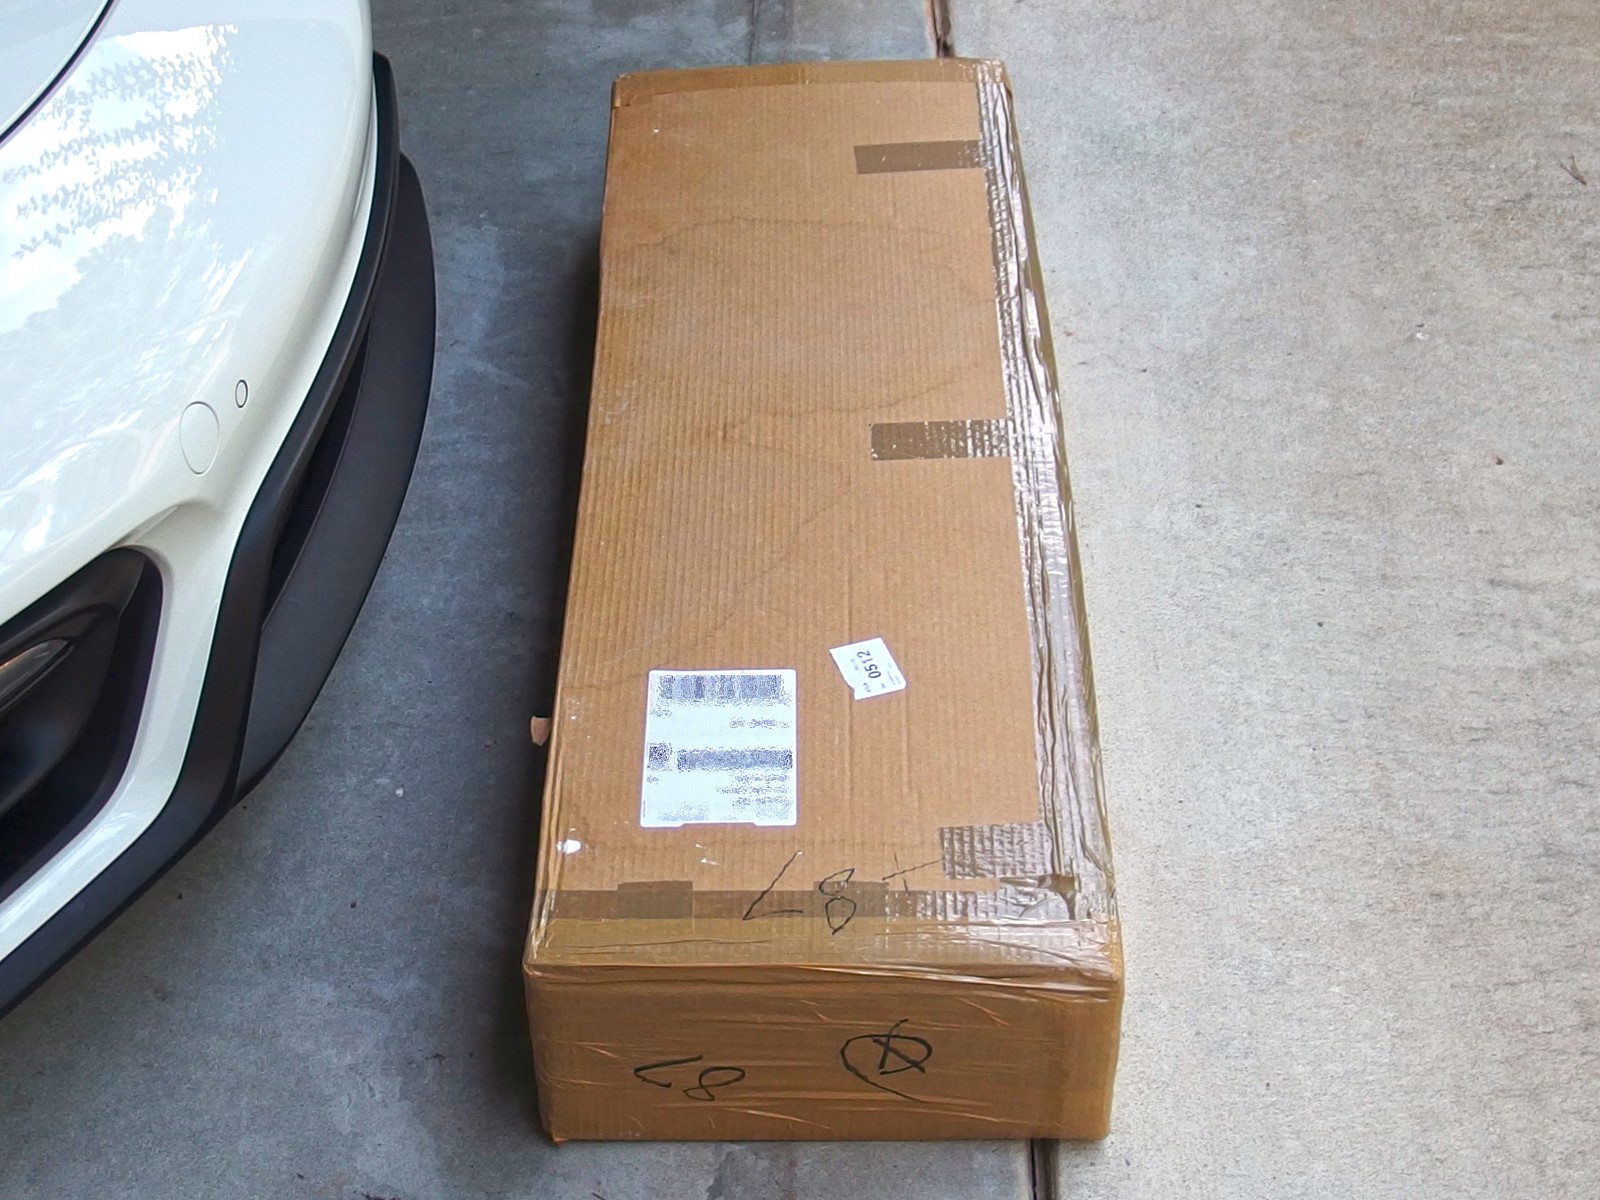
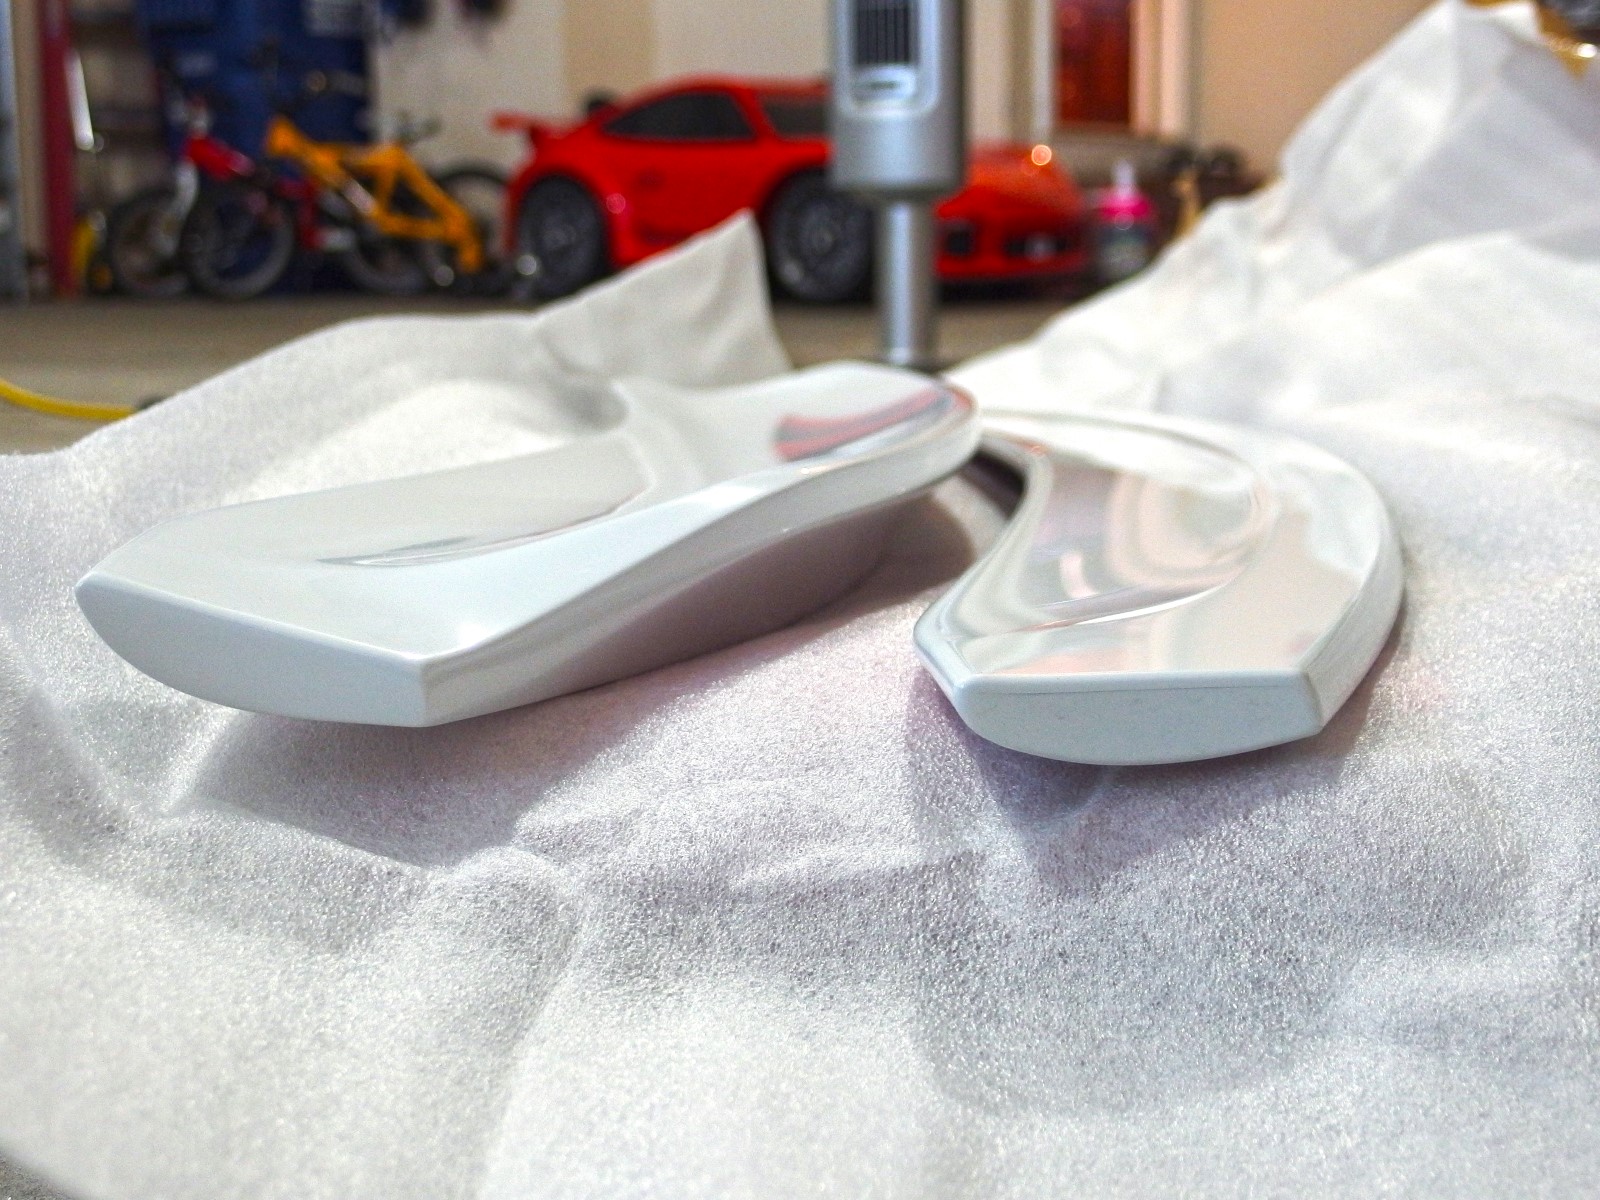
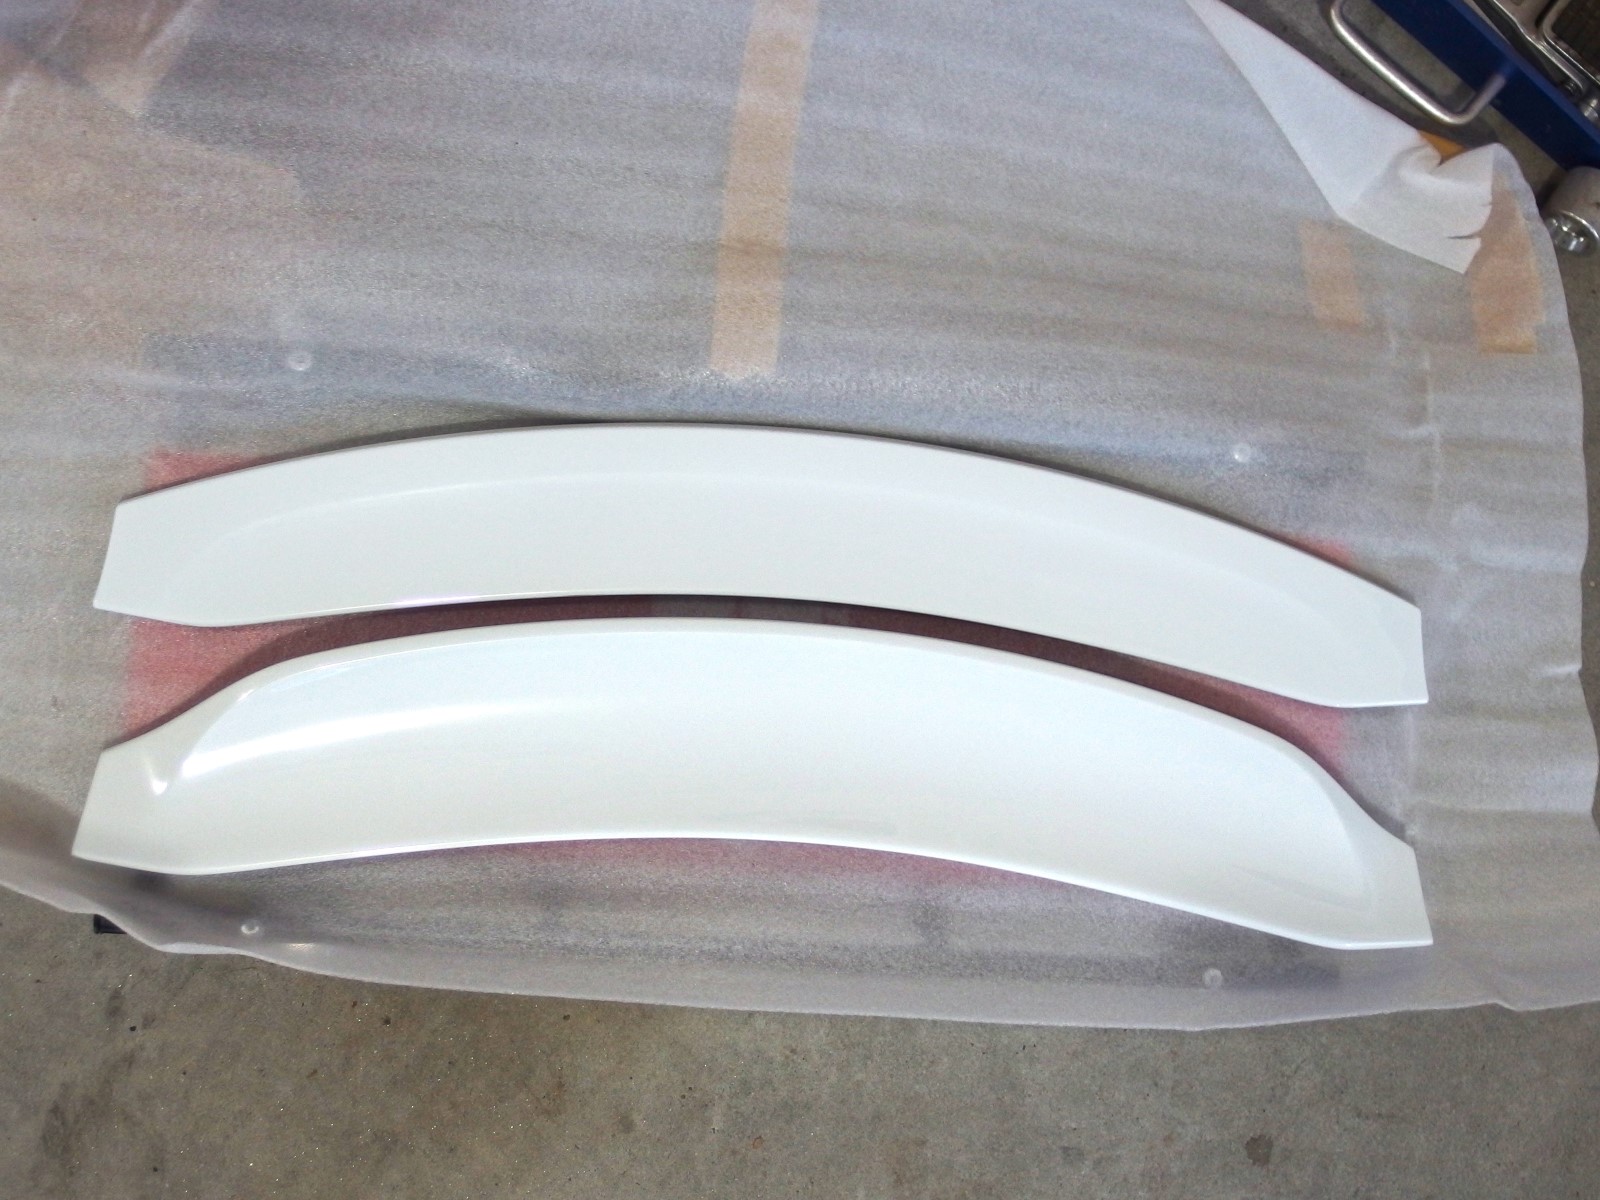
The ducktail arrived in a cardboard box with sufficient foam padding and bubble-wrap for protection. My first impression upon handling the box was "Wow, this thing is light."
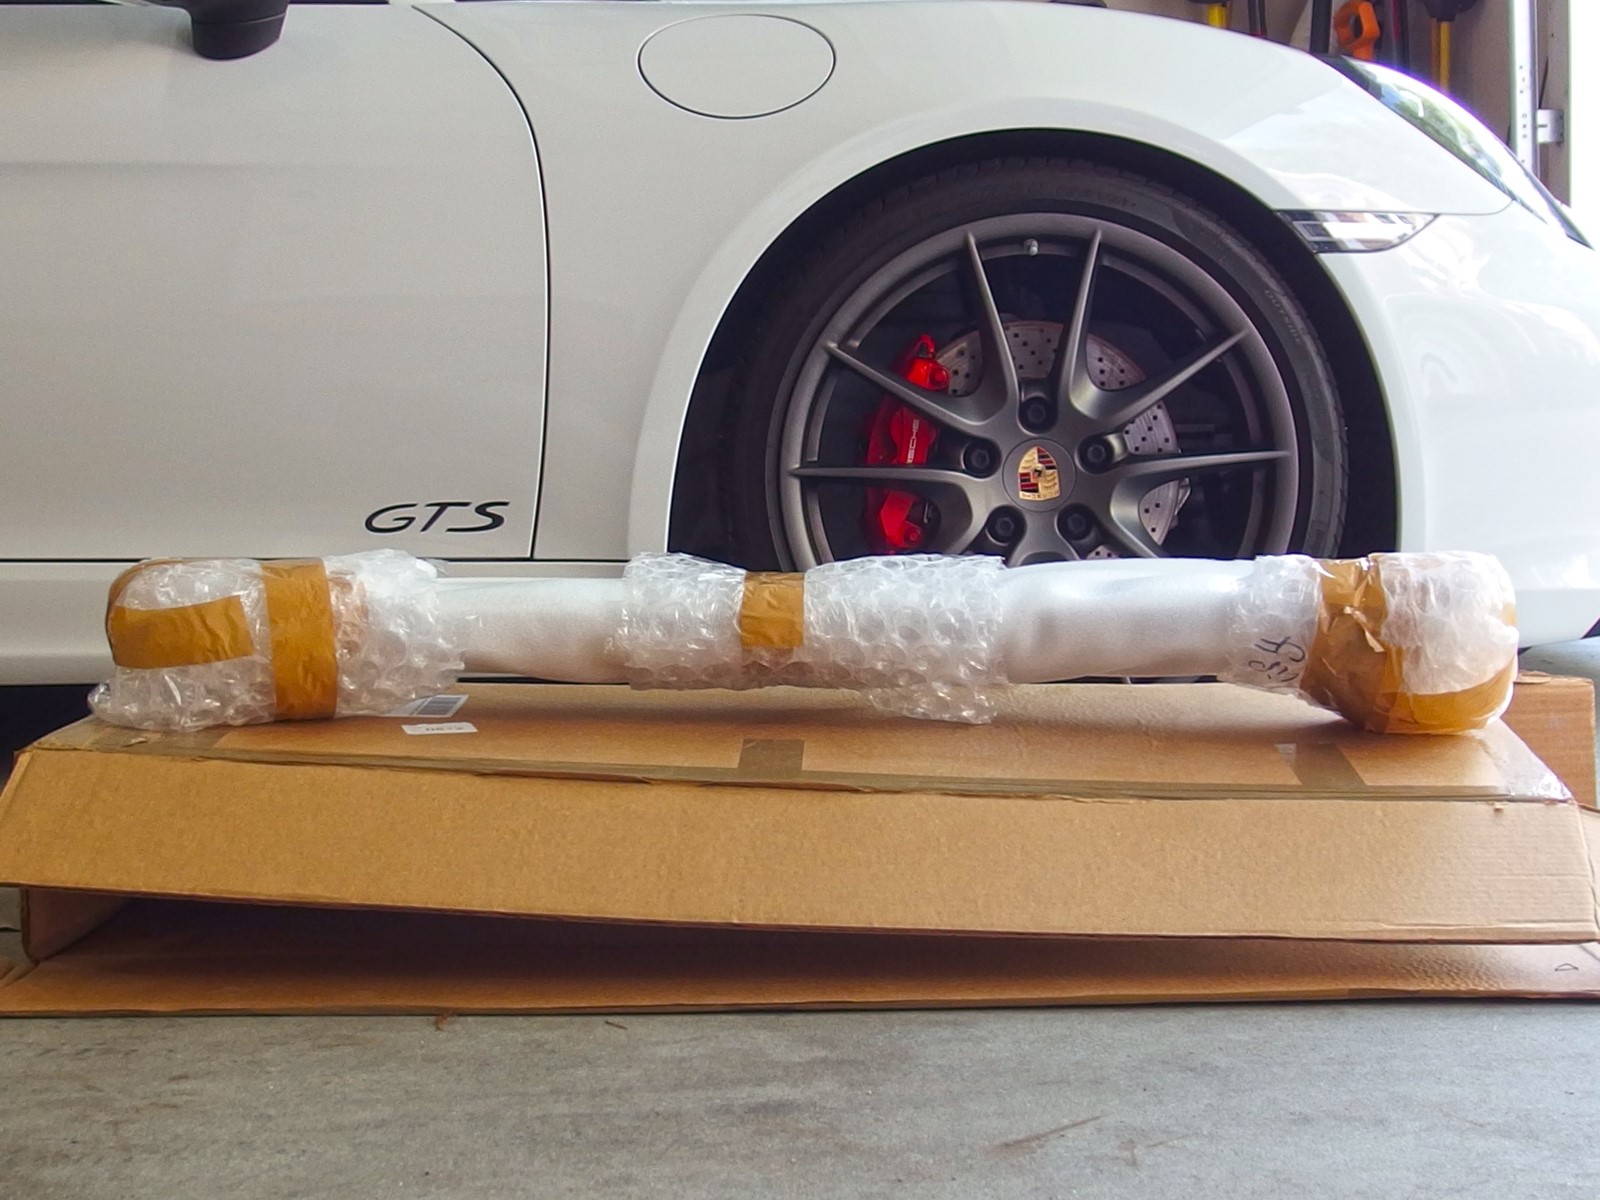
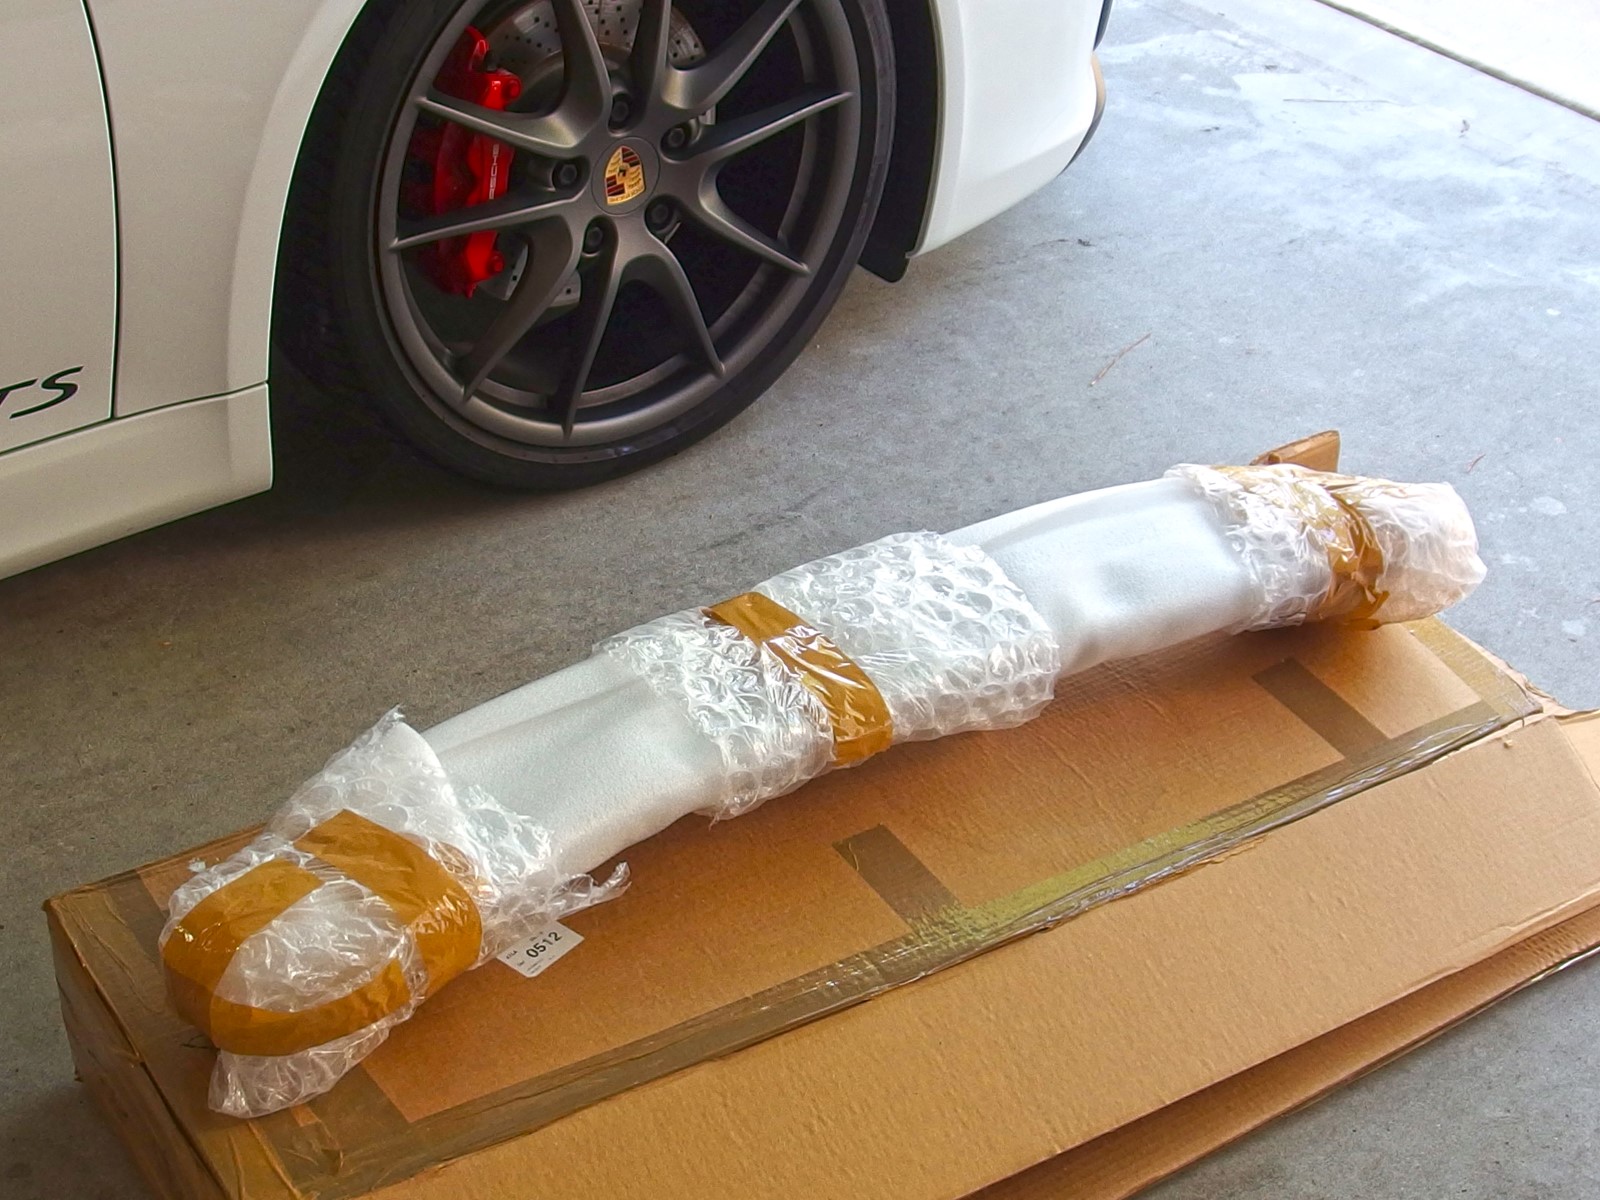
After carefully opening the protective padding (be careful if using a knife!), my 2nd impression was "Wow, this thing is thick and rigid."
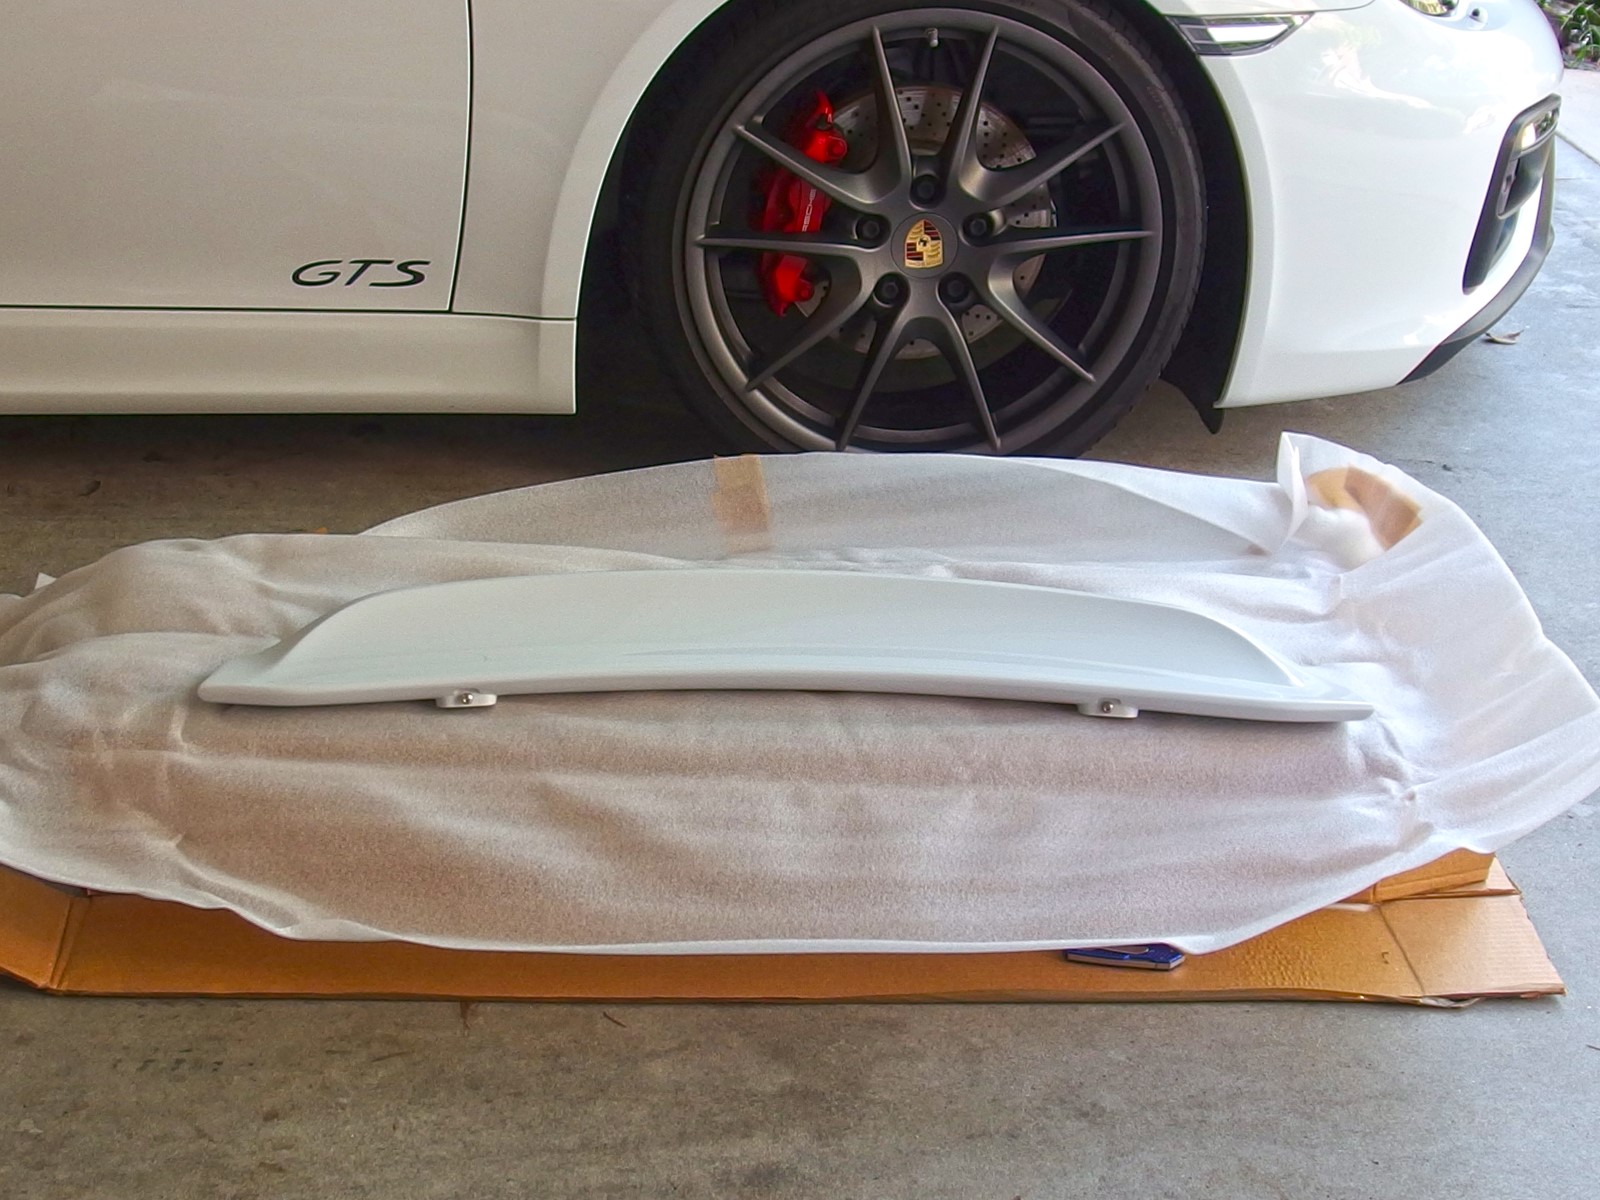
I fully inspected the ducktail for damage, color match, and cosmetic blemishes like dust, scratches, excessive orange peel, or runs in the clear coat (because I was not going to bother removing my stock spoiler if I was going to have to send a defective part back in the mail).
Thankfully, after careful scrutiny I was satisfied that the aftermarket part (visually) passed muster and met my quality standards, so I protected the edges with tape and set it aside.

Then I began the 5-minute process of removing my stock spoiler (which is essentially loosening 5 Torx bolts and 2 nuts).
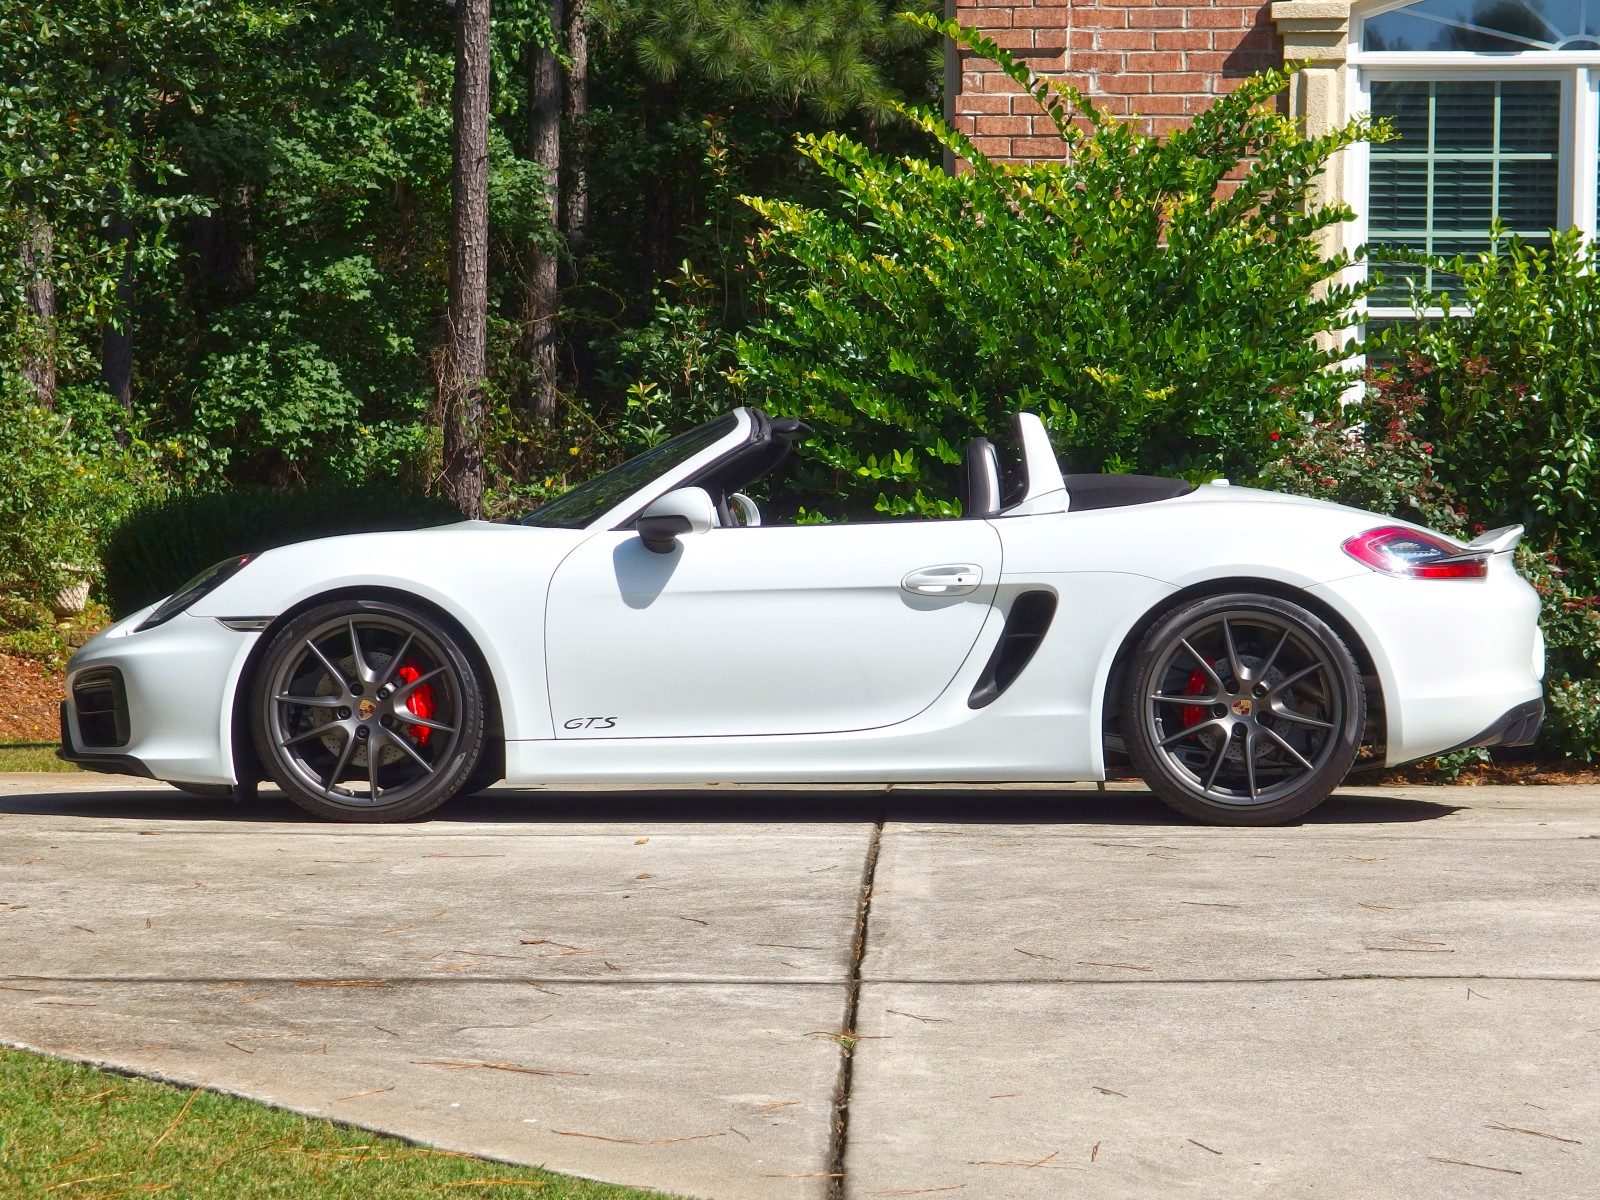
A few hours later, I finally had the ducktail on the car and adjusted properly (and no, I never manually raise the spoiler while driving or when parked--if shown raised in any of my pictures, it's for demonstration purposes only, because it's a lot harder to photograph the ducktail from another moving vehicle at 75 MPH).
So what do I think of the replica ducktail now that I've installed and used it on my own car? Please read on below for my product ratings, findings, and installation tips.
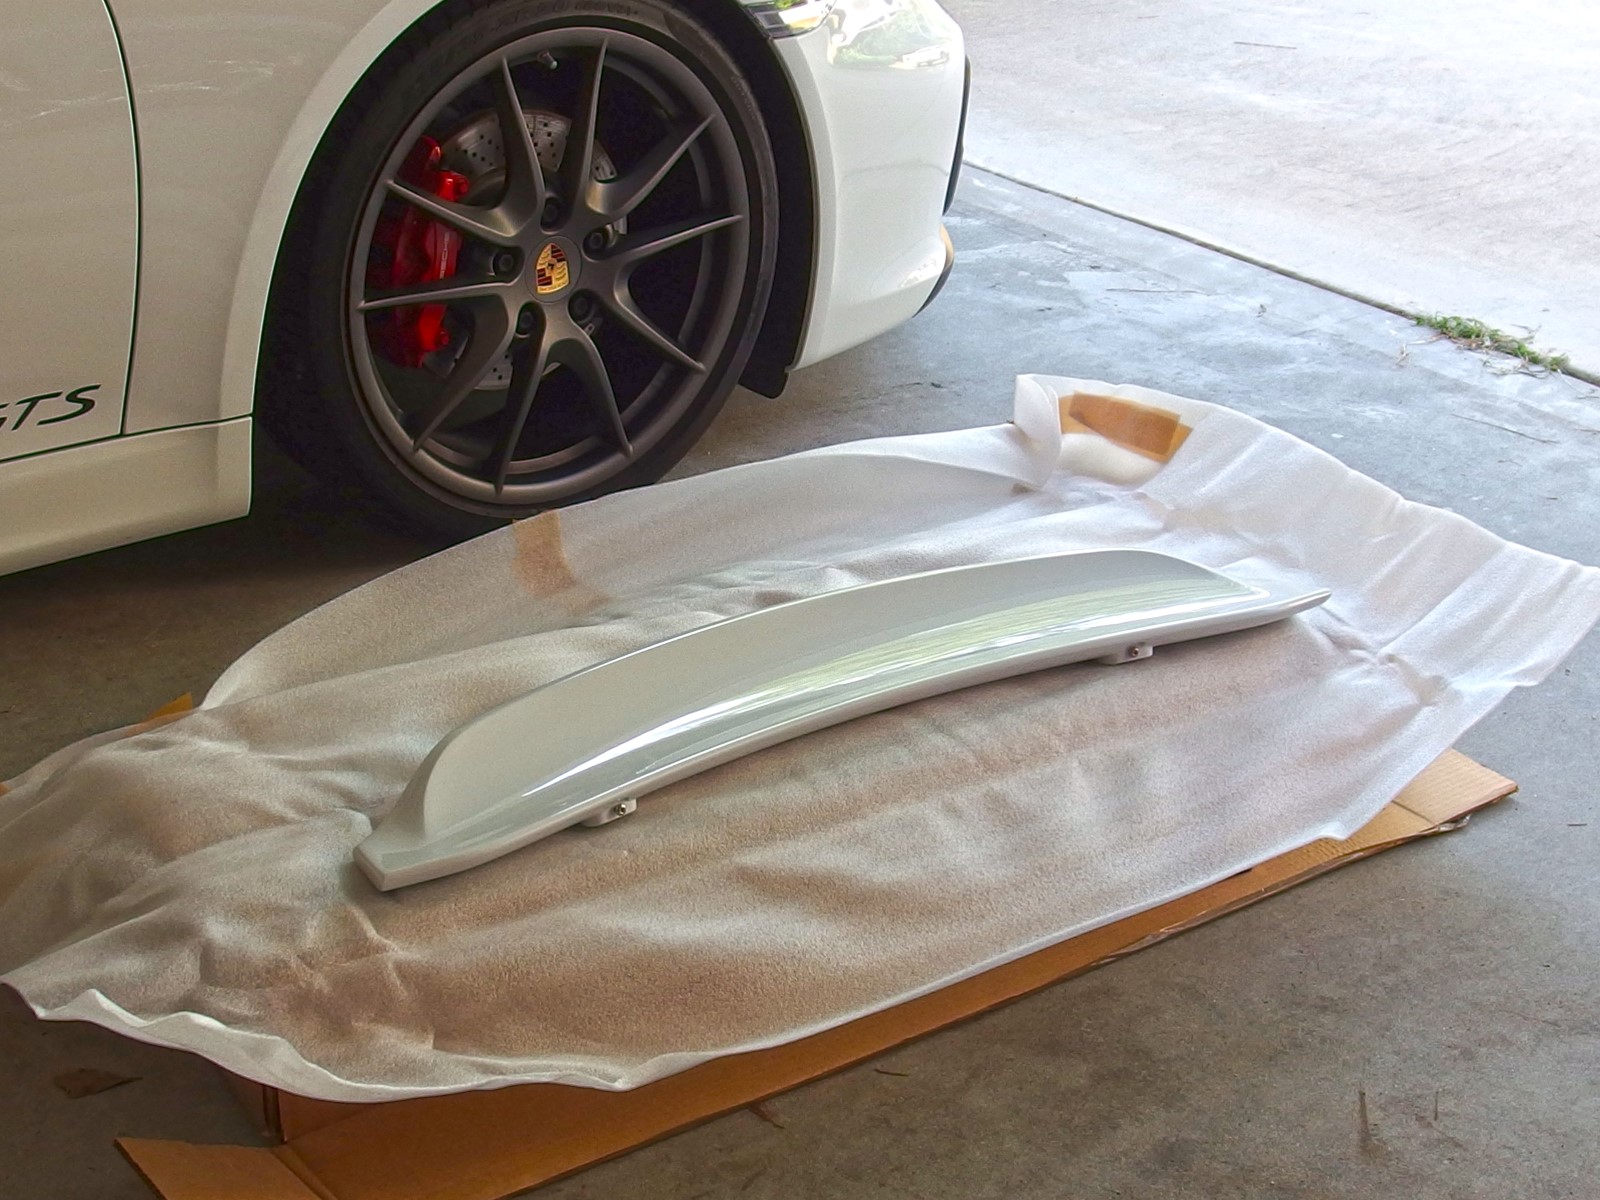
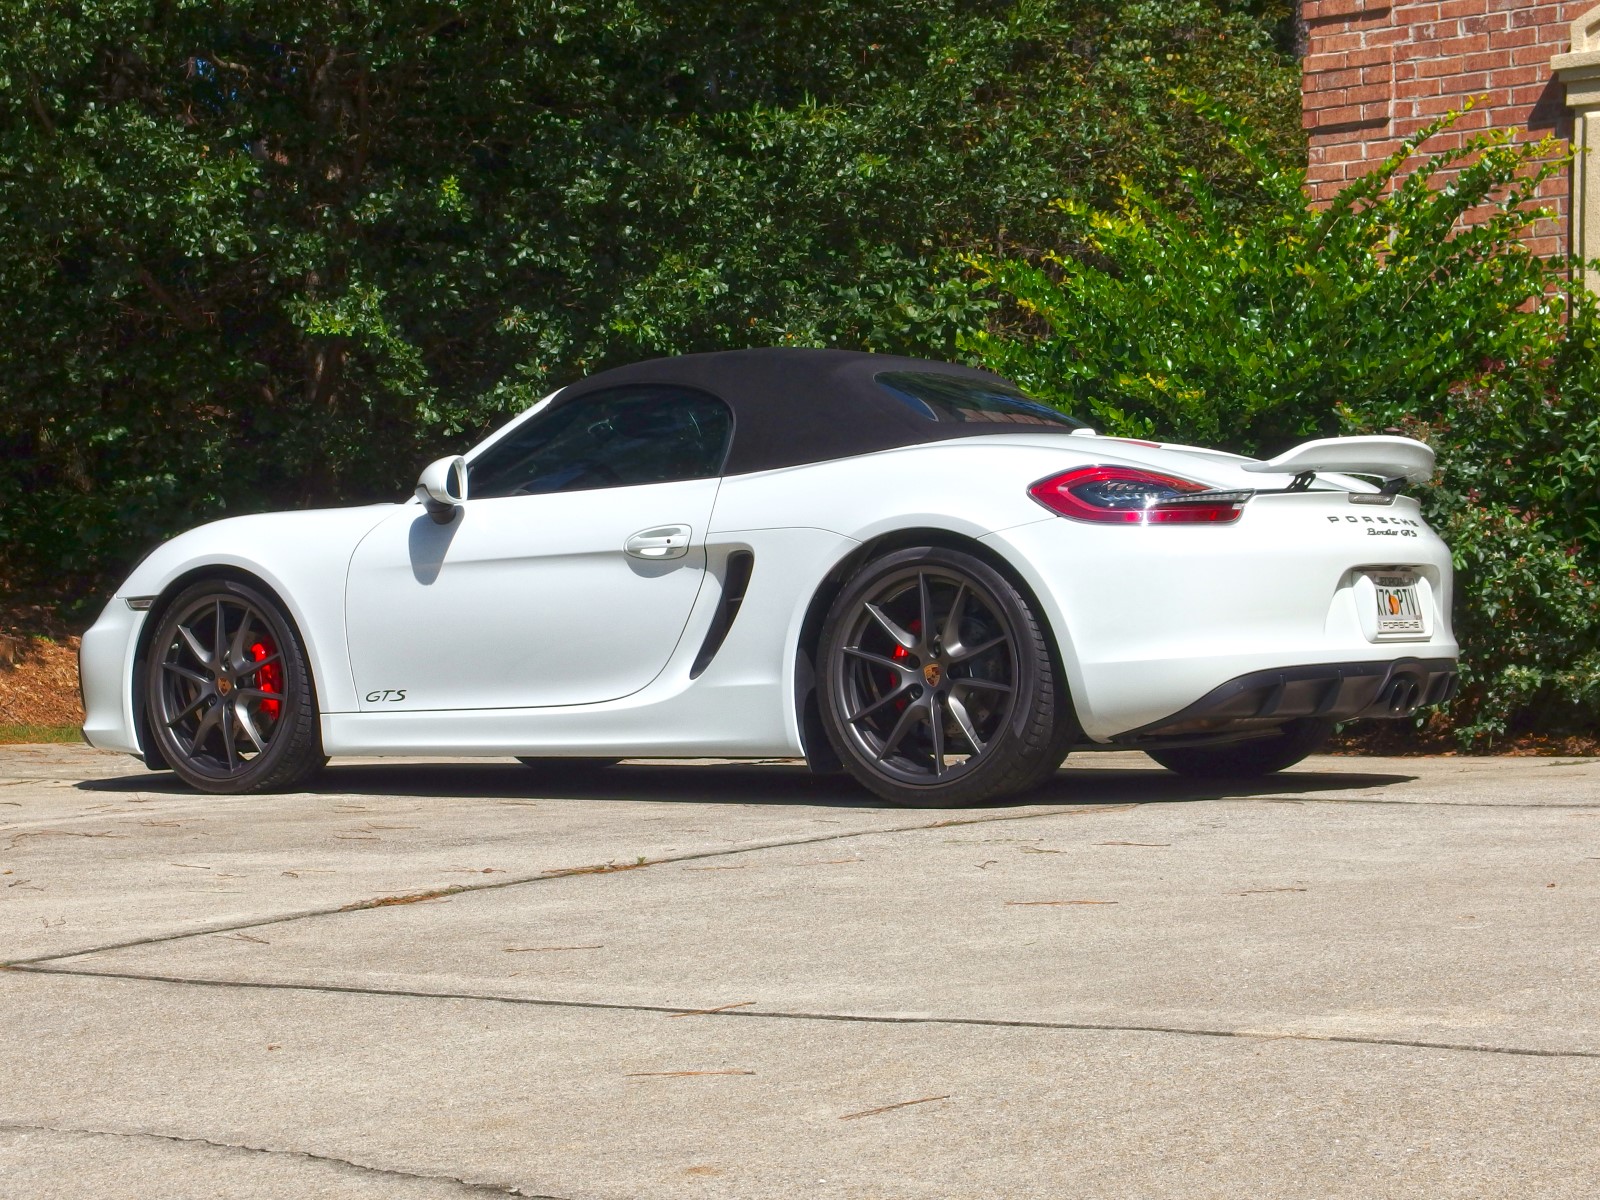
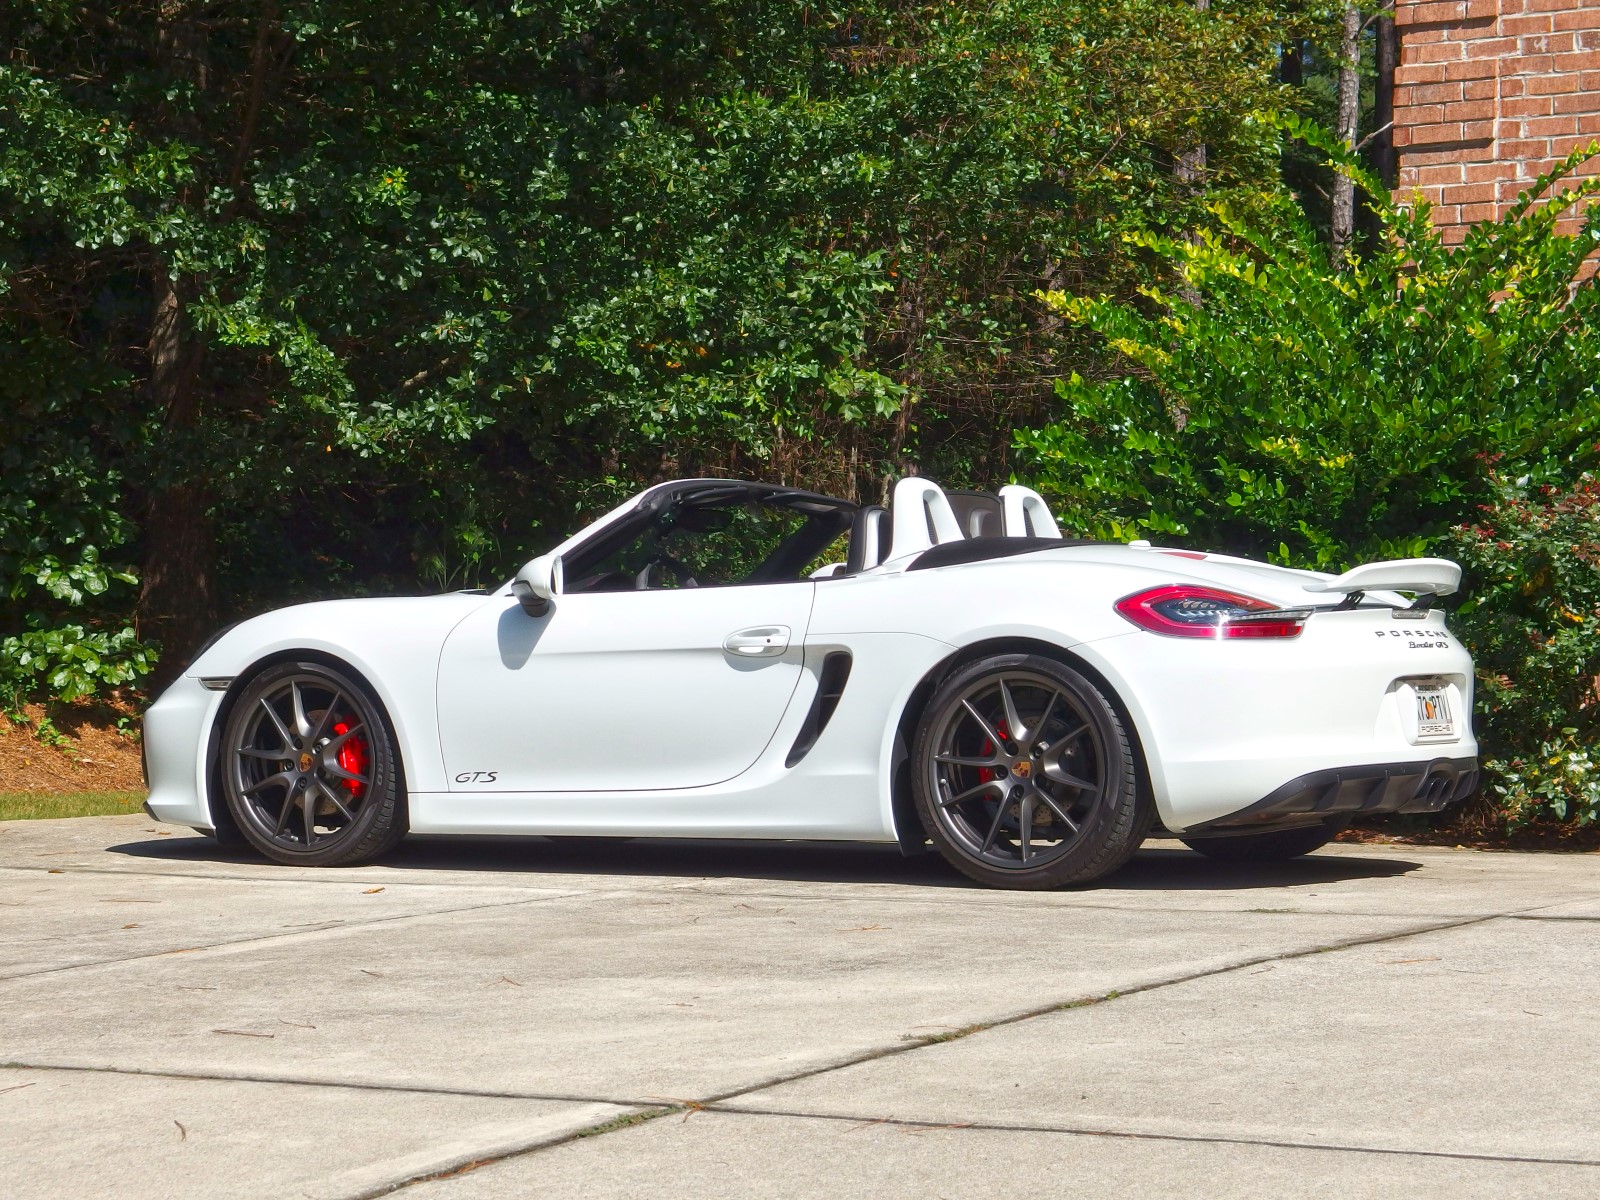
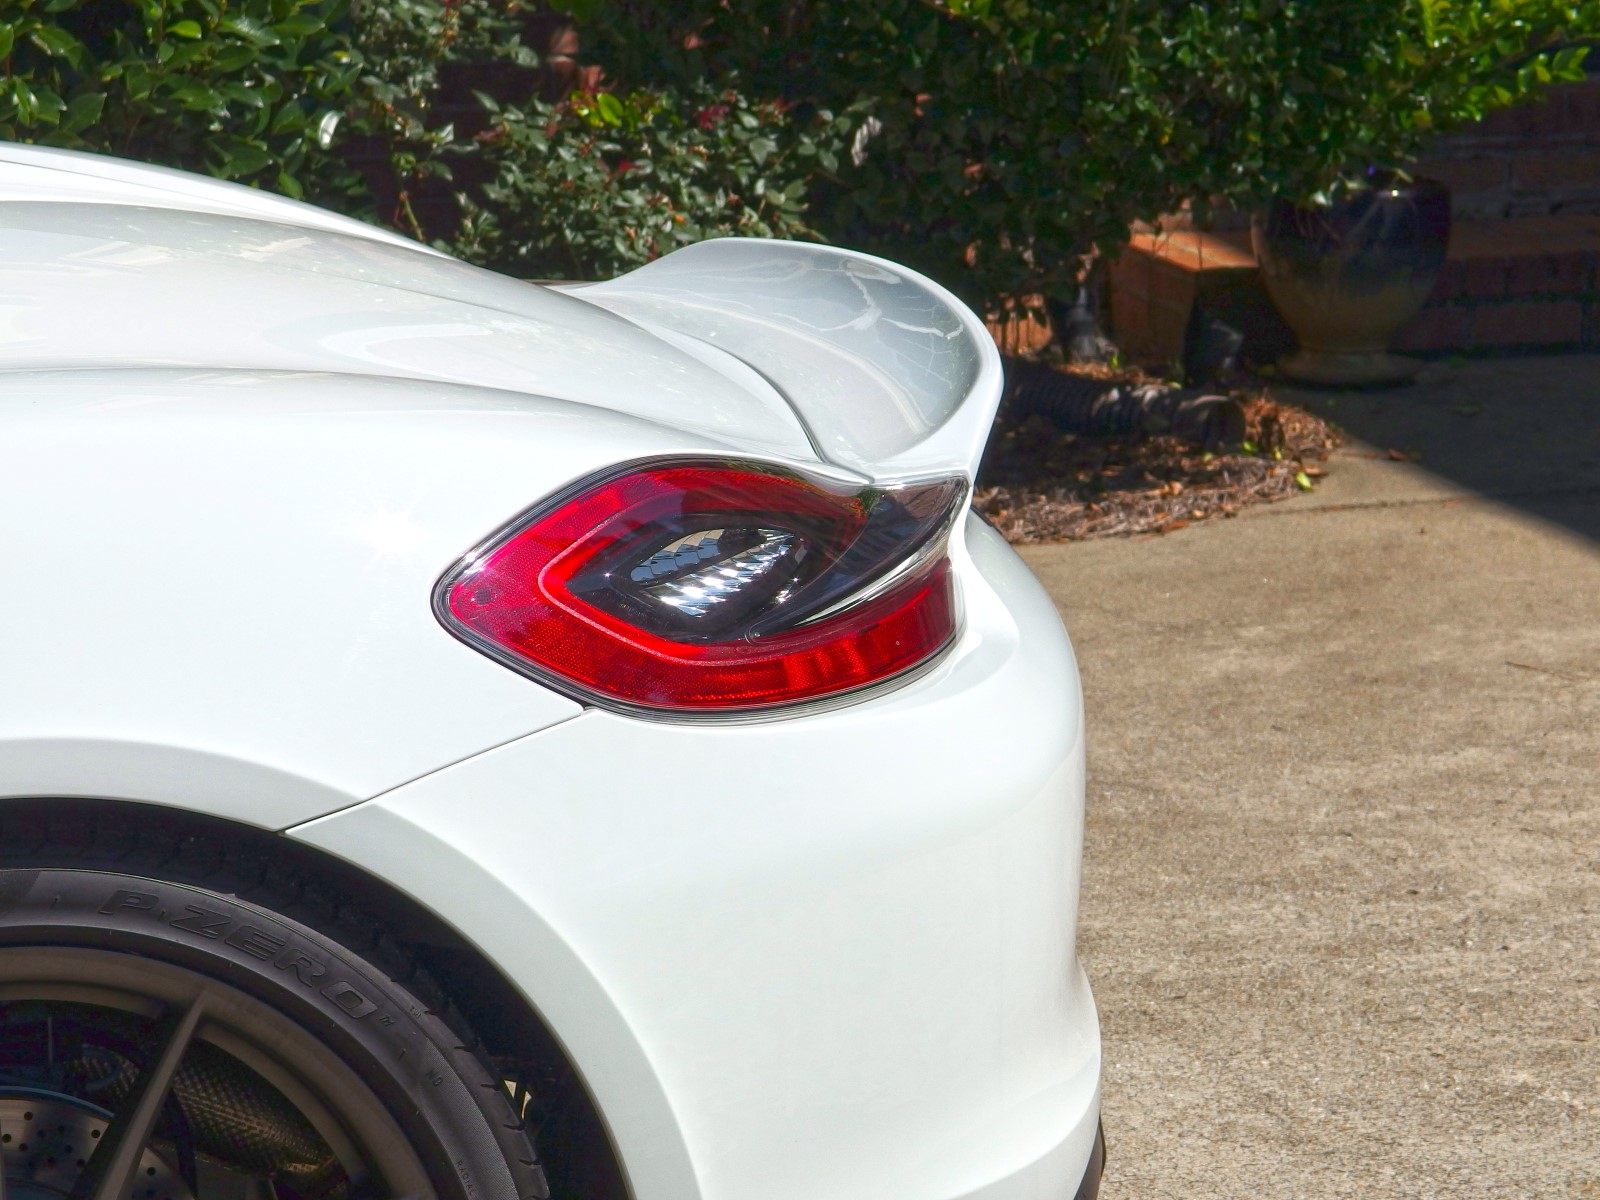
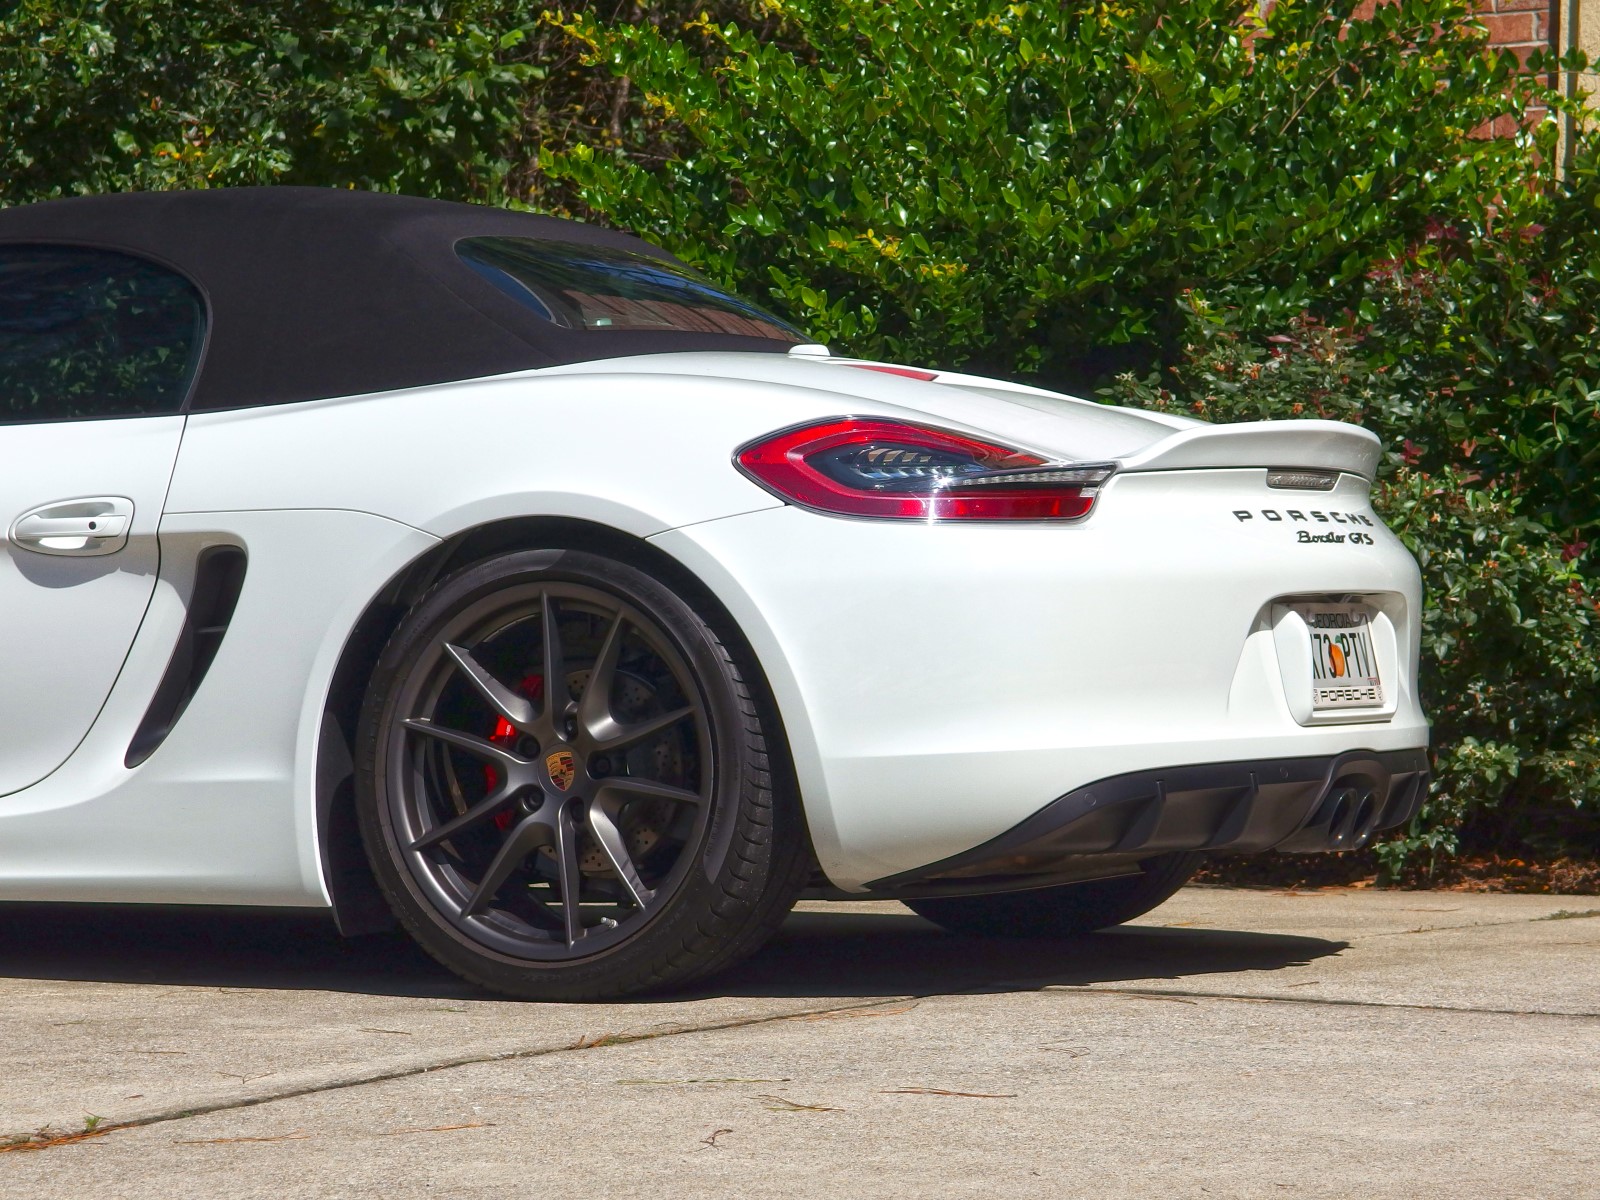
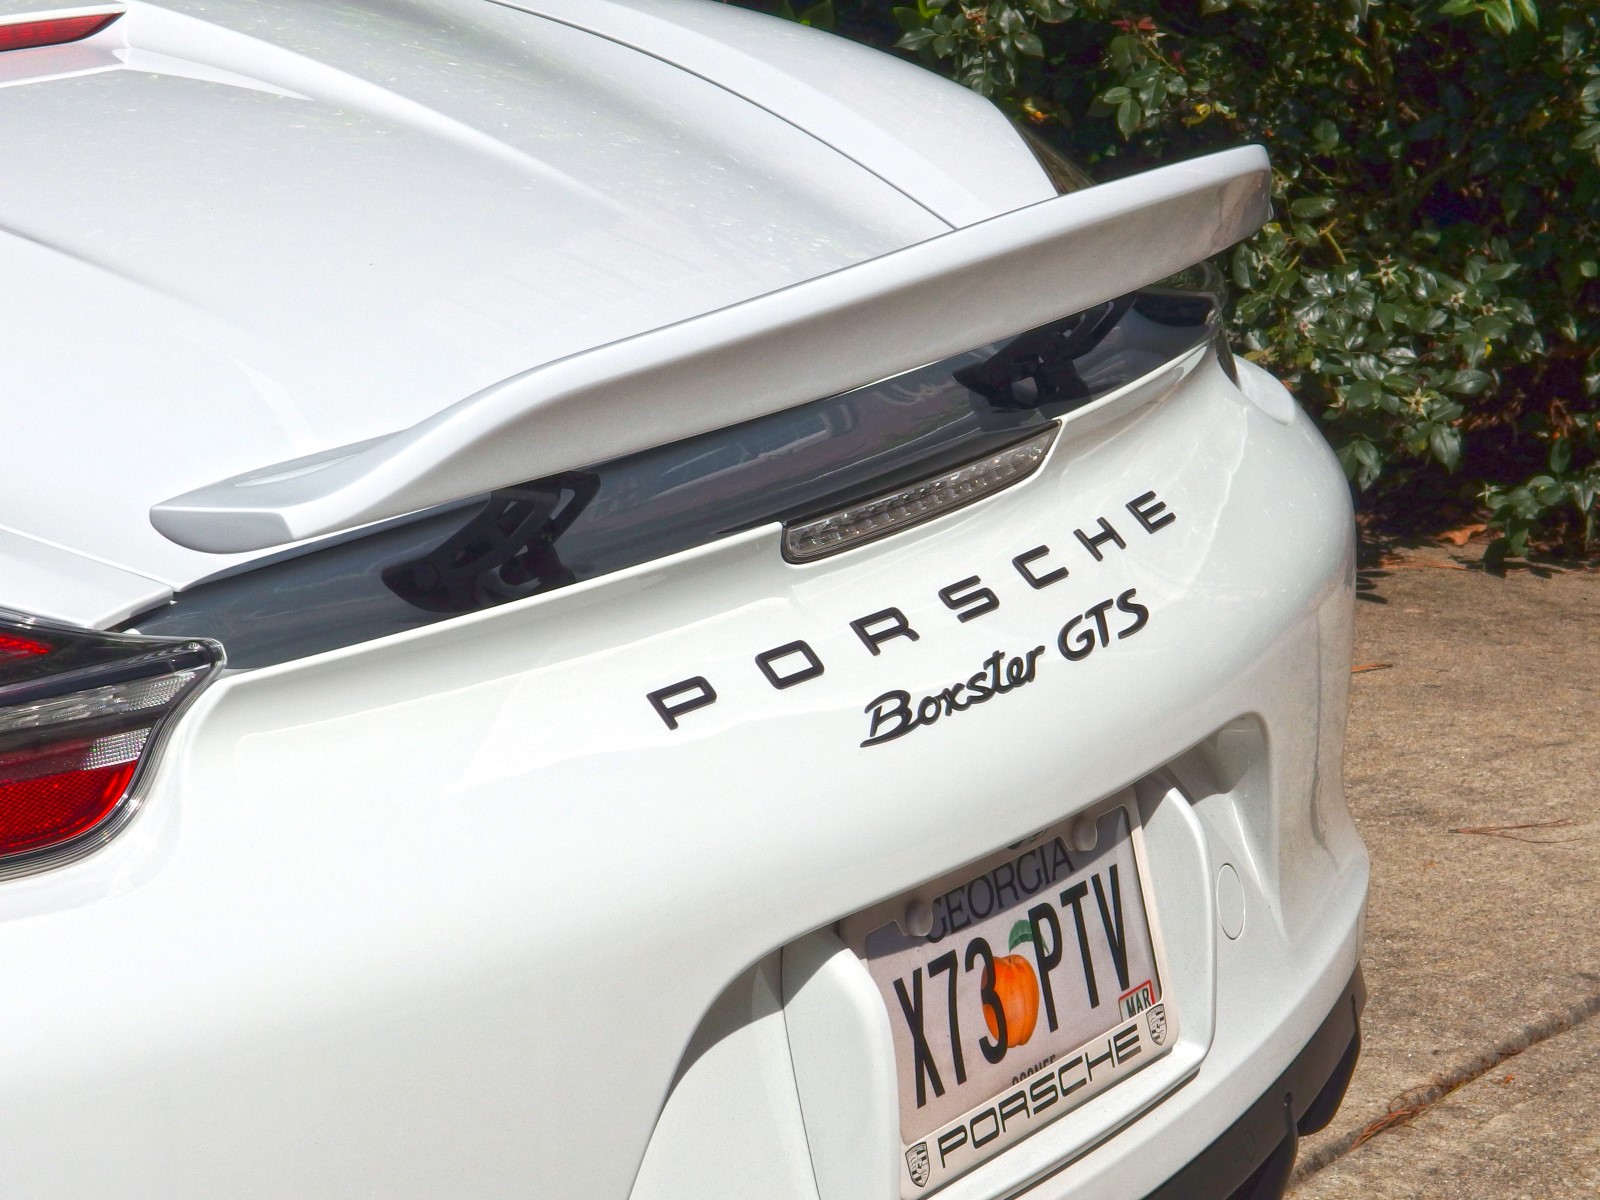
Design/Appearance: 9 out of 10
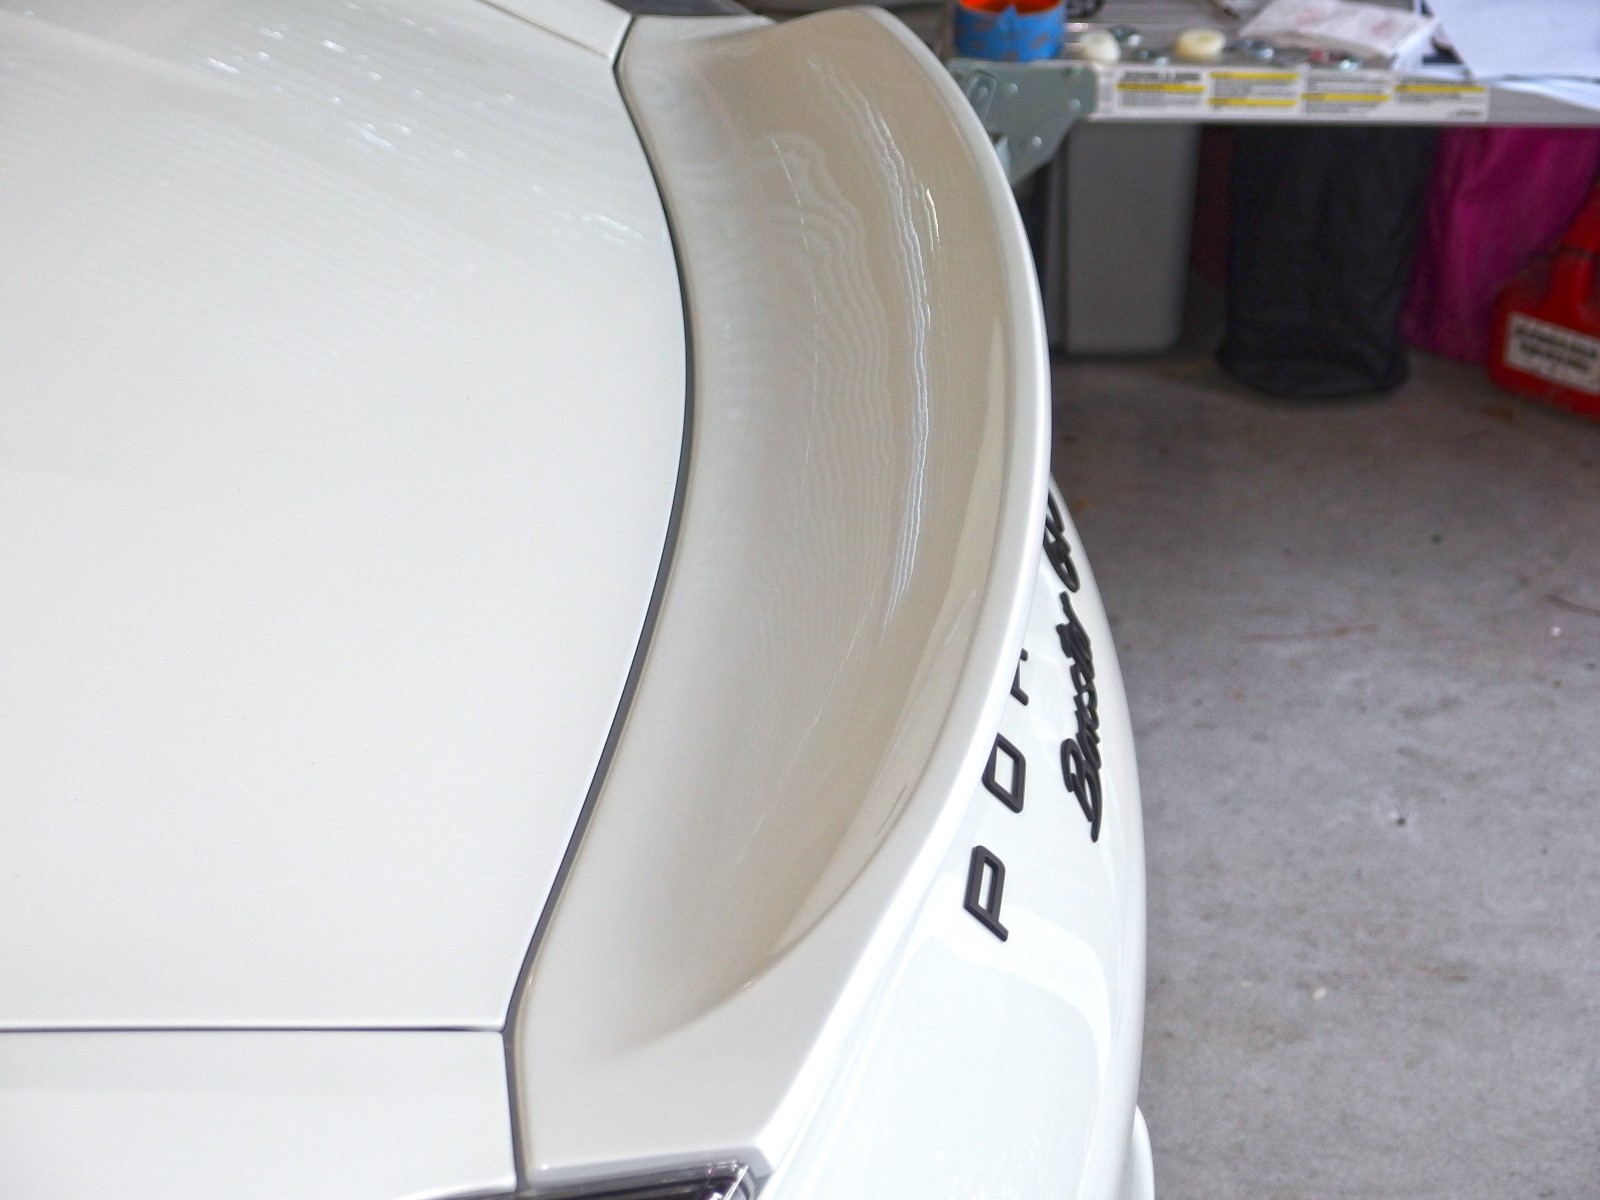
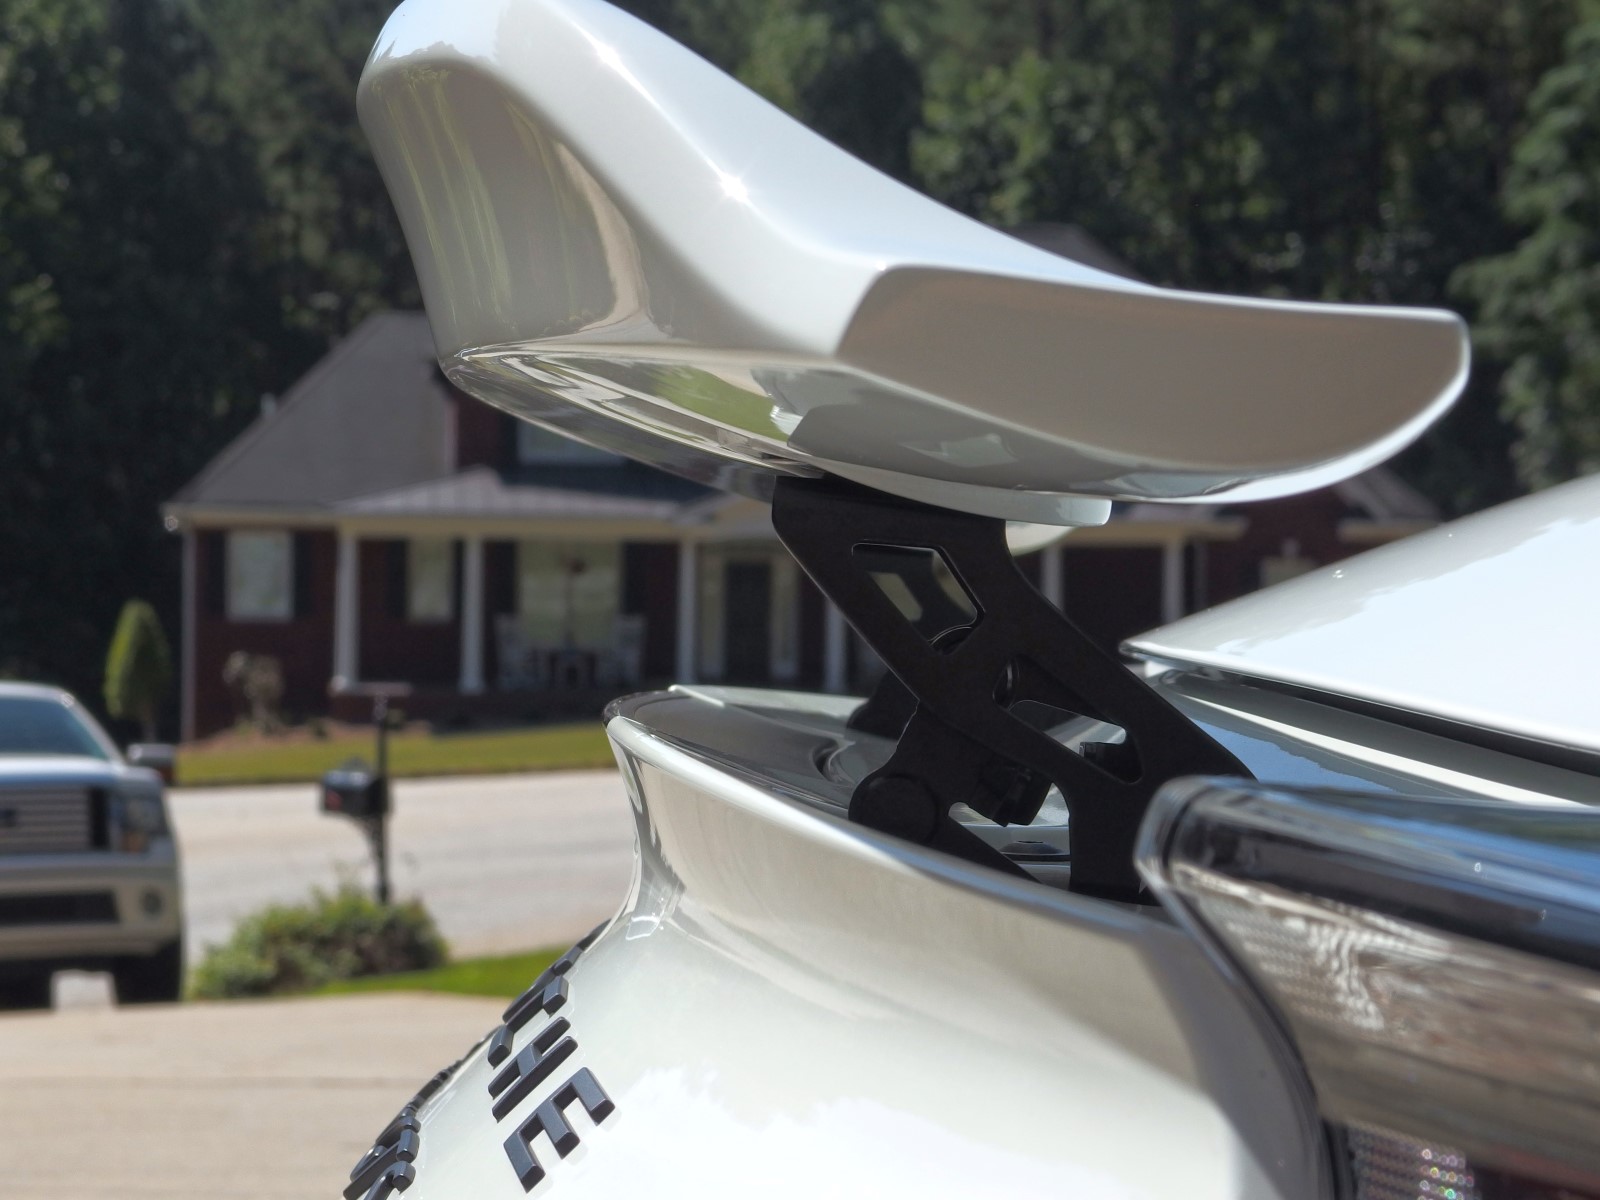
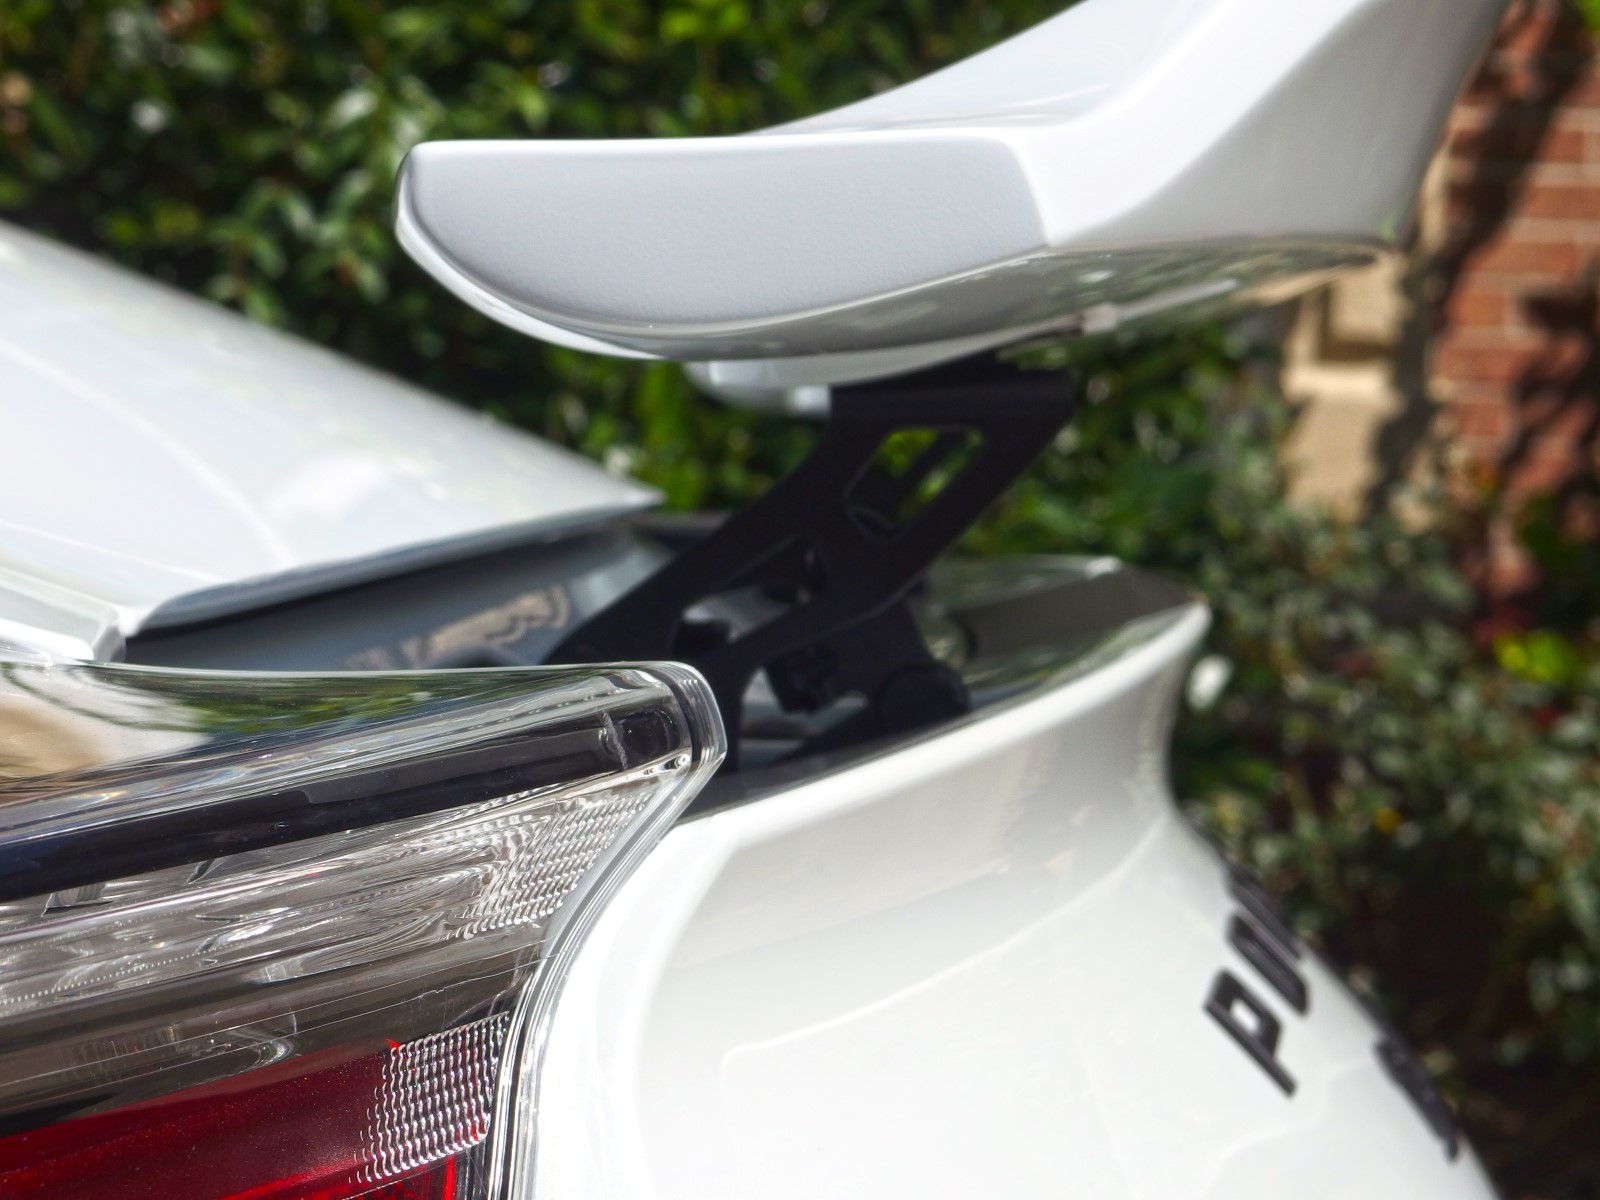
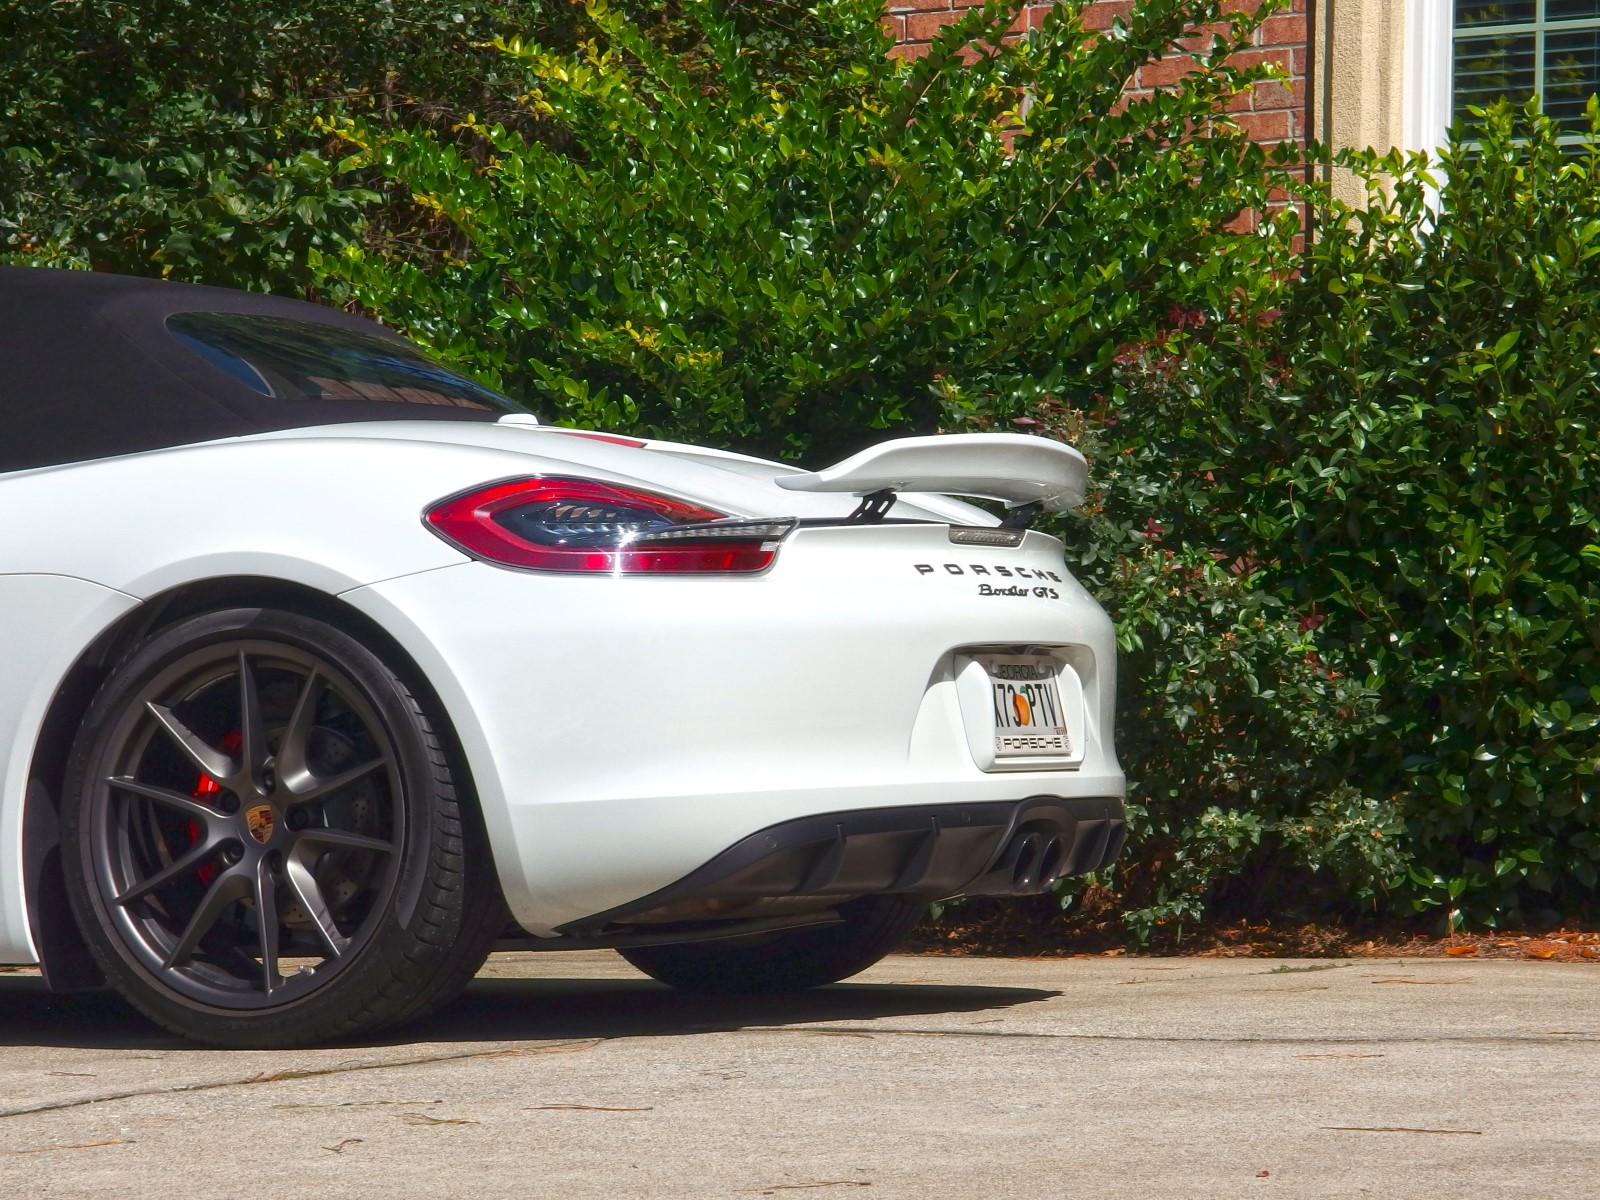
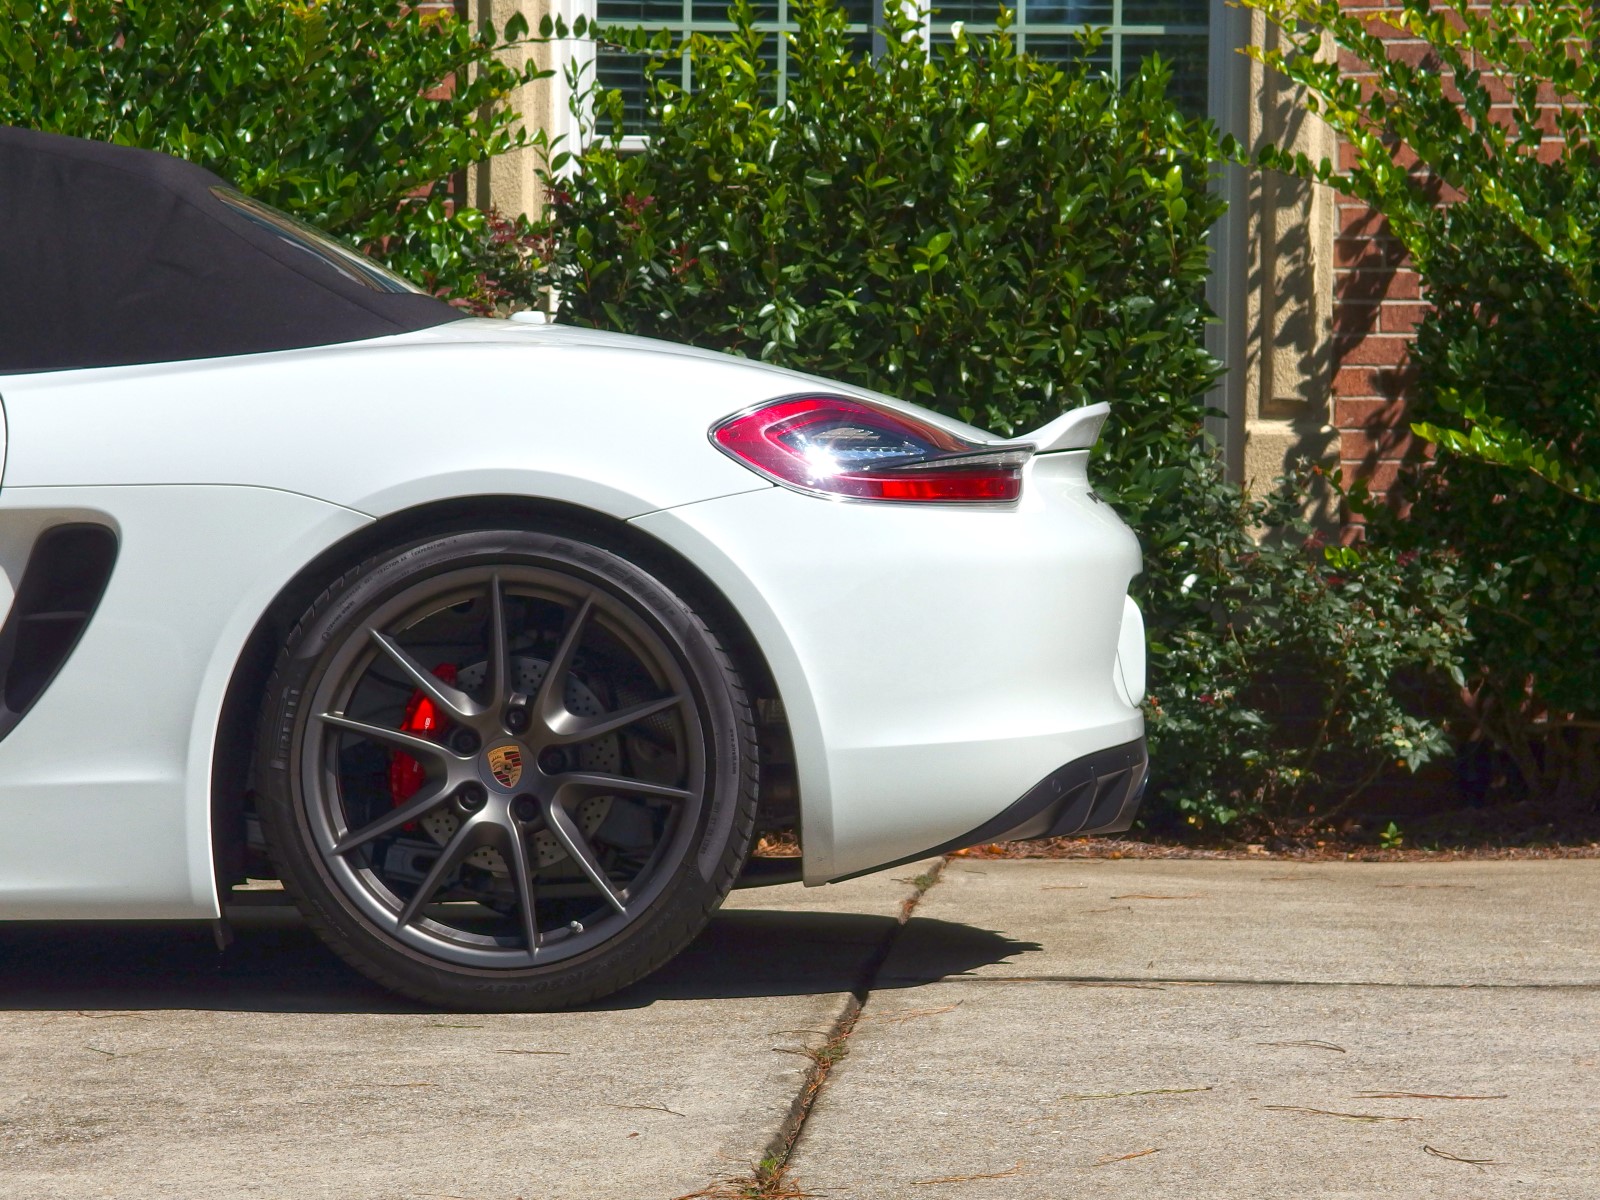
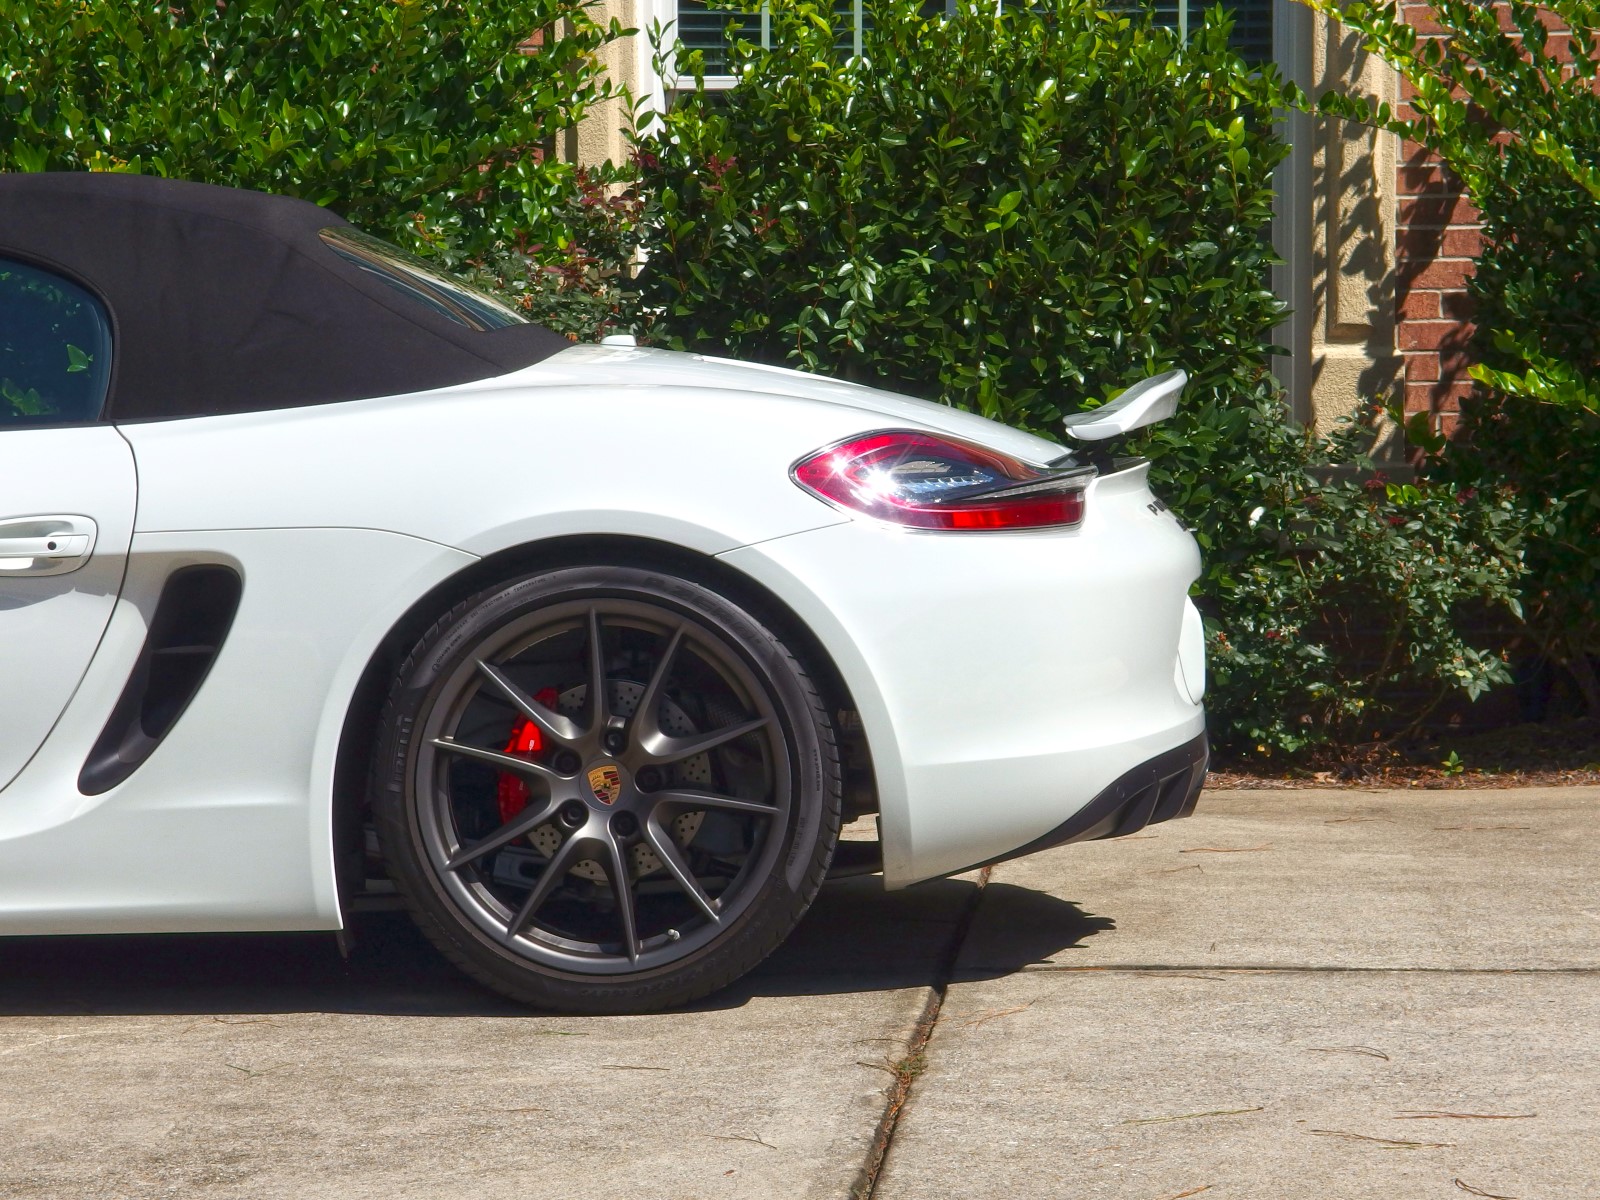
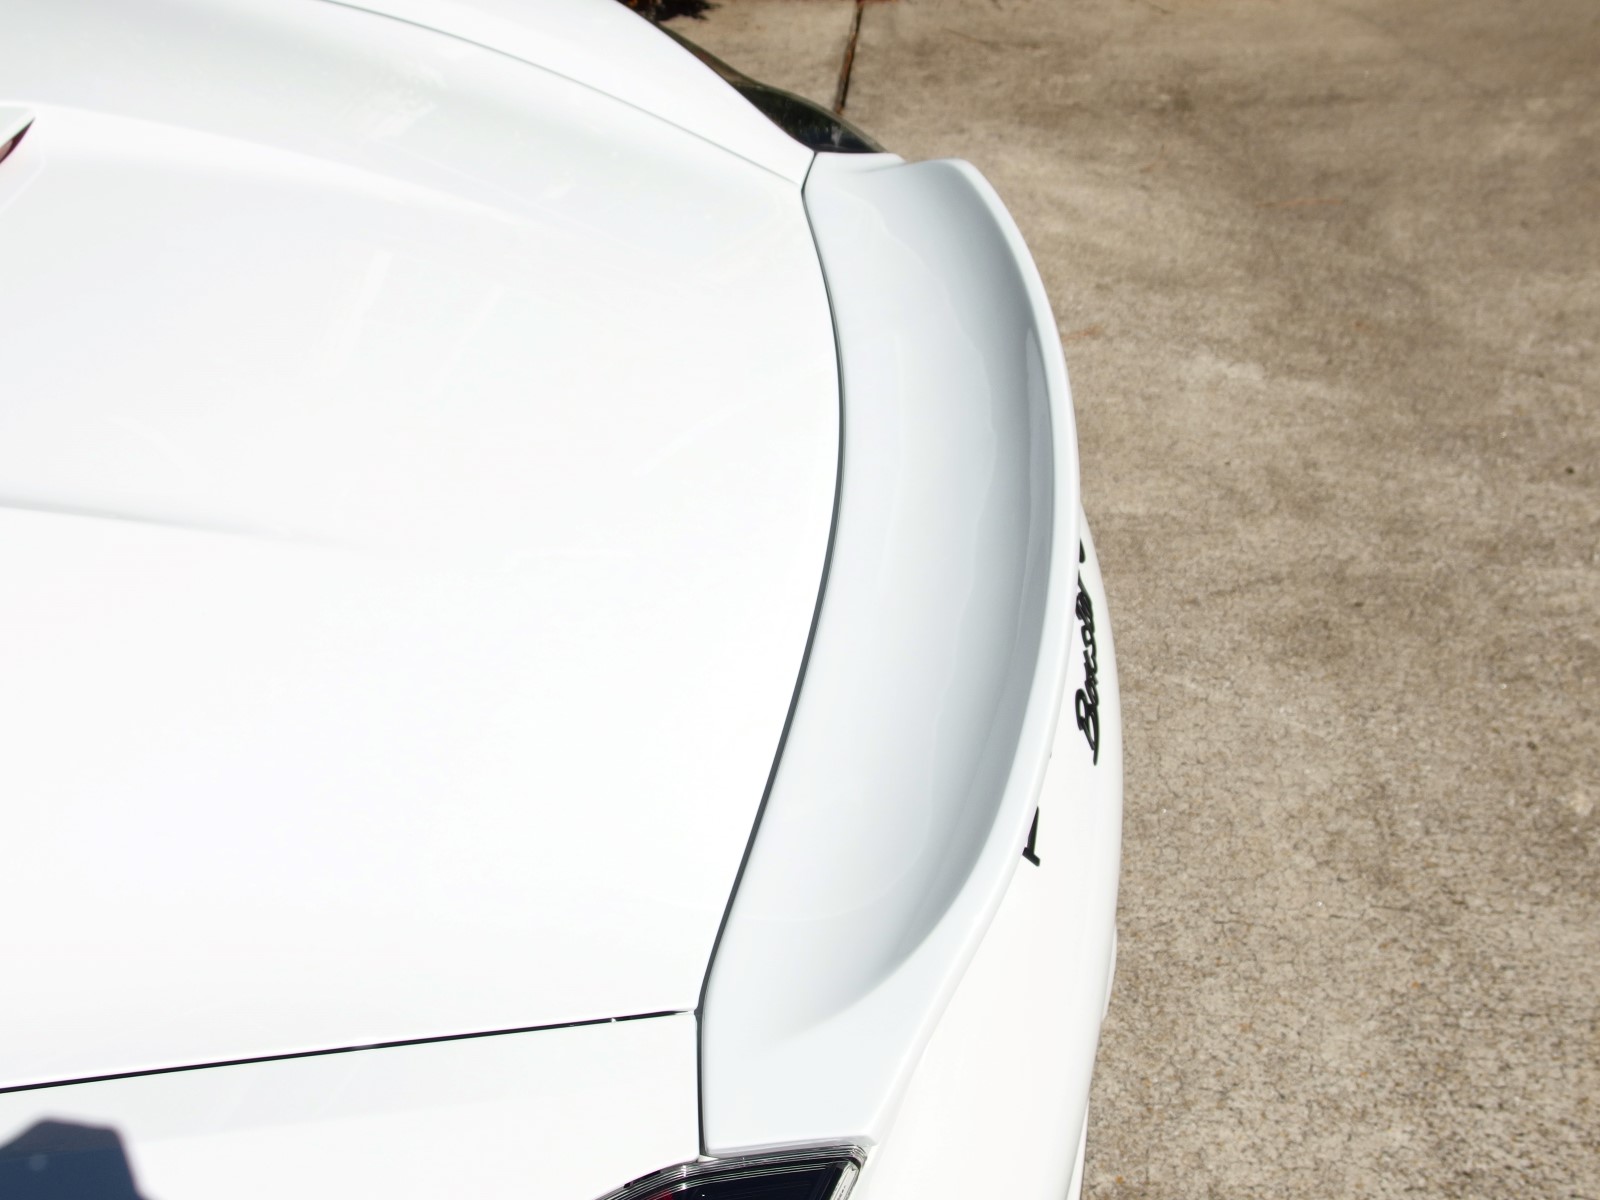
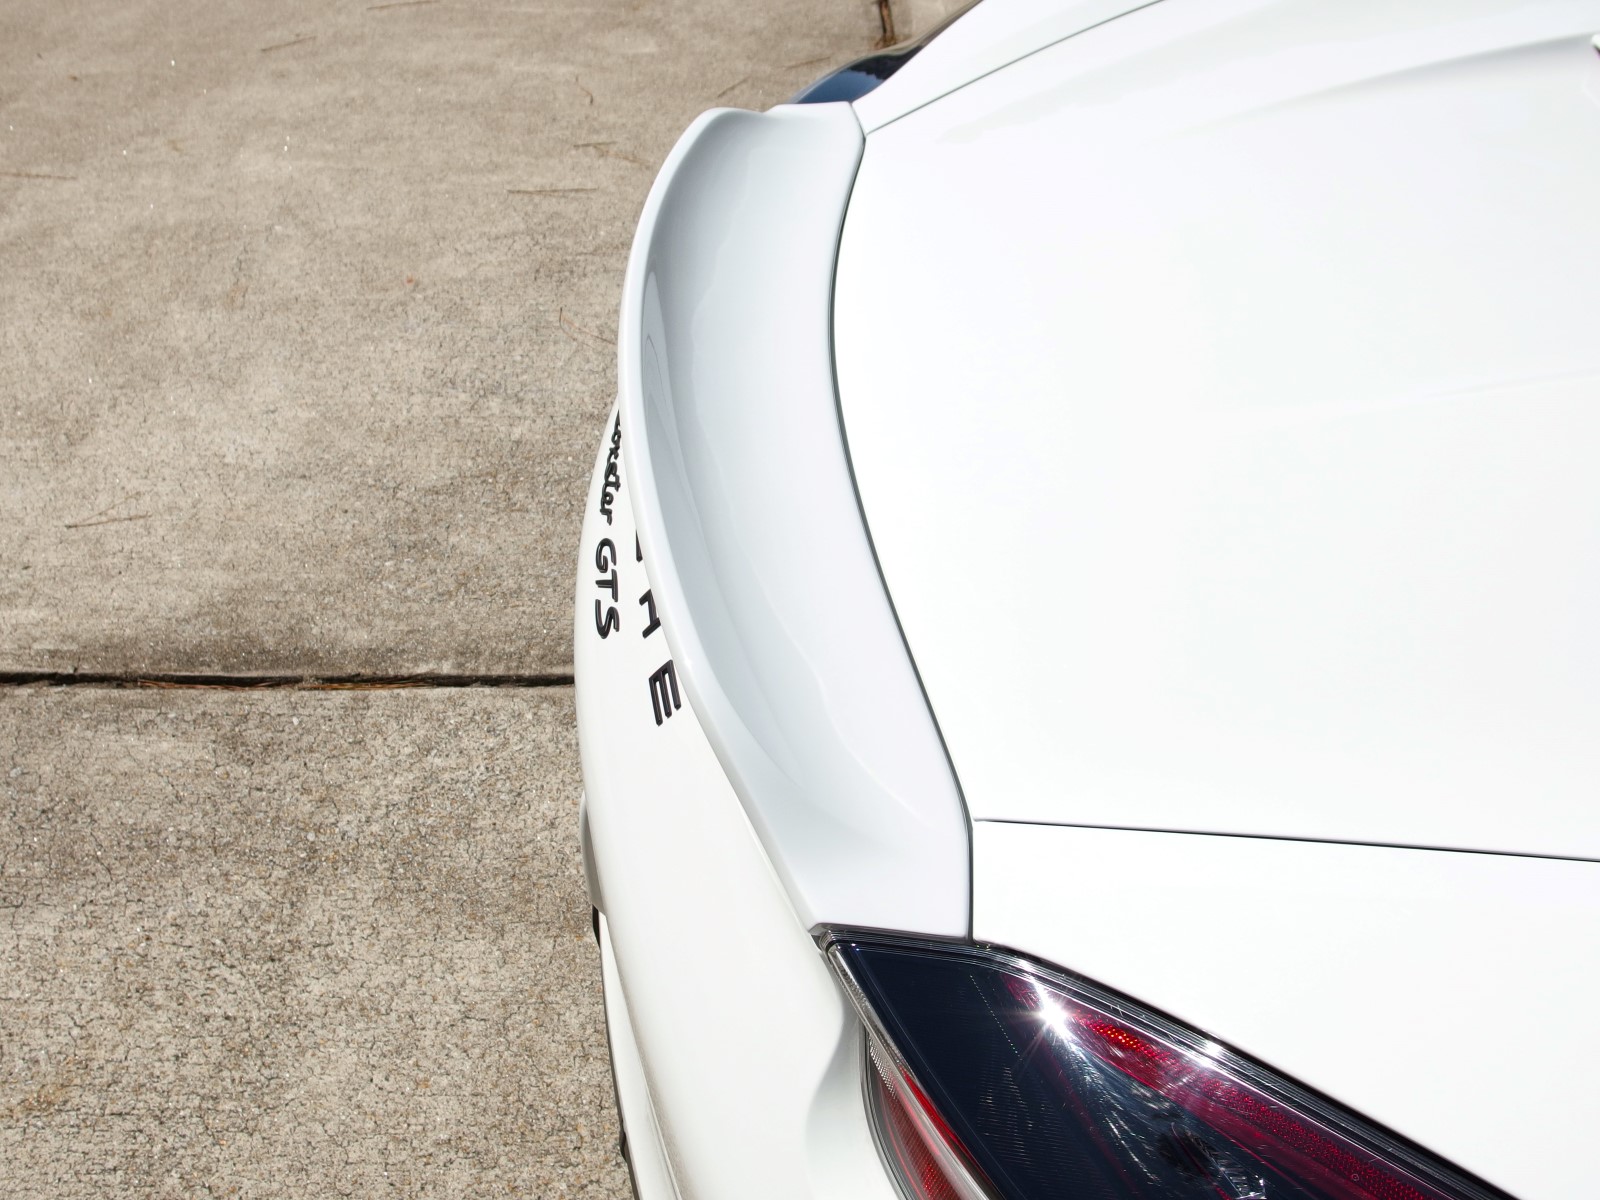
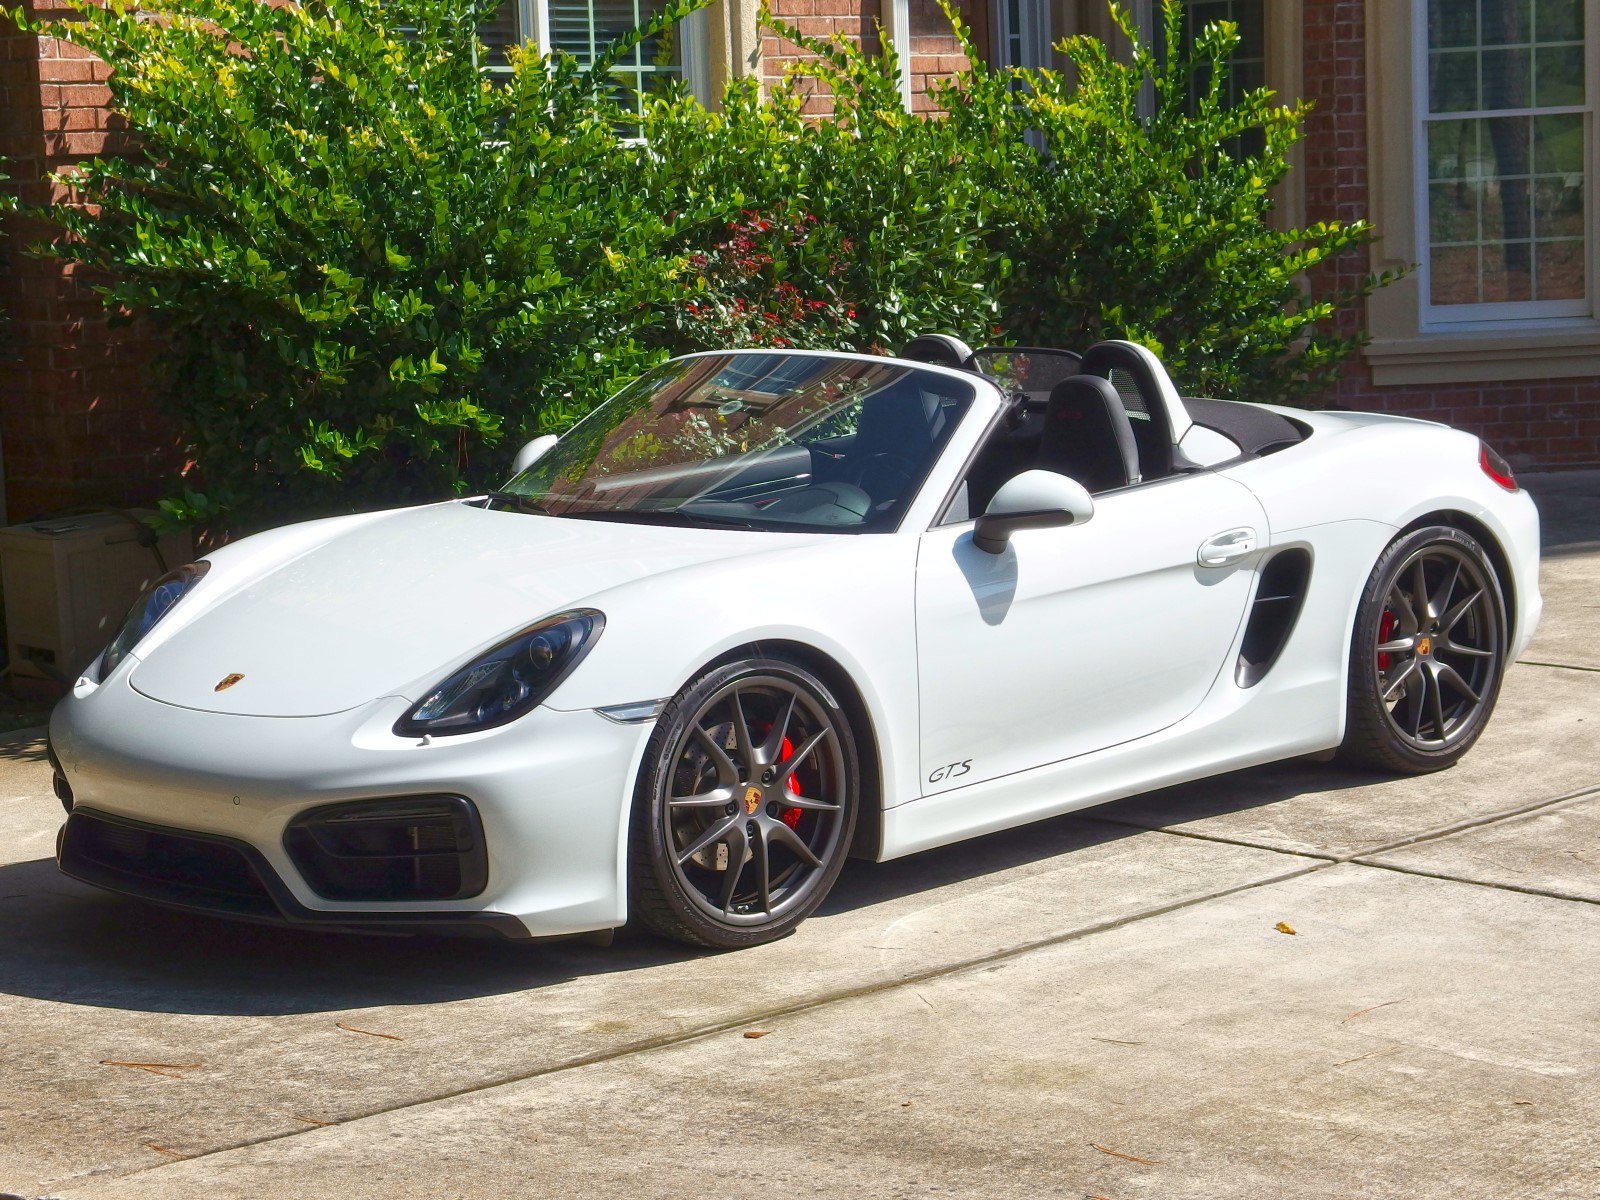
From a design standpoint, this replica product mimics the profile and proportions of Porsche's original Spyder ducktail. So it's hard to critique or fault the design, as it follows the same factory contours (both above and below the "wing").
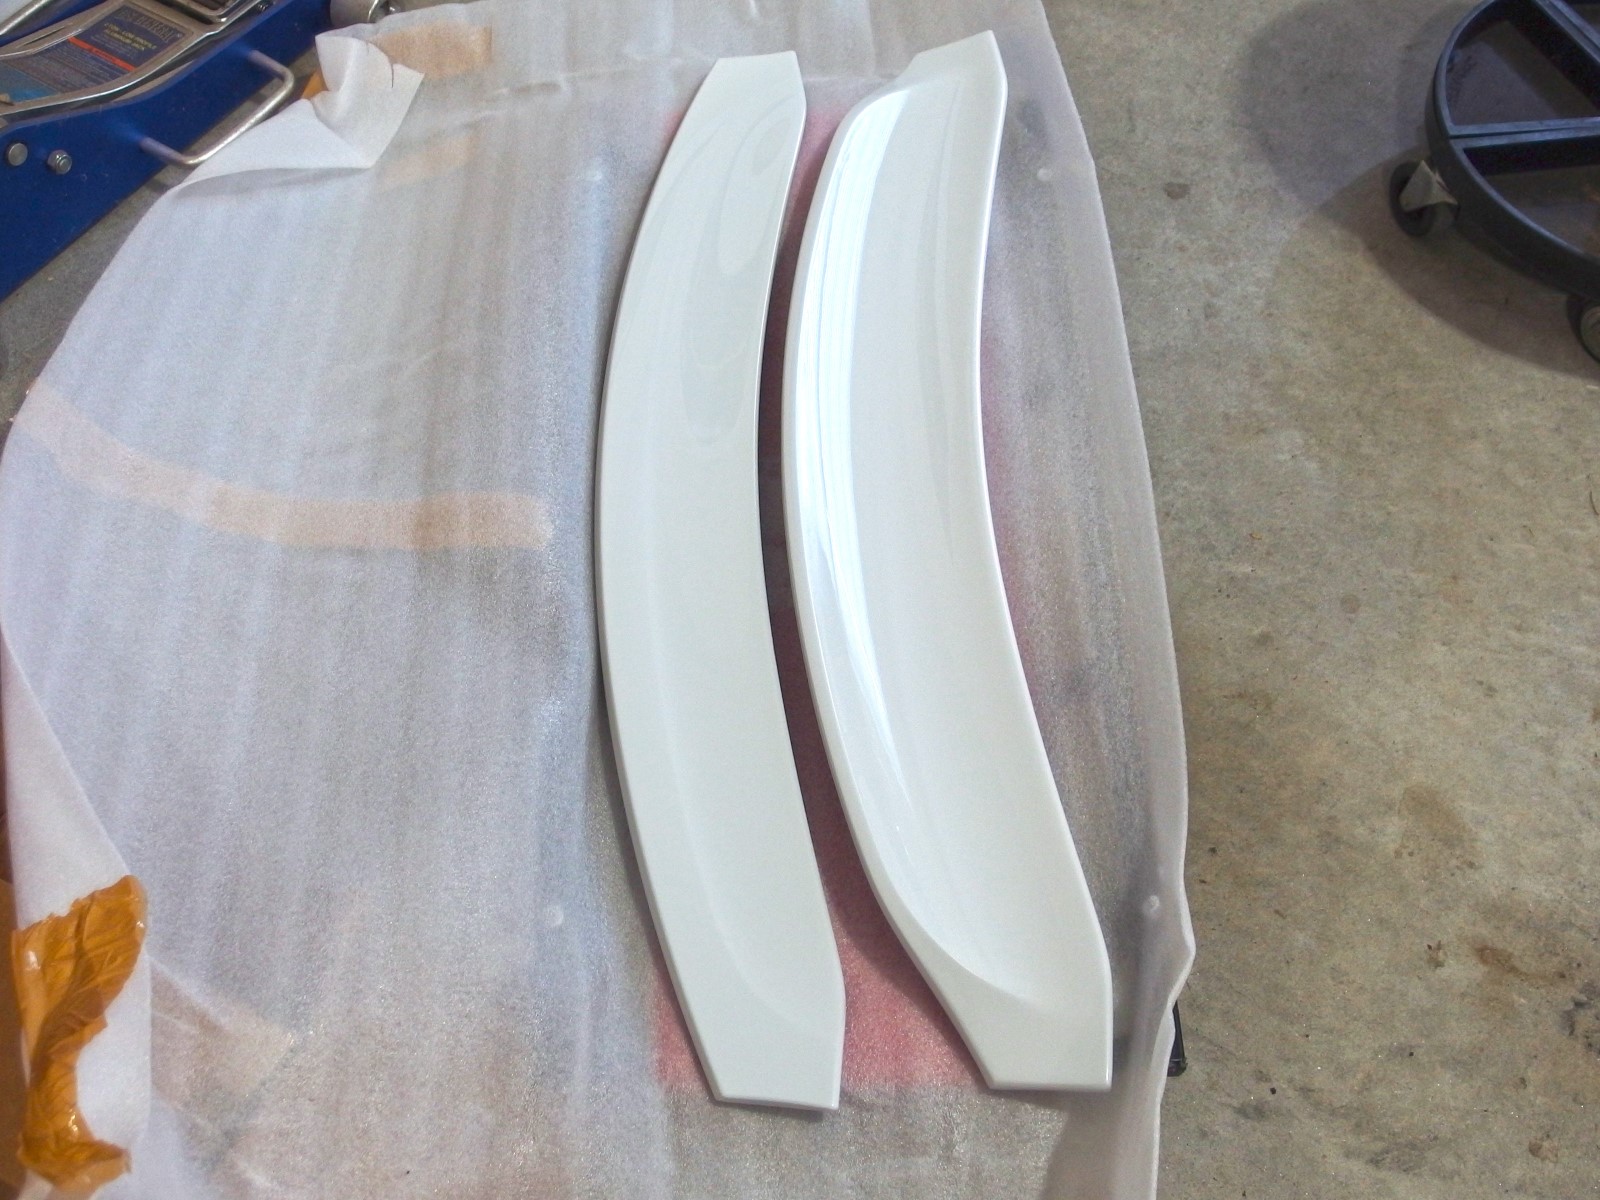
I will thus use this space to instead focus on a comparison with the stock Boxster spoiler. While not a radical departure (like a GT4's elevated wing), the ducktail does still feature significant differences when directly compared with the old spoiler. In cross-section or profile view, the edges of both spoilers are basically identical (where they mate flush against the inside edges of the taillights), so the differences in design are primarily in the middle 98%.
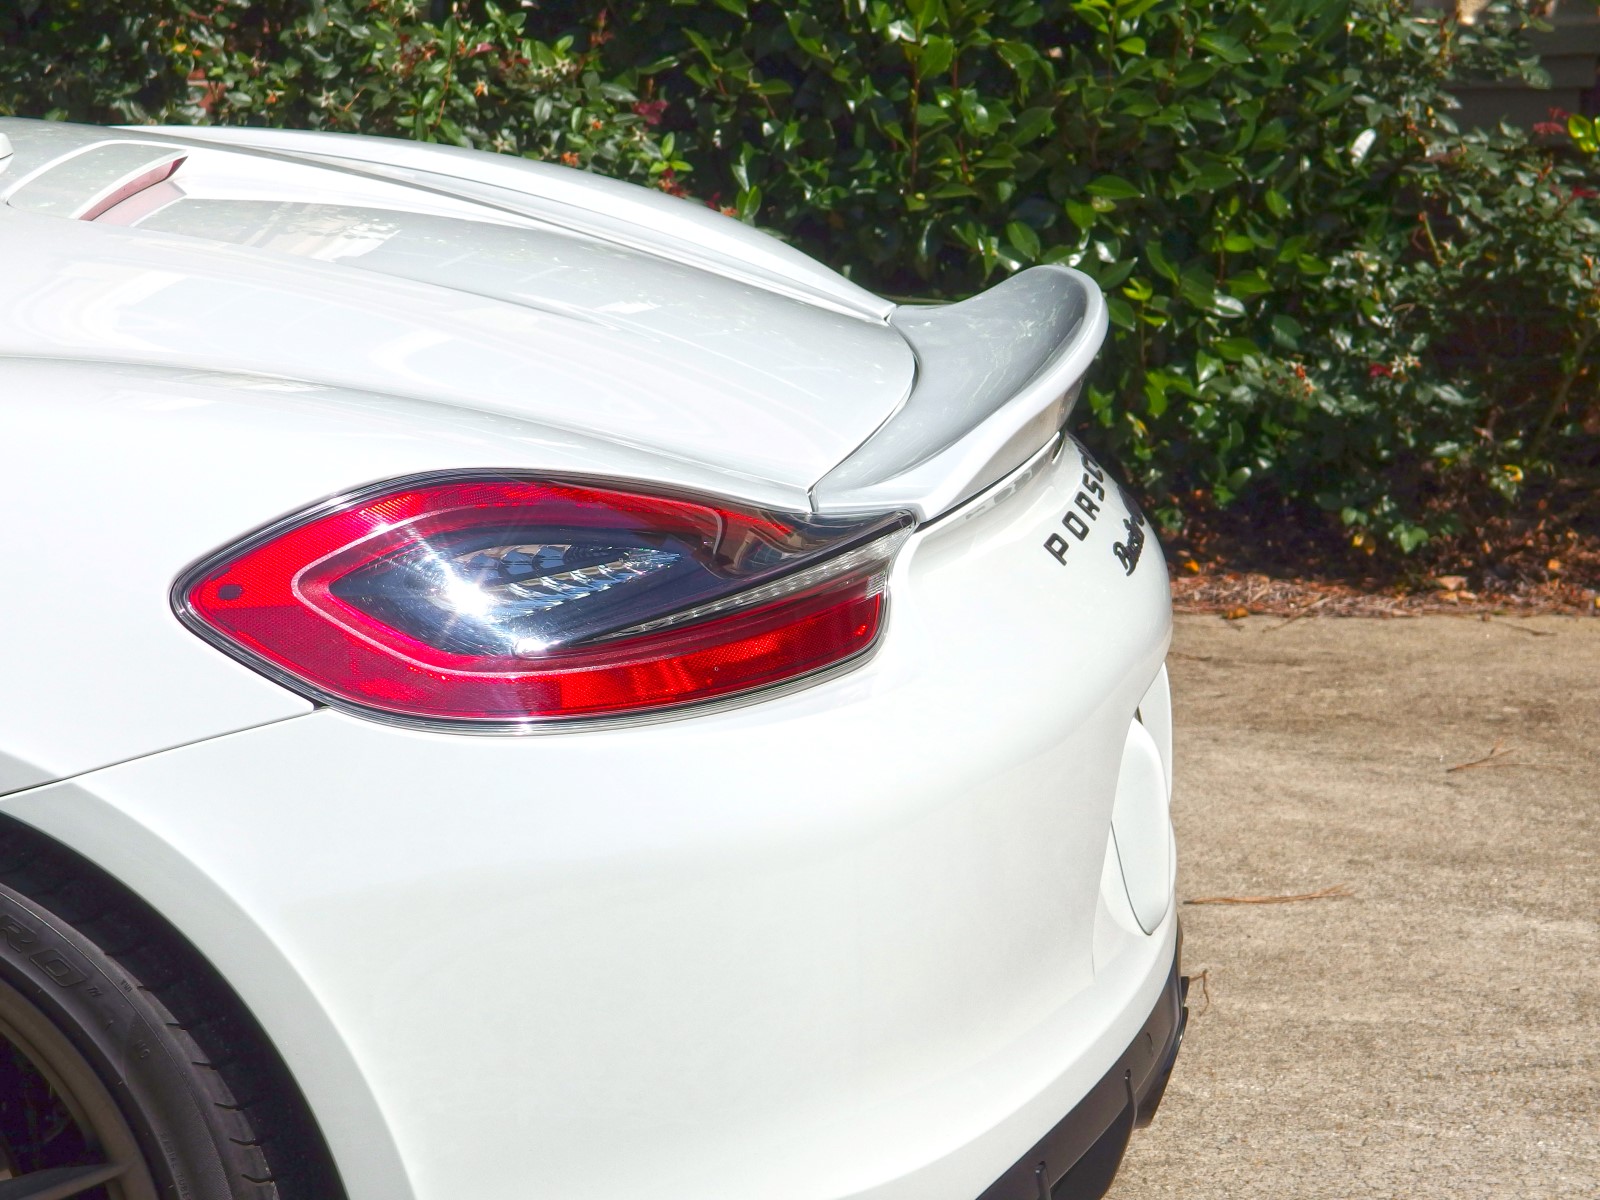
The ducktail's raised arc is more pronounced and because the spoiler is larger in 2 dimensions (it is both taller and protrudes further away from the car), it definitely creates a more aggressive look.
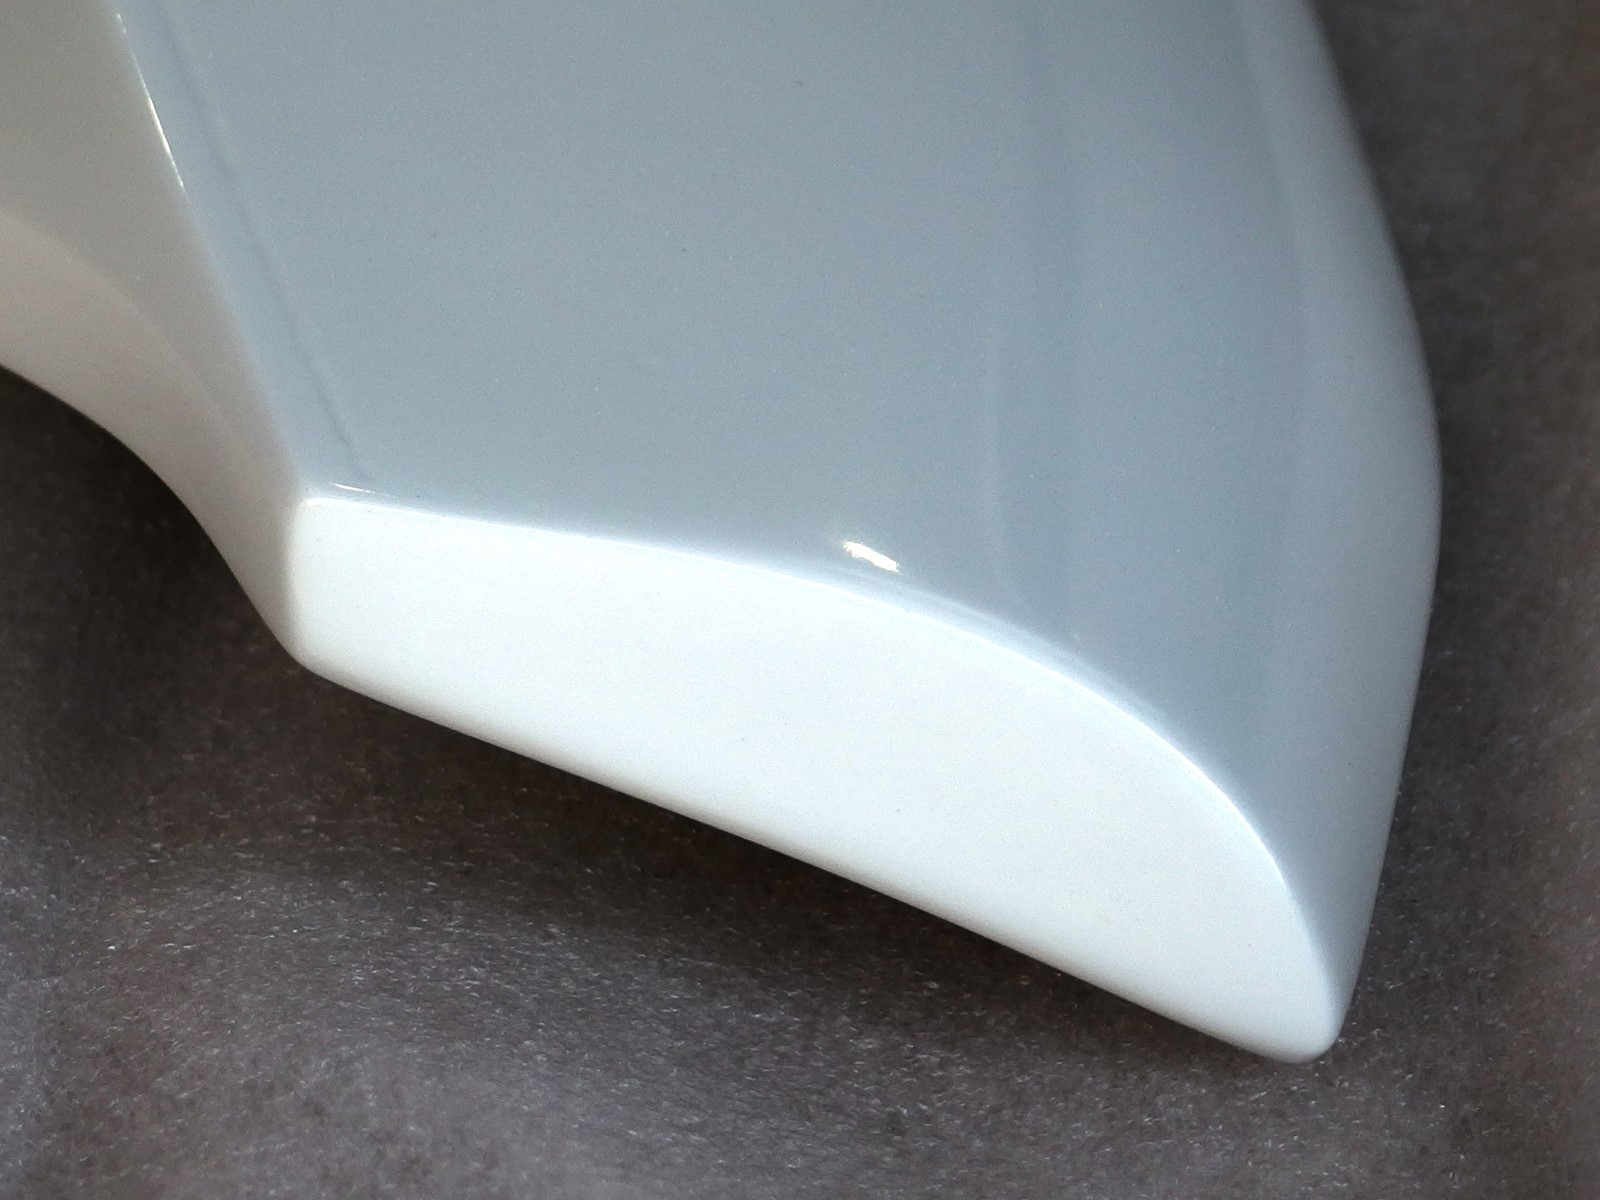
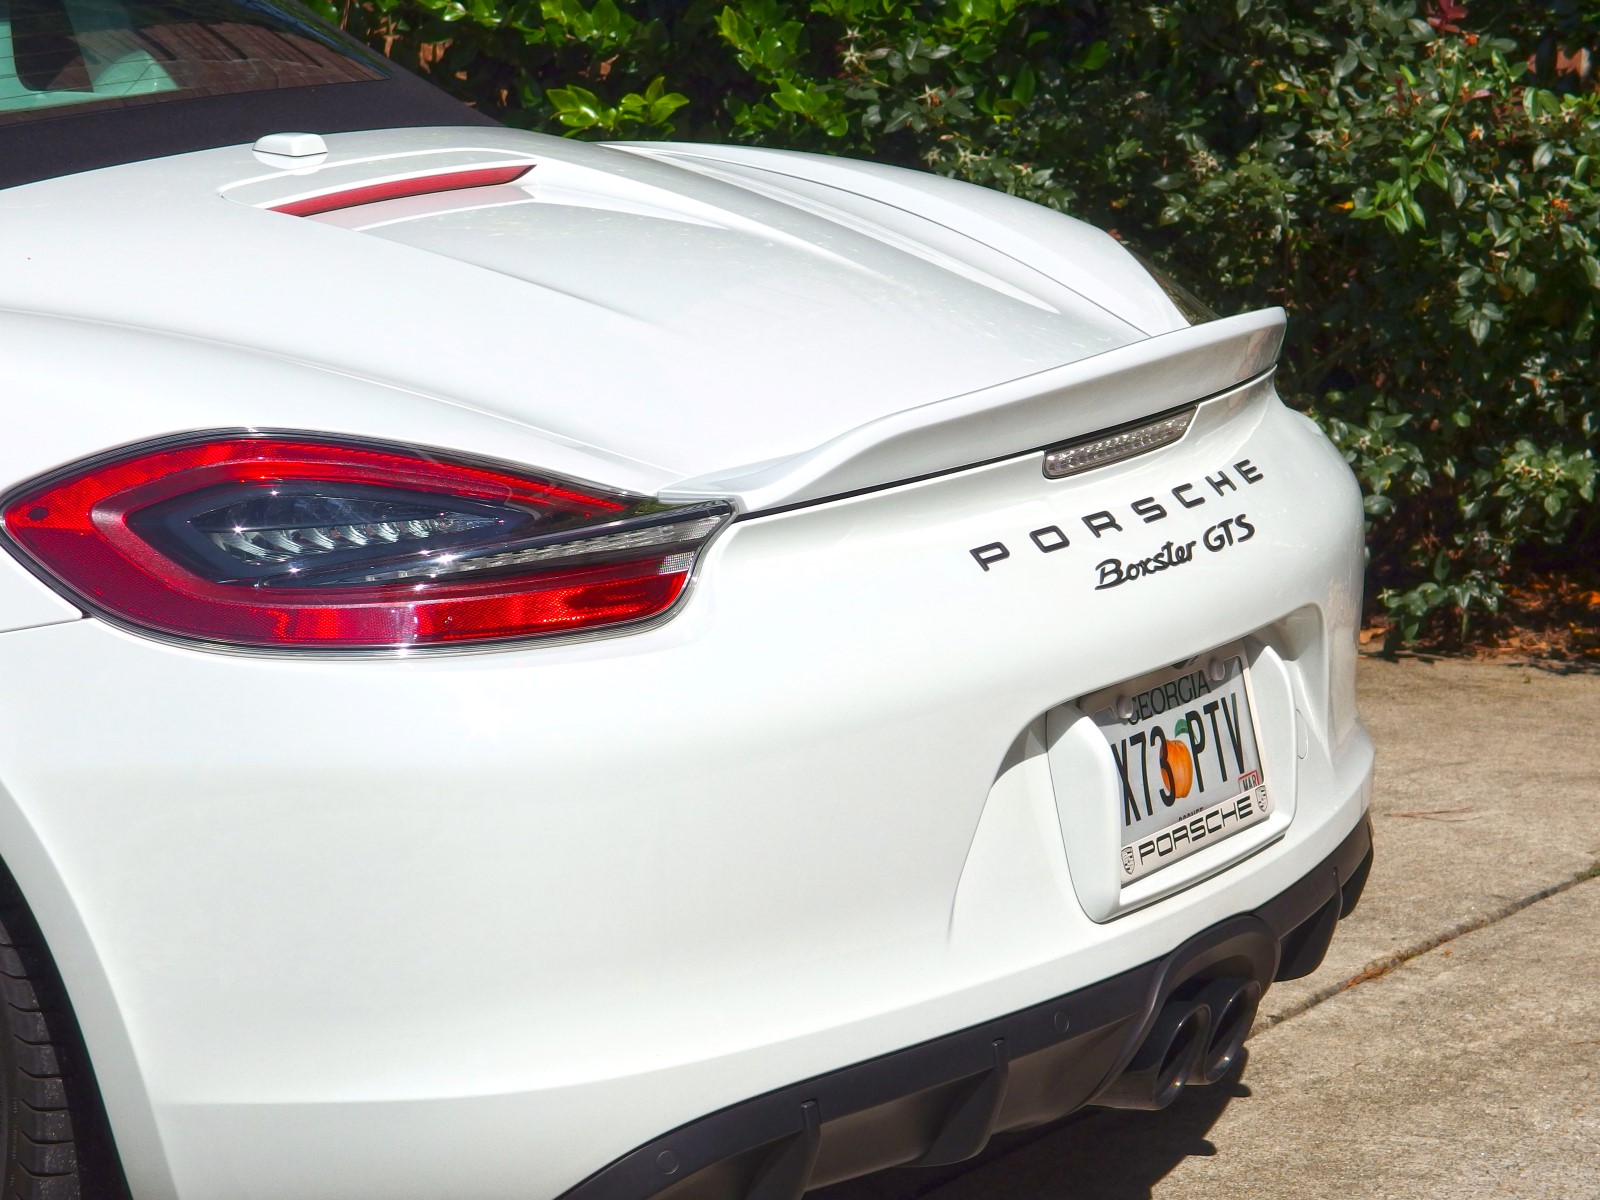
The scallop carved into the top of the ducktail elegantly flows from the trunk in a smooth curve that is crested by a small lip that matches the thickness of the original spoiler (which matches the thickness of the ridges that gracefully taper and disappear into the surface of the taillight lenses), continuing the theme or idea that someone tugged and stretched the original spoiler away from the car by a couple inches.
You know how caressing the curves of a car's body (while washing, etc.) can be gratifying? The stock Boxster spoiler just didn't excite me very much, but the more pronounced Spyder ducktail surfaces are way more sensual and a pleasure to touch.
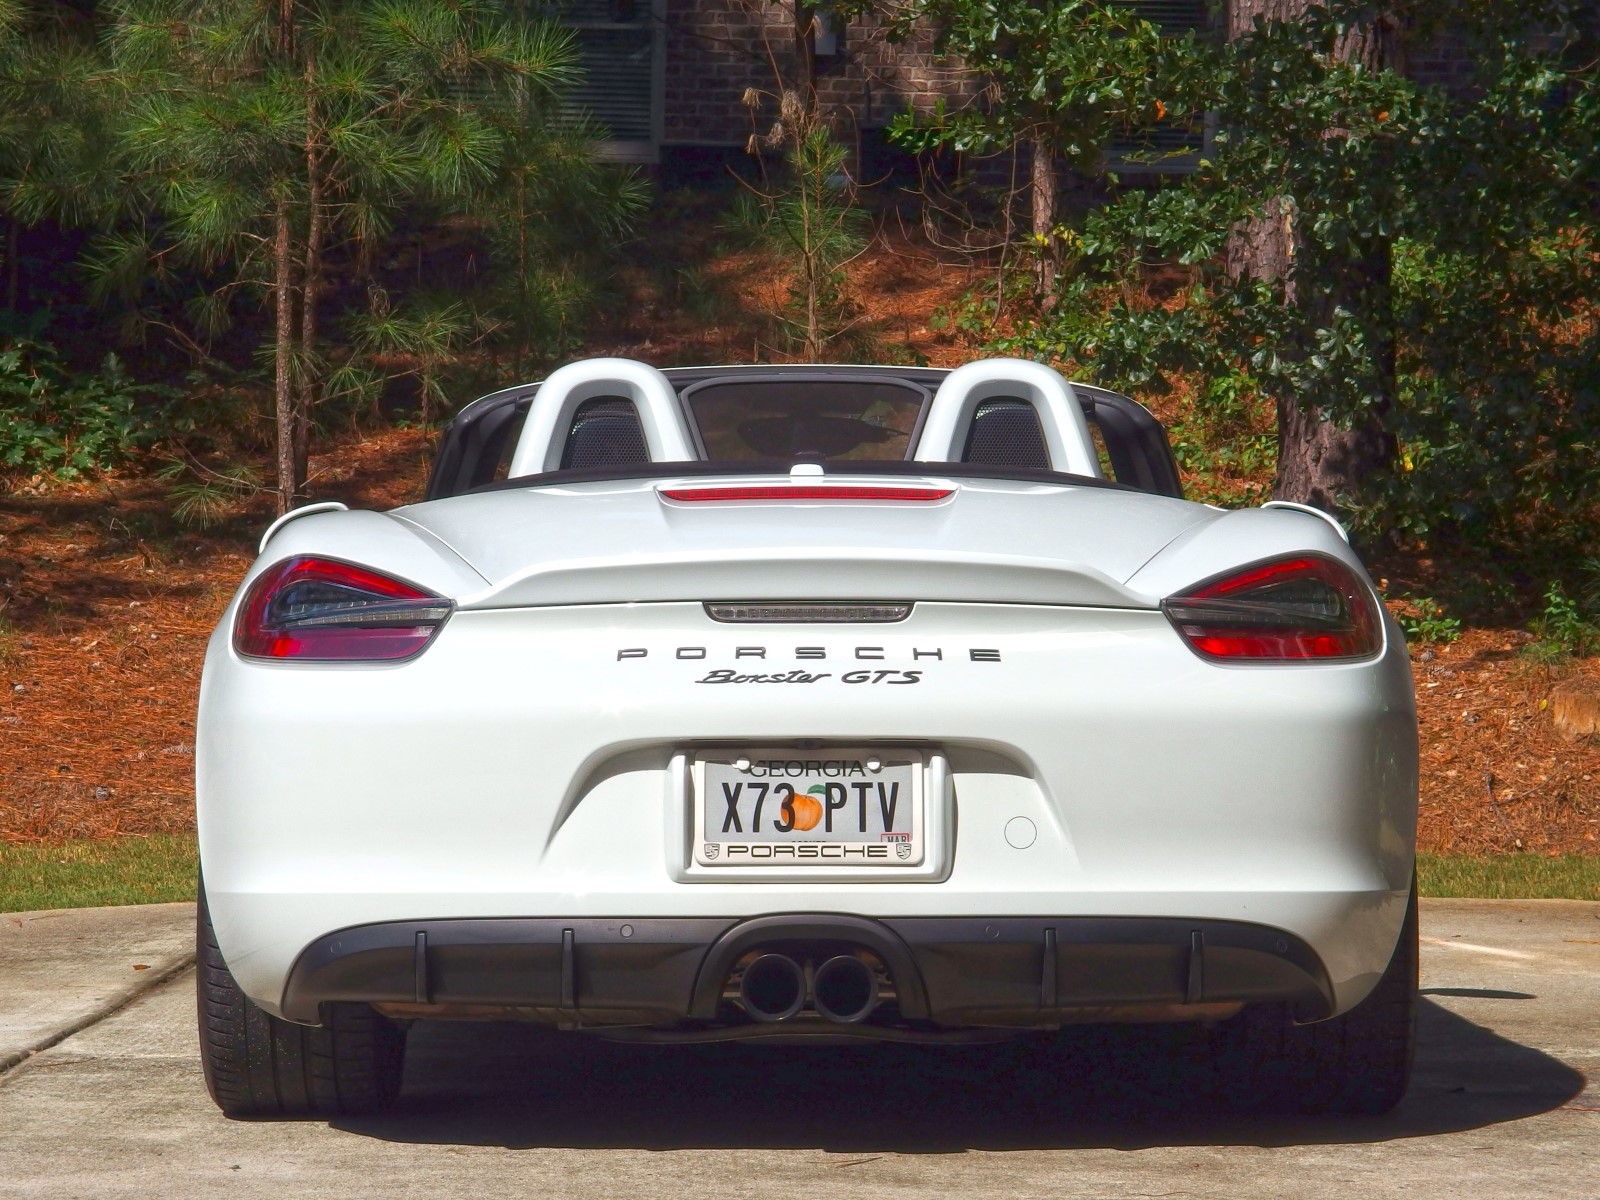
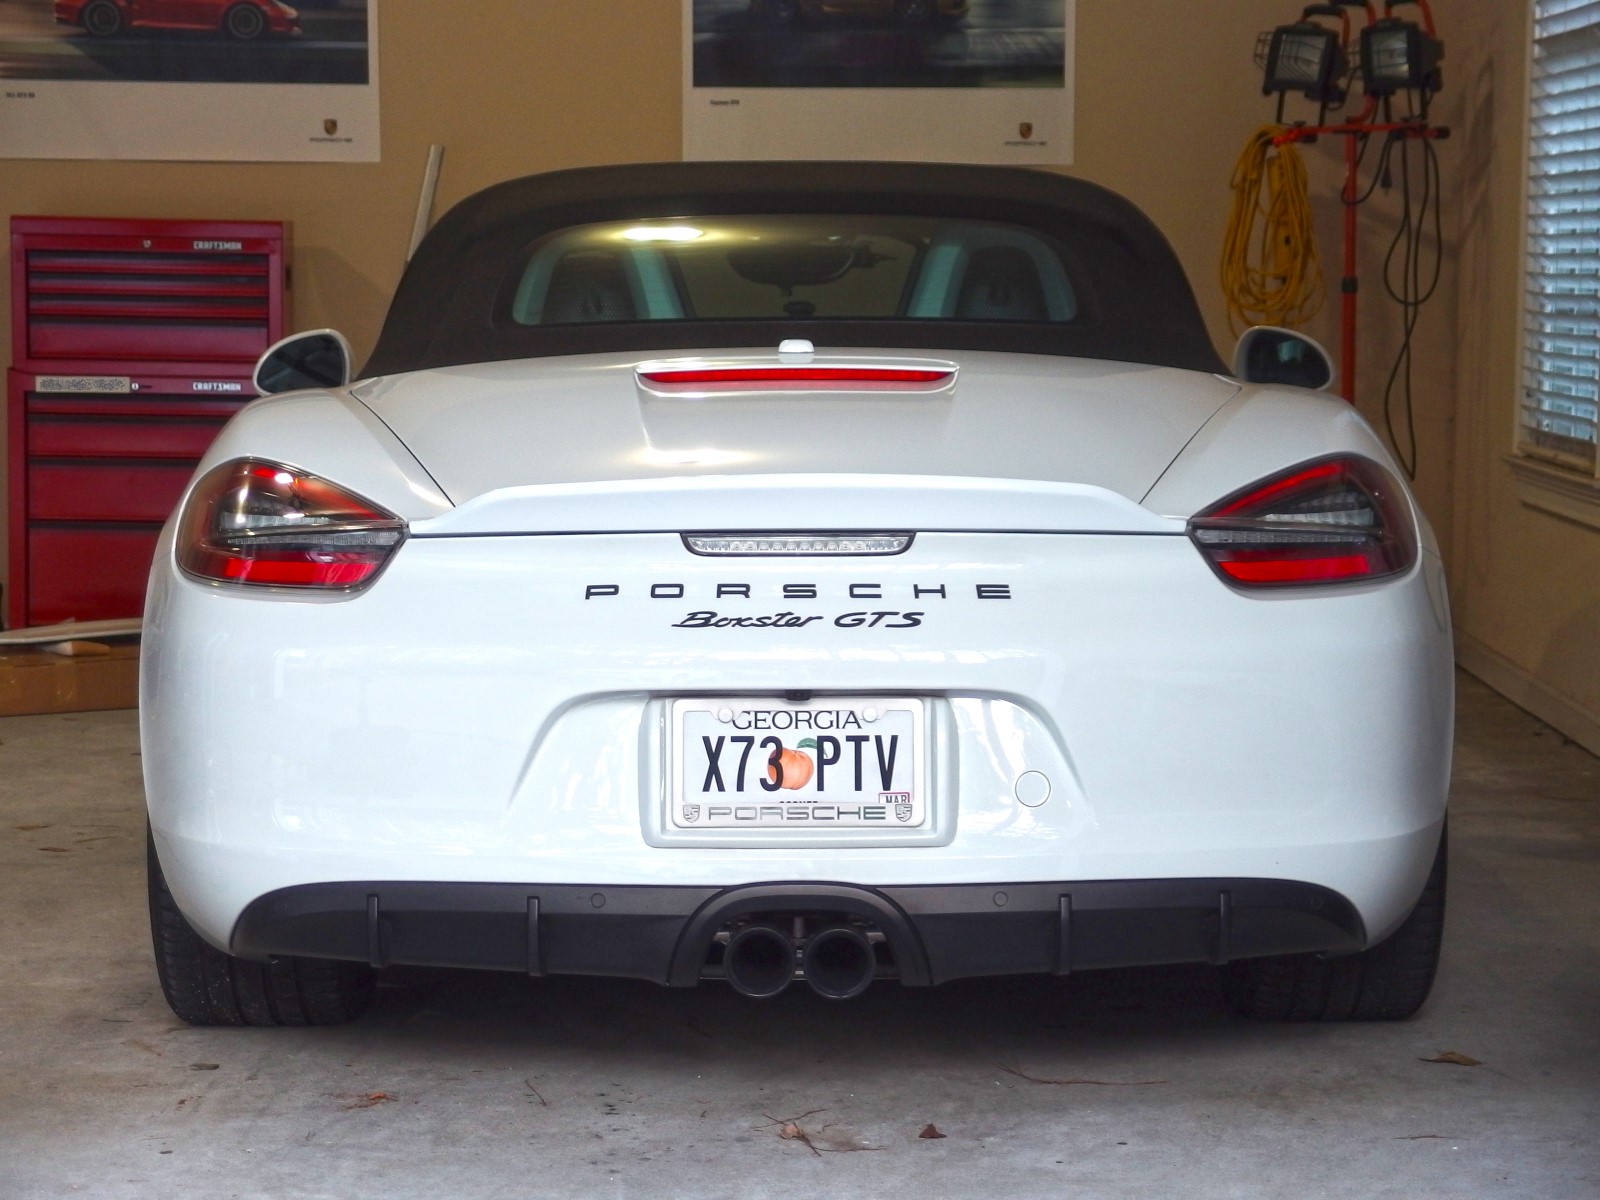
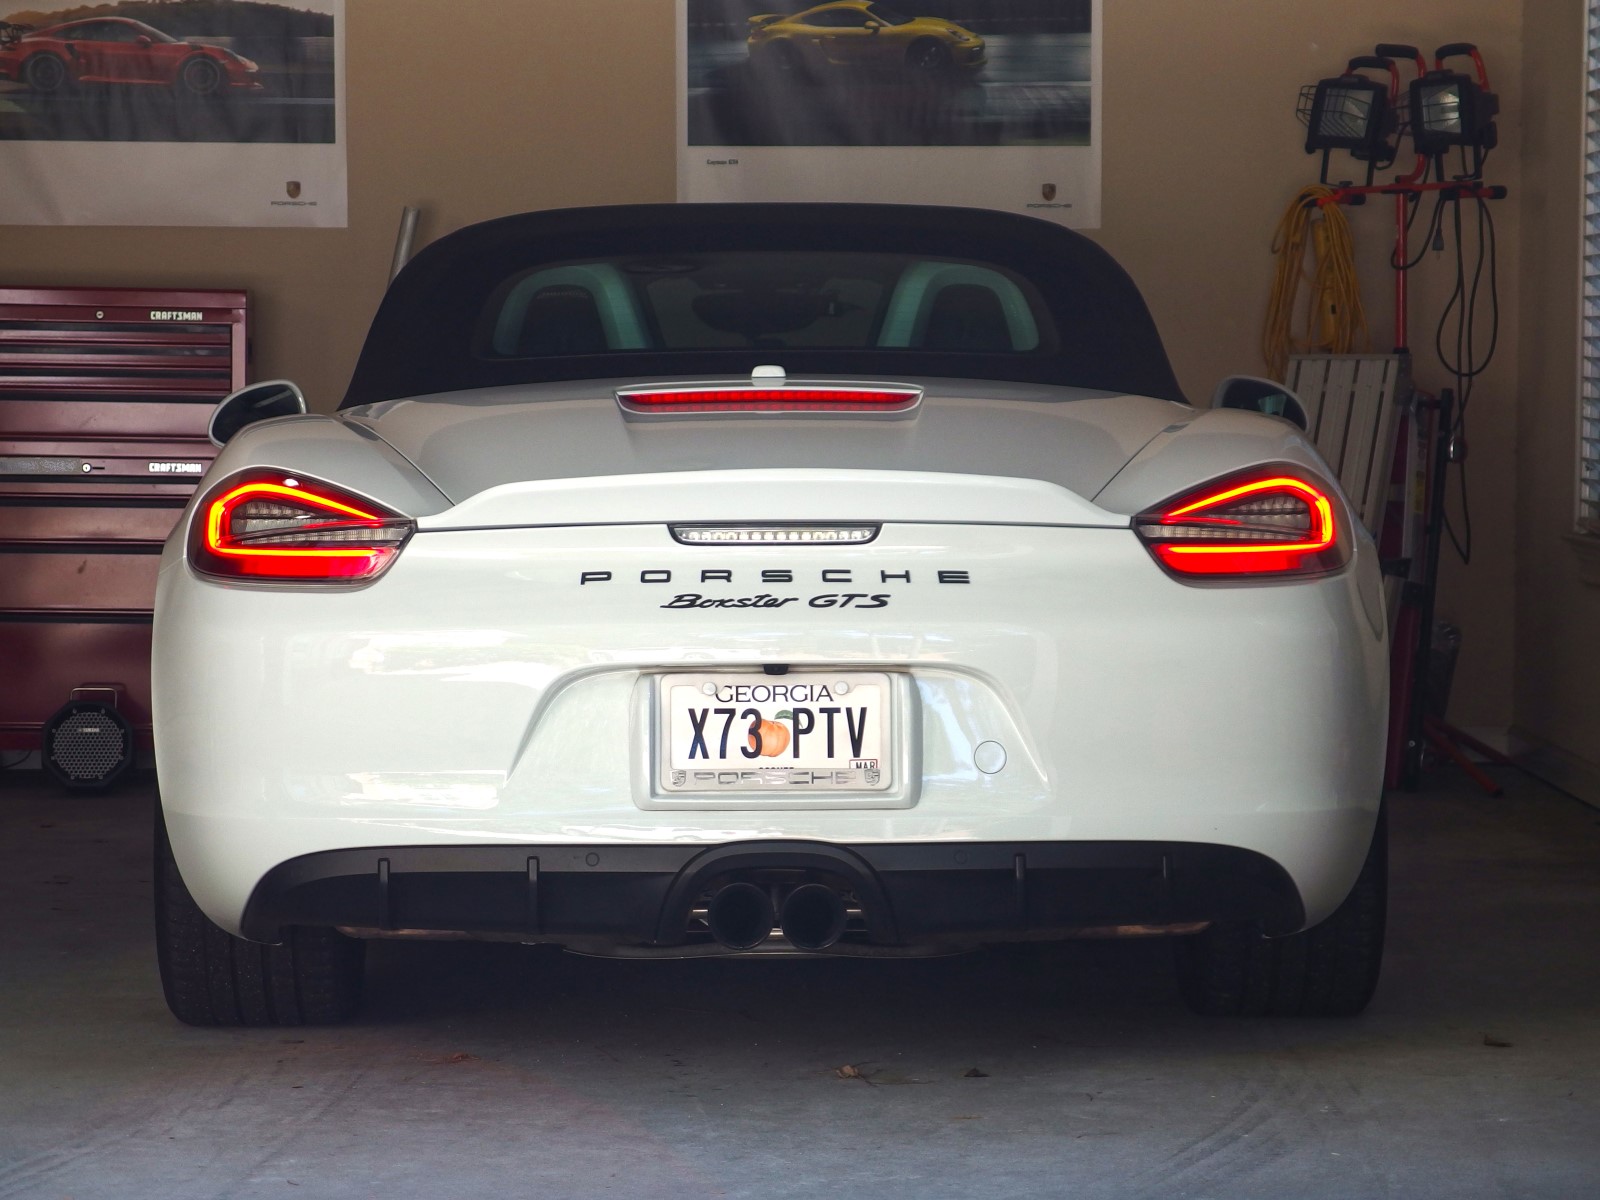
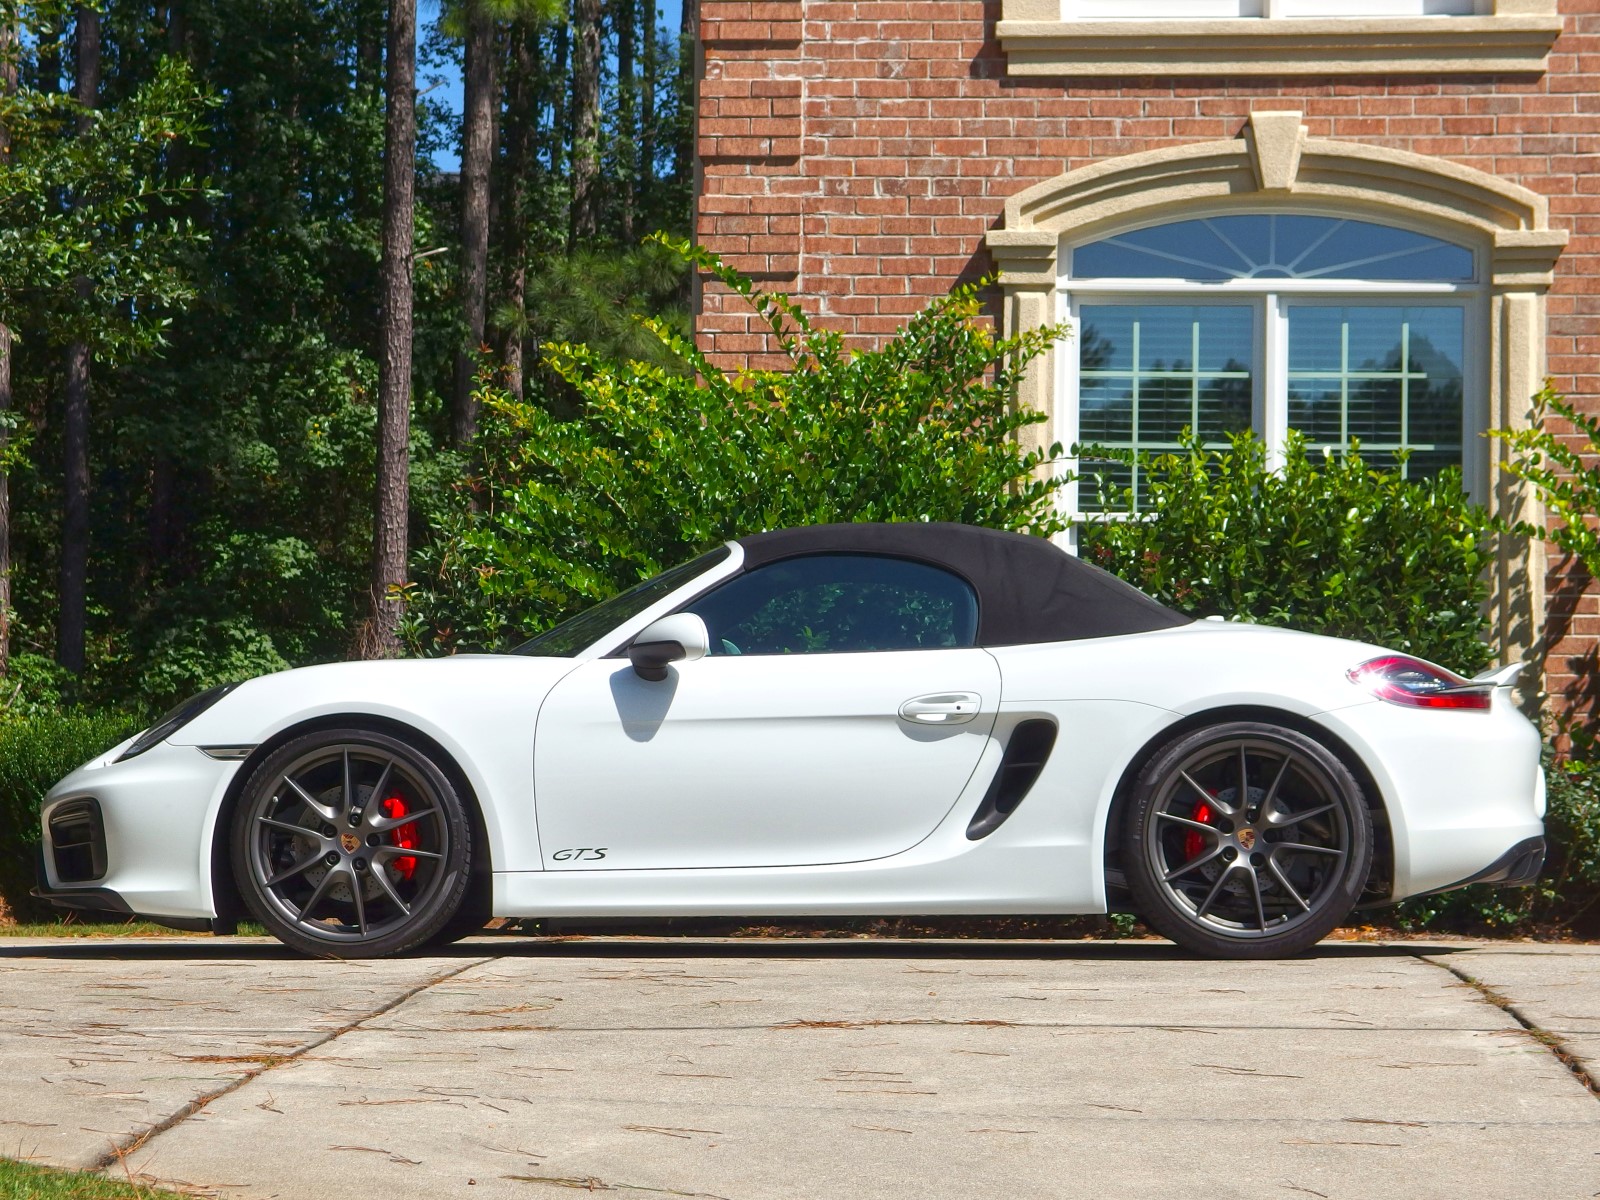
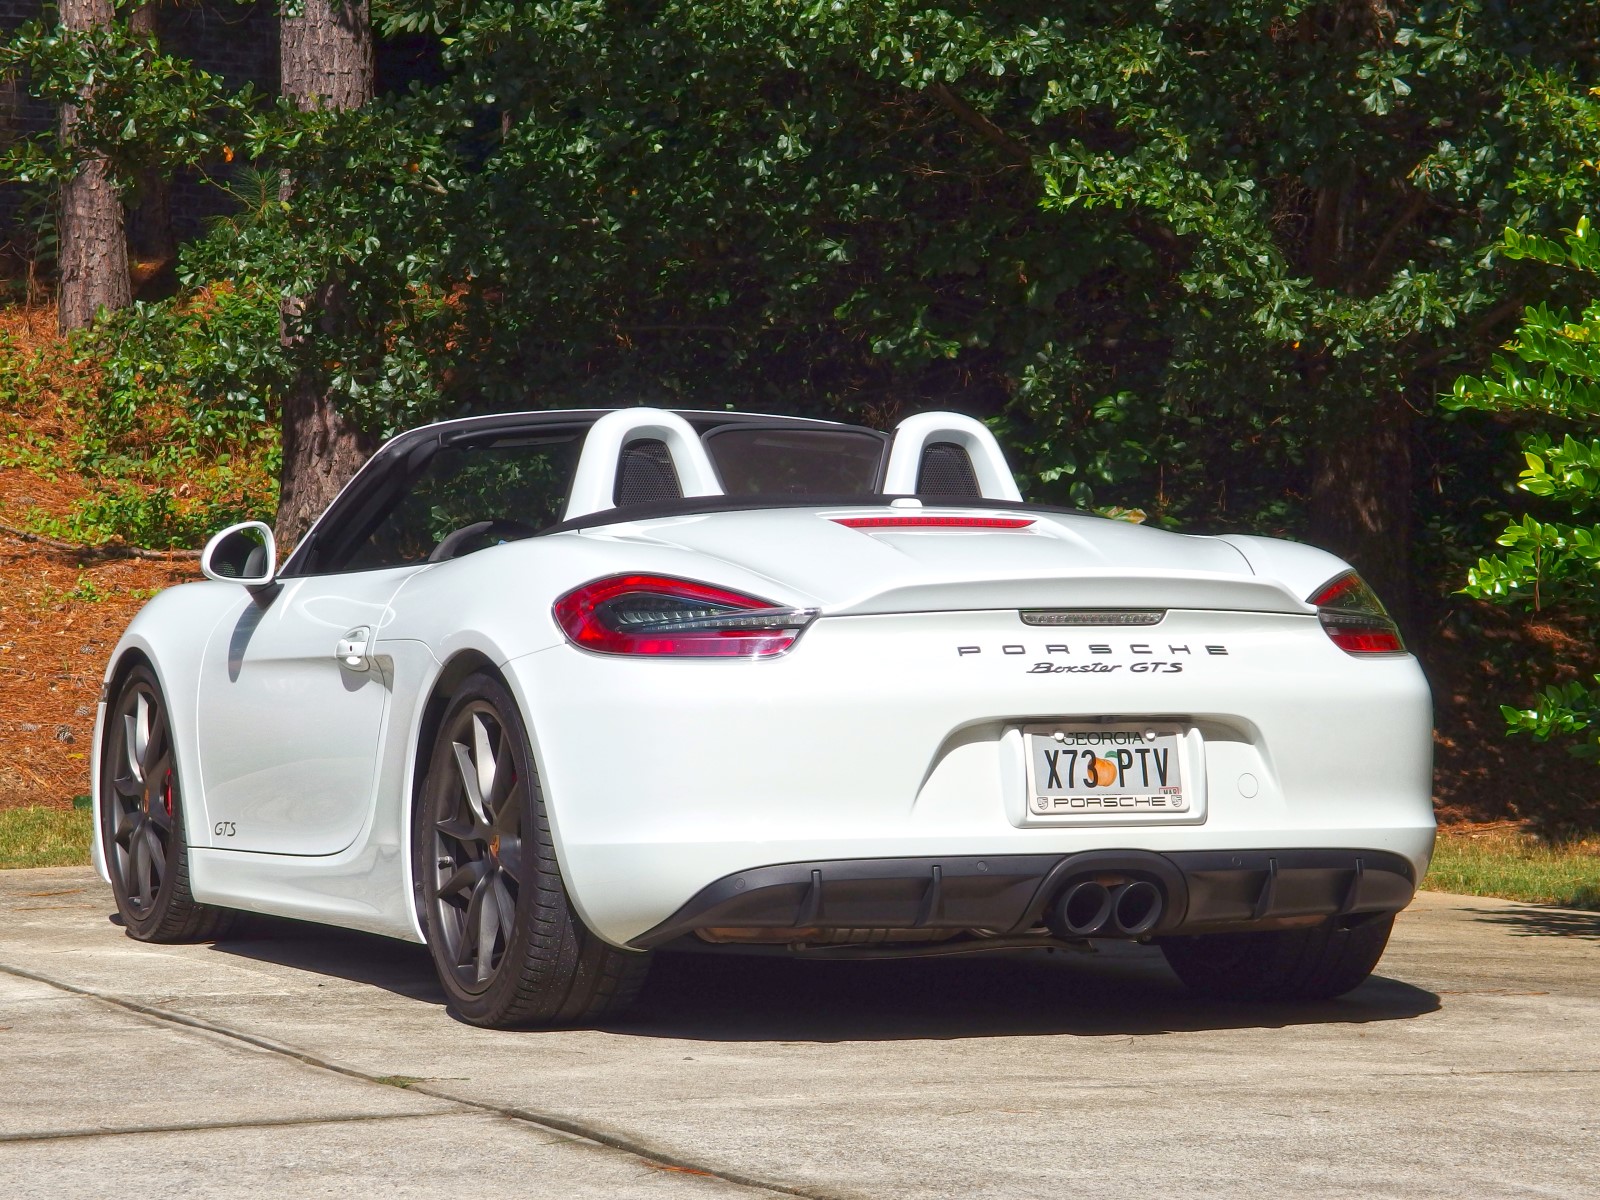
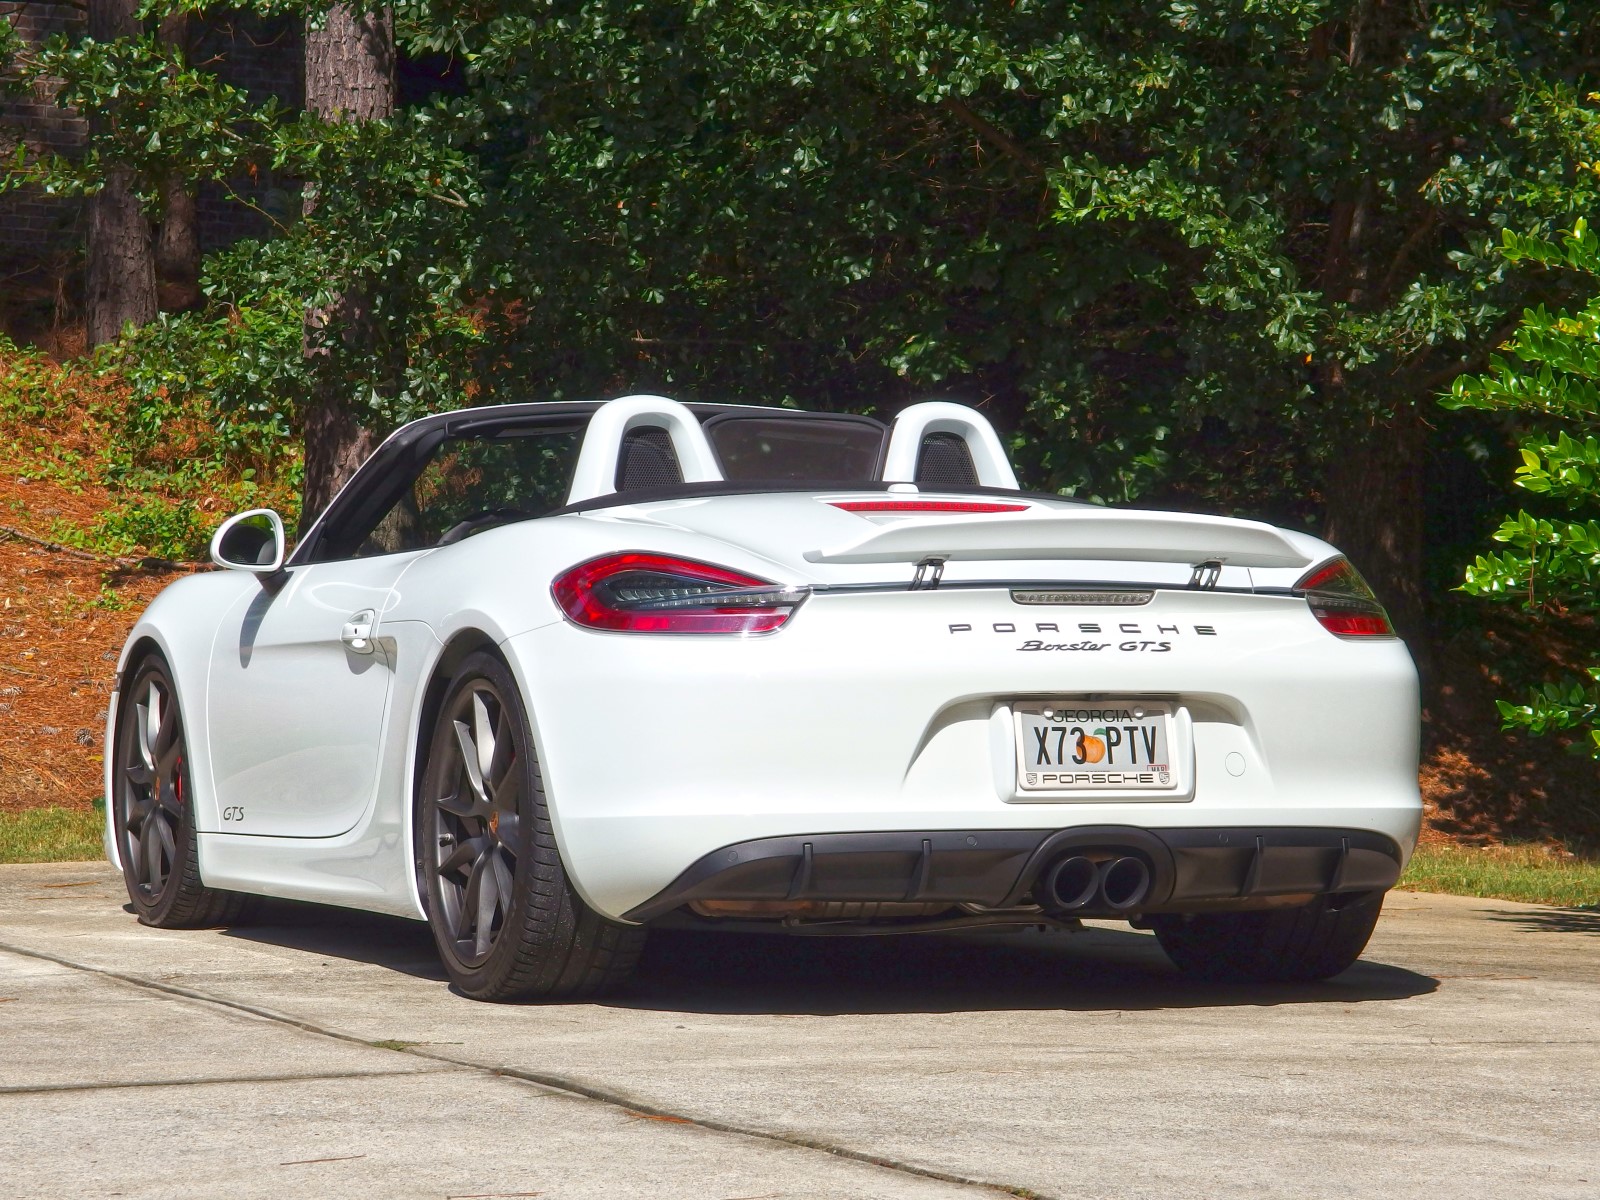
As is evident in the photos, the ducktail is a handsome addition that visually complements the rest of the car in a subtle and understated way. The Spyder ducktail looks nice and purposeful, and is subdued compared to some of the louder aftermarket tuner options available. Nothing is worse than an add-on that screams "AFTERMARKET!" on an otherwise stock vehicle, and I just don't think my car would look right with a big raised platform wing or Transformers movie aerodynamics kit. Educated enthusiasts might notice the new ducktail, but the casual observer will never know the difference unless you point it out to them, as the ducktail appears to be naturally styled by the same person who designed the rest of the car (or at most, by someone who offered a conservative "remix" or facelift of the original design). It's a nice compromise between HEY LOOK AT ME! and the rather plain stock spoiler.

I'm also pleased by what's absent, namely the lack of any gaudy aftermarket decals or relief text script in the corner of the spoiler. I'm glad the company went with a less-is-more approach that is faithful to the original OE look.
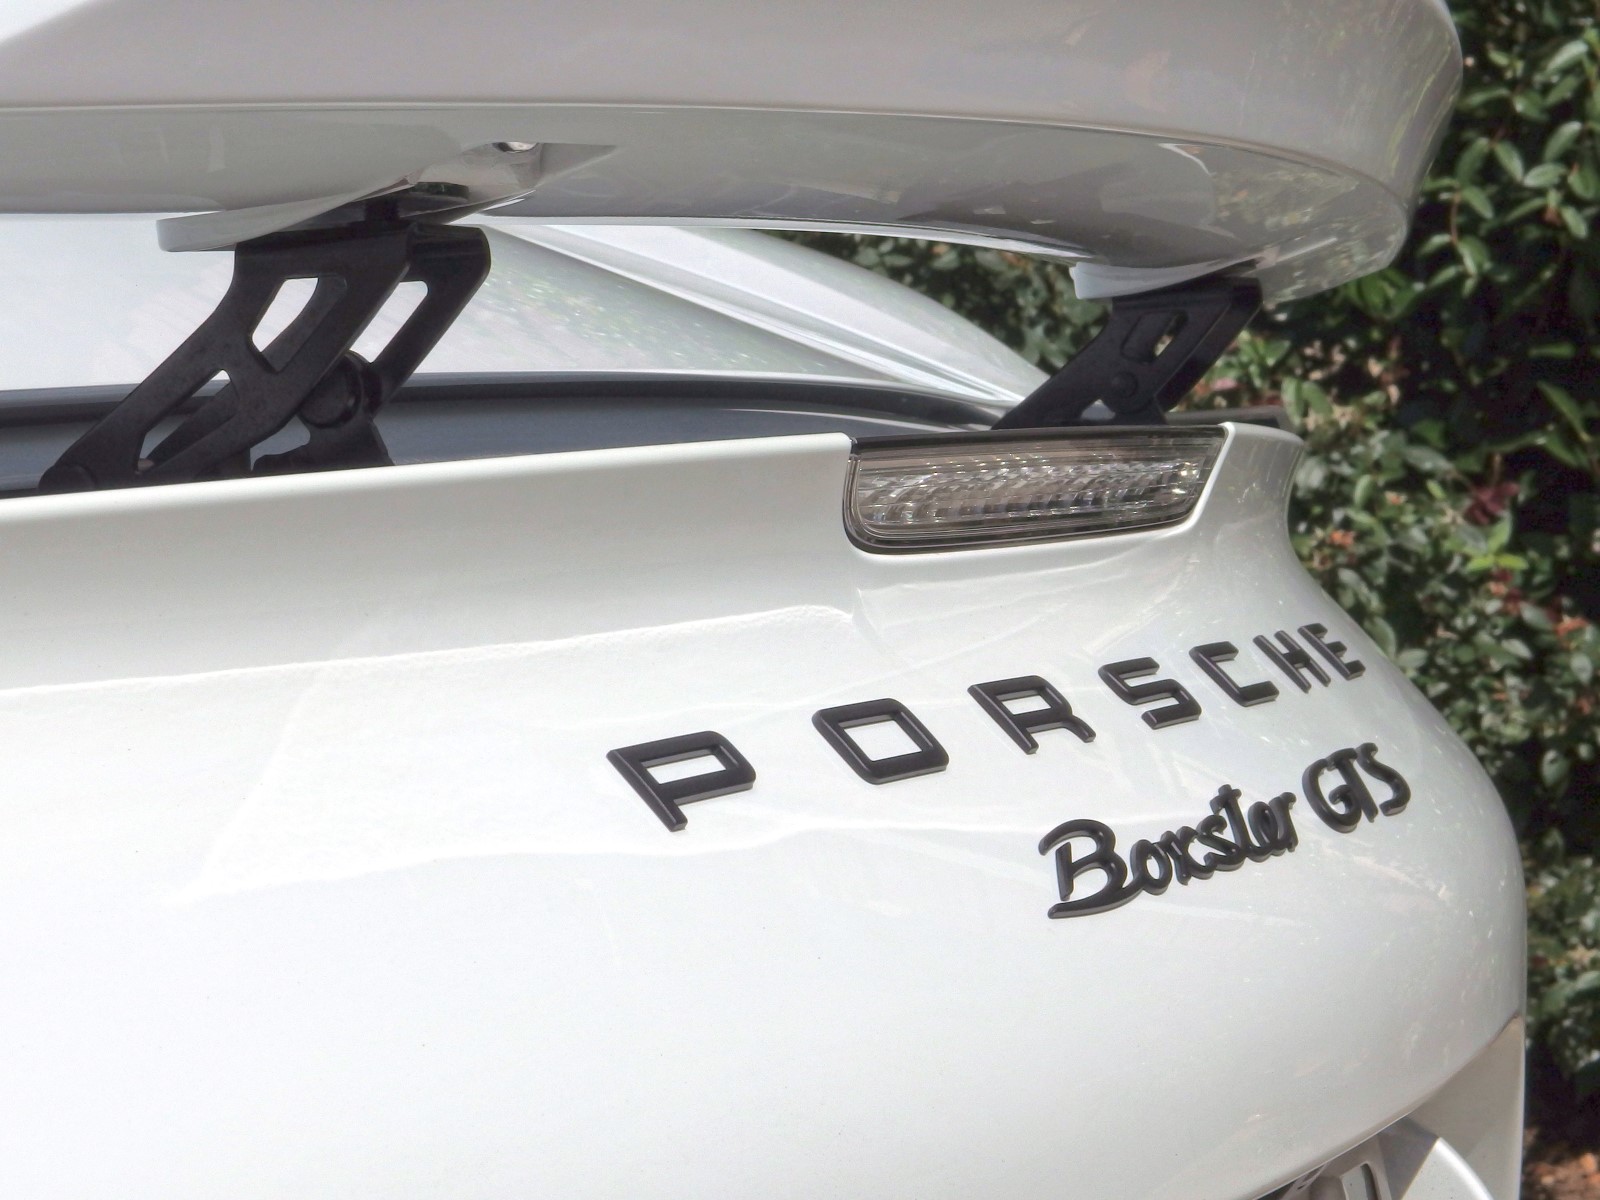
The bright stainless fasteners, while normally only visible when the spoiler is raised at speeds over 75 MPH (and even then, only from certain angles), kind of stand out visually, but they don't necessarily look out of place and are simple and honest (in a no frills, form-follows-function kind of way).
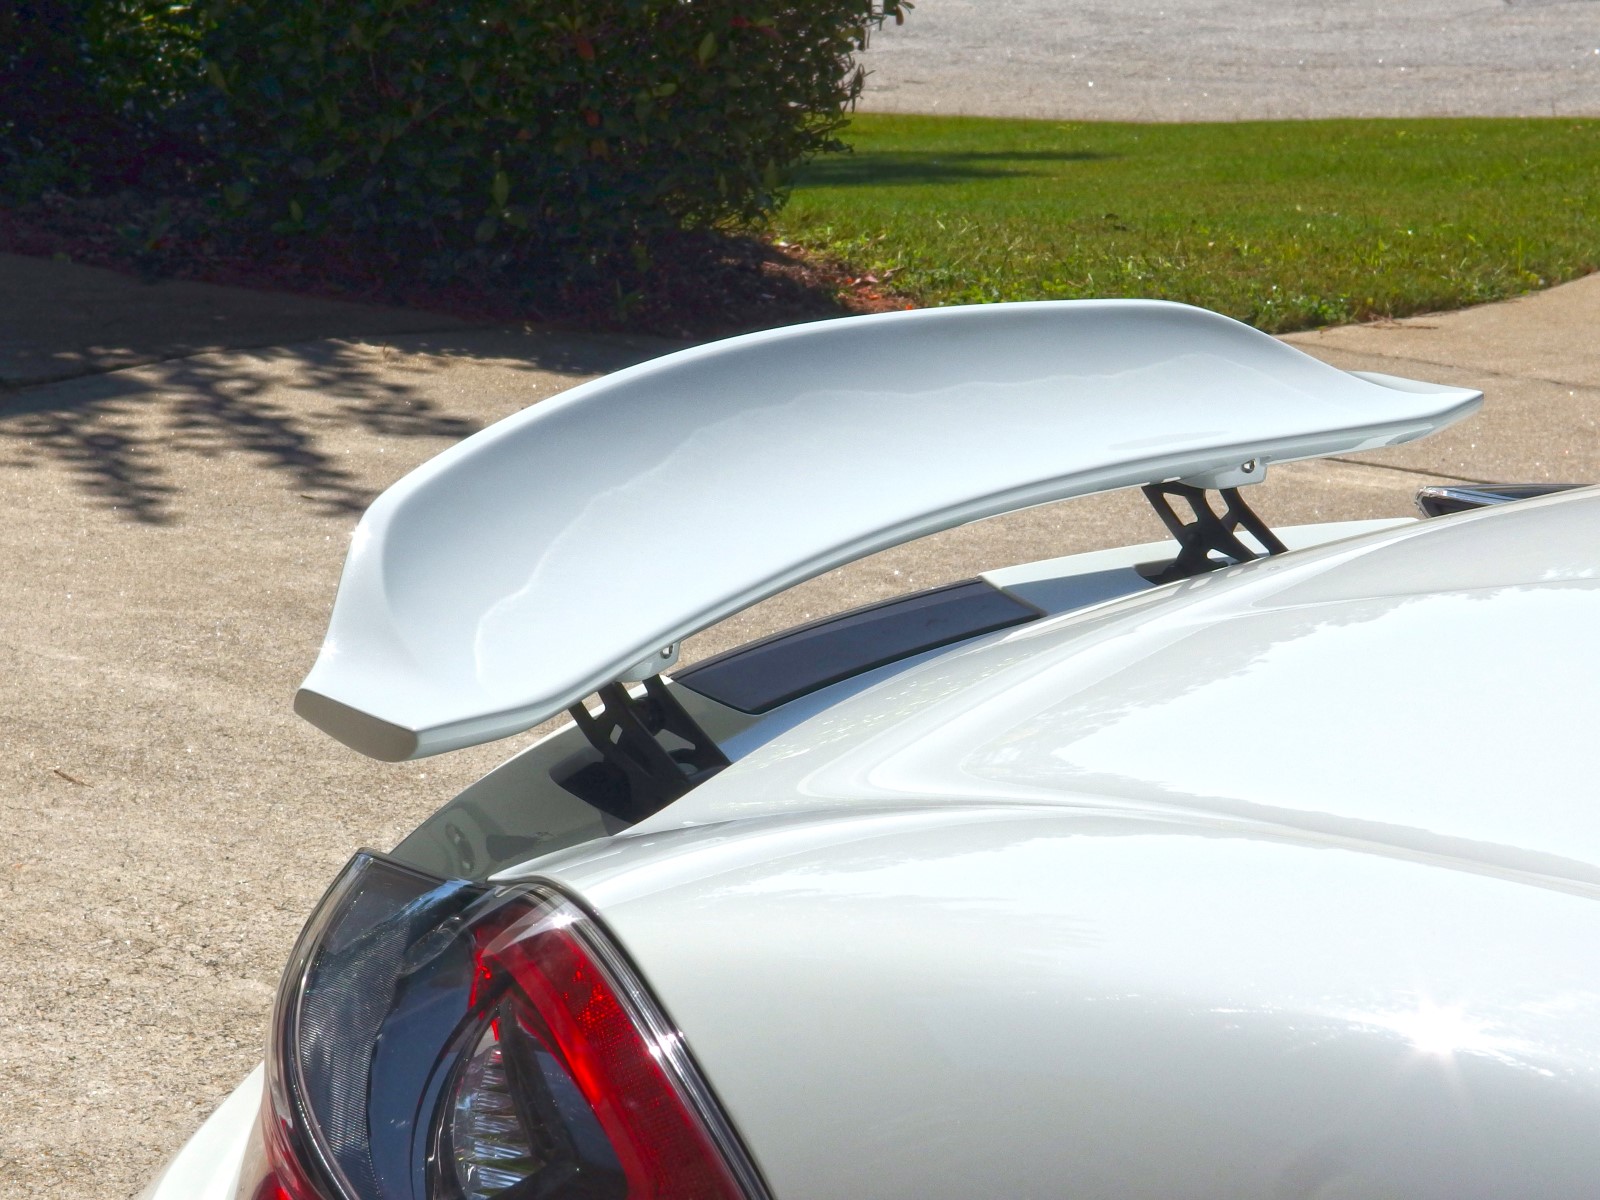
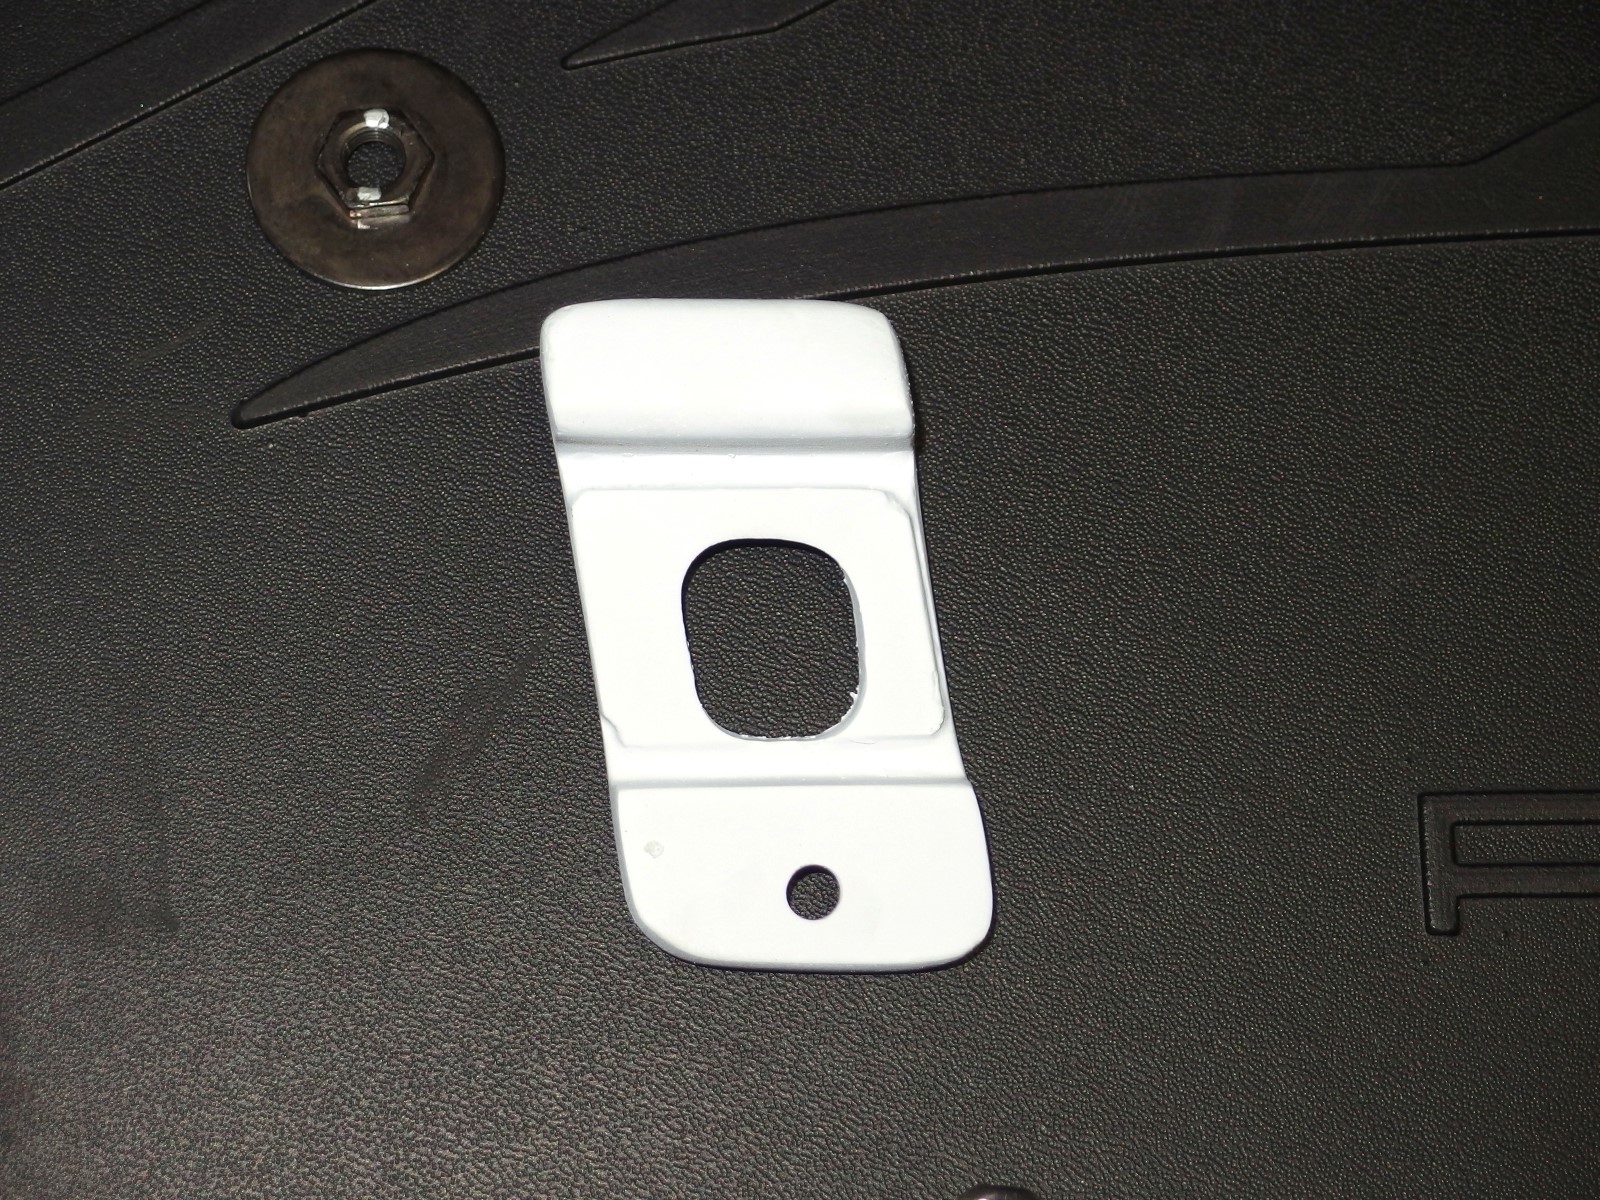
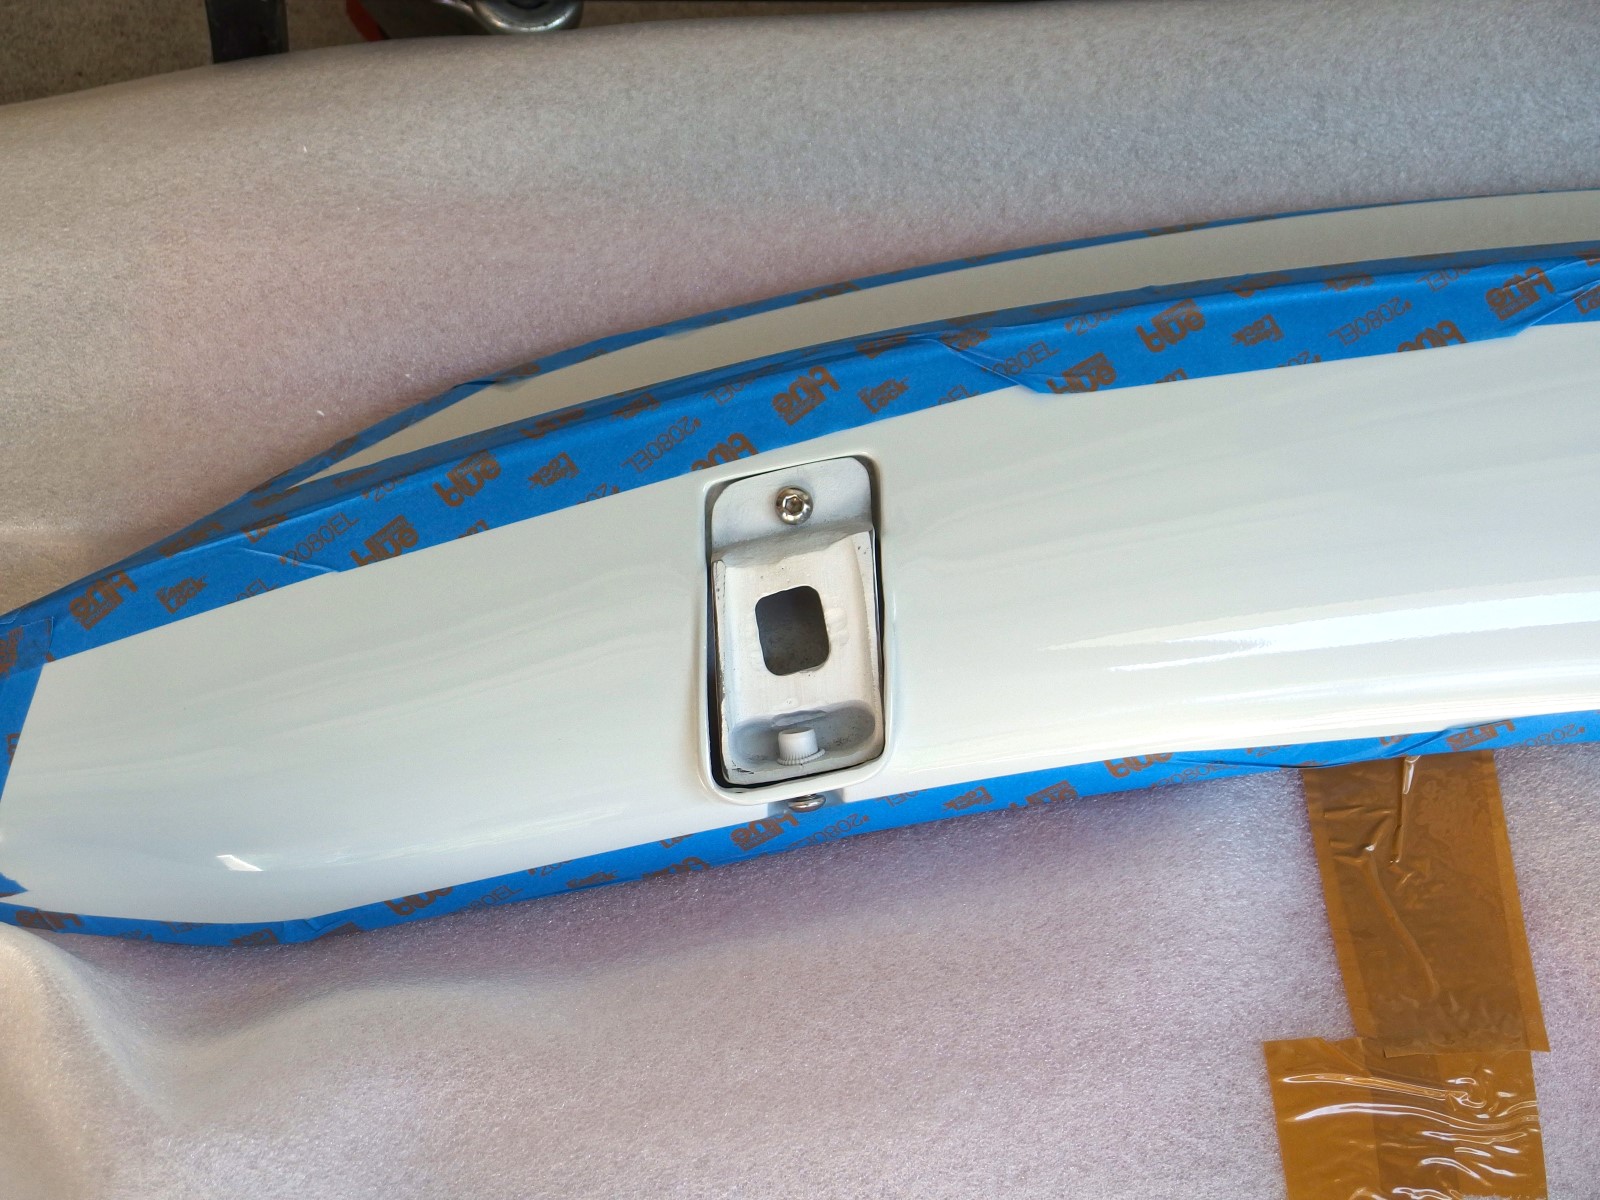
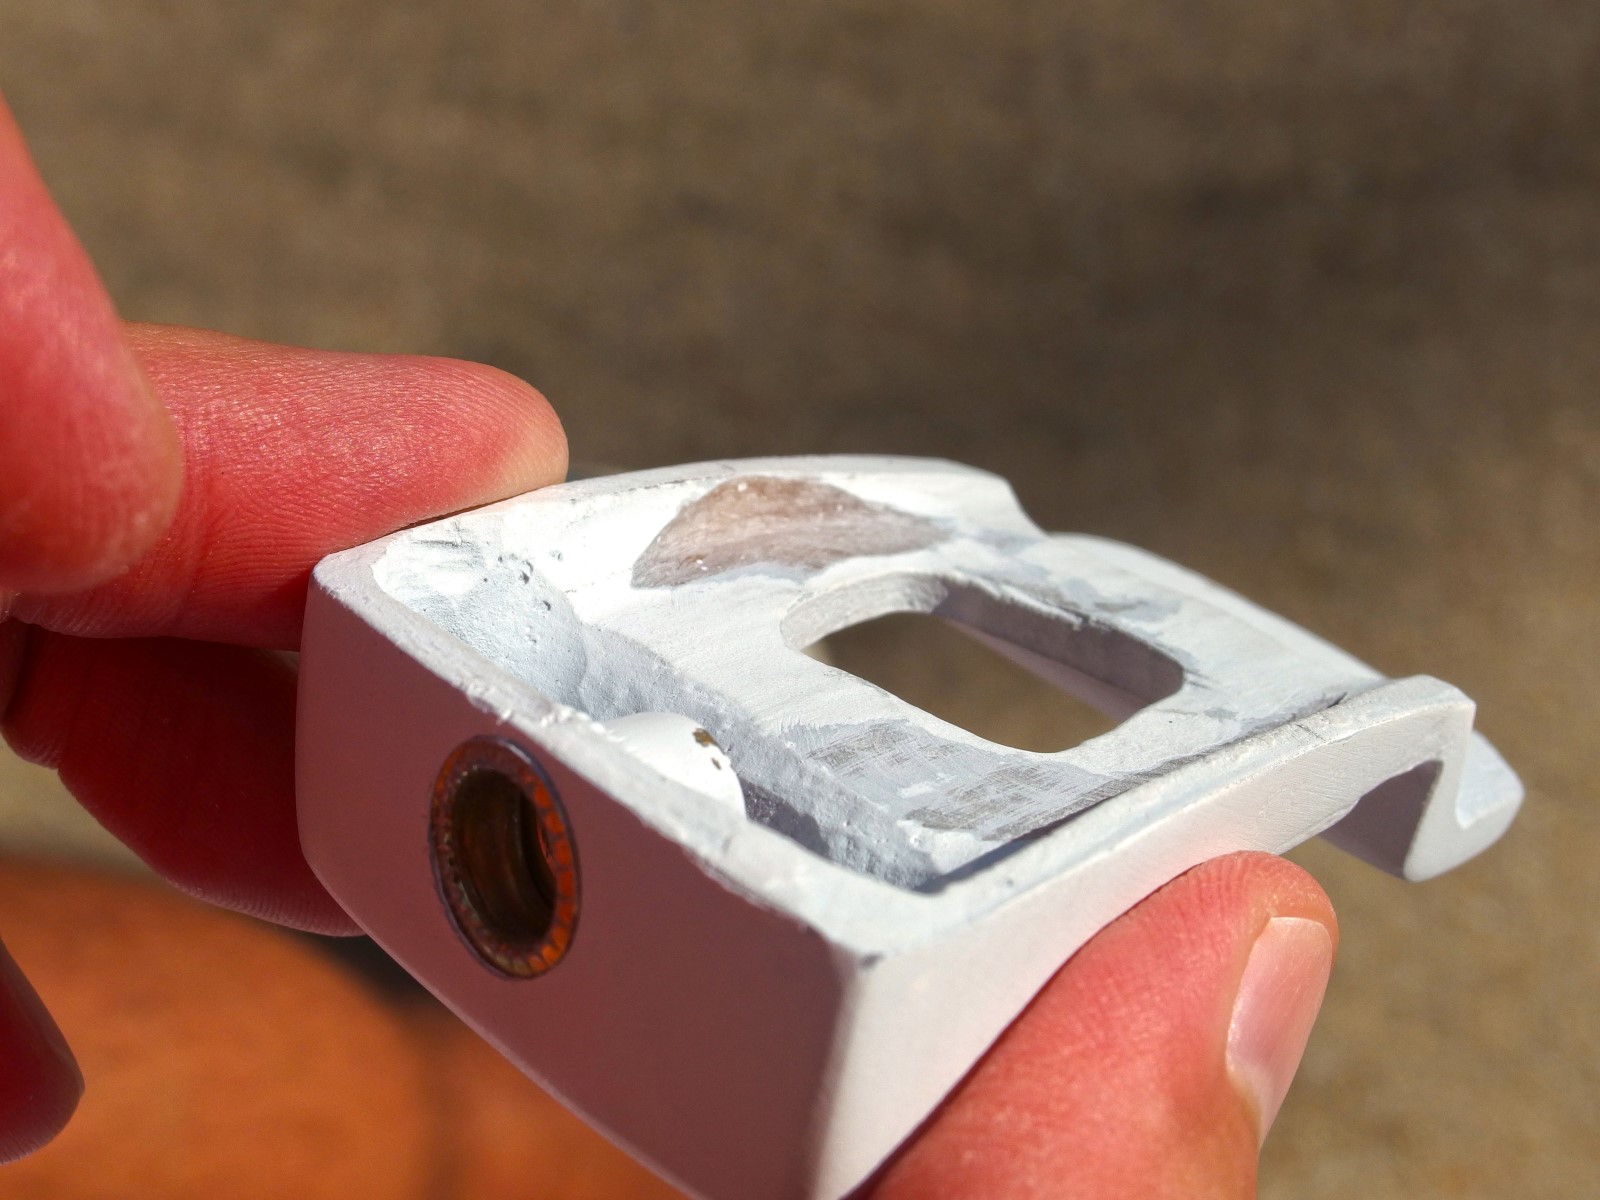
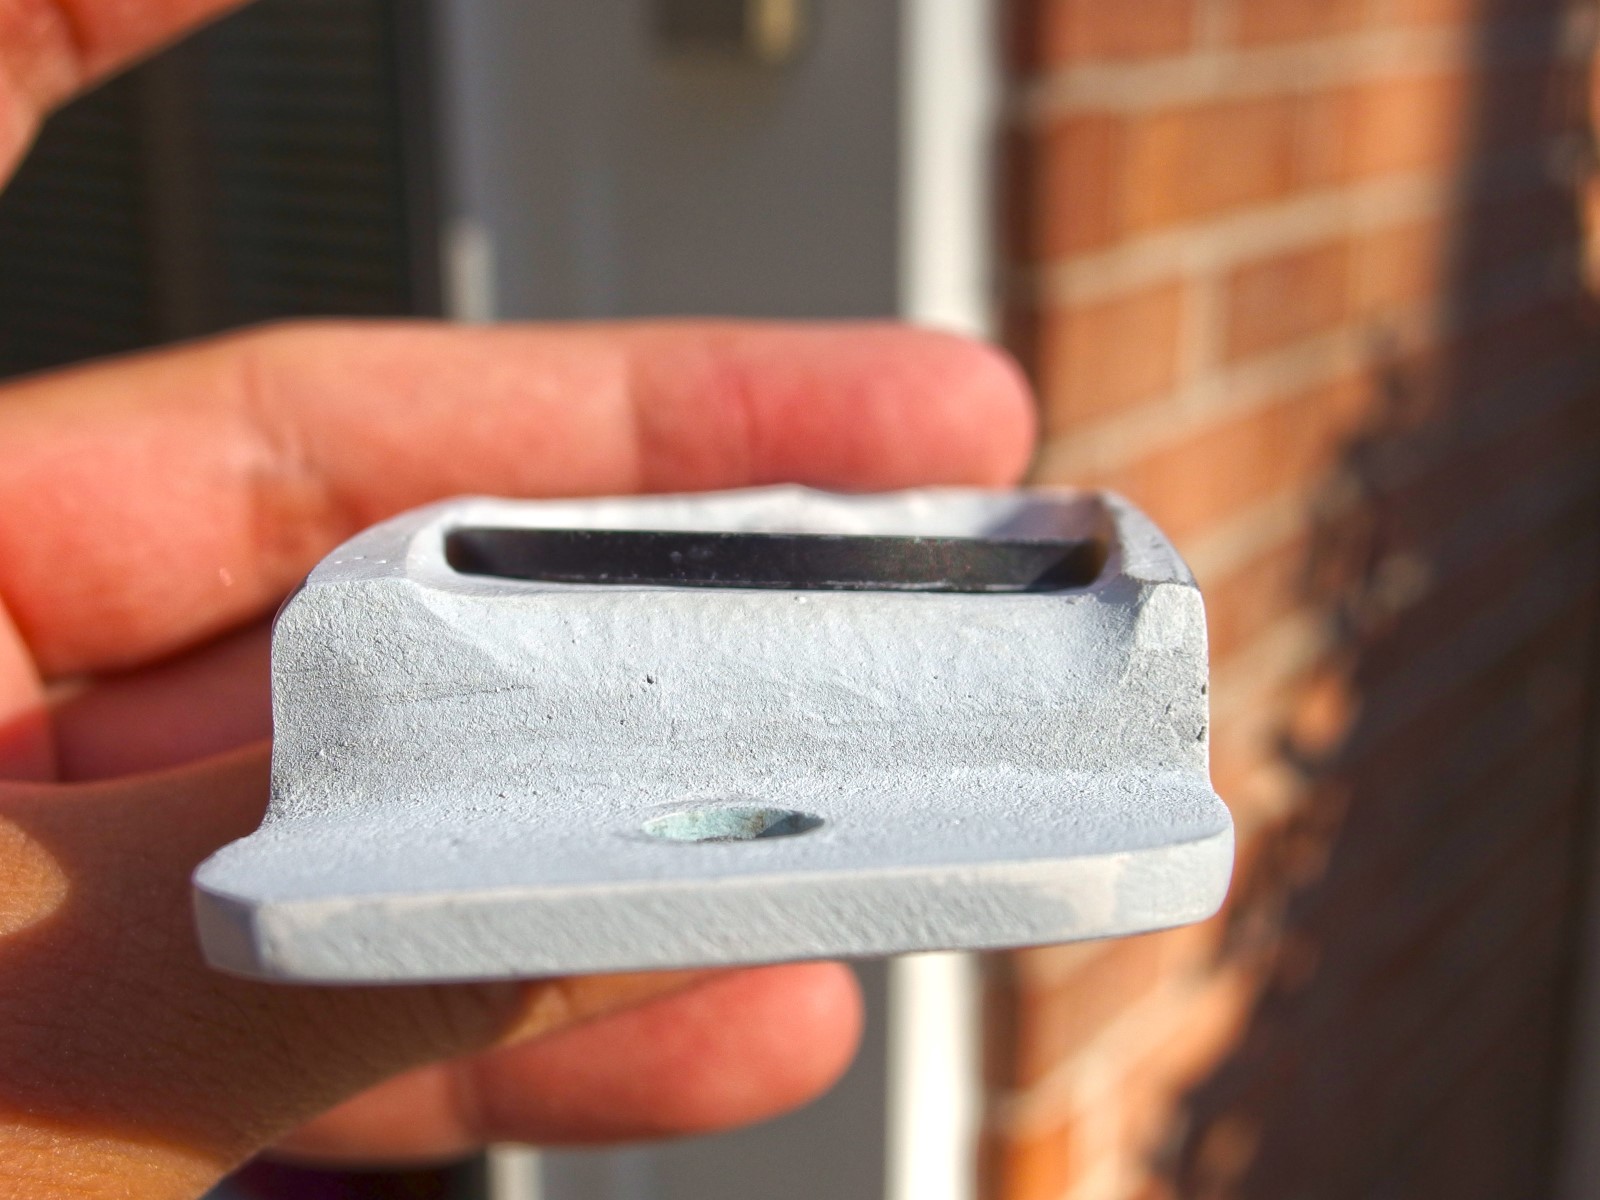
If there is any knock on product appearance, it is that the little custom-fabricated fiberglass mounting brackets definitely don't look OE (because they have a coarser unfinished look), but those are only visible from really low angles (you have to bend down or stoop to see them) and only if you're actually looking for them, because they are mostly obscured by the ducktail itself. And unless you raise the spoiler while the car is parked, nobody would ever notice them (certainly not when viewed from within another vehicle at 75+ MPH).
But the most important aspect that affects the ducktail's appearance and visual harmony is the paint match, because any body panel in the wrong shade or hue will attract attention and won't look right on an otherwise perfect vehicle. Thankfully, the company did a great job (blindly) matching my car's "Pure White" paint (factory paint code 0Q or C9A). Using my VIN, they were able to come very very close to my paint color, and if I'm being picky, the ducktail is maybe 1% brighter against my car's (dirtier) 3-year old paint.
The company did admit up front that my specific paint color would be hard to match exactly, and warned me that the color difference might be similar to the subtle color difference one might normally observe on factory paint between a metal body panel and an adjoining plastic bumper cover. And that's exactly how I would describe it too--the paint color is probably the same or darn close, but because of the different underlying materials, it takes on a slightly different tone that is really only visible when scrutinizing it with adjacent panels. Overall, I'm very pleased with the mail-order color match (and the best part: I never had to set foot in a body shop, woohoo!).
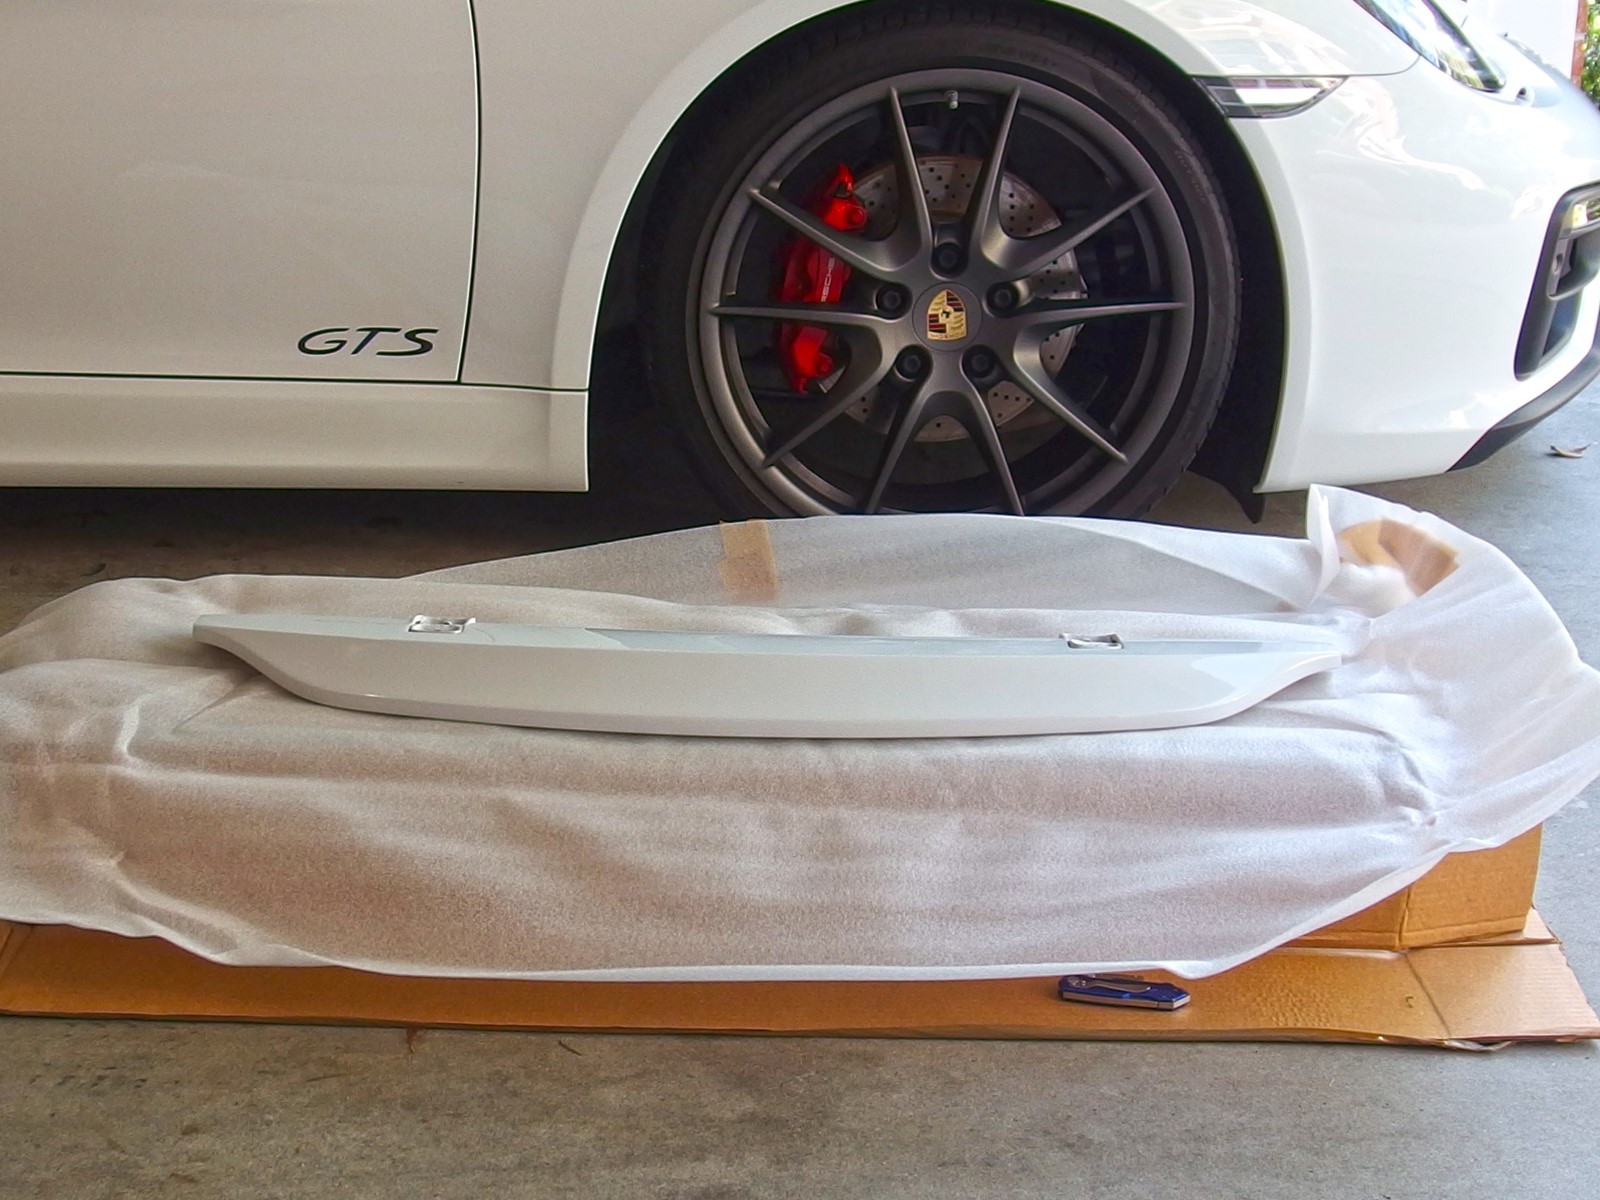
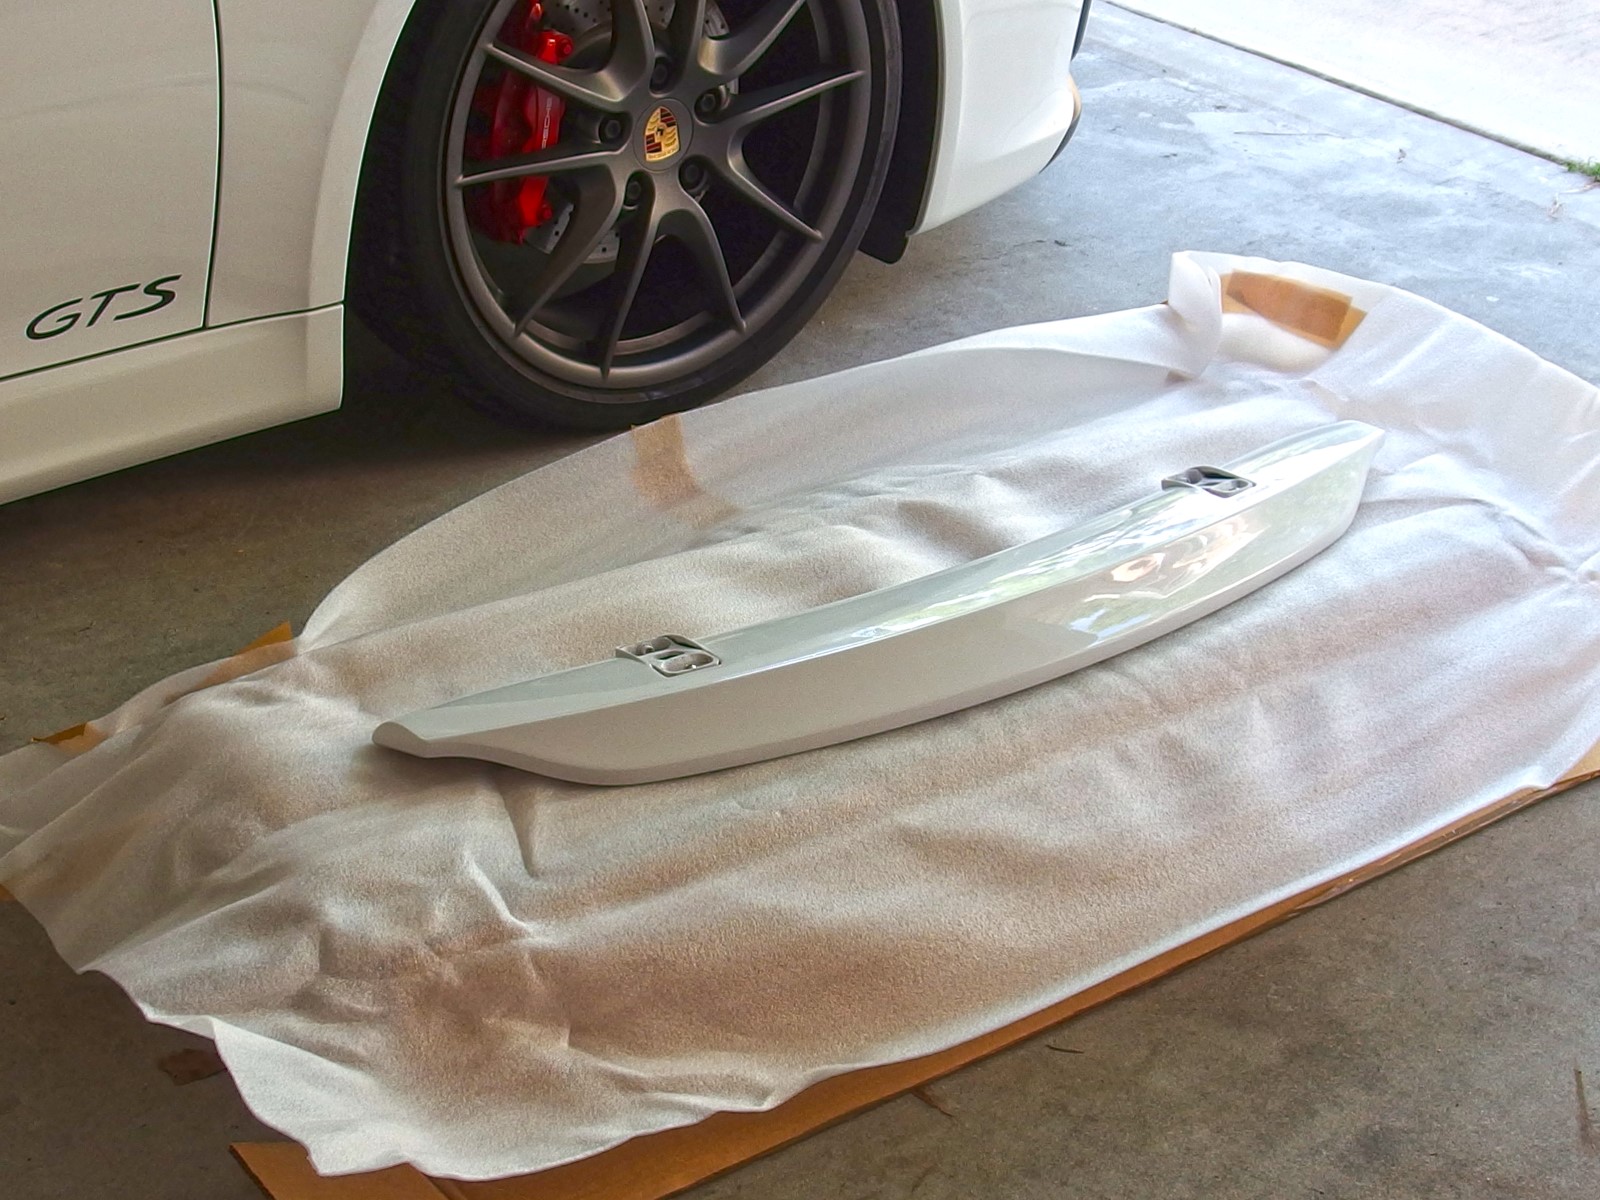
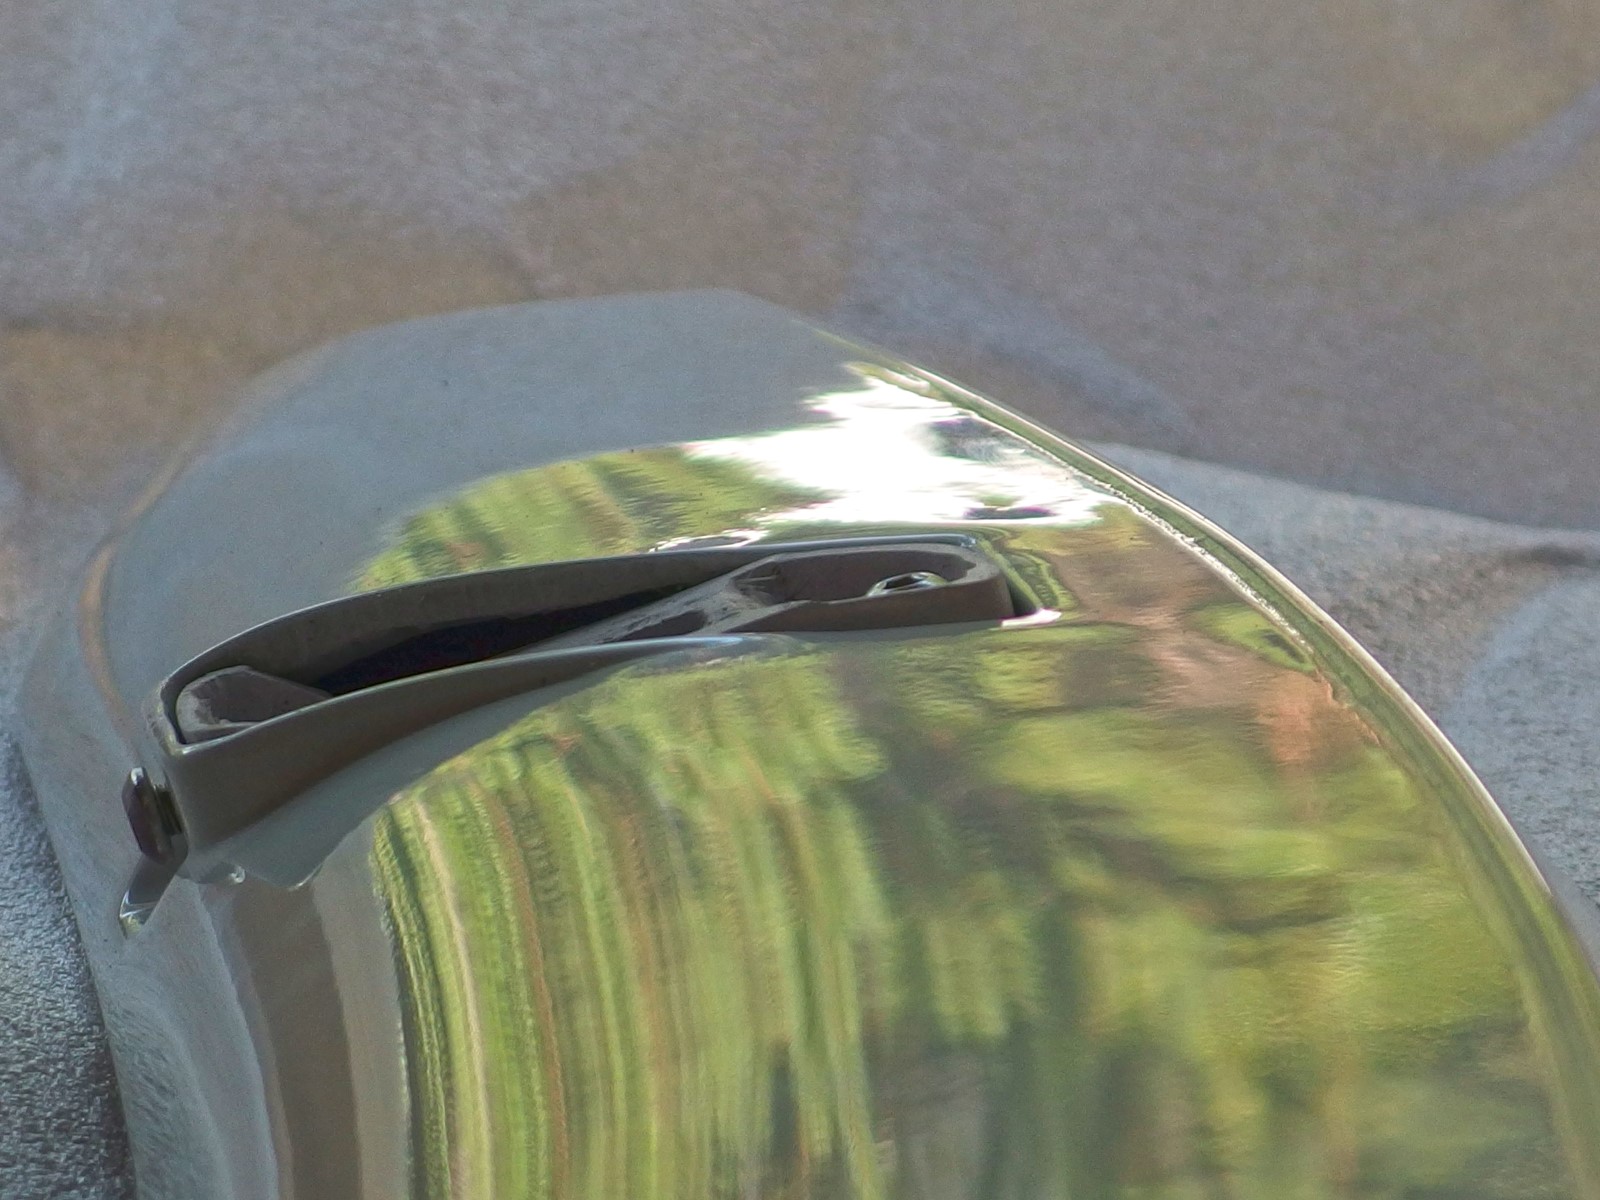
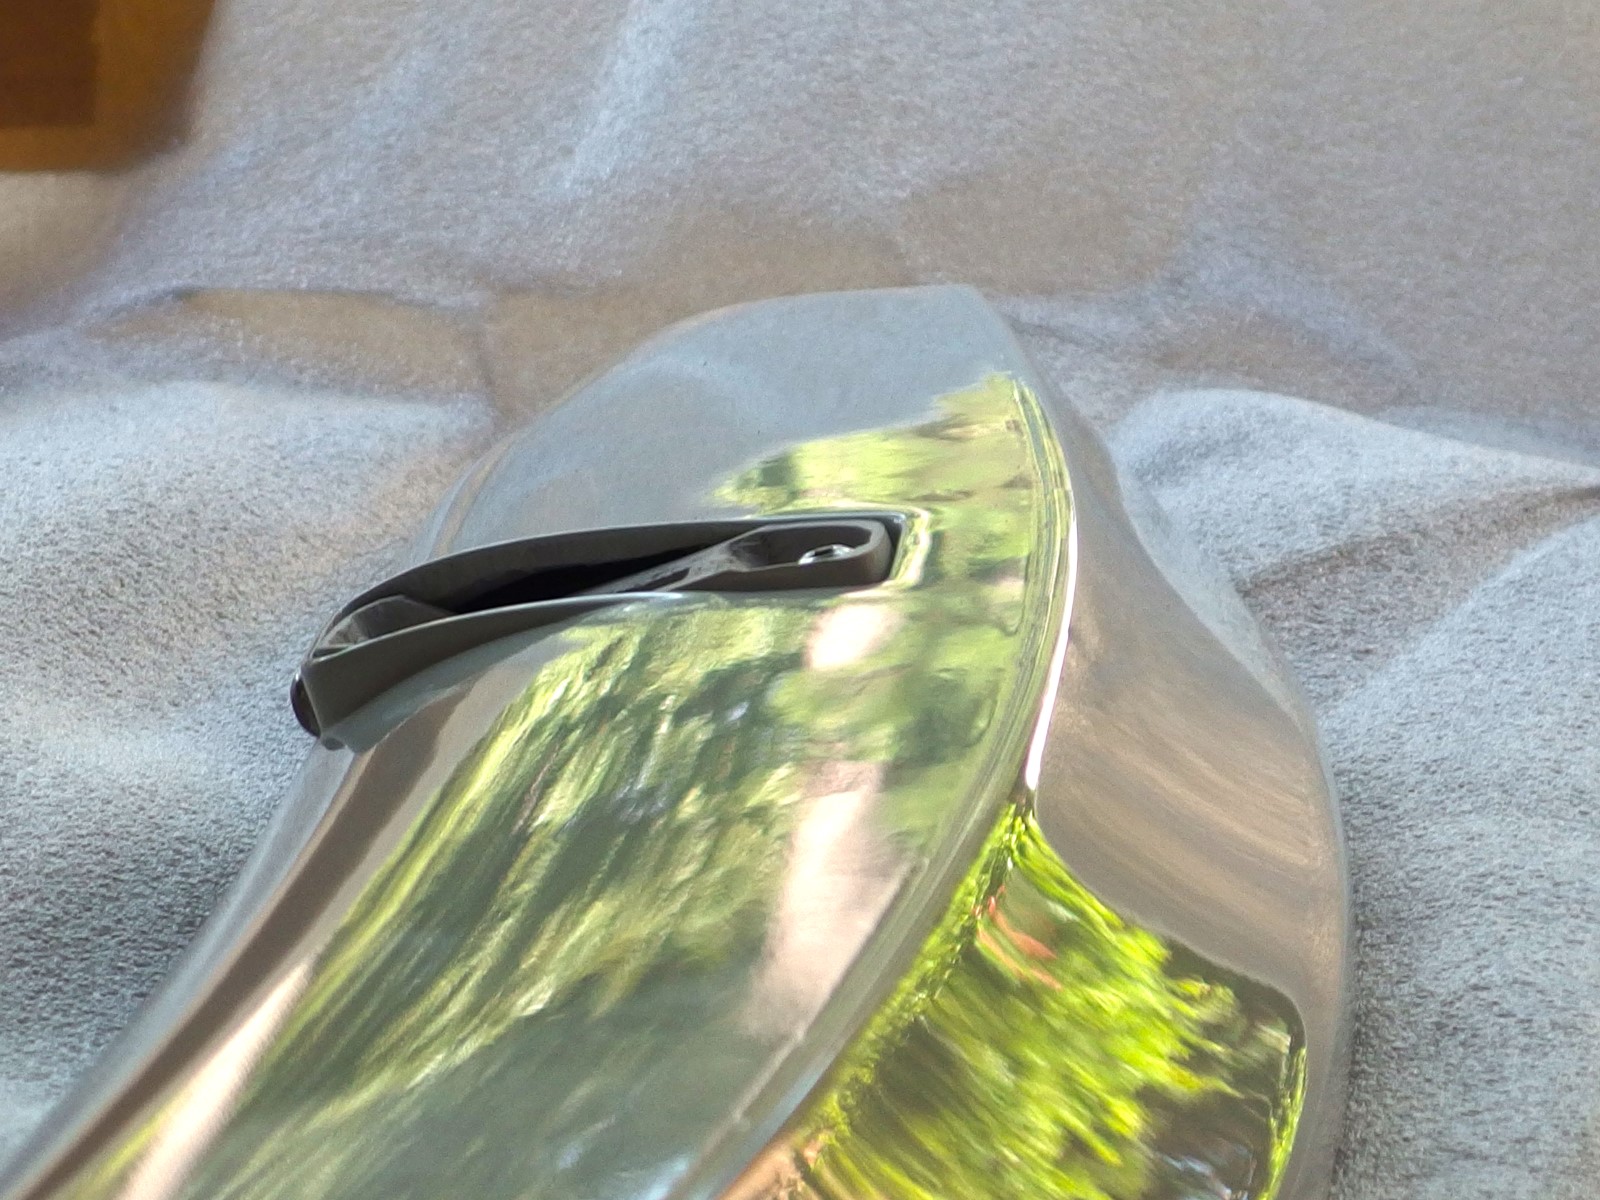
Construction/Craftsmanship: 9 out of 10
The ducktail itself is beautiful to behold, with a glossy smooth finish on the top and rear. The paint and clear coat on these faces are flawless with no visible imperfections whatsoever (and I looked hard to find any).
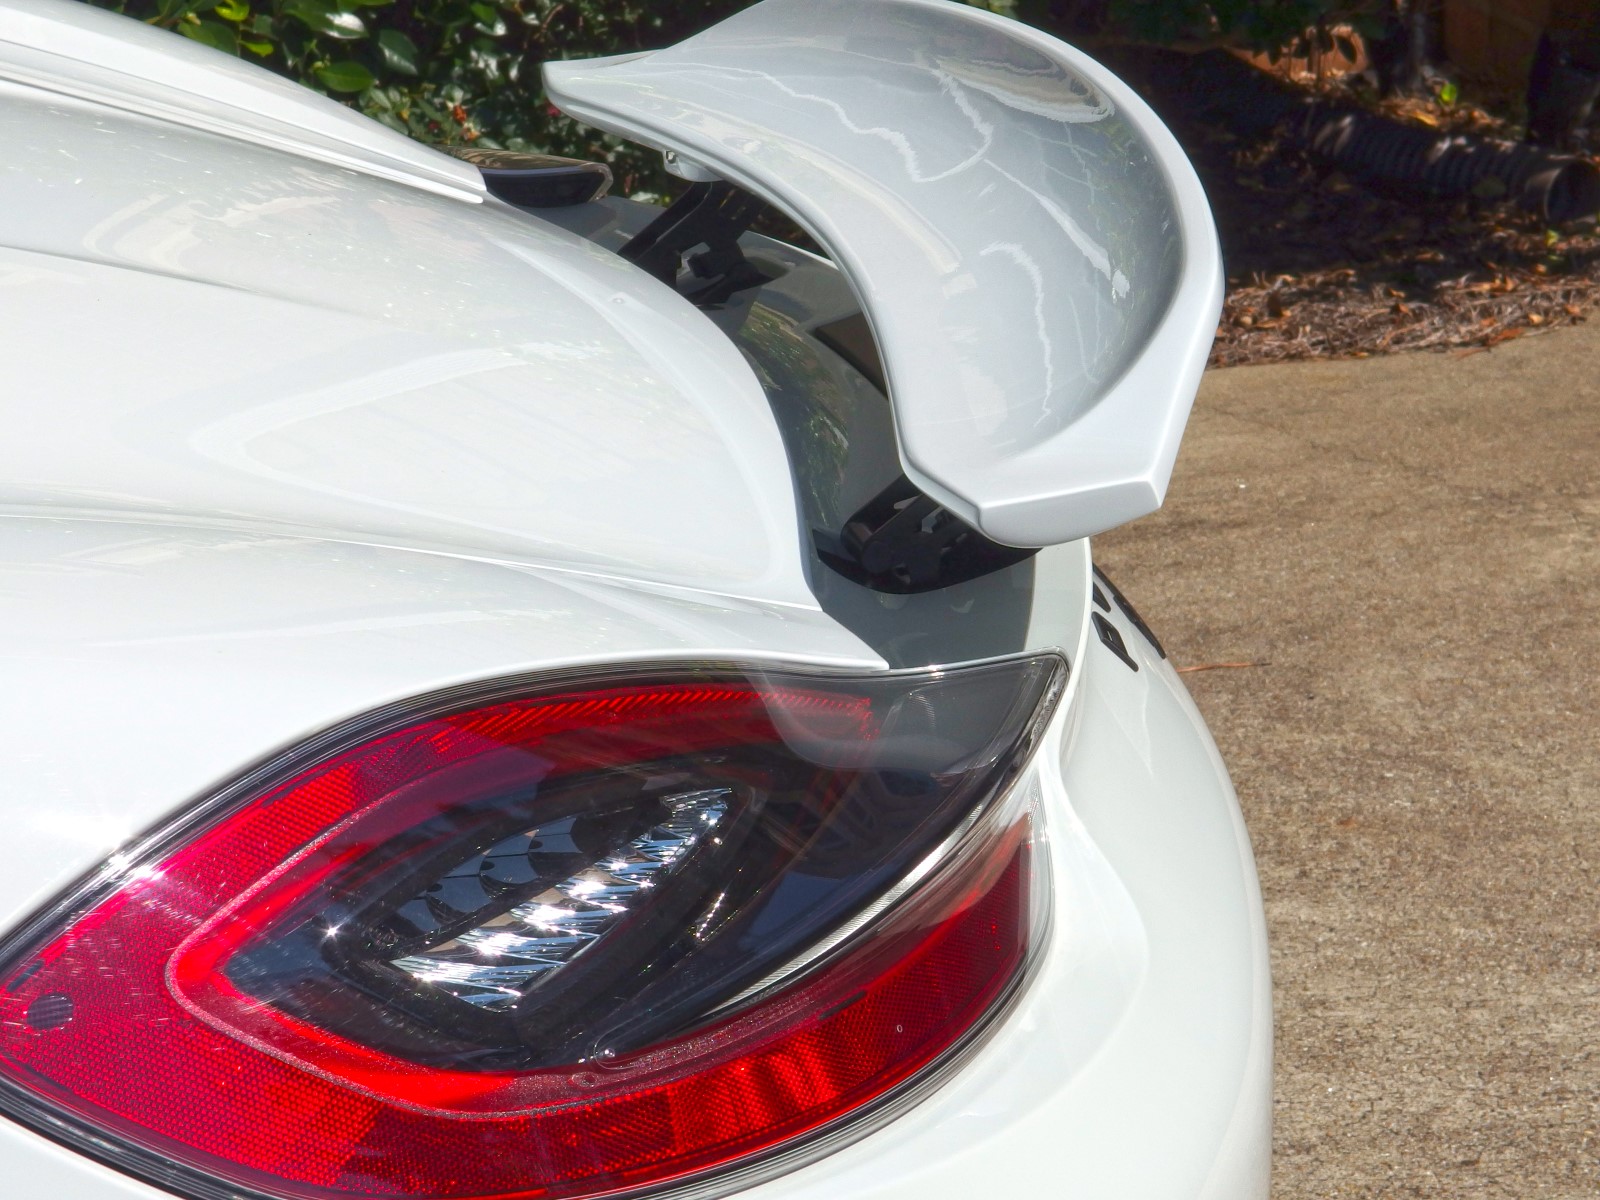
If I'm being ultra-picky, when I compare my aftermarket ducktail with the factory one on a Spyder, the "scoop" in the top of the genuine ducktail is a perfectly smooth bowl as if it was extruded as one solid sheet, while the bowl in the top of my fiberglass ducktail shows a few minor surface waves and undulations which are very gradual (not sharp ripples or abrupt surface changes) that are only really visible when directly comparing reflections. Because while the factory ducktail exhibits few distortions, the reflections in the aftermarket ducktail has a little more fun-house mirror action. The surface is almost like how injection molded plastic parts shrink and contract differently between denser reinforced areas and larger thinner unreinforced spans, but not nearly as obvious with no perceptible lines or ribs in the surface and nothing that would give the surface any contrasting relief. Under harsh artificial lighting, I can spot a shallow dimple that resembles the kind of minor ding you'd get from hail damage, but under natural lighting it's hardly visible.
The left and right edge faces have more orange peel than the top or rear of the spoiler, but they are usually nestled against the inside of each tail lamp lens where you'd never see them so this is not a big deal.
The underside is generally finished to a lower state of refinement, with significantly more orange peel and a few minor imperfections (particles, etc.), but that is acceptable since the bottom is normally hidden until you're over 75 MPH anyway (when nobody is going to be checking up close).
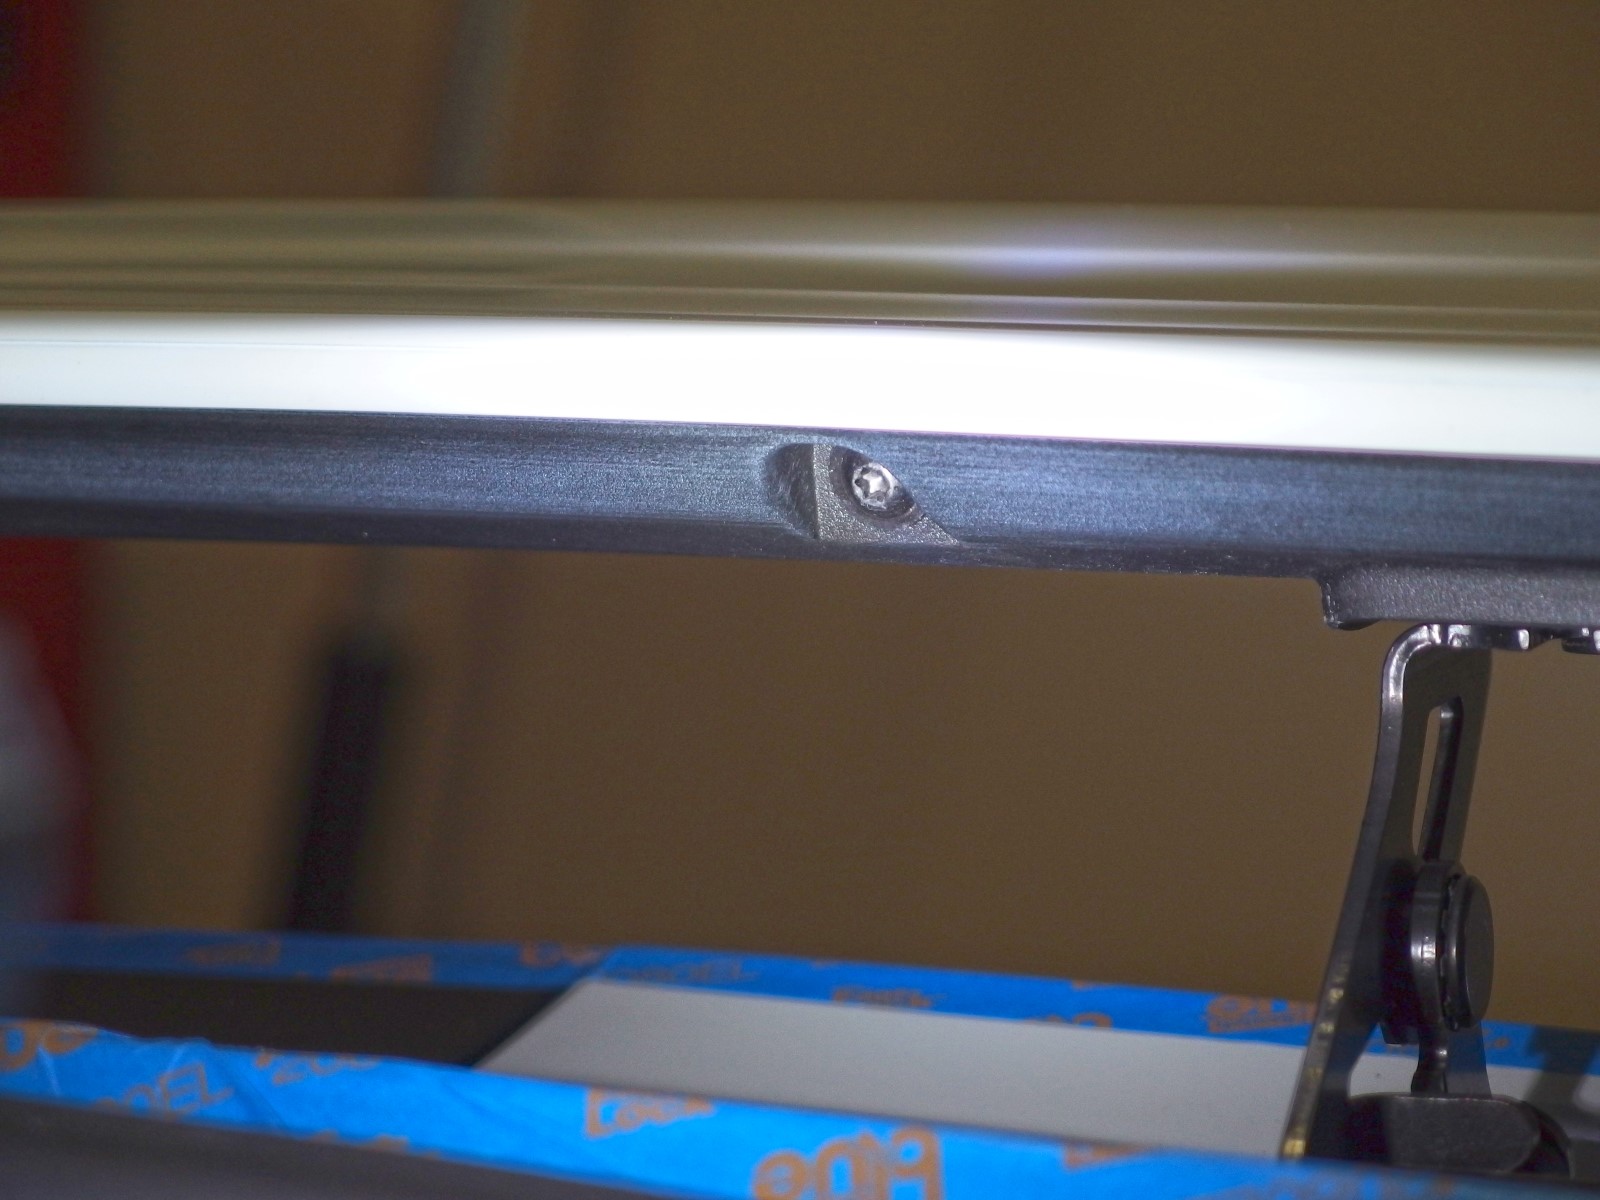
I like the use of stainless hex-drive bolts, and the bosses on each joint appear to be appropriately beefy.
The holes drilled for the mounting bolts were clean (no sharp burrs or jagged edges), and more importantly they lined up easily when mounting and adjusting the ducktail's alignment.
If I'm being picky, the only eyesore might be the (previously mentioned) custom fiberglass brackets, because they are not finished to the same degree of care or quality, but this is acceptable since they primarily serve a functional purpose only.
For those who may scoff at the use of fiberglass (vs. more exotic materials like carbon fiber), I personally don't see the point in paying more for carbon fiber when I'm going to paint the ducktail anyway (vs. leaving CF weave exposed). I'm sure there are strength and maybe weight advantages to CF, but this aftermarket ducktail is close enough in weight to the original stock spoiler that I don't notice much difference in my hands (it wasn't even worth using a scale to compare). I think for the average 981 Boxster or Cayman customer (whose cars are now at least 1-5 years old now that the 2018 model year cars are coming out), the simpler and cheaper fiberglass solution is the right choice for this market. Purists won't accept less than OE parts no matter what material they're made from, and hardcore racers would likely have their own aerodynamic aids custom-fabricated anyway.
Documentation: 8 out of 10
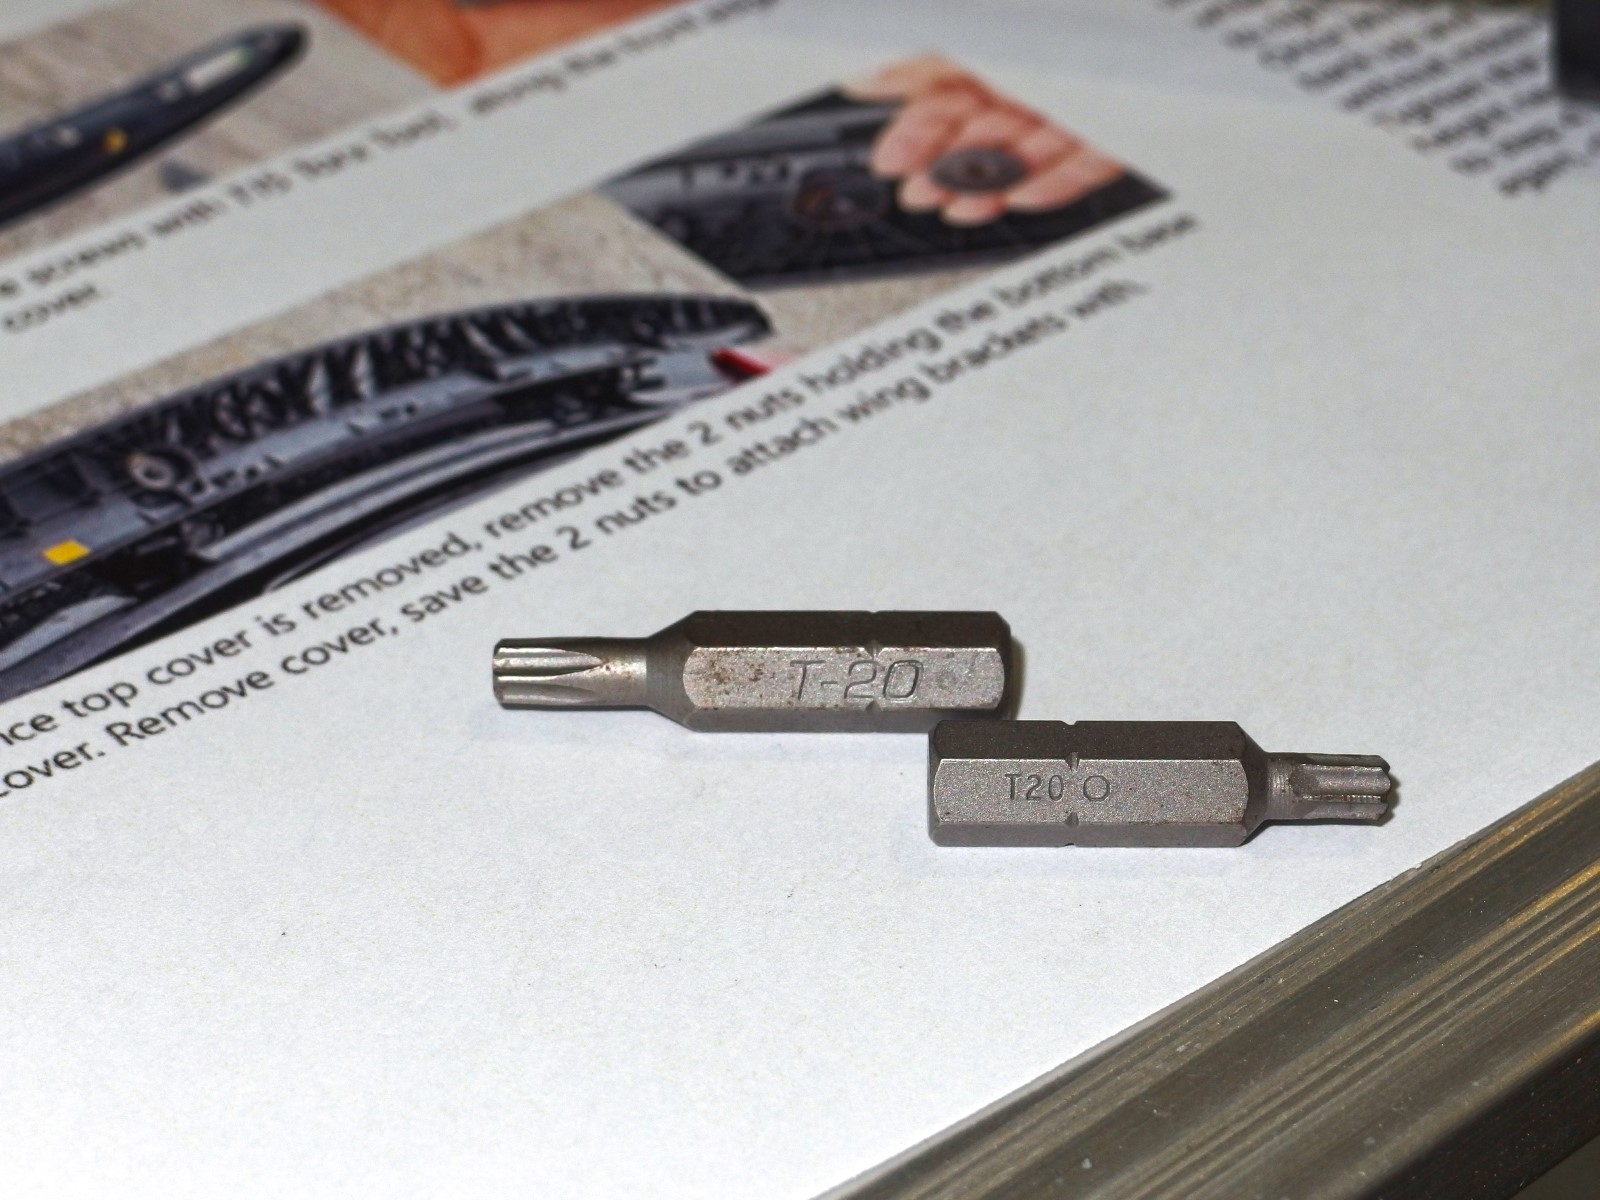
The ducktail came with an instruction sheet (which is also available online). I appreciate that the guide is specific to our application (so many companies cheap out on this and use generic instructions for all applications), and each step is accompanied with color photos (granted the car in the pictures is actually a Cayman, but the installation process is common with the Boxster). I did notice one inaccuracy in the instructions (it mentions a T15 Torx bit when in reality my Boxster needed a T20 bit, but maybe the Cayman uses a T15?). [EDIT: The company says that they have corrected their instructions.]
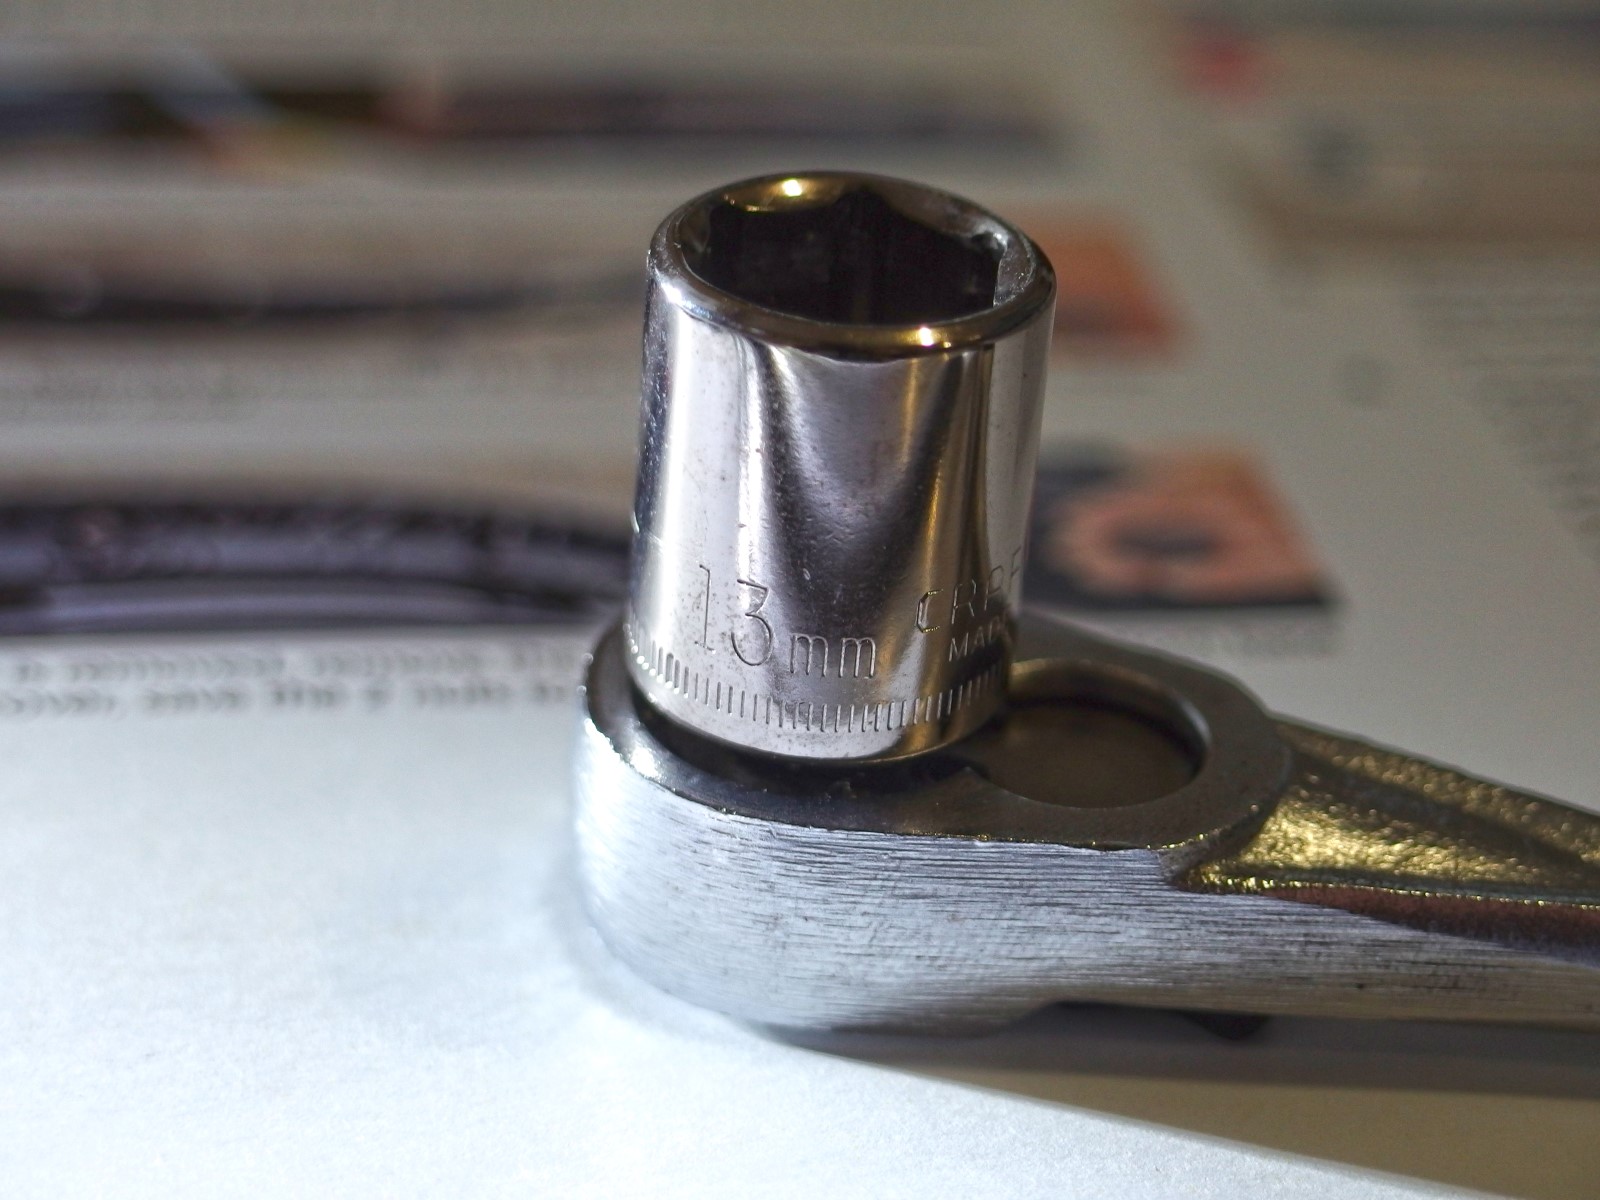
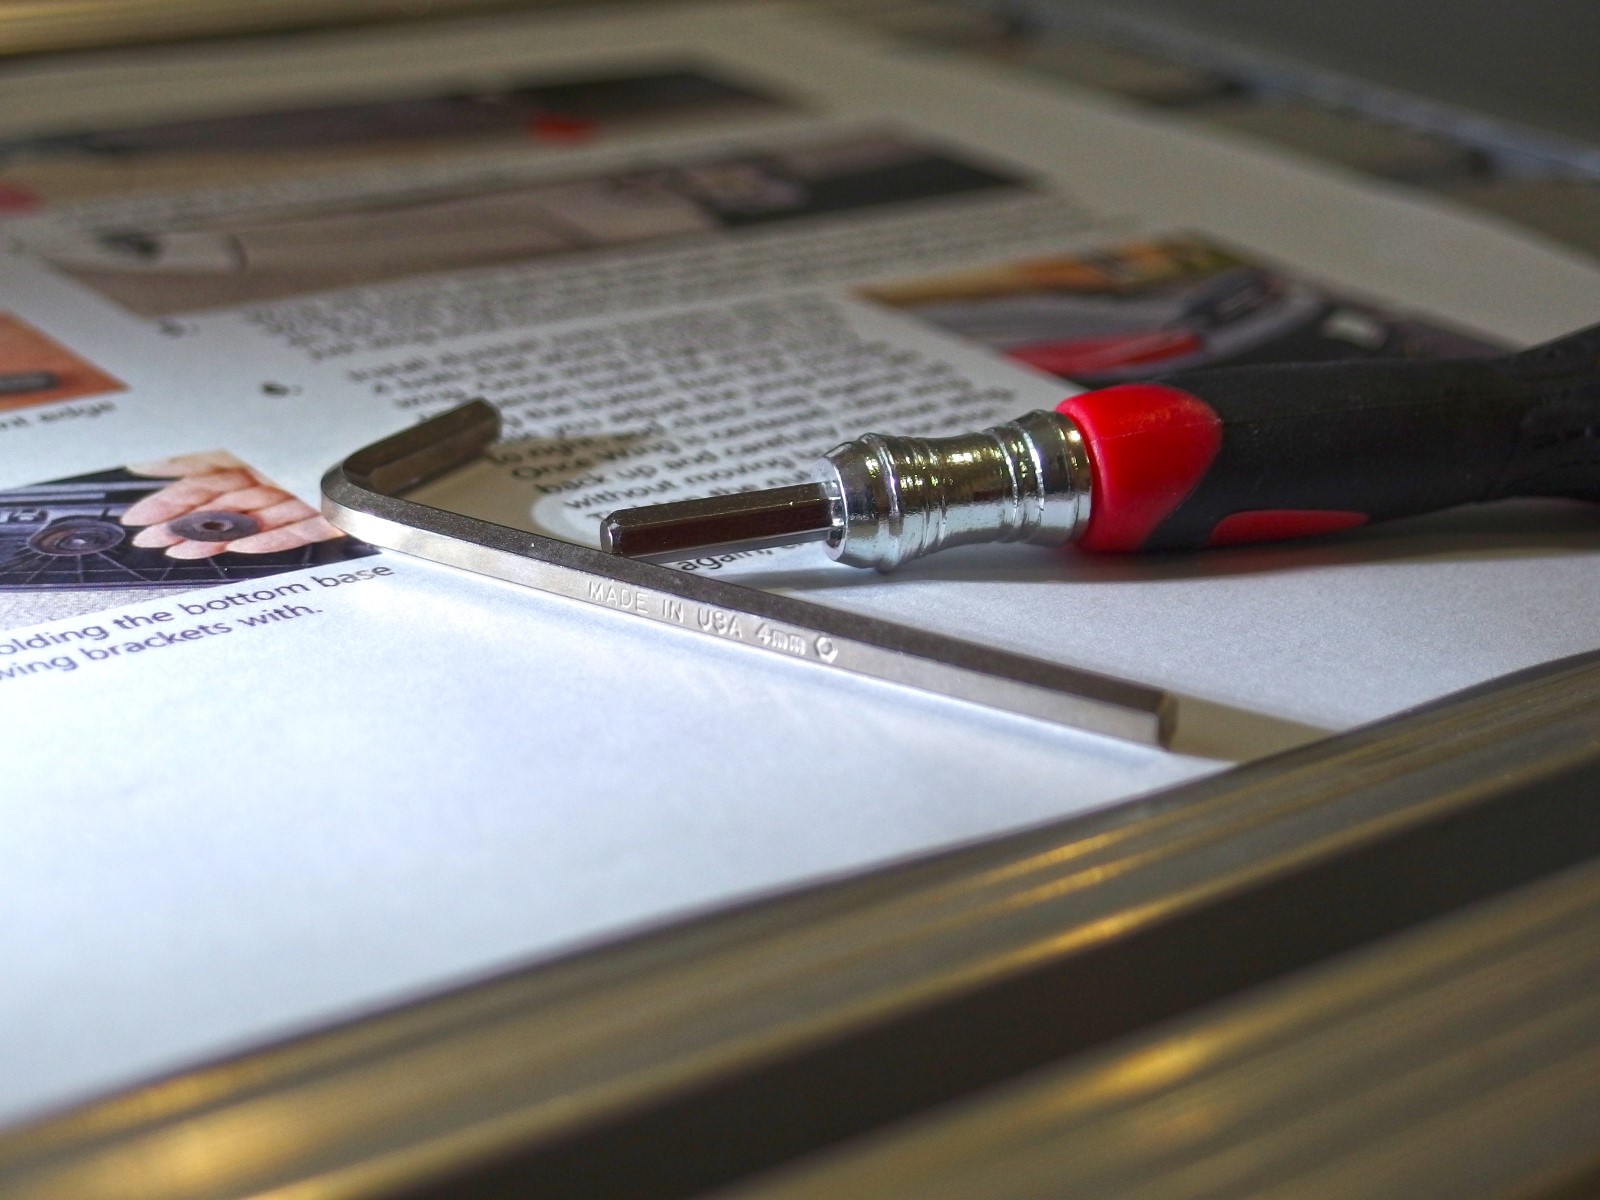
Otherwise the instructions were spot on and included a few helpful tips, though it could have been even more informative and included additional warnings (for people who actually read instructions and user manuals like me). To improve the documentation, I would suggest adding a list of required tools (like 13mm socket for the height adjustment nut, and 4mm hex key for the stainless bolts).
It would also be nice to give the customer an estimated timeframe to complete the job (or each step), and difficulty rating or skill-level required. (BTW, I give this job a Medium difficulty rating, mainly because some additional modification of my parts was required, you have to be patient while making numerous alignment adjustments, and be very careful not to drop any of the fasteners into the holes where the spoiler support mechanisms fold away into the car body.)
After having taken the ducktail on and off the car numerous times while making alignment adjustments, here are some of my own tips that are not part of the official documentation:
Tip 1: Budget a few hours (at least 2-3 hours) to do a proper job. The stock spoiler comes off in minutes, and you can probably have the new ducktail physically on the car in under an hour (assuming you don't need to modify any parts like I did), but the painstaking and time-consuming process is making the minute alignment adjustments to get all of the panel gaps and part lines equal on all sides (though you might get lucky on the first try). The instructions suggest having a 2nd person to assist, but I did it all by myself and don't think having a 2nd person inside the car pushing the button to raise/lower the spoiler for me would have saved much time anyway. In fact, it may have made me more feel more uncomfortable and rushed because I'd be more self-conscious about my work pace.
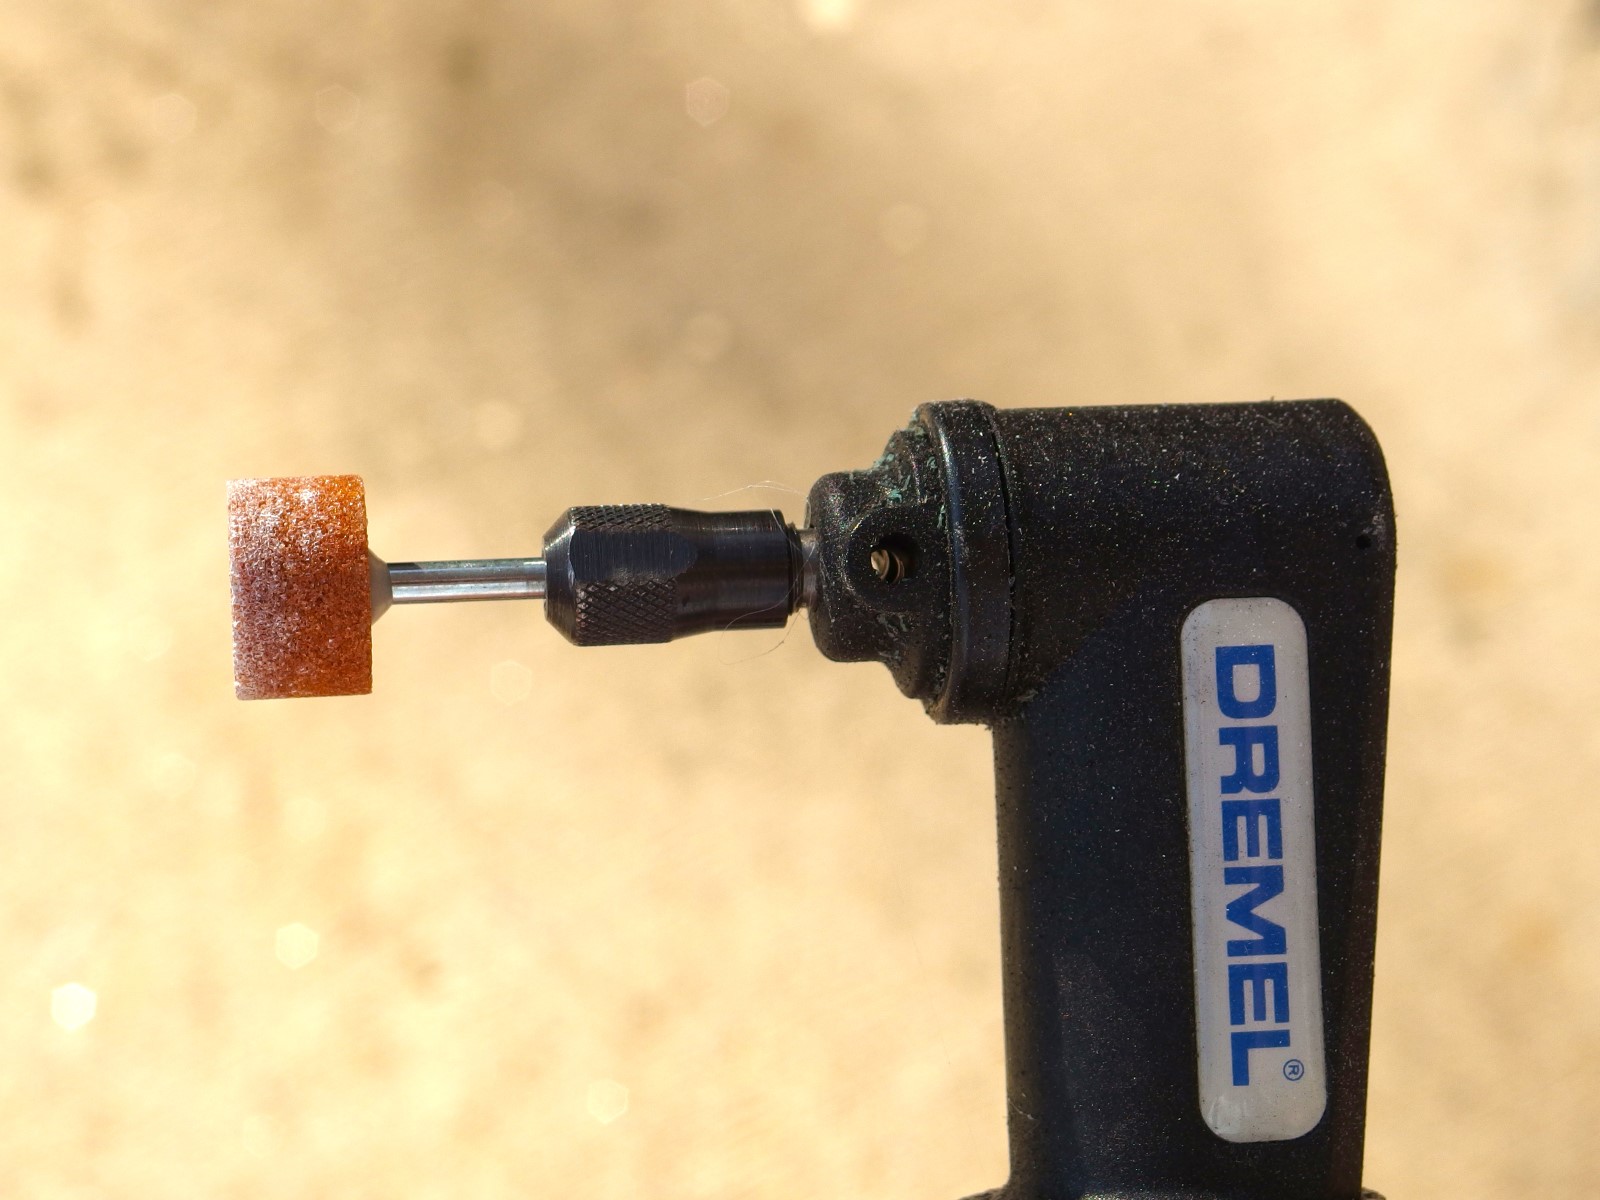
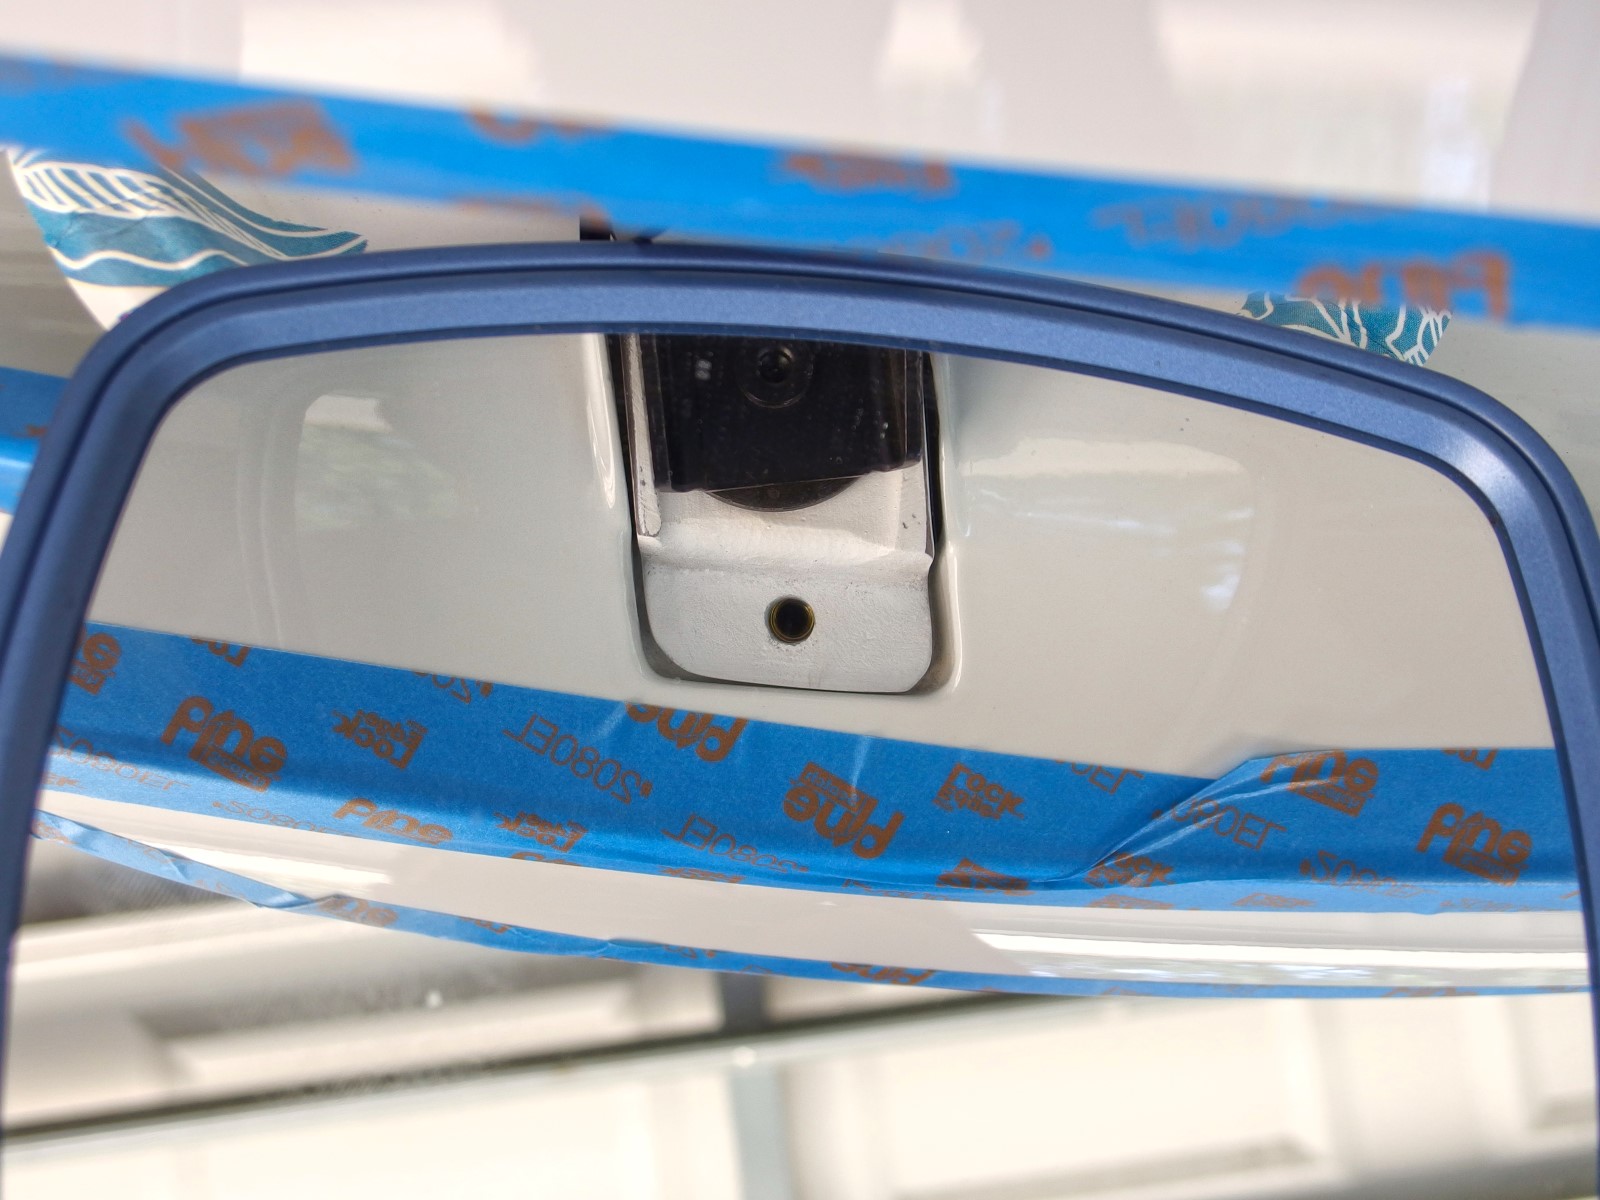
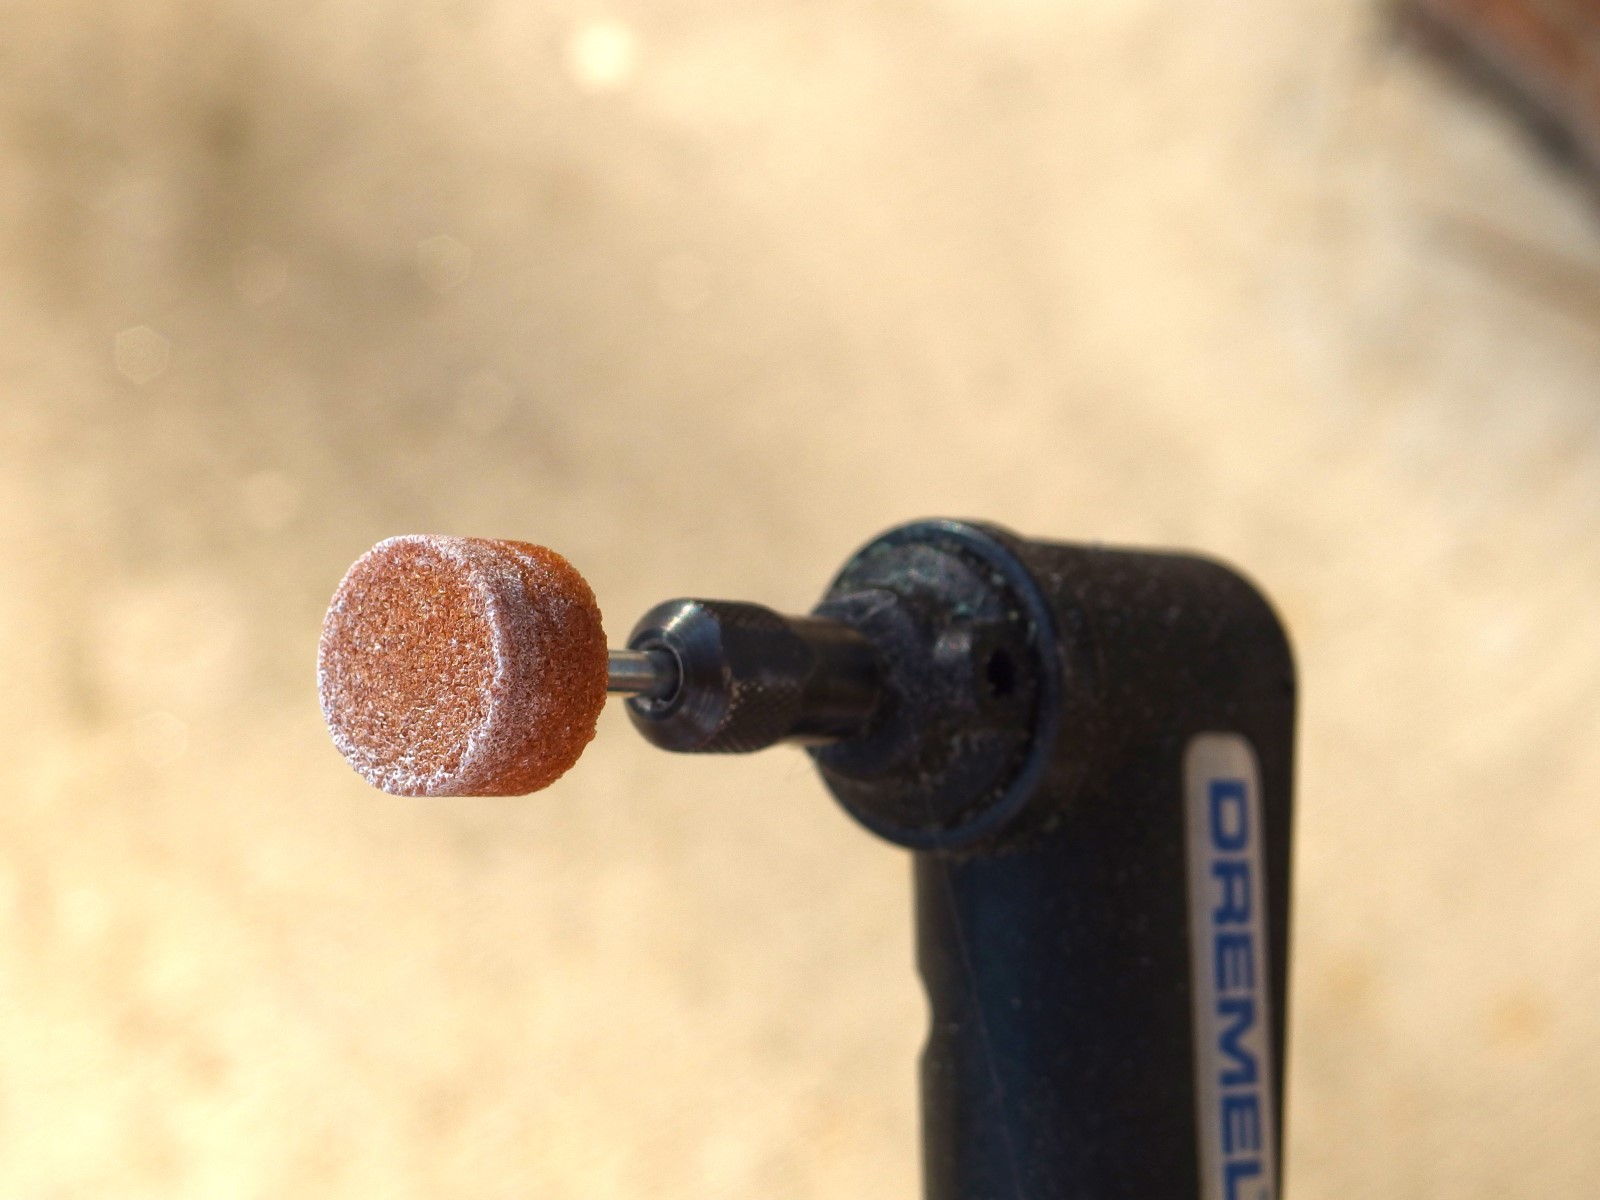
Tip 2: While not necessary, the following tools will greatly aid in the installation process: Blue painter's tape, handheld (cosmetic beauty) mirror, stool w/ caster wheels, and possibly a Dremel (or equivalent tool) with a sanding drum (more on that later).
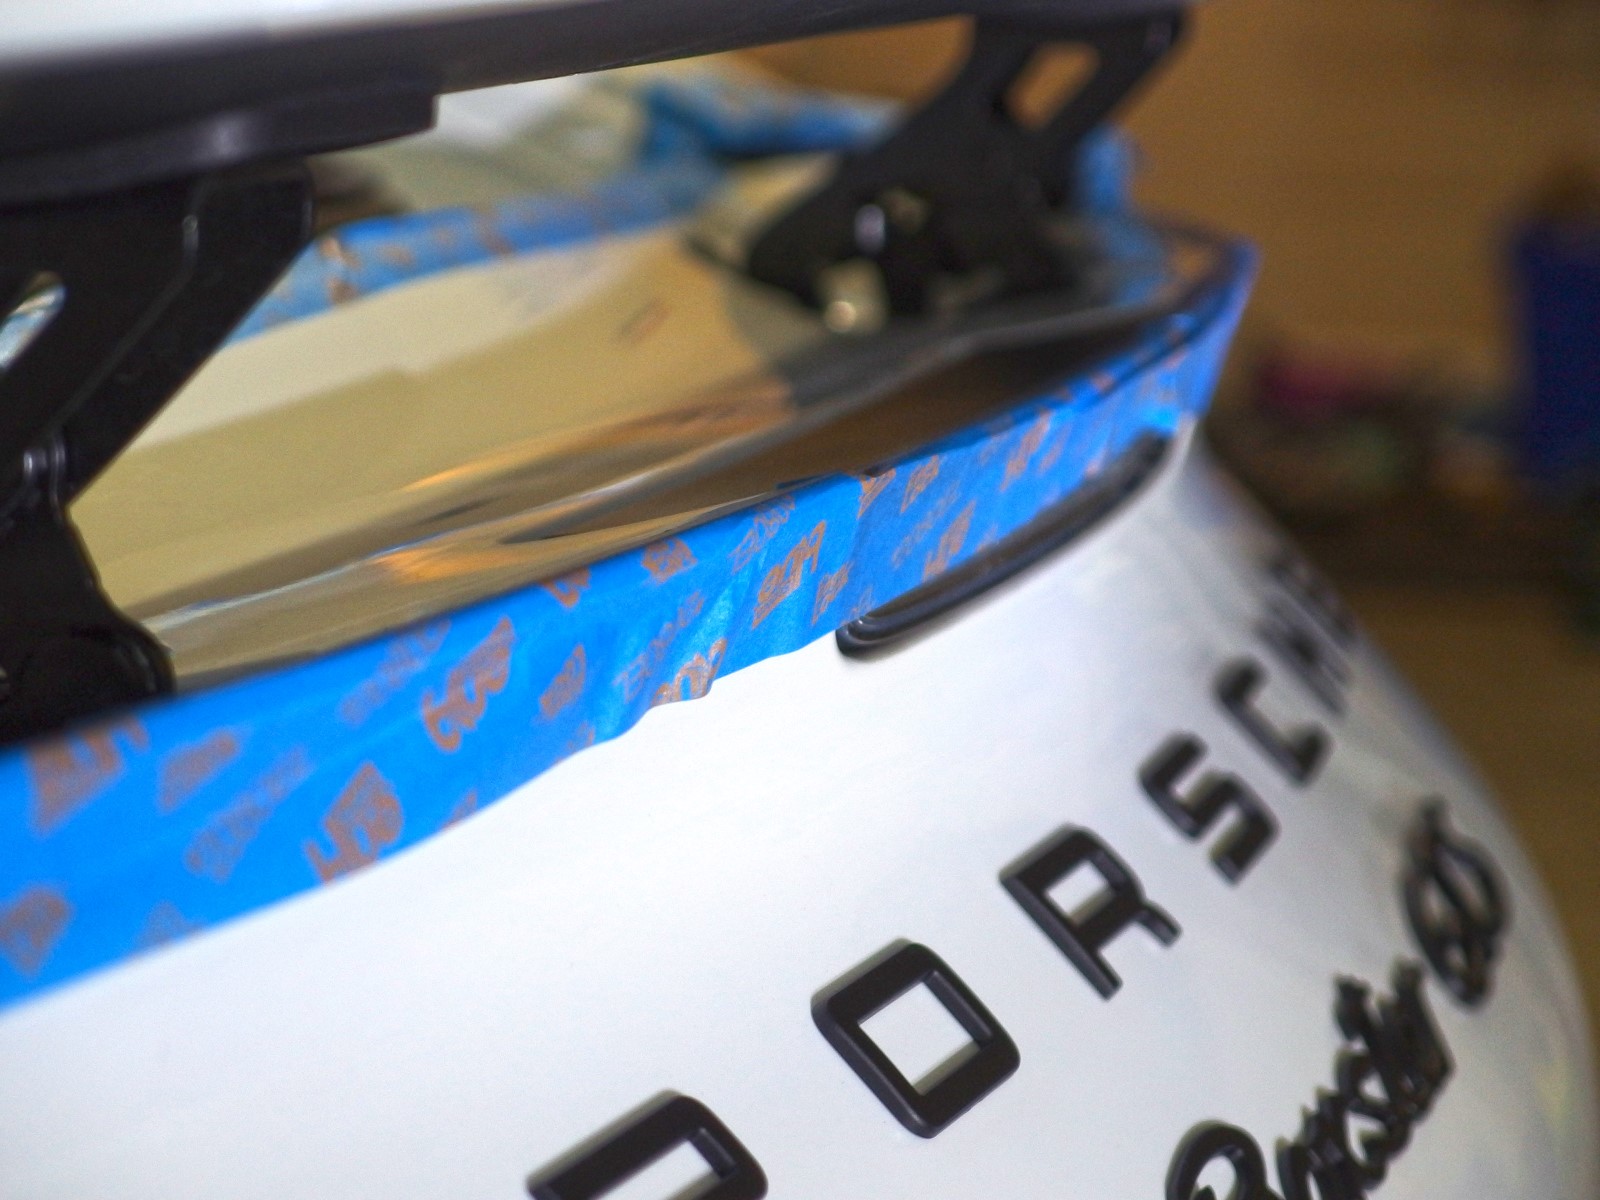
Tip 3: Use the blue painter's tape to mask off and protect the vulnerable edges of the other adjacent body panels (and taillight housings) so that you don't accidentally scratch or nick the paint while test-fitting, re-positioning, and electrically lowering the ducktail. But once you've got the ducktail pretty much lined up and you're in the final adjustment phase (there's no more risk of banging sheet metal), definitely remove the tape because if the tape lines are crooked they will mess with your eyes while trying to visually compare panel gaps.
Tip 4: Use a shop rag or towel to block the hole where the car's spoiler lift mechanism retracts, so you don't accidentally drop anything into that cavity. I modified a paper plate (by cutting slits for each lift arm) to catch anything before it fell into the hole, but that's overkill.
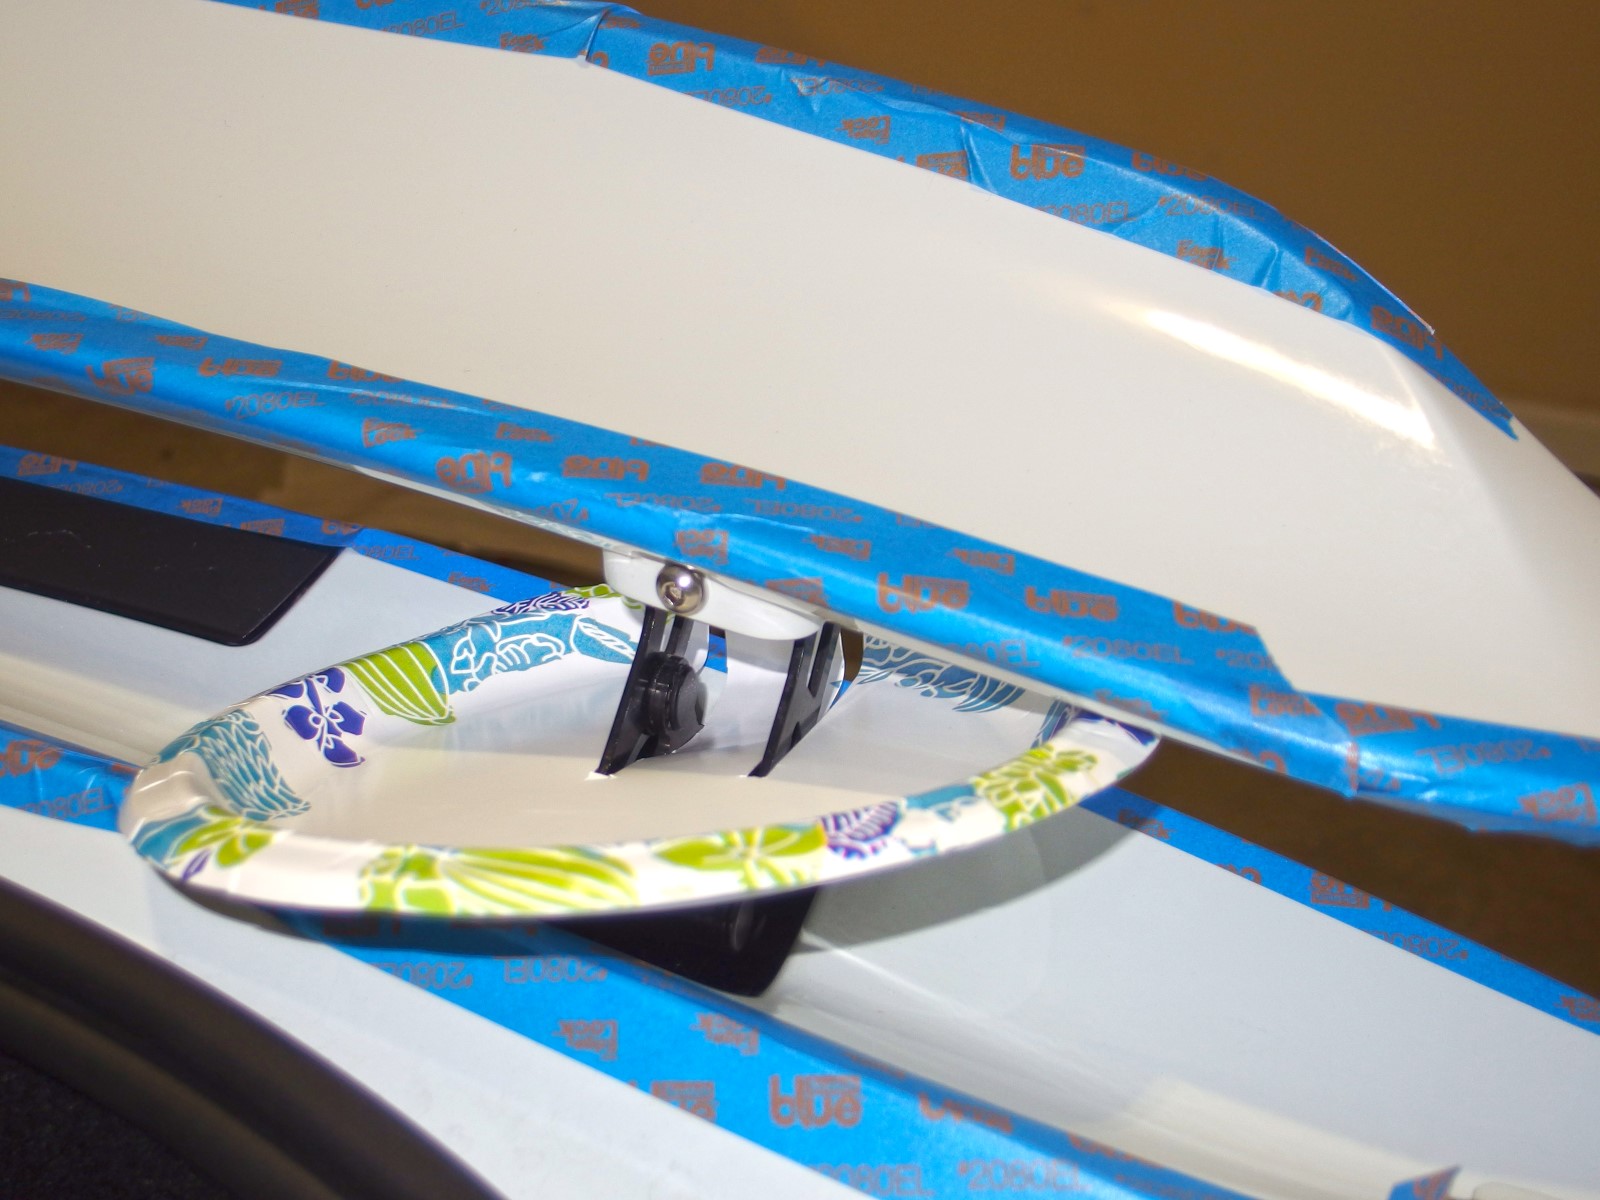
Tip 5: Use the handheld beauty mirror to view the alignment of the holes on the front and underside of the ducktail (so that you don't have to stand over it, or stoop below it, while getting the bolts inserted into their holes).
Tip 6: Don't waste your time measuring panel gaps and part lines on the stock spoiler (just make a mental note or take a picture) and eyeball final alignment at the end because production variance between every vehicle means that final fitment won't exactly match the stock spoiler gaps anyway. I'm happy to share my measurements, but they probably won't match your car's gaps.
Tip 7: Use the work stool on casters to comfortably scoot around behind the car, because you will tire from bending over throughout the test-fitting process. Your back will thank you.
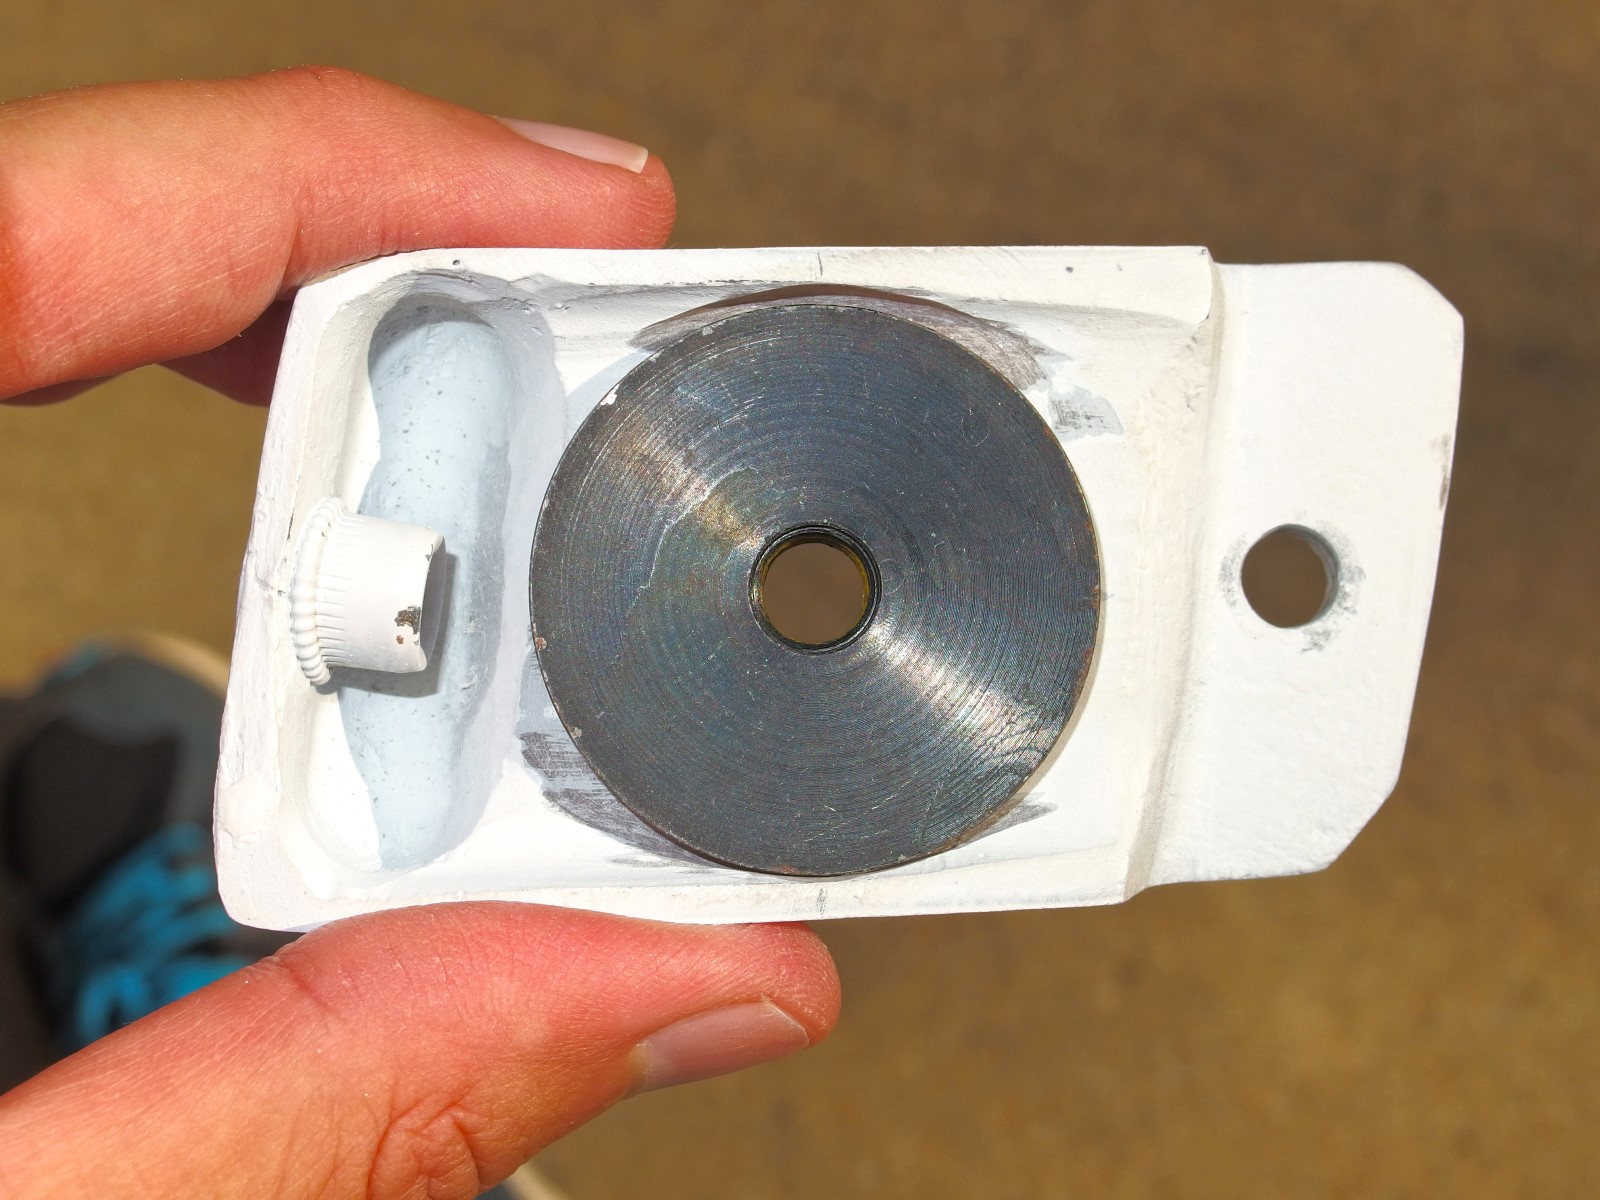
Tip 8: When test-fitting the ducktail, use a pencil to draw a circle around the factory washers that rest on top of the brackets when making alignment adjustments in the 2 horizontal axes (front-to-rear, and side-to-side). That way if you discover that you need to slide the spoiler over 1 mm to the right and push it 2 mm closer to the trunk lid, you have a convenient reference point the next time you take the spoiler off the brackets to make your adjustments. Also don't assume that the factory spoiler height adjustment will be the same for the new ducktail--you'll most likely have to tweak those anyway so don't bother memorizing or marking their height unless you think you'll put the original spoiler back on one day.
Tip 9: While you may think you've got the alignment done while incrementally raising and lowering the ducktail in various intermediate positions, I noticed that the spoiler's retractable support mechanism folds and sits differently against the car when lowering it from the fully raised to fully closed position. So make sure you completely raise and lower the ducktail several times before settling on a final position, because that will be a true representation of how the spoiler will sit against the car body when stowed. Also, before putting all of your tools away, go for a test drive (that includes stretches over 75 MPH to raise the spoiler) so that you know the spoiler hasn't moved or changed position once the wind has exerted its force on it. It could have been my imagination, but I swear that my spoiler had "settled" and shifted (slightly toward one side, maybe 0.5 mm from the test-fit position in my garage) after an extended test drive.
Tip 10: Don't tighten any of the 4 stainless bolts until you have at least properly inserted all of them into their holes. And insert the front bolts first (they are trickier to line up). Because you may need to rock or tilt the ducktail slightly to get the 2 front holes lined up, and this free play and motion will be limited if any of the other bolts are already tightened. You don't want to severely bend or force anything that might stress or crack the fiberglass either (and the car's spoiler lift mechanism arms don't like to be twisted either). If you find it impossible to make the ducktail fit properly on the mounting brackets, it's possible that there is a problem with the brackets and you should stop and contact the company about getting a new matched pair.
Tip 11: Don't over tighten anything, unless you like cracked paint and stripped threads. The 4 bolts should engage the threads and spin freely until the last possible moment when you're tightening the ducktail against the mounting brackets. If you're encountering premature resistance on the first thread and find yourself having to exert a lot of force, STOP immediately and back the bolt out because you're likely cross-threaded. If you're having trouble getting the bolt to engage and bite the threads, it's probably because your holes are not lined up. Verify alignment using the mirror and start again.
Tip 12: If you lose a bolt, you can buy another one at the local hardware store. Look for an M6 x 16mm stainless hex-drive bolt, though you could theoretically substitute a Philips or flat-head drive if the hex-drive style is unavailable. (It would be nice if the company included a spare bolt in the kit in the event a mishap occurs, as it would only cost them a few extra cents but go a long way in terms of goodwill and preventing someone from trying to substitute their own incorrect fasteners.)
Fitment: 8 out of 10.
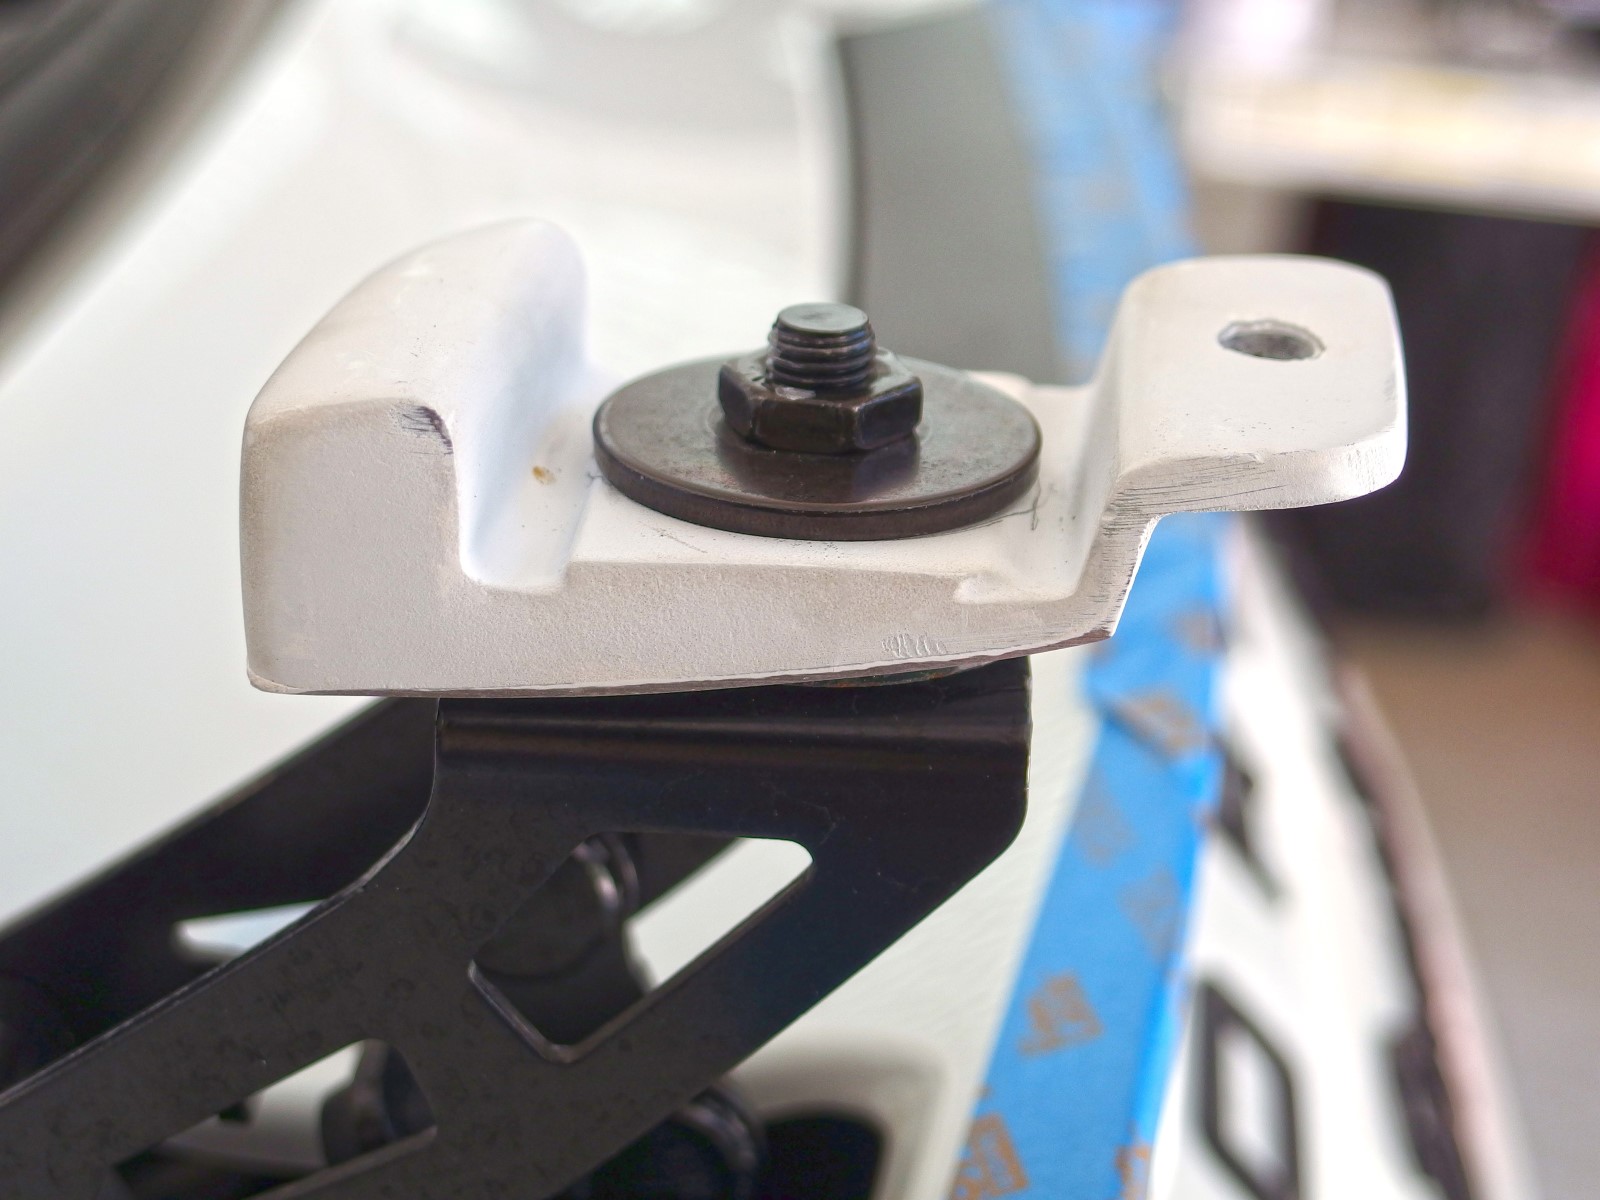
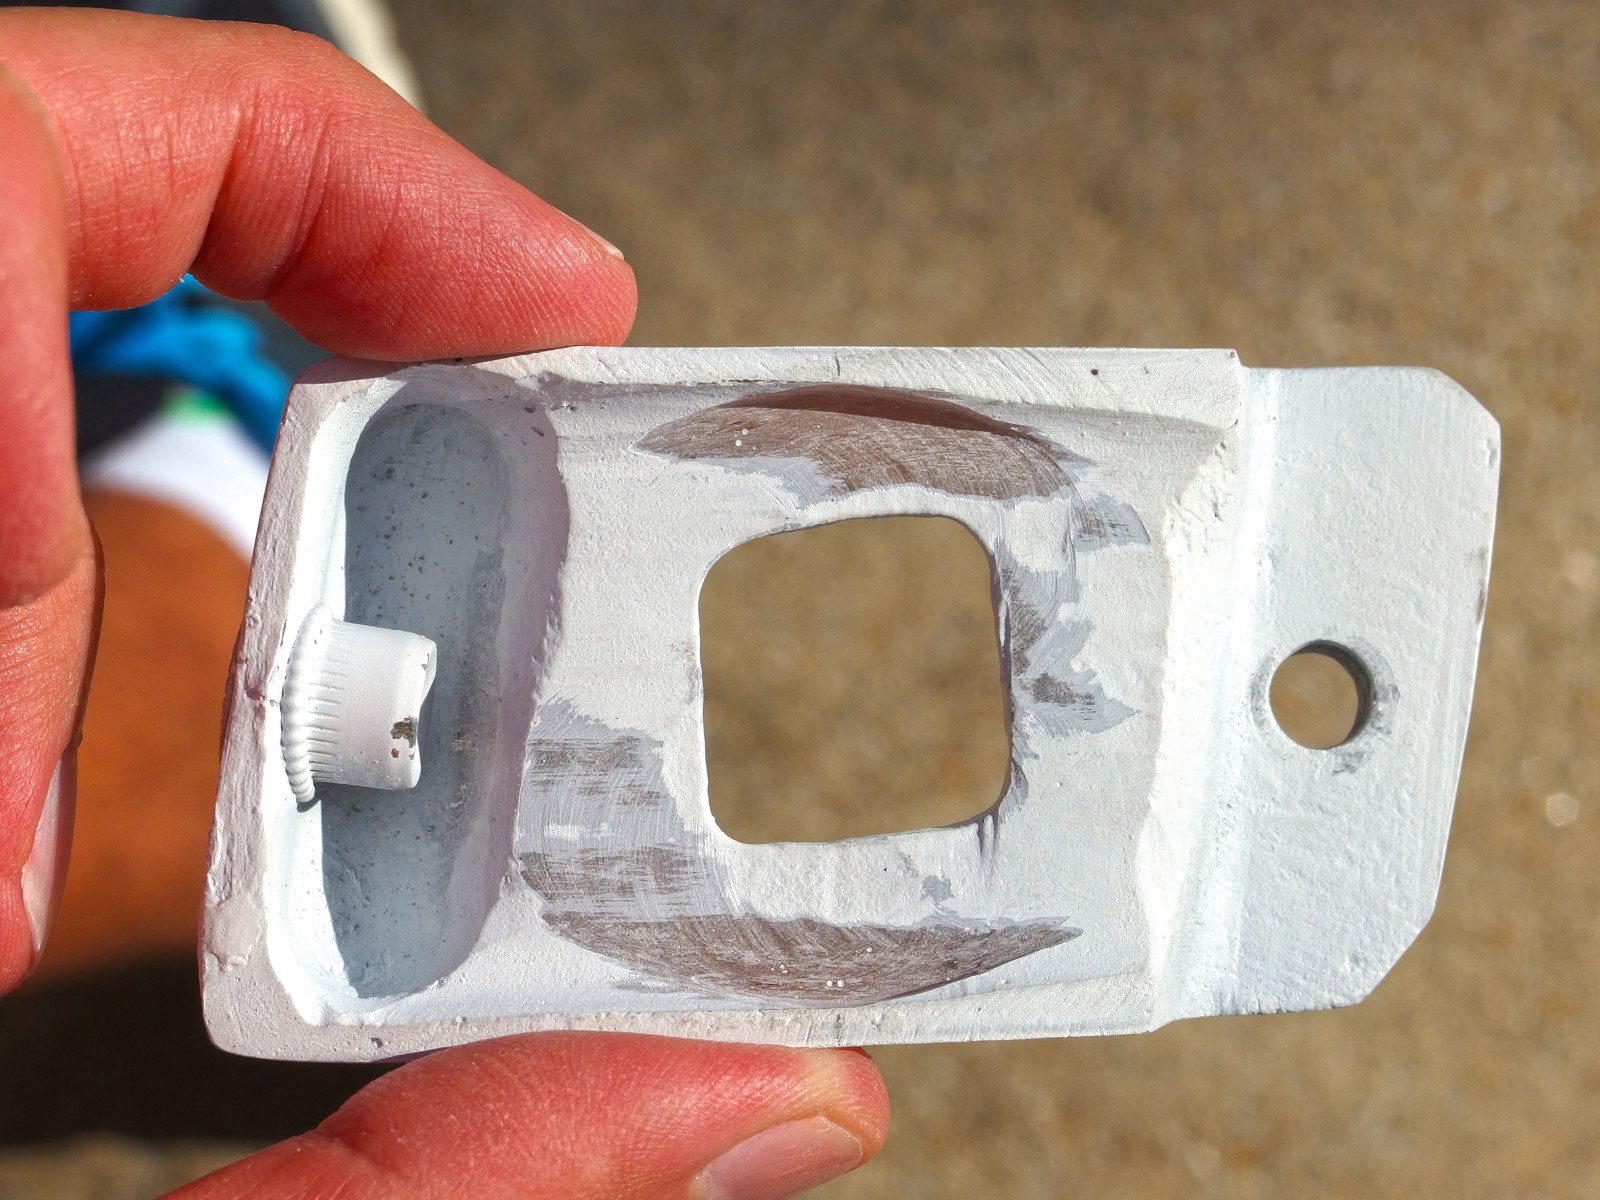
The true test of quality in any aftermarket product is: Does it bolt on as intended without having to pound and bang it into place because of poor tolerances or production variances? There are no visible battle scars or collateral damage resulting from the installation, so it did go on relatively smoothly. However, I did have to tweak and customize the mounting brackets for a 100% perfect fit because the car's lower height-adjustment washers didn't quite fit flush into the recesses underneath the brackets until I removed some extra material to allow proper mating between both surfaces. [EDIT: Spoiler Nation says that they have improved their bracket design for better fitment, so Dremel touch-up shouldn't be needed anymore.]
This was not a showstopper, and I verified with the company that this modification wouldn't compromise the strength of the brackets (they don't experience much stress in the lateral direction).
On the plus side, using a Dremel with a sanding drum means it didn't take more than a few minutes to carve out the cavities (I used a medium RPM speed on the Dremel), but for a product costing this much, I expect it to bolt on without any modifications (or me having to put on safety glasses to grind something). Because I lost some time modifying the brackets, and since my time is valuable, it erodes the value proposition of this kit, but really it was more annoying than anything because it really didn't add much consequential time. I have shared my notes with the company so maybe they will modify their jig so that subsequent brackets will require no such modification and work right out of the box. Hopefully my pain will be someone else's gain. [EDIT: The brackets have since been redesigned for better fitment.]
Once I got the ducktail properly positioned on the brackets, the fitment was great and I was able to adjust everything so that the panel gaps are uniform on all sides. If I'm being super picky, the bottom edge of the ducktail mostly follows the same arc of the car's bumper cover but the gap is a little tighter toward the center than at the edges (which may be attributed to the way to the ducktail sits on its perch--rocking it forward slightly might even out that gap in the center--or maybe my car simply suffers from its own unique production variances).
I should also mention that the stock spoiler has a black rubber bumper under each front corner, but the aftermarket ducktail has no such provision.

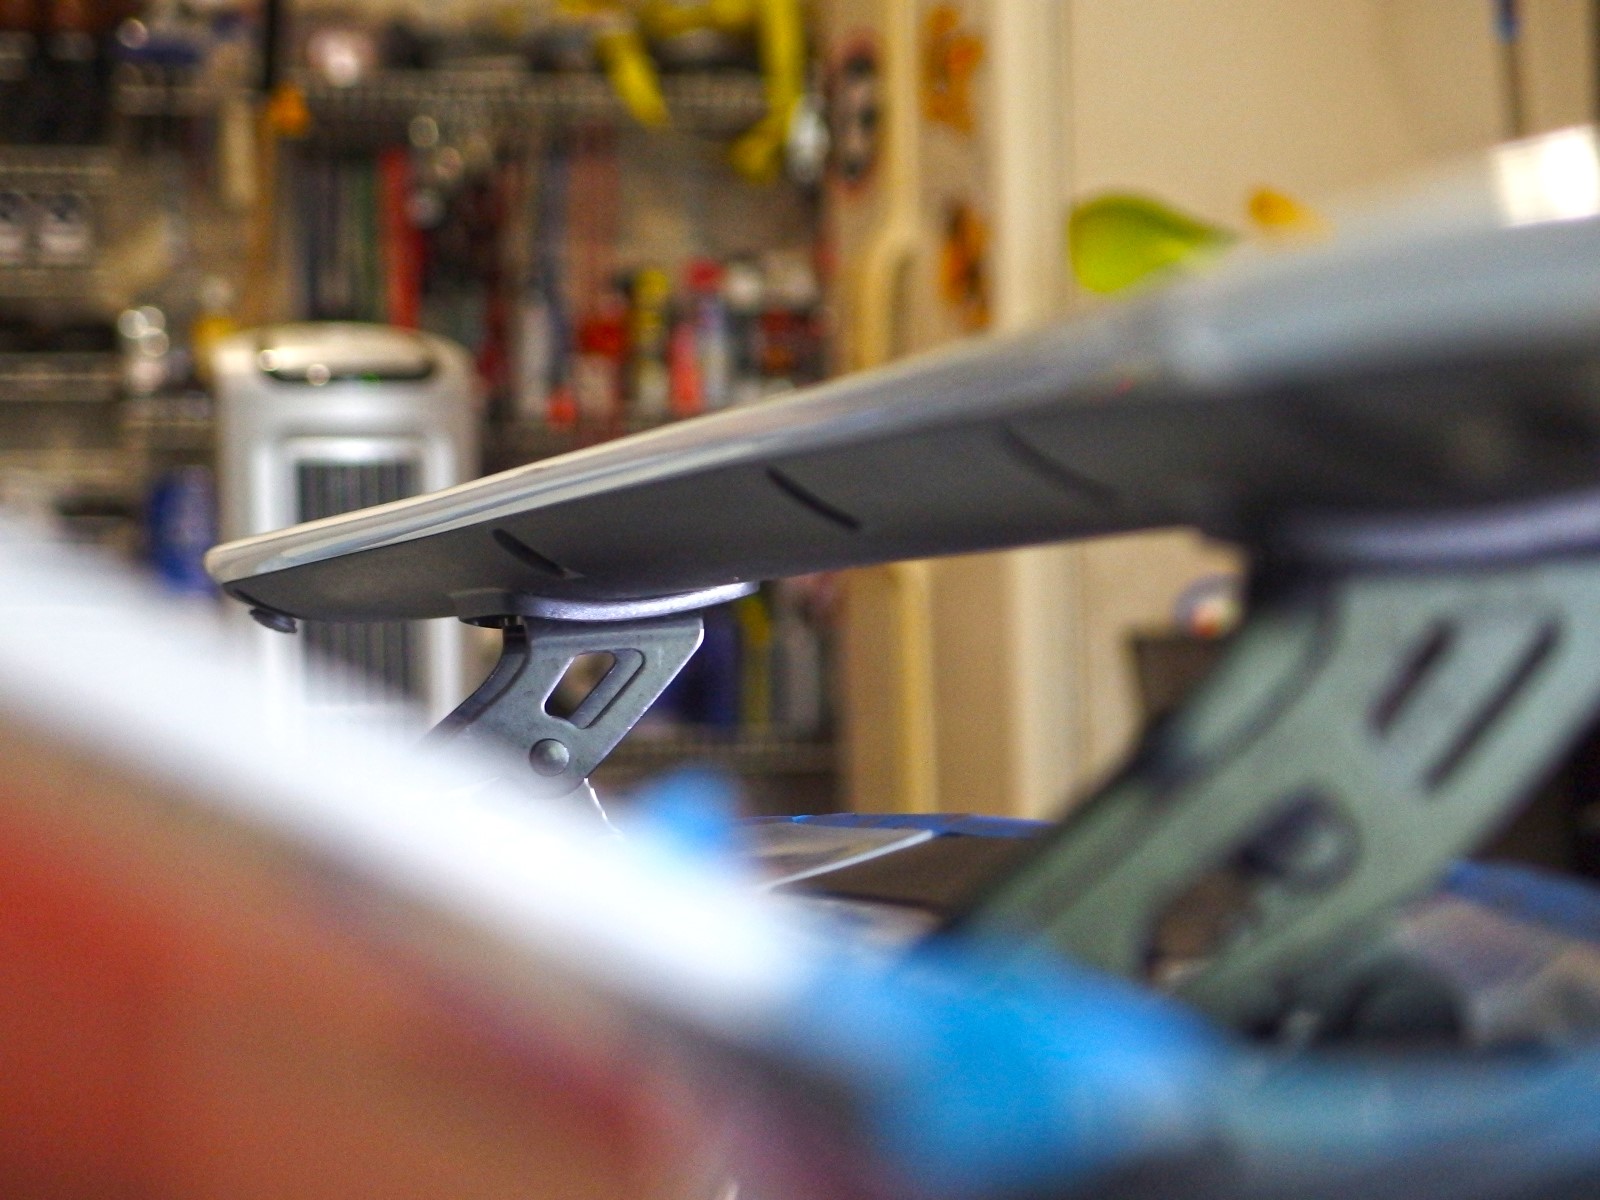
It appears that the real Spyder ducktail includes rubber bumpers too, but I honestly don't know if they are really needed if you properly align everything to begin with (is Porsche worried about incidental contact over harsh bumps?). I suppose if I really cared or was worried about contact, I could add my own self-adhesive bumpers (which can be found in a clear color at hardware stores too).
Performance: N/A (No Basis to Judge)
Without access to a wind-tunnel (or before-and-after track lap times under identical conditions), it's hard to objectively measure any performance change from the ducktail alone. Since it's more of a spoiler with a wedge cross-section (vs. a true downforce producing wing), it's probably just creating a low pressure zone that may modestly reduce lift (at the expense of additional drag and maybe some marginal fuel economy).
Is the effect large enough to notice (either in lap times or perceived driving behavior)? And does it require offsetting downforce at the front of the car (with dive planes or a splitter) so as not to upset the front-to-rear aerodynamic balance? I have no idea, but it doesn't seem to feel any different from the driver's seat (so far). One day I may consider a front splitter (like the one under development by Composite Concepts) but in the meantime, I'm satisfied enough with the visual enhancement with no perceptible penalty in everyday driving at road legal speeds. In other words, I'm not worried about the ducktail causing an unsafe condition except possibly at extreme speeds (and I don't plan to do any top speed runs in my car). But I obviously have no evidence or before-and-after test results to support that assertion. I'm not an engineer but one would think that the big hole created by lowering the convertible top would have an outsized effect and disrupt the airflow more than a comparatively small change to the trailing edge of small spoiler at the rear of the car. (And would the net effect be greater than the addition or omission of the optional mesh (or aftermarket glass) wind deflector between the roll hoops? Or shifting the front-to-rear balance of the car by placing heavy cargo in the trunk or frunk? Or refilling an empty gas tank?)

But don't take my word for it (buyer beware, YMMV, and all of the usual disclaimers apply). We all know that loss of tire grip can be incremental or sudden, so hopefully my assumptions are proven to be correct (and if incorrect, I'll hopefully have plenty of warning beforehand).
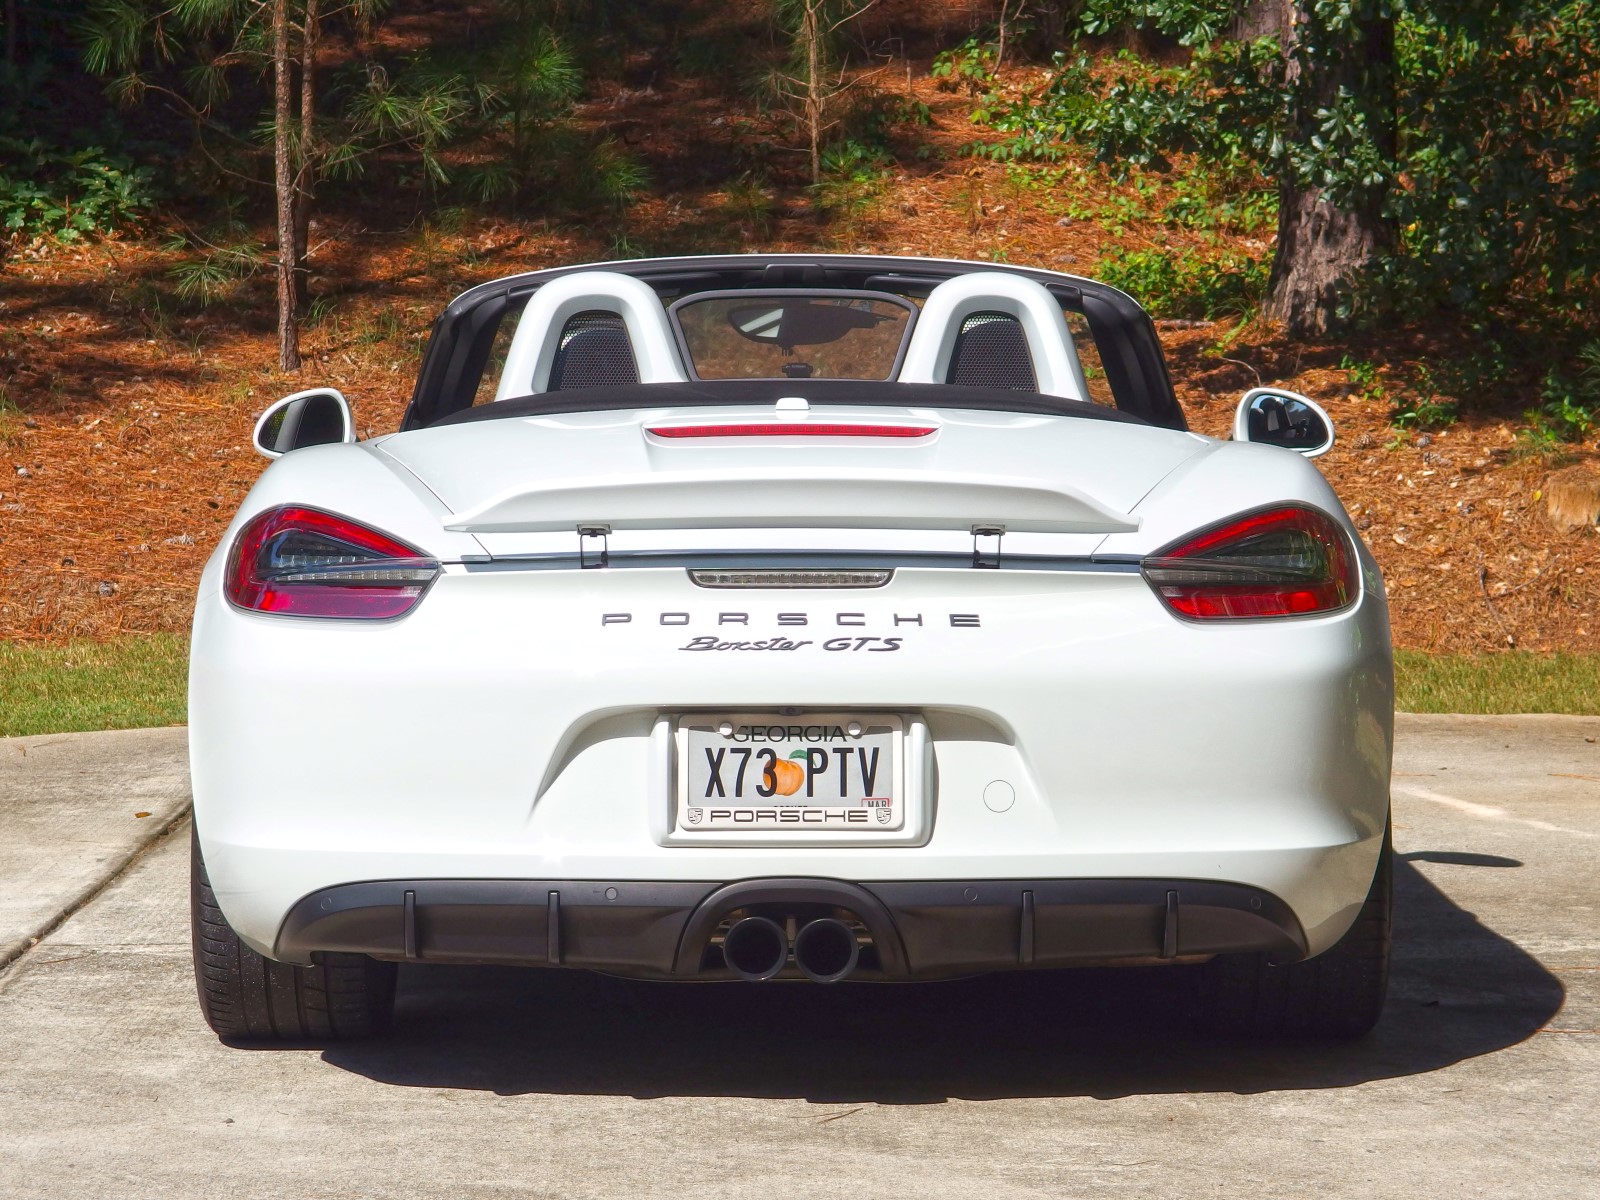
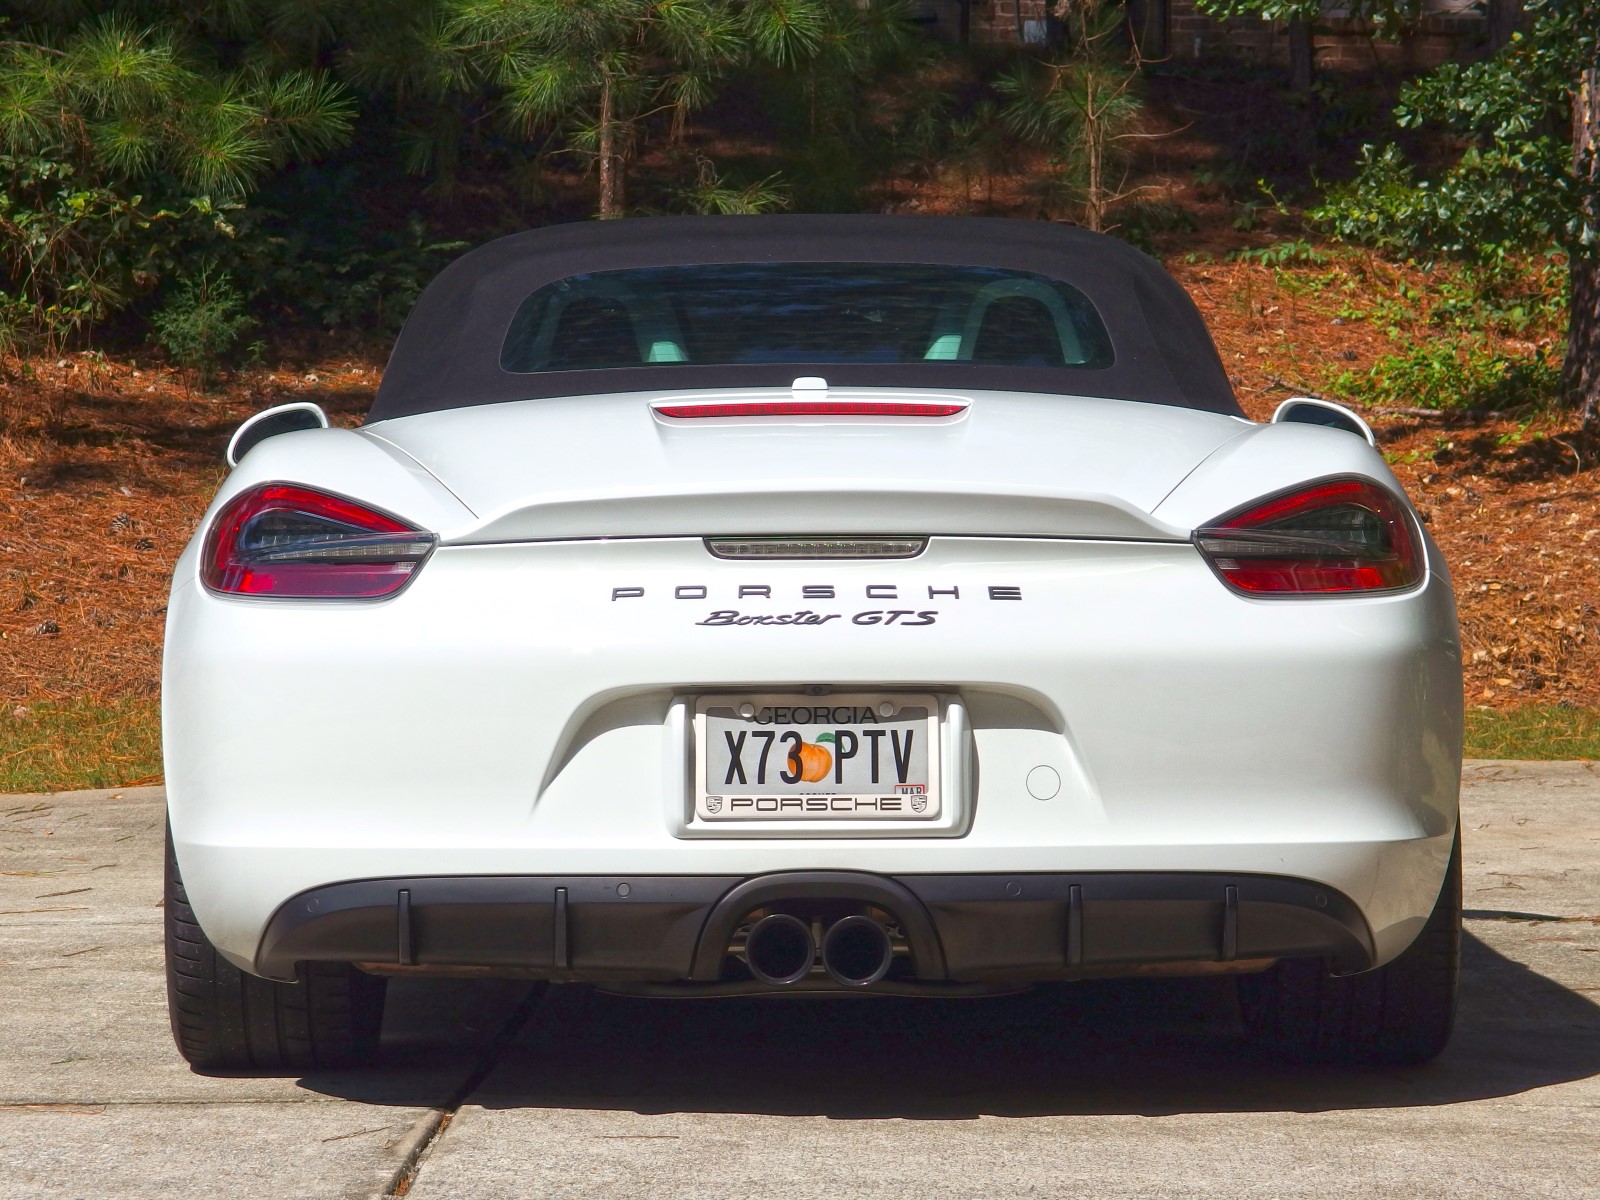
I will also mention 2 unintended consequences of this modification. First, I can now see the top of the spoiler (if I crane my neck) when it rises in the rearview mirror. It doesn't obstruct the rear view at all (you still have to sit up in your seat to see it), but I like being able to tell when the spoiler is up or down since the button on the center console doesn't illuminate when it raises automatically. Secondly, because the ducktail is a couple inches taller, it almost reaches the height of the bottom edge of the center high mount brake light.
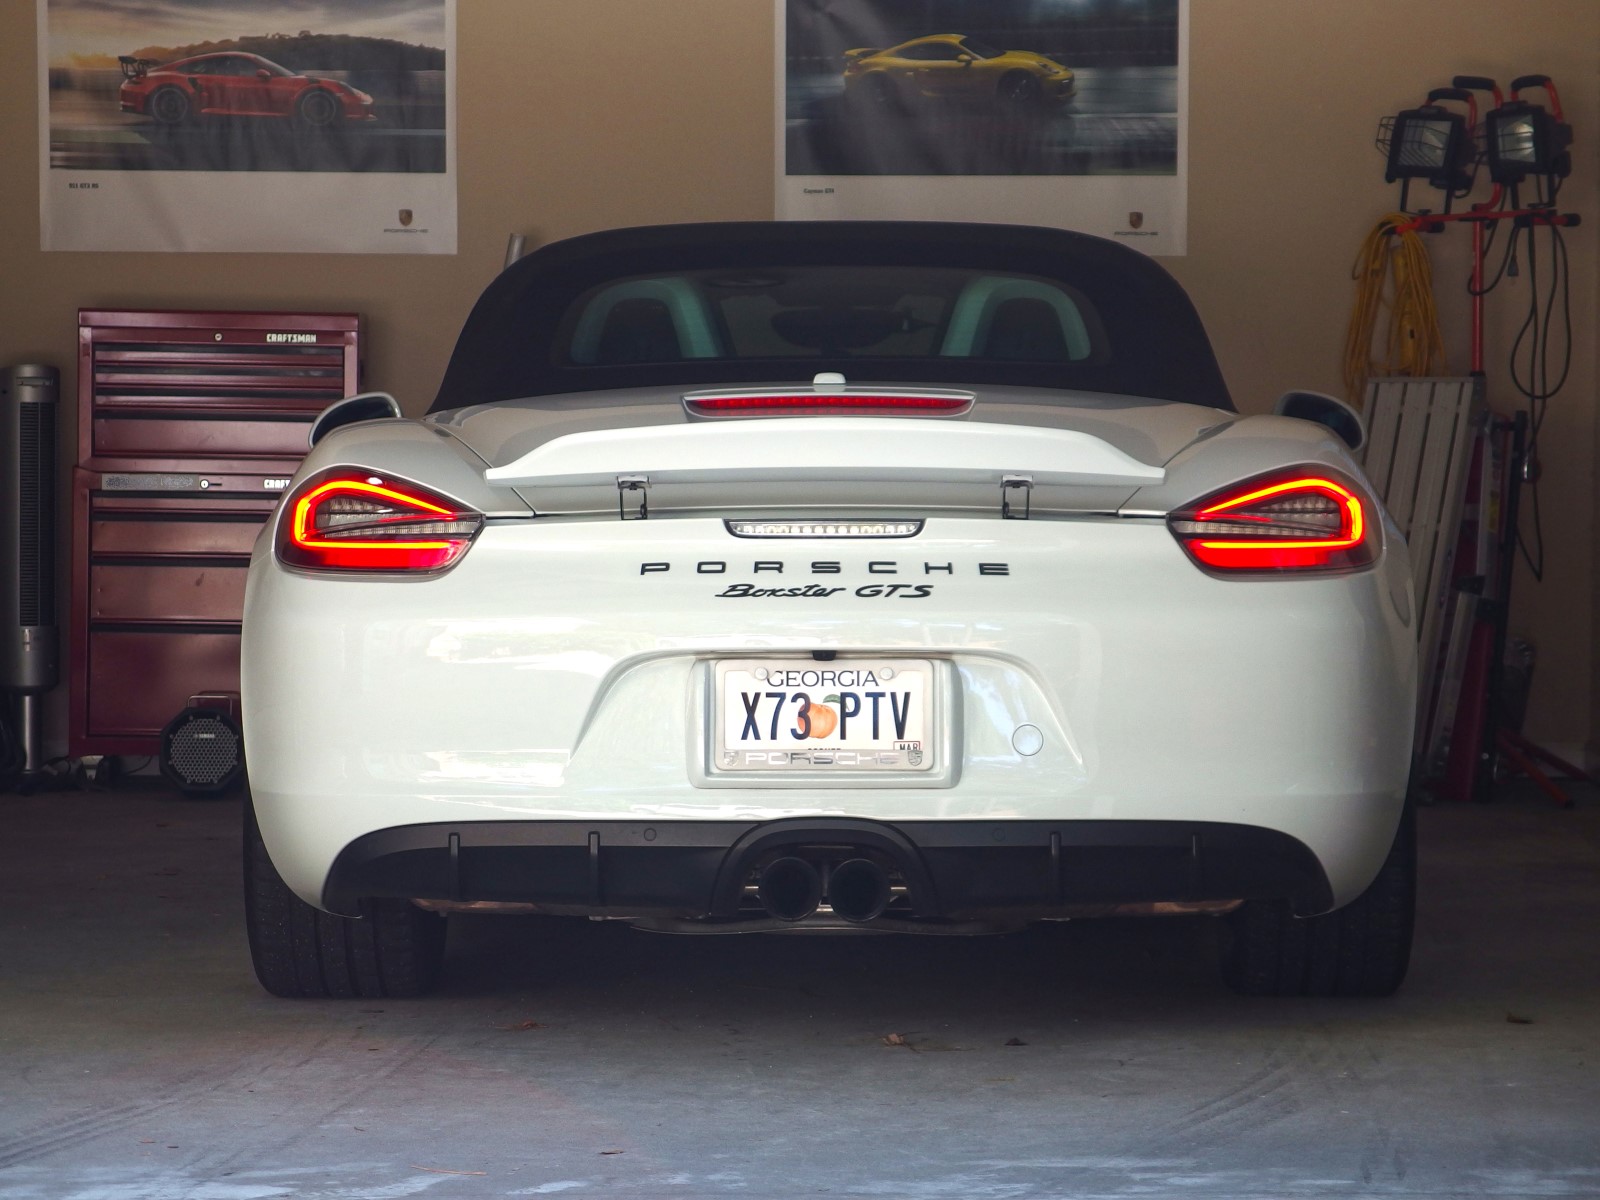
It doesn't block the third brake light for anybody directly behind you, but the bottom part of the lens may be obscured if you were cresting a hill and the person behind you was downhill from you (looking uphill at the back of your car from a lower vantage point, like this).
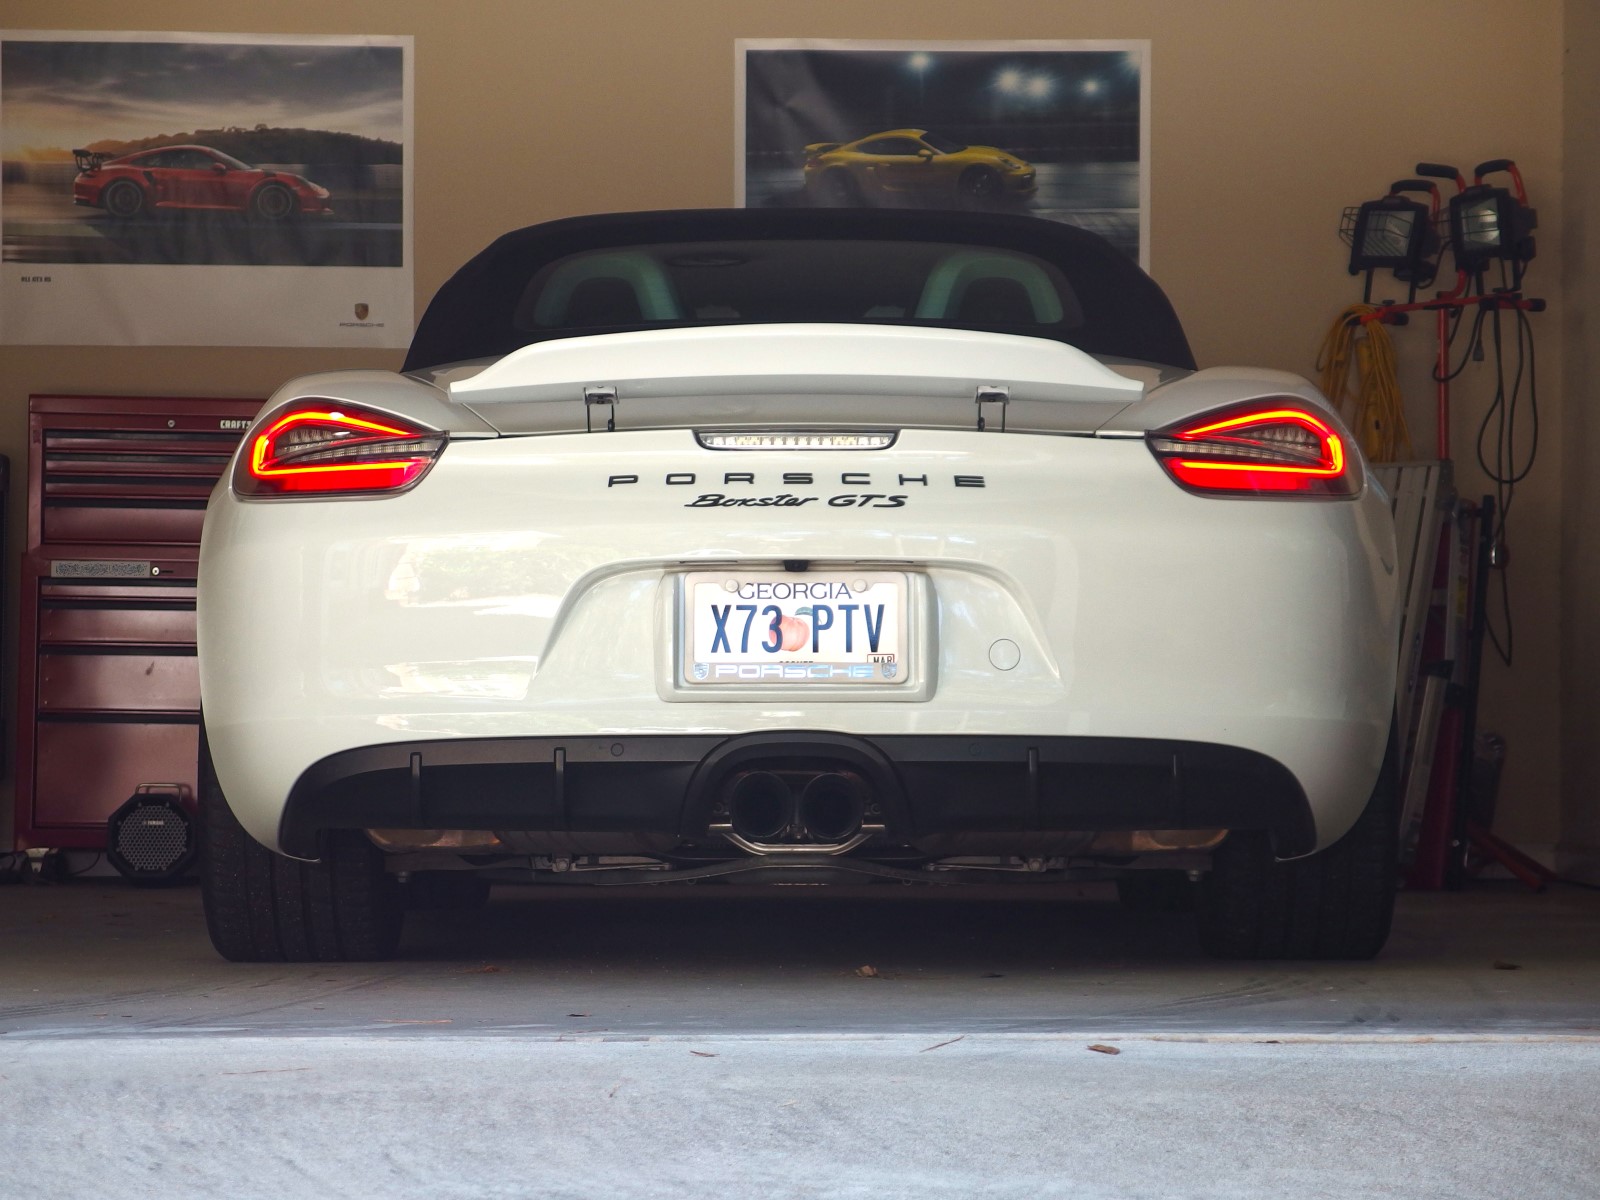
I don't think it's a big deal, but Porsche did raise the third brake light on its Spyders, perhaps for this reason.
Customer Service: 10 out of 10
I don't want to say that I'm that annoying needy customer, but I did have many questions about the product (especially with regard to the paint match and fitment) both before and after purchase. Every time I contacted the company (which included some dialog over a holiday weekend too), I received a prompt and courteous response (with phone support being more responsive than email). Each time I contacted the company, the person on the other line was friendly, knowledgeable about the product, interested in my satisfaction (not just trying to make me go away as fast as possible), and offered suggestions from industry lessons learned from producing and installing thousands of similar products. Needless to say, I was impressed with the outstanding communication, which I think was also aided by the fact that the product is made in the USA (because parts sourced from overseas can sometimes suffer from inherent communication challenges stemming from a logistical standpoint, like time-zone and language differences).
Value: 9 out of 10
For some people, only OE parts will be good enough to grace their cars. But that kind of purist philosophy can be expensive, especially for (2nd and 3rd) owners of older late-model Porsches. When the next-best-thing can be had for a fraction of the cost, I believe that it at least merits consideration, especially when it frees funds for other expenses (whether maintenance-related or more performance and cosmetic goodies). Spoiler Nation's replica ducktail offers an OE look at just over half the cost of painting and adapting an actual Spyder ducktail. And it's a relatively painless and hassle-free modification because the product arrives already painted (saving you the trips and trouble of having to deal with a local body shop). Considering the price of an OE Spyder ducktail and the cost to paint one, I think that this aftermarket ducktail is a considerable value (and an even better value if you can paint the ducktail yourself and save $100). Throw in the 3-year warranty and "Made in the USA" quality and you've got a pretty compelling package. I'd give this product a 10 for value if it didn't require any of my personal time and labor to tweak the brackets (which could have been due to a production fluke). [EDIT: Spoiler Nation claims that their latest redesigned brackets should fit better out-of-the-box, with no modification necessary.]
I don't have any personal experience with competitor products, but I'm aware that an overseas company also sells an aftermarket reproduction ducktail that can be imported via Japan Post. However, at current exchange rates, it costs about the same as an OE ducktail and still has to be painted so I'm not sure why anyone (in the U.S.) would opt for that. (They do have carbon fiber options at extraordinary cost if you're looking for that kind of thing.)
Conclusion:
TL;DR Version: This product rocks, comes with an attractive price tag, and met most of my expectations and high standards. The paint color match and finish are excellent, and good fitment is achievable but may require some finessing and tweaking of the brackets for perfectionists.
I think the 80/20 rule applies in that 80% of the alignment ("good enough" which may satisfy the majority of customers) can be performed quickly (in the first hour or two), but those seeking that extra 20% will likely spend another hour making tiny adjustments with diminishing returns that most people wouldn't even notice anyway unless they inspected everything closely with calipers. And if you try it and you decide that it's not for you, it's completely reversible as it doesn't require any permanent modification to your vehicle.
Despite the minor modifications that I had to make to the aftermarket brackets, I fully endorse and recommend the Spoiler Nation ducktail for anyone looking for a reasonably priced way to give their Boxster (or Cayman) a sportier look. While not a complete transformation, the ducktail definitely gives the back (and side) of the car more attitude (especially when raised at speed, though I actually prefer the lower position the best).

Am I still envious of the Spyder's sexy streamliner humps? Sure, but I'm not envious of the manual top and compromised trunk access that comes with it. And my goal was not to turn my car into a poser Spyder anyway, I merely wanted to add a little testosterone to the rear end of my GTS in a way that wasn't overtly obvious but would cause some onlookers to go "Hmm, that looks better than most Boxsters that I've seen but I can't quite put my finger on exactly why." Mission accomplished. My only regret is that I didn't install this sooner!
Not only does this product get my seal of approval, but based on my positive experience with this one, I'd gladly try Spoiler Nation's other products (including those for different vehicles, not just Porsches). If I could suggest improvements to Spoiler Nation, I would recommend the following:
Everybody is susceptible to a little bit of confirmation bias to rationalize their decisions and justify their purchases, but I tried to be fair and objective while evaluating this product and I hope others find this review beneficial. Please let me know if I can help answer any questions. I hope you enjoyed reading this review as much I enjoyed writing it.
Ever since the 981 Spyder was released, I've loved the look of its rear ducktail spoiler. One of the most distinctive features of every 981 is the crescent-shaped integrated spoiler "shelf" that spans from each taillight, as if formed by someone who pinched the tapering rear end of the 981 between their fingers and pulled a graceful arc straight outward like hot taffy. The Spyder's ducktail was just pinched and pulled further and taller, giving it more visual presence and attitude. I think my Boxster GTS looks great in stock form, but the idea of adding the Spyder ducktail to my car appealed to my sensibilities as a fan of tasteful and restrained modifications that result in an OEM+ look. The only problems were: Cost (the OE Spyder ducktail is at least $700 plus the cost of shipping and painting, bringing the total cost closer to $1,000), and my aversion to taking my car anywhere near an auto body shop to have one painted to match or installed by someone else (I illogically loathe going to those shops as much as some people loathe going to the doctor--it's probably because I am always fearful of collateral damage, even though having a spoiler painted up wouldn't really require my car go "under the knife.") It turns out that somebody already makes an affordable bolt-on solution for paintwork-phobic people like me: Spoiler Nation's 2013-2016 Porsche Boxster Ducktail Rear Wing Spoiler. Here are the product specs:
- Available painted or unpainted
- Made of FRP composite material (fiberglass)
- Light weight and will not interfere with raising or lowering function
- Remove and replace type install - All hardware included
- Handmade in the USA
The painted option is the one that obviously appealed to me the most, as the product arrives already painted to match my factory paint color based on my VIN and color code. This includes 2-3 base coats and 2-3 coats of 2:1 "high solid" clear coat, which is wet sanded and polished to match the factory finish. Because of the time required to prep, paint, and polish the product (and to allow the paint the cure), the painted option takes 3-6 business days to build-to-order.
Considering that the known alternatives are more expensive and genuine OE quality may not be dramatically different or noticeable (to the naked eye), I decided to take a chance on Spoiler Nation's replica product. The product shipped in a few business days, and 2 days later this showed up on my doorstep.
The ducktail arrived in a cardboard box with sufficient foam padding and bubble-wrap for protection. My first impression upon handling the box was "Wow, this thing is light."
After carefully opening the protective padding (be careful if using a knife!), my 2nd impression was "Wow, this thing is thick and rigid."
I fully inspected the ducktail for damage, color match, and cosmetic blemishes like dust, scratches, excessive orange peel, or runs in the clear coat (because I was not going to bother removing my stock spoiler if I was going to have to send a defective part back in the mail).
Thankfully, after careful scrutiny I was satisfied that the aftermarket part (visually) passed muster and met my quality standards, so I protected the edges with tape and set it aside.
Then I began the 5-minute process of removing my stock spoiler (which is essentially loosening 5 Torx bolts and 2 nuts).
A few hours later, I finally had the ducktail on the car and adjusted properly (and no, I never manually raise the spoiler while driving or when parked--if shown raised in any of my pictures, it's for demonstration purposes only, because it's a lot harder to photograph the ducktail from another moving vehicle at 75 MPH).
So what do I think of the replica ducktail now that I've installed and used it on my own car? Please read on below for my product ratings, findings, and installation tips.
Design/Appearance: 9 out of 10
From a design standpoint, this replica product mimics the profile and proportions of Porsche's original Spyder ducktail. So it's hard to critique or fault the design, as it follows the same factory contours (both above and below the "wing").
I will thus use this space to instead focus on a comparison with the stock Boxster spoiler. While not a radical departure (like a GT4's elevated wing), the ducktail does still feature significant differences when directly compared with the old spoiler. In cross-section or profile view, the edges of both spoilers are basically identical (where they mate flush against the inside edges of the taillights), so the differences in design are primarily in the middle 98%.
The ducktail's raised arc is more pronounced and because the spoiler is larger in 2 dimensions (it is both taller and protrudes further away from the car), it definitely creates a more aggressive look.
The scallop carved into the top of the ducktail elegantly flows from the trunk in a smooth curve that is crested by a small lip that matches the thickness of the original spoiler (which matches the thickness of the ridges that gracefully taper and disappear into the surface of the taillight lenses), continuing the theme or idea that someone tugged and stretched the original spoiler away from the car by a couple inches.
You know how caressing the curves of a car's body (while washing, etc.) can be gratifying? The stock Boxster spoiler just didn't excite me very much, but the more pronounced Spyder ducktail surfaces are way more sensual and a pleasure to touch.
As is evident in the photos, the ducktail is a handsome addition that visually complements the rest of the car in a subtle and understated way. The Spyder ducktail looks nice and purposeful, and is subdued compared to some of the louder aftermarket tuner options available. Nothing is worse than an add-on that screams "AFTERMARKET!" on an otherwise stock vehicle, and I just don't think my car would look right with a big raised platform wing or Transformers movie aerodynamics kit. Educated enthusiasts might notice the new ducktail, but the casual observer will never know the difference unless you point it out to them, as the ducktail appears to be naturally styled by the same person who designed the rest of the car (or at most, by someone who offered a conservative "remix" or facelift of the original design). It's a nice compromise between HEY LOOK AT ME! and the rather plain stock spoiler.
I'm also pleased by what's absent, namely the lack of any gaudy aftermarket decals or relief text script in the corner of the spoiler. I'm glad the company went with a less-is-more approach that is faithful to the original OE look.
The bright stainless fasteners, while normally only visible when the spoiler is raised at speeds over 75 MPH (and even then, only from certain angles), kind of stand out visually, but they don't necessarily look out of place and are simple and honest (in a no frills, form-follows-function kind of way).
If there is any knock on product appearance, it is that the little custom-fabricated fiberglass mounting brackets definitely don't look OE (because they have a coarser unfinished look), but those are only visible from really low angles (you have to bend down or stoop to see them) and only if you're actually looking for them, because they are mostly obscured by the ducktail itself. And unless you raise the spoiler while the car is parked, nobody would ever notice them (certainly not when viewed from within another vehicle at 75+ MPH).
But the most important aspect that affects the ducktail's appearance and visual harmony is the paint match, because any body panel in the wrong shade or hue will attract attention and won't look right on an otherwise perfect vehicle. Thankfully, the company did a great job (blindly) matching my car's "Pure White" paint (factory paint code 0Q or C9A). Using my VIN, they were able to come very very close to my paint color, and if I'm being picky, the ducktail is maybe 1% brighter against my car's (dirtier) 3-year old paint.
The company did admit up front that my specific paint color would be hard to match exactly, and warned me that the color difference might be similar to the subtle color difference one might normally observe on factory paint between a metal body panel and an adjoining plastic bumper cover. And that's exactly how I would describe it too--the paint color is probably the same or darn close, but because of the different underlying materials, it takes on a slightly different tone that is really only visible when scrutinizing it with adjacent panels. Overall, I'm very pleased with the mail-order color match (and the best part: I never had to set foot in a body shop, woohoo!).
Construction/Craftsmanship: 9 out of 10
The ducktail itself is beautiful to behold, with a glossy smooth finish on the top and rear. The paint and clear coat on these faces are flawless with no visible imperfections whatsoever (and I looked hard to find any).
If I'm being ultra-picky, when I compare my aftermarket ducktail with the factory one on a Spyder, the "scoop" in the top of the genuine ducktail is a perfectly smooth bowl as if it was extruded as one solid sheet, while the bowl in the top of my fiberglass ducktail shows a few minor surface waves and undulations which are very gradual (not sharp ripples or abrupt surface changes) that are only really visible when directly comparing reflections. Because while the factory ducktail exhibits few distortions, the reflections in the aftermarket ducktail has a little more fun-house mirror action. The surface is almost like how injection molded plastic parts shrink and contract differently between denser reinforced areas and larger thinner unreinforced spans, but not nearly as obvious with no perceptible lines or ribs in the surface and nothing that would give the surface any contrasting relief. Under harsh artificial lighting, I can spot a shallow dimple that resembles the kind of minor ding you'd get from hail damage, but under natural lighting it's hardly visible.
The left and right edge faces have more orange peel than the top or rear of the spoiler, but they are usually nestled against the inside of each tail lamp lens where you'd never see them so this is not a big deal.
The underside is generally finished to a lower state of refinement, with significantly more orange peel and a few minor imperfections (particles, etc.), but that is acceptable since the bottom is normally hidden until you're over 75 MPH anyway (when nobody is going to be checking up close).
I like the use of stainless hex-drive bolts, and the bosses on each joint appear to be appropriately beefy.
The holes drilled for the mounting bolts were clean (no sharp burrs or jagged edges), and more importantly they lined up easily when mounting and adjusting the ducktail's alignment.
If I'm being picky, the only eyesore might be the (previously mentioned) custom fiberglass brackets, because they are not finished to the same degree of care or quality, but this is acceptable since they primarily serve a functional purpose only.
For those who may scoff at the use of fiberglass (vs. more exotic materials like carbon fiber), I personally don't see the point in paying more for carbon fiber when I'm going to paint the ducktail anyway (vs. leaving CF weave exposed). I'm sure there are strength and maybe weight advantages to CF, but this aftermarket ducktail is close enough in weight to the original stock spoiler that I don't notice much difference in my hands (it wasn't even worth using a scale to compare). I think for the average 981 Boxster or Cayman customer (whose cars are now at least 1-5 years old now that the 2018 model year cars are coming out), the simpler and cheaper fiberglass solution is the right choice for this market. Purists won't accept less than OE parts no matter what material they're made from, and hardcore racers would likely have their own aerodynamic aids custom-fabricated anyway.
Documentation: 8 out of 10
The ducktail came with an instruction sheet (which is also available online). I appreciate that the guide is specific to our application (so many companies cheap out on this and use generic instructions for all applications), and each step is accompanied with color photos (granted the car in the pictures is actually a Cayman, but the installation process is common with the Boxster). I did notice one inaccuracy in the instructions (it mentions a T15 Torx bit when in reality my Boxster needed a T20 bit, but maybe the Cayman uses a T15?). [EDIT: The company says that they have corrected their instructions.]
Otherwise the instructions were spot on and included a few helpful tips, though it could have been even more informative and included additional warnings (for people who actually read instructions and user manuals like me). To improve the documentation, I would suggest adding a list of required tools (like 13mm socket for the height adjustment nut, and 4mm hex key for the stainless bolts).
It would also be nice to give the customer an estimated timeframe to complete the job (or each step), and difficulty rating or skill-level required. (BTW, I give this job a Medium difficulty rating, mainly because some additional modification of my parts was required, you have to be patient while making numerous alignment adjustments, and be very careful not to drop any of the fasteners into the holes where the spoiler support mechanisms fold away into the car body.)
After having taken the ducktail on and off the car numerous times while making alignment adjustments, here are some of my own tips that are not part of the official documentation:
Tip 1: Budget a few hours (at least 2-3 hours) to do a proper job. The stock spoiler comes off in minutes, and you can probably have the new ducktail physically on the car in under an hour (assuming you don't need to modify any parts like I did), but the painstaking and time-consuming process is making the minute alignment adjustments to get all of the panel gaps and part lines equal on all sides (though you might get lucky on the first try). The instructions suggest having a 2nd person to assist, but I did it all by myself and don't think having a 2nd person inside the car pushing the button to raise/lower the spoiler for me would have saved much time anyway. In fact, it may have made me more feel more uncomfortable and rushed because I'd be more self-conscious about my work pace.
Tip 2: While not necessary, the following tools will greatly aid in the installation process: Blue painter's tape, handheld (cosmetic beauty) mirror, stool w/ caster wheels, and possibly a Dremel (or equivalent tool) with a sanding drum (more on that later).
Tip 3: Use the blue painter's tape to mask off and protect the vulnerable edges of the other adjacent body panels (and taillight housings) so that you don't accidentally scratch or nick the paint while test-fitting, re-positioning, and electrically lowering the ducktail. But once you've got the ducktail pretty much lined up and you're in the final adjustment phase (there's no more risk of banging sheet metal), definitely remove the tape because if the tape lines are crooked they will mess with your eyes while trying to visually compare panel gaps.
Tip 4: Use a shop rag or towel to block the hole where the car's spoiler lift mechanism retracts, so you don't accidentally drop anything into that cavity. I modified a paper plate (by cutting slits for each lift arm) to catch anything before it fell into the hole, but that's overkill.
Tip 5: Use the handheld beauty mirror to view the alignment of the holes on the front and underside of the ducktail (so that you don't have to stand over it, or stoop below it, while getting the bolts inserted into their holes).
Tip 6: Don't waste your time measuring panel gaps and part lines on the stock spoiler (just make a mental note or take a picture) and eyeball final alignment at the end because production variance between every vehicle means that final fitment won't exactly match the stock spoiler gaps anyway. I'm happy to share my measurements, but they probably won't match your car's gaps.
Tip 7: Use the work stool on casters to comfortably scoot around behind the car, because you will tire from bending over throughout the test-fitting process. Your back will thank you.
Tip 8: When test-fitting the ducktail, use a pencil to draw a circle around the factory washers that rest on top of the brackets when making alignment adjustments in the 2 horizontal axes (front-to-rear, and side-to-side). That way if you discover that you need to slide the spoiler over 1 mm to the right and push it 2 mm closer to the trunk lid, you have a convenient reference point the next time you take the spoiler off the brackets to make your adjustments. Also don't assume that the factory spoiler height adjustment will be the same for the new ducktail--you'll most likely have to tweak those anyway so don't bother memorizing or marking their height unless you think you'll put the original spoiler back on one day.
Tip 9: While you may think you've got the alignment done while incrementally raising and lowering the ducktail in various intermediate positions, I noticed that the spoiler's retractable support mechanism folds and sits differently against the car when lowering it from the fully raised to fully closed position. So make sure you completely raise and lower the ducktail several times before settling on a final position, because that will be a true representation of how the spoiler will sit against the car body when stowed. Also, before putting all of your tools away, go for a test drive (that includes stretches over 75 MPH to raise the spoiler) so that you know the spoiler hasn't moved or changed position once the wind has exerted its force on it. It could have been my imagination, but I swear that my spoiler had "settled" and shifted (slightly toward one side, maybe 0.5 mm from the test-fit position in my garage) after an extended test drive.
Tip 10: Don't tighten any of the 4 stainless bolts until you have at least properly inserted all of them into their holes. And insert the front bolts first (they are trickier to line up). Because you may need to rock or tilt the ducktail slightly to get the 2 front holes lined up, and this free play and motion will be limited if any of the other bolts are already tightened. You don't want to severely bend or force anything that might stress or crack the fiberglass either (and the car's spoiler lift mechanism arms don't like to be twisted either). If you find it impossible to make the ducktail fit properly on the mounting brackets, it's possible that there is a problem with the brackets and you should stop and contact the company about getting a new matched pair.
Tip 11: Don't over tighten anything, unless you like cracked paint and stripped threads. The 4 bolts should engage the threads and spin freely until the last possible moment when you're tightening the ducktail against the mounting brackets. If you're encountering premature resistance on the first thread and find yourself having to exert a lot of force, STOP immediately and back the bolt out because you're likely cross-threaded. If you're having trouble getting the bolt to engage and bite the threads, it's probably because your holes are not lined up. Verify alignment using the mirror and start again.
Tip 12: If you lose a bolt, you can buy another one at the local hardware store. Look for an M6 x 16mm stainless hex-drive bolt, though you could theoretically substitute a Philips or flat-head drive if the hex-drive style is unavailable. (It would be nice if the company included a spare bolt in the kit in the event a mishap occurs, as it would only cost them a few extra cents but go a long way in terms of goodwill and preventing someone from trying to substitute their own incorrect fasteners.)
Fitment: 8 out of 10.
The true test of quality in any aftermarket product is: Does it bolt on as intended without having to pound and bang it into place because of poor tolerances or production variances? There are no visible battle scars or collateral damage resulting from the installation, so it did go on relatively smoothly. However, I did have to tweak and customize the mounting brackets for a 100% perfect fit because the car's lower height-adjustment washers didn't quite fit flush into the recesses underneath the brackets until I removed some extra material to allow proper mating between both surfaces. [EDIT: Spoiler Nation says that they have improved their bracket design for better fitment, so Dremel touch-up shouldn't be needed anymore.]
This was not a showstopper, and I verified with the company that this modification wouldn't compromise the strength of the brackets (they don't experience much stress in the lateral direction).
On the plus side, using a Dremel with a sanding drum means it didn't take more than a few minutes to carve out the cavities (I used a medium RPM speed on the Dremel), but for a product costing this much, I expect it to bolt on without any modifications (or me having to put on safety glasses to grind something). Because I lost some time modifying the brackets, and since my time is valuable, it erodes the value proposition of this kit, but really it was more annoying than anything because it really didn't add much consequential time. I have shared my notes with the company so maybe they will modify their jig so that subsequent brackets will require no such modification and work right out of the box. Hopefully my pain will be someone else's gain. [EDIT: The brackets have since been redesigned for better fitment.]
Once I got the ducktail properly positioned on the brackets, the fitment was great and I was able to adjust everything so that the panel gaps are uniform on all sides. If I'm being super picky, the bottom edge of the ducktail mostly follows the same arc of the car's bumper cover but the gap is a little tighter toward the center than at the edges (which may be attributed to the way to the ducktail sits on its perch--rocking it forward slightly might even out that gap in the center--or maybe my car simply suffers from its own unique production variances).
I should also mention that the stock spoiler has a black rubber bumper under each front corner, but the aftermarket ducktail has no such provision.
It appears that the real Spyder ducktail includes rubber bumpers too, but I honestly don't know if they are really needed if you properly align everything to begin with (is Porsche worried about incidental contact over harsh bumps?). I suppose if I really cared or was worried about contact, I could add my own self-adhesive bumpers (which can be found in a clear color at hardware stores too).
Performance: N/A (No Basis to Judge)
Without access to a wind-tunnel (or before-and-after track lap times under identical conditions), it's hard to objectively measure any performance change from the ducktail alone. Since it's more of a spoiler with a wedge cross-section (vs. a true downforce producing wing), it's probably just creating a low pressure zone that may modestly reduce lift (at the expense of additional drag and maybe some marginal fuel economy).
Is the effect large enough to notice (either in lap times or perceived driving behavior)? And does it require offsetting downforce at the front of the car (with dive planes or a splitter) so as not to upset the front-to-rear aerodynamic balance? I have no idea, but it doesn't seem to feel any different from the driver's seat (so far). One day I may consider a front splitter (like the one under development by Composite Concepts) but in the meantime, I'm satisfied enough with the visual enhancement with no perceptible penalty in everyday driving at road legal speeds. In other words, I'm not worried about the ducktail causing an unsafe condition except possibly at extreme speeds (and I don't plan to do any top speed runs in my car). But I obviously have no evidence or before-and-after test results to support that assertion. I'm not an engineer but one would think that the big hole created by lowering the convertible top would have an outsized effect and disrupt the airflow more than a comparatively small change to the trailing edge of small spoiler at the rear of the car. (And would the net effect be greater than the addition or omission of the optional mesh (or aftermarket glass) wind deflector between the roll hoops? Or shifting the front-to-rear balance of the car by placing heavy cargo in the trunk or frunk? Or refilling an empty gas tank?)
But don't take my word for it (buyer beware, YMMV, and all of the usual disclaimers apply). We all know that loss of tire grip can be incremental or sudden, so hopefully my assumptions are proven to be correct (and if incorrect, I'll hopefully have plenty of warning beforehand).
I will also mention 2 unintended consequences of this modification. First, I can now see the top of the spoiler (if I crane my neck) when it rises in the rearview mirror. It doesn't obstruct the rear view at all (you still have to sit up in your seat to see it), but I like being able to tell when the spoiler is up or down since the button on the center console doesn't illuminate when it raises automatically. Secondly, because the ducktail is a couple inches taller, it almost reaches the height of the bottom edge of the center high mount brake light.
It doesn't block the third brake light for anybody directly behind you, but the bottom part of the lens may be obscured if you were cresting a hill and the person behind you was downhill from you (looking uphill at the back of your car from a lower vantage point, like this).
I don't think it's a big deal, but Porsche did raise the third brake light on its Spyders, perhaps for this reason.
Customer Service: 10 out of 10
I don't want to say that I'm that annoying needy customer, but I did have many questions about the product (especially with regard to the paint match and fitment) both before and after purchase. Every time I contacted the company (which included some dialog over a holiday weekend too), I received a prompt and courteous response (with phone support being more responsive than email). Each time I contacted the company, the person on the other line was friendly, knowledgeable about the product, interested in my satisfaction (not just trying to make me go away as fast as possible), and offered suggestions from industry lessons learned from producing and installing thousands of similar products. Needless to say, I was impressed with the outstanding communication, which I think was also aided by the fact that the product is made in the USA (because parts sourced from overseas can sometimes suffer from inherent communication challenges stemming from a logistical standpoint, like time-zone and language differences).
Value: 9 out of 10
For some people, only OE parts will be good enough to grace their cars. But that kind of purist philosophy can be expensive, especially for (2nd and 3rd) owners of older late-model Porsches. When the next-best-thing can be had for a fraction of the cost, I believe that it at least merits consideration, especially when it frees funds for other expenses (whether maintenance-related or more performance and cosmetic goodies). Spoiler Nation's replica ducktail offers an OE look at just over half the cost of painting and adapting an actual Spyder ducktail. And it's a relatively painless and hassle-free modification because the product arrives already painted (saving you the trips and trouble of having to deal with a local body shop). Considering the price of an OE Spyder ducktail and the cost to paint one, I think that this aftermarket ducktail is a considerable value (and an even better value if you can paint the ducktail yourself and save $100). Throw in the 3-year warranty and "Made in the USA" quality and you've got a pretty compelling package. I'd give this product a 10 for value if it didn't require any of my personal time and labor to tweak the brackets (which could have been due to a production fluke). [EDIT: Spoiler Nation claims that their latest redesigned brackets should fit better out-of-the-box, with no modification necessary.]
I don't have any personal experience with competitor products, but I'm aware that an overseas company also sells an aftermarket reproduction ducktail that can be imported via Japan Post. However, at current exchange rates, it costs about the same as an OE ducktail and still has to be painted so I'm not sure why anyone (in the U.S.) would opt for that. (They do have carbon fiber options at extraordinary cost if you're looking for that kind of thing.)
Conclusion:
TL;DR Version: This product rocks, comes with an attractive price tag, and met most of my expectations and high standards. The paint color match and finish are excellent, and good fitment is achievable but may require some finessing and tweaking of the brackets for perfectionists.
I think the 80/20 rule applies in that 80% of the alignment ("good enough" which may satisfy the majority of customers) can be performed quickly (in the first hour or two), but those seeking that extra 20% will likely spend another hour making tiny adjustments with diminishing returns that most people wouldn't even notice anyway unless they inspected everything closely with calipers. And if you try it and you decide that it's not for you, it's completely reversible as it doesn't require any permanent modification to your vehicle.
Despite the minor modifications that I had to make to the aftermarket brackets, I fully endorse and recommend the Spoiler Nation ducktail for anyone looking for a reasonably priced way to give their Boxster (or Cayman) a sportier look. While not a complete transformation, the ducktail definitely gives the back (and side) of the car more attitude (especially when raised at speed, though I actually prefer the lower position the best).
Am I still envious of the Spyder's sexy streamliner humps? Sure, but I'm not envious of the manual top and compromised trunk access that comes with it. And my goal was not to turn my car into a poser Spyder anyway, I merely wanted to add a little testosterone to the rear end of my GTS in a way that wasn't overtly obvious but would cause some onlookers to go "Hmm, that looks better than most Boxsters that I've seen but I can't quite put my finger on exactly why." Mission accomplished. My only regret is that I didn't install this sooner!
Not only does this product get my seal of approval, but based on my positive experience with this one, I'd gladly try Spoiler Nation's other products (including those for different vehicles, not just Porsches). If I could suggest improvements to Spoiler Nation, I would recommend the following:
- Fix the instructions (change reference to T15 Torx to T20) [EDIT: The company claims that this has been done!] and incorporate some of my installation tips and warnings (hey, it might avoid installer aggravation and save them customer support time by averting common mistakes, when we all know that time is money).
- Include a spare M6 x 16mm bolt (or two), in case the customer loses or damages one (e.g. strips the hex-drive hole).
- Make sure the brackets can clear the lower height adjustment washers (because they are slightly wider than the top washers). I had to shave my brackets a little to get a flush fit on mine. [EDIT: The company claims that they have revised their bracket design to clear the larger lower washers.]
- Give the brackets a more polished, finished look. They may never have the look and feel of a solid part that was CNC-milled from a solid chunk, but they do have a rough cast look to them that has room for improvement. But if this would somehow add to the price of the product, I'd skip this and leave the brackets alone (most people won't care what they look like).
- Consider becoming a forum sponsor (if they aren't already).
Everybody is susceptible to a little bit of confirmation bias to rationalize their decisions and justify their purchases, but I tried to be fair and objective while evaluating this product and I hope others find this review beneficial. Please let me know if I can help answer any questions. I hope you enjoyed reading this review as much I enjoyed writing it.
Last edited by gearFX; 11-09-2017 at 06:11 AM. Reason: Spoiler Nation improved their product based on my feedback.
 09-26-2017, 08:49 PM
#2
Rennlist Member
If I've got to take a grinder to a bolt on part, I'd give no greater than a 6/10 for fitment. And from the pictures, the paint doesn't match, but that could be light and the camera.

The following users liked this post:
Paul Quilter (10-11-2020)
09-26-2017, 11:11 PM
#5
Racer
Thread Starter
I agree that the photos and lighting don't do a good job representing the paint match in real life (in fact some of the factory body panels don't even match each other in some of the photos). I'm definitely not a pro photographer and shot most of these in Auto mode with some exposure compensation. [EDIT: I really struggle with shooting pictures of white cars in general. Not sure why they're so hard for me but my photos of white cars often suck. I'd give my photography skills a 2/10! Maybe I should just stick to using the grinder.
 ] Of course my monitor may look different than yours too (and maybe things look better or worse on a phone, tablet, etc). I'm certainly willing to let anybody local inspect the paint match for themselves. It's definitely a touch brighter, which I noted in my review. Is it worth sending back or having a local body shop try to respray it? No way (for me at least).
Last edited by gearFX; 09-26-2017 at 11:30 PM.
09-27-2017, 02:25 AM
#6
Rennlist Member
Join Date: Oct 2015
Location: Orange County, California
Posts: 2,027
Likes: 0
Received 112 Likes
on
79 Posts
Appreciate the time and effort, not to mention the level of detail, of this great product review. 
The end result looks fantastic IMO! Congrats!
Had to smile at this "pinched taffy" description. Never thought of it in these terms, but it's a very apt description.
The end result looks fantastic IMO! Congrats!
One of the most distinctive features of every 981 is the crescent-shaped integrated spoiler "shelf" that spans from each taillight, as if formed by someone who pinched the tapering rear end of the 981 between their fingers and pulled a graceful arc straight outward like hot taffy. The Spyder's ducktail was just pinched and pulled further and taller, giving it more visual presence and attitude.
09-27-2017, 01:31 PM
#7
Racer
Thread Starter
Trending Topics
09-27-2017, 03:31 PM
#8

Looks great.
Ten seconds until someone clicks in to tell you that your aero is now unbalanced and unsafe...
Ten seconds until someone clicks in to tell you that your aero is now unbalanced and unsafe...
09-27-2017, 06:21 PM
#9
Racer
Thread Starter
Thanks!
 Haha, I'm totally expecting that (but certainly welcome an insightful analysis), followed by a counterpoint from westwest888 (all due respect, I've learned some interesting facts from him, so I hope he chimes in because I know he does his math homework) that says changing the angle of one's foot on the accelerator pedal will have greater effect on the car's balance than a raised pimple on the back of the car.

BTW, love the quote in your sig!
Haha, I'm totally expecting that (but certainly welcome an insightful analysis), followed by a counterpoint from westwest888 (all due respect, I've learned some interesting facts from him, so I hope he chimes in because I know he does his math homework) that says changing the angle of one's foot on the accelerator pedal will have greater effect on the car's balance than a raised pimple on the back of the car.BTW, love the quote in your sig!
 09-29-2017, 04:48 PM
#12
Racer
Thread Starter
09-29-2017, 04:58 PM
#13
I'm not a member, I was going to join in NY and the local chapter was like hey Terbium we take turns at people's houses throwing get togethers how bout your place? That sounded like some sort of tupperware organization and at that time I was way too busy with work to play host so I noped out and never went back. I'm certainly open to checking out the Atlanta chapter, I can always use more friends in my new foreign land home.
11-08-2017, 05:10 PM
#14
Racer
Thread Starter
Just an update: Spoiler Nation agreed with some of my recommendations and made the following changes:
- Corrected instructions to specify the correct Torx T20 bit
- Modified the brackets to fit the larger bottom washer correctly (no Dremel needed anymore)
05-29-2018, 04:50 PM
#15
Interesting, from Suncoast Porsche GT4 Front Bumper Conversion
Genuine Porsche Parts - Factory GT4 front bumper conversion. ...Due to the aggressive aerodynamic design of this bumper, we recommend only using in combination with an upgraded spoiler similar to the one found on the GT4 (please consult a specialist).
Genuine Porsche Parts - Factory GT4 front bumper conversion. ...Due to the aggressive aerodynamic design of this bumper, we recommend only using in combination with an upgraded spoiler similar to the one found on the GT4 (please consult a specialist).