
Retrofitting an OEM Steering Wheel to the 968
 11-21-2013, 10:48 AM
#1
Rennlist Member
Thread Starter
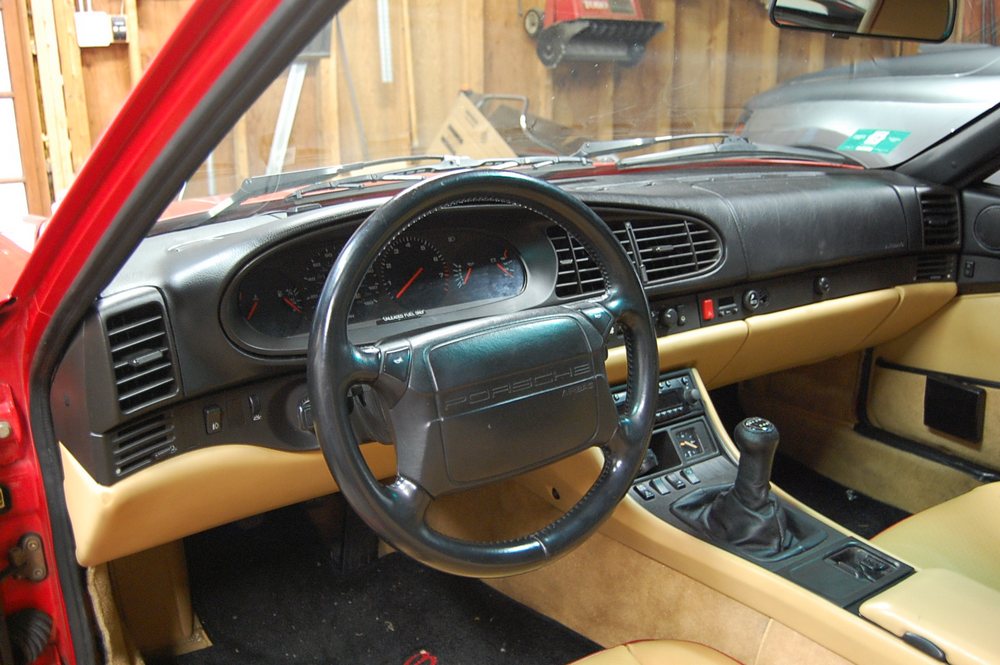
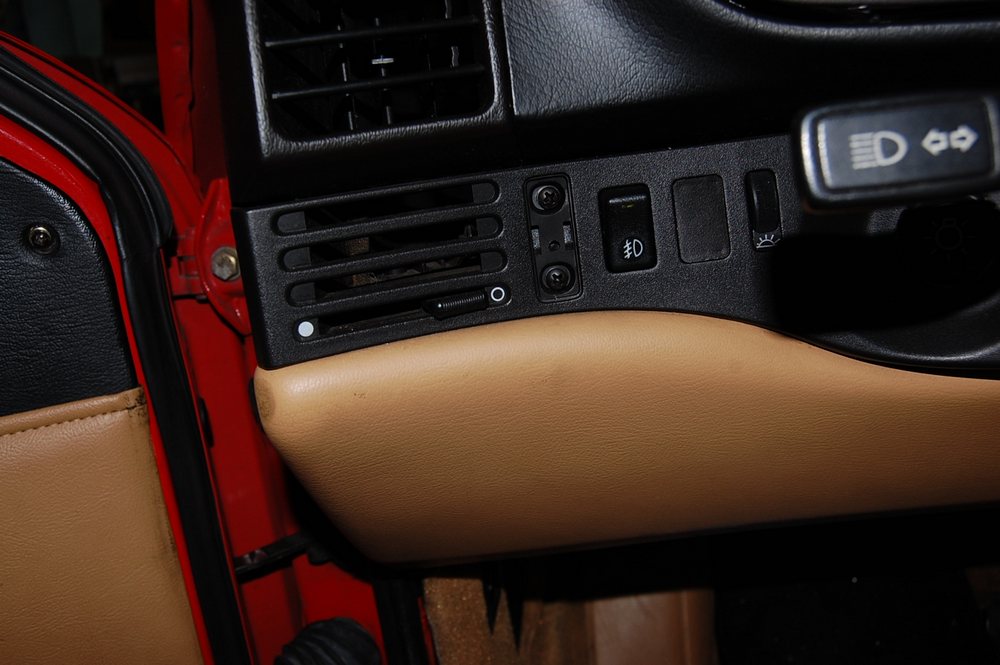
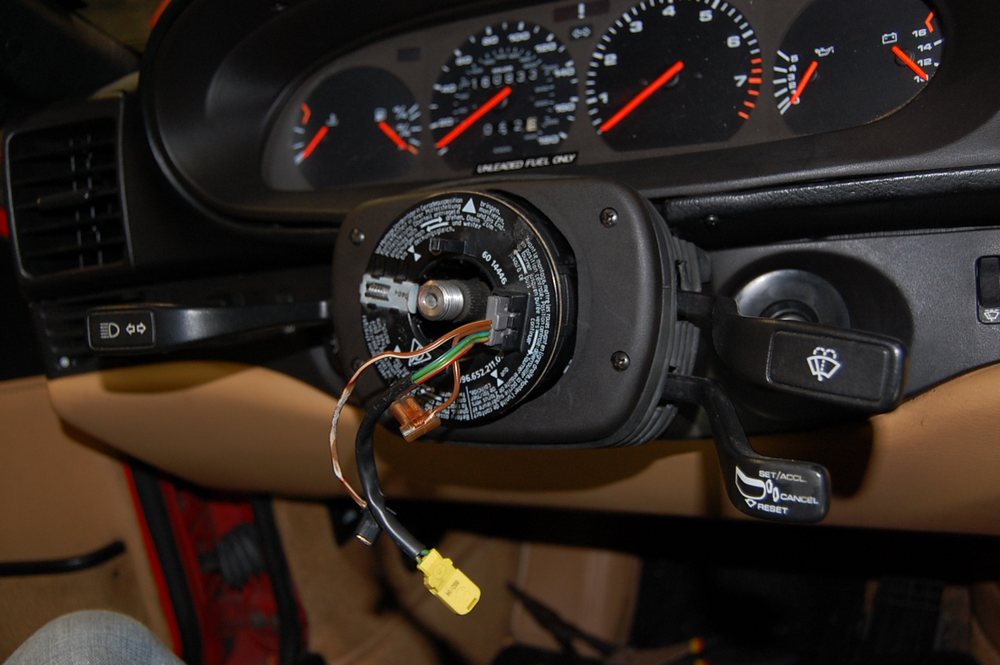
Do you want your car to go from looking like this:
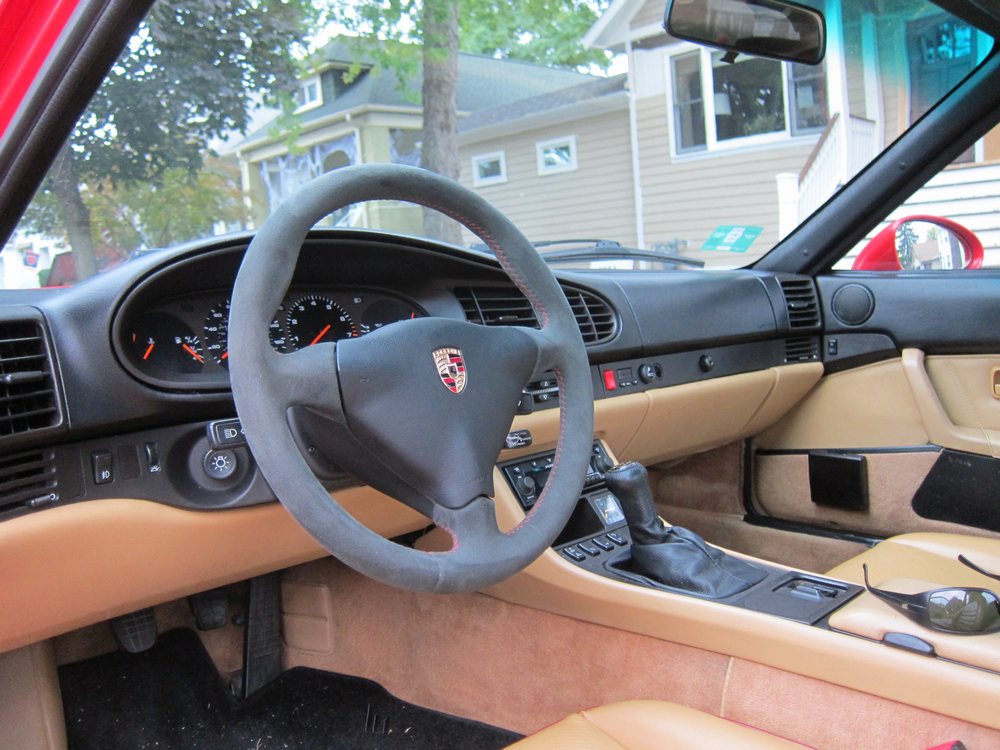
To something more like this?
If so, this post is for you! It is based on the following threads I saw:
Thread Number 1
Thread Number 2
I know, it's iconic that I am posting a thread on how to retrofit a new steering wheel to my 20 year old car, but I haven't seen one in detail on the web. So why not?
First, you need to find yourself some new shiny for mounting on the steering hub. I initially choose a 4 spoke 993 steering wheel, but then found this 3 spoke alcantara wrapped wheel from a 993 GT3. I scored it very cheaply relatively speaking and I also found out that my four spoke wheel was actually MODIFIED by the previous owner (he forgot to mention this) and it would not fit a 968. A 4 spoke 993 wheel with airbag will run you $200-$350, a three spoke is more like $400 and up.
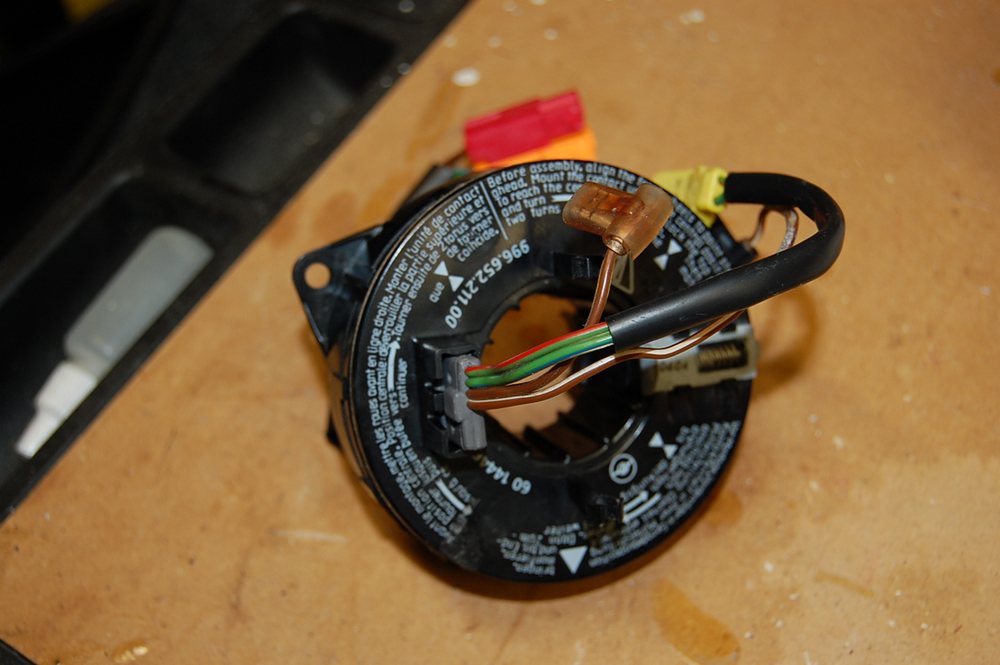
Once you find the steering wheel, you need a clock spring from a 964, 993 or 996, you can find them all over ebay for anywhere from $35 to $100. The part number I purchased was 996.652.211.00. The nice thing about this clock spring is that when it is removed from the car, you can't "unwind" it because of the spring loaded locking pin. I will discuss how to set it up later in the procedure, it's pretty much fool proof.
Things that you will need include:
� Steering Wheel
� Clock Spring
� Length of 16 gage wire about 20" long
� Insulation Displacement Connector
� Dremel Tool
� Torx T30 to Remove/Install Airbag
� 7/8" or Equivalent Metric Socket
� Various Basic Tools
Next step is to DISCONNECT the battery 3-4 hours before surgery. I read about this on the forum, this prevents the airbag light from coming on after everything is connected. I followed this rule twice (took me once to do the install, and another time to adjust everything) and it worked like a champ.
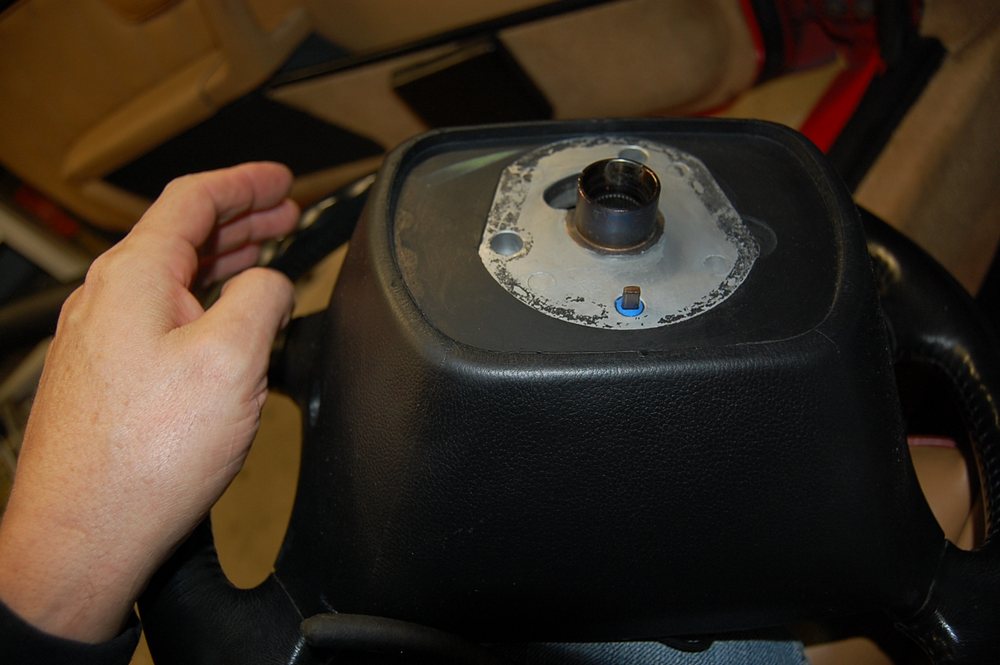
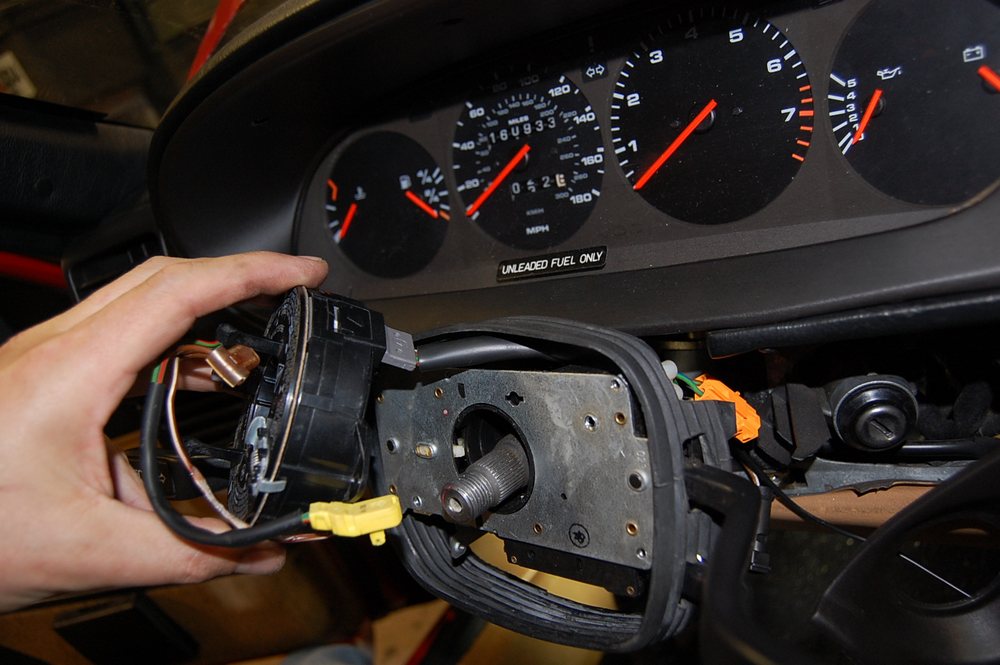
Put your key in the ignition and unlock it. Turn the wheel so you can get your T30 on the airbag torx screw (2) on the back of the wheel. The angle has to be just right to engage it, you'll know when you find it. Unscrew both screws and the airbag will basically fall in your lap. It is still connected by the one connector, just pry it off with a small screwdriver.
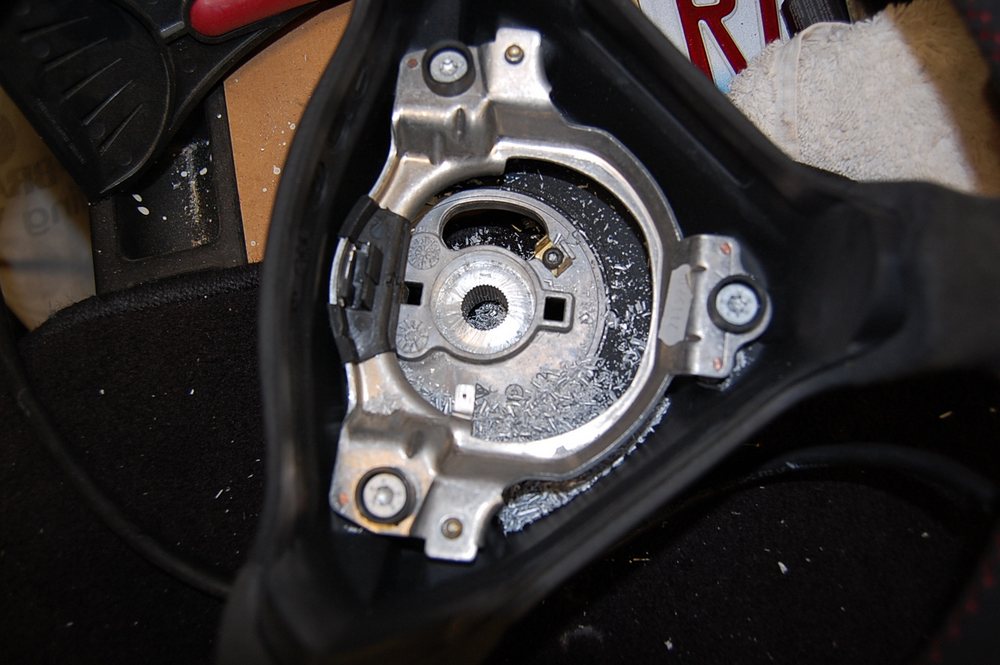
You can see the two airbag screws in the background, disconnect the red connector:
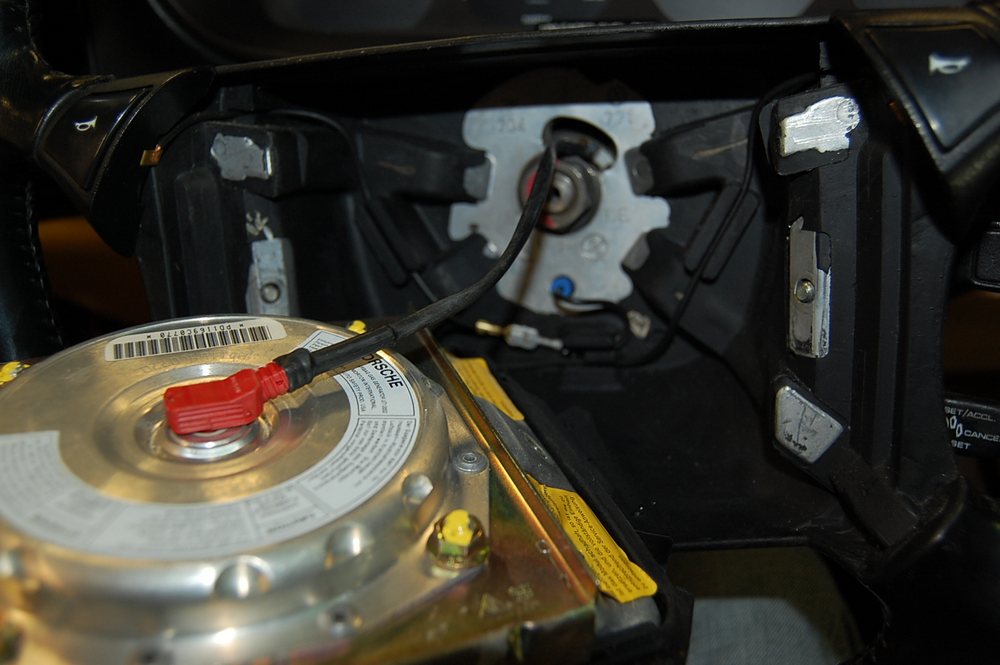
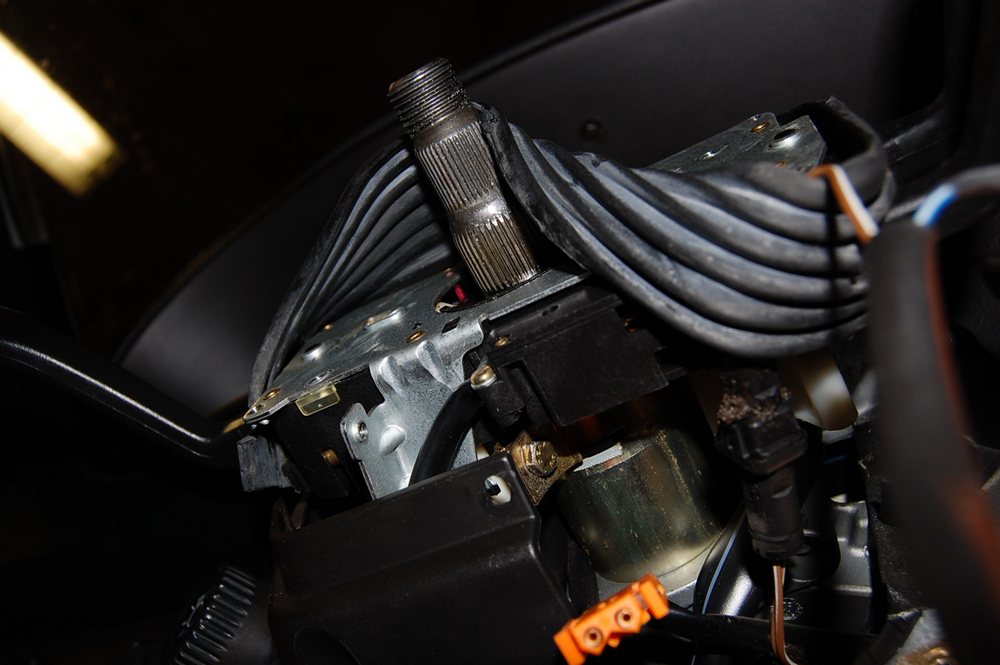
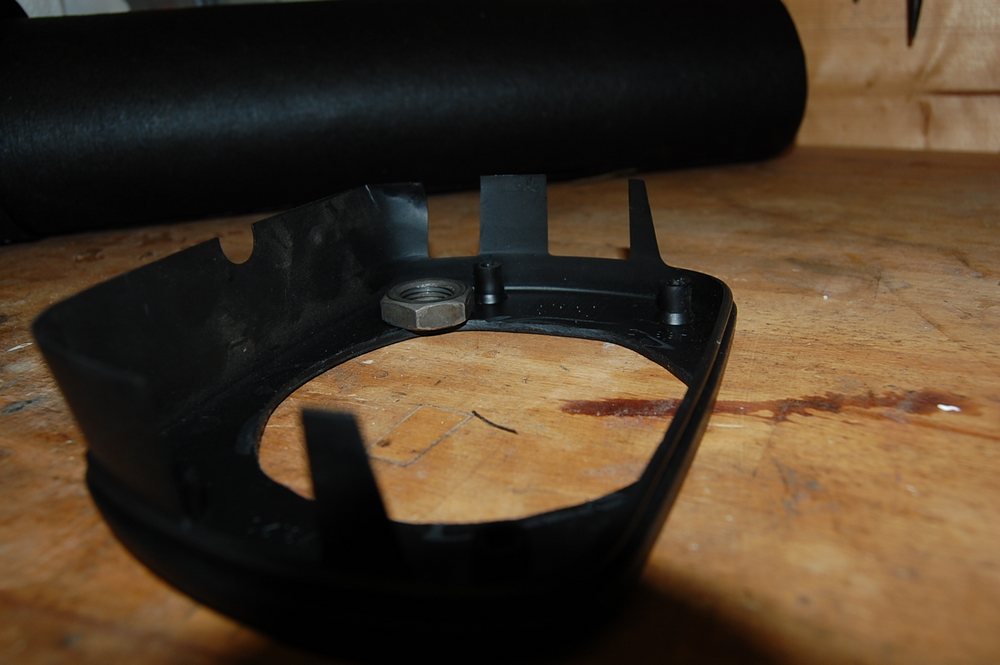
Once that is done, using the proper socket, unscrew the nut. See the blue plastic piece in the picture? That's the ground for the horn. This is the difference in setup between the old and new style steering wheels/clock springs. This uses a slip ring and brush (the brush is on the back side of the blue plastic piece).
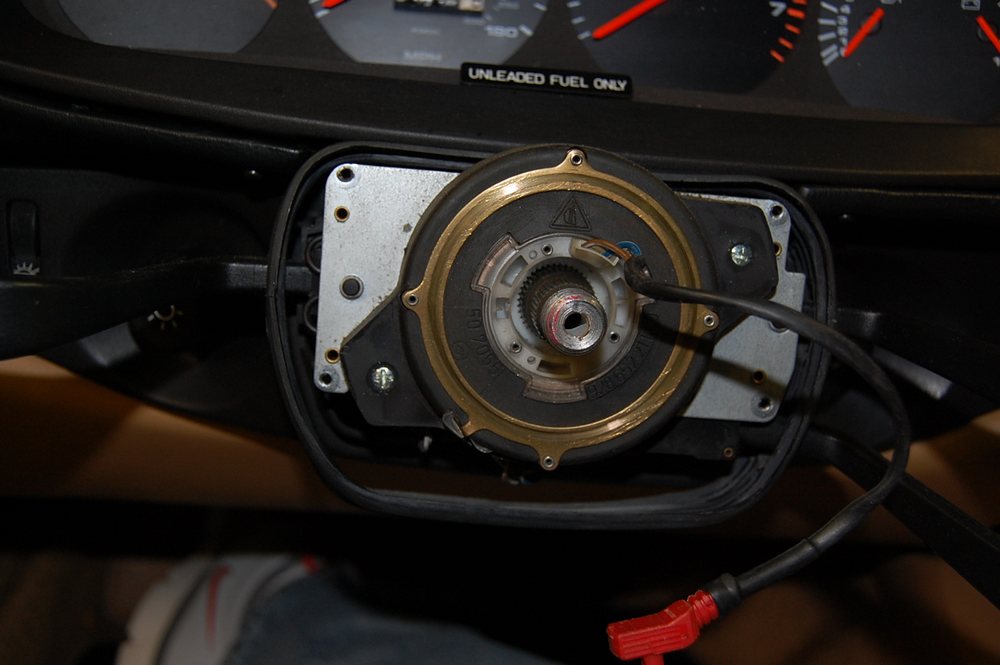
That brush rides on this slip ring, the brass piece in the picture. This is what makes up the ground circuit for the horn relay. It goes something like this:
+12 VDC > Clock Spring > Wire > Horn Button > Wire > Slip Ring > Horn Relay Coil > Ground Connection
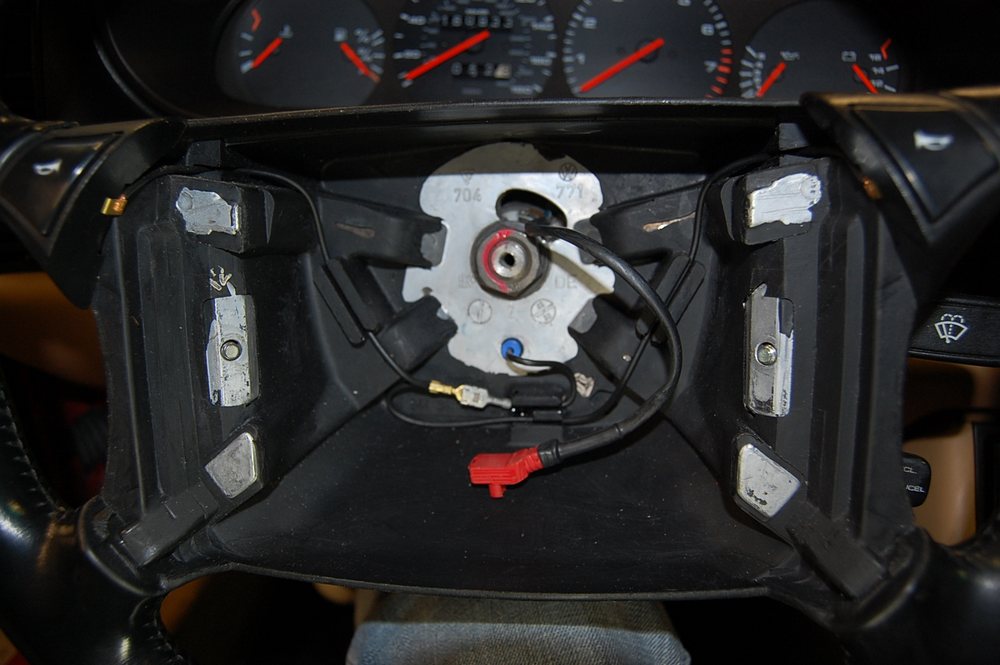
Here's the spring loaded brush that rides on the slip ring:
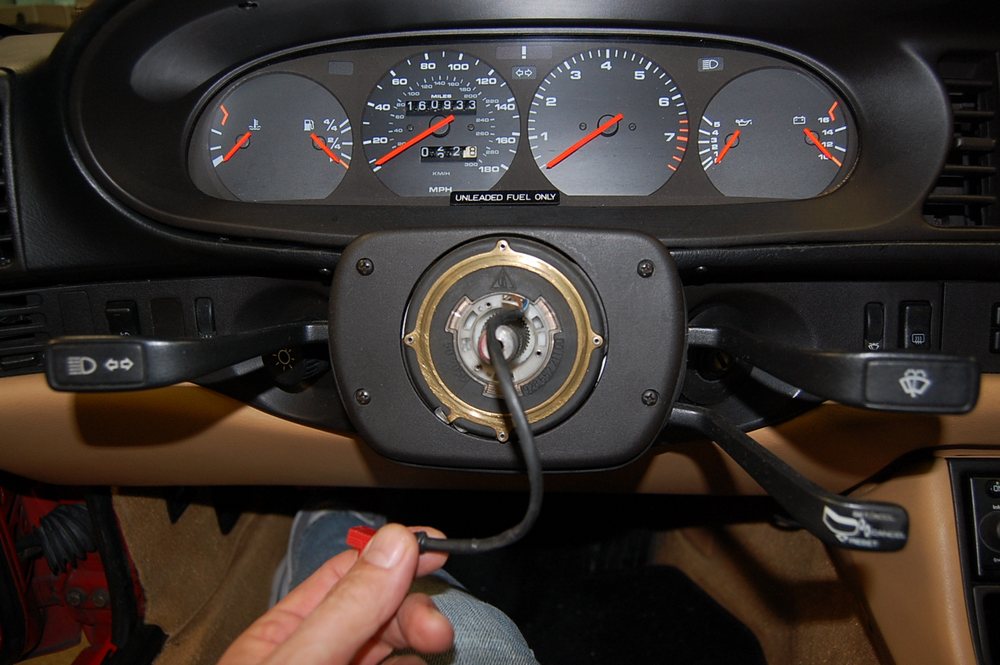
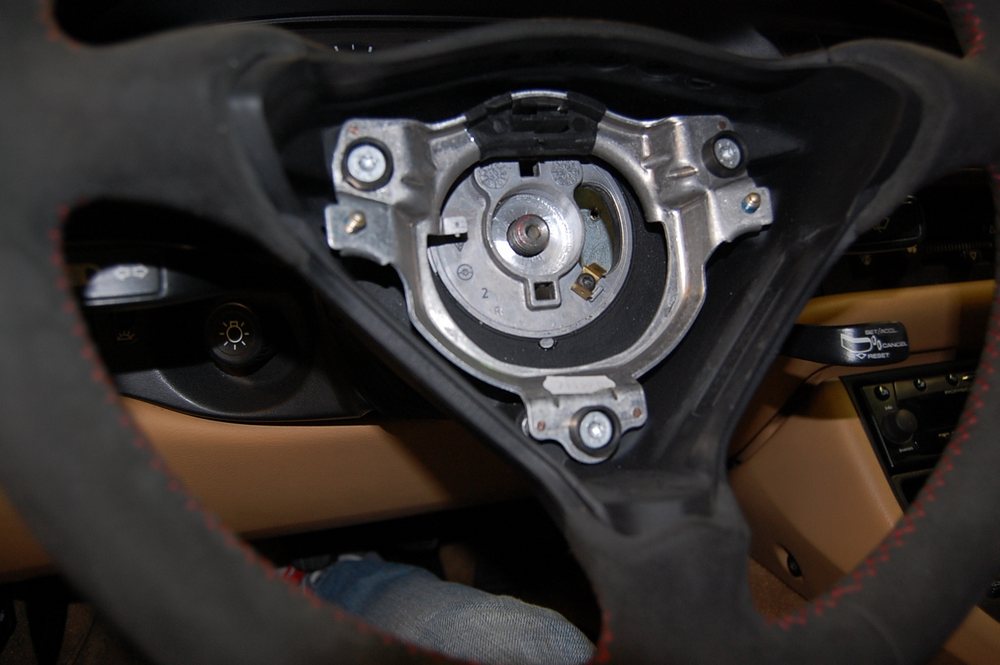
Take the four screws out and remove the plastic beauty cover.
To remove the clock spring, it's two screws. Take it off and you can actually pull the wires out and disconnect the connectors, or just wait until you get more clearance after taking the trim off.

At this point, do yourself a favor and take the trim off so you can get to the 8 mm bolt that holds the turn signal switch assembly tight to the steering column, it will need to be pushed back. I fought this and ended up doing this later. It's easy and quick. To get the trim off you:
� Pop the two heater slide pieces off
� Using a trim removal tool, pop the HVAC cover plate off
� Unscrew the four screws holding the HVAC panel in place
� Unscrew the visible screws under the steering wheel
� Remove the rubber piece around the ignition
� There is one additional screw to the left of the ignition, I did not find this one and broke the plastic piece
� Take the left side trim cover to the left of the fog light switch off, loosen the two screws
� Remove all the pieces.
� If they don't come off easily, you are missing a screw
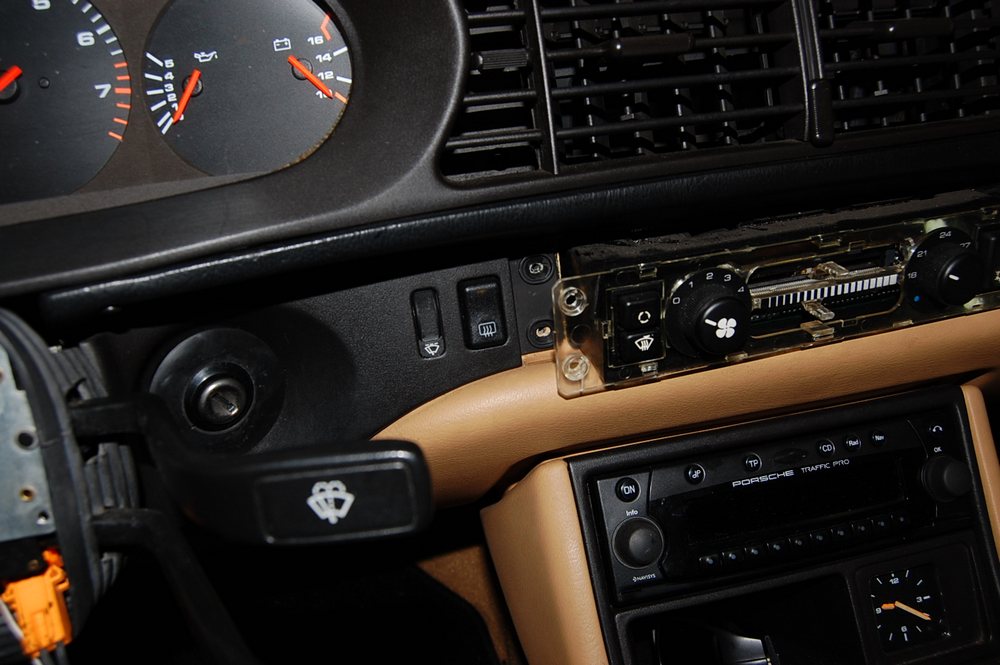
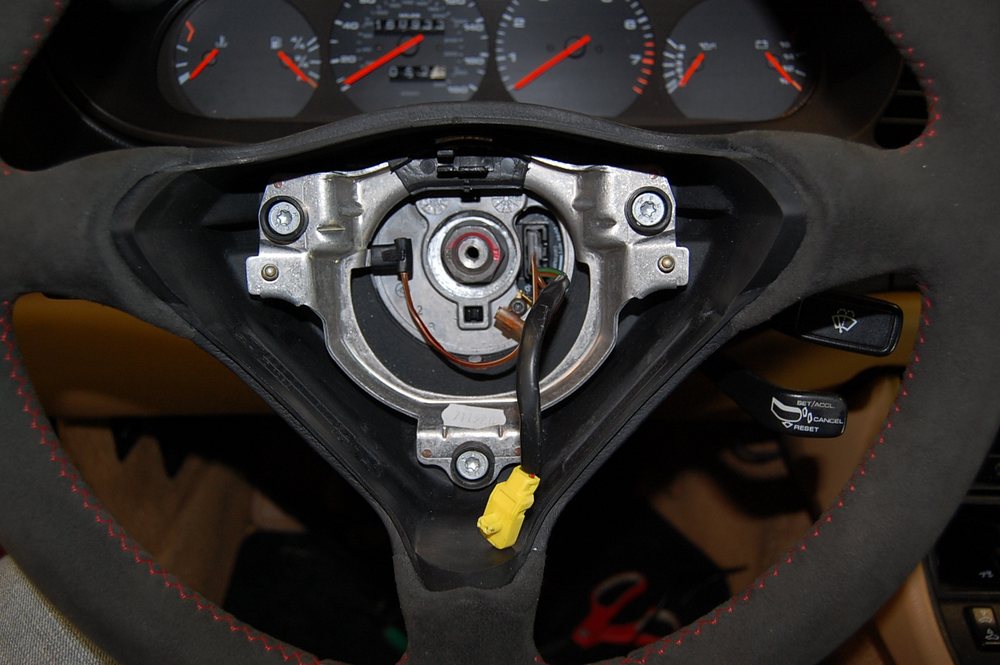
It's hard to see but there are a few screws here, and once you get these off, you have to move the rubber piece up and out of the way, there is one adjacent to the ignition switch.
Loosen these two screws, I did not have to remove them. Either way, it's only a few seconds.
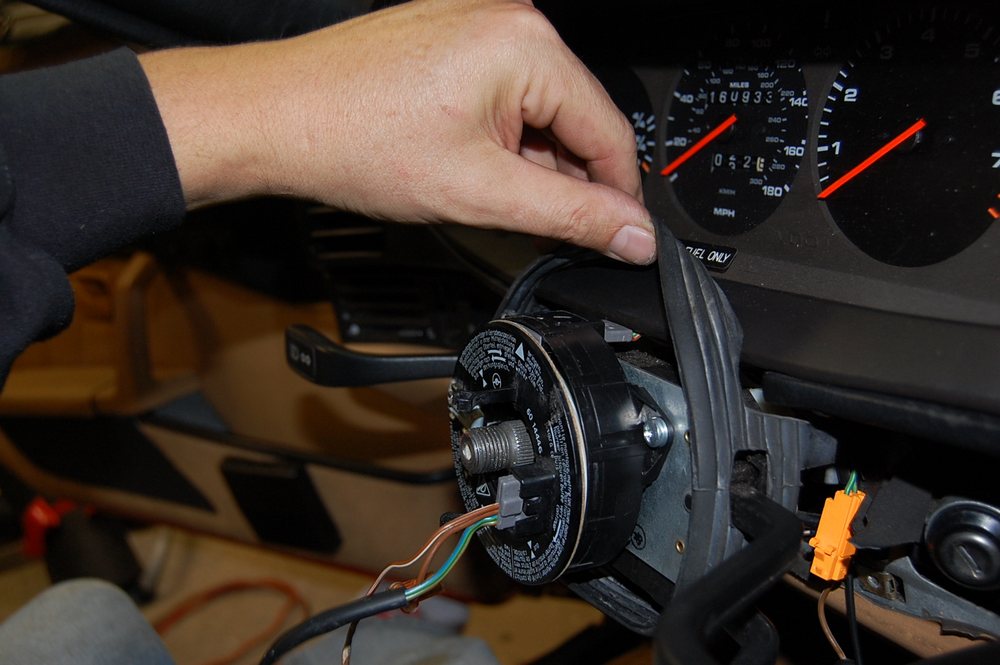
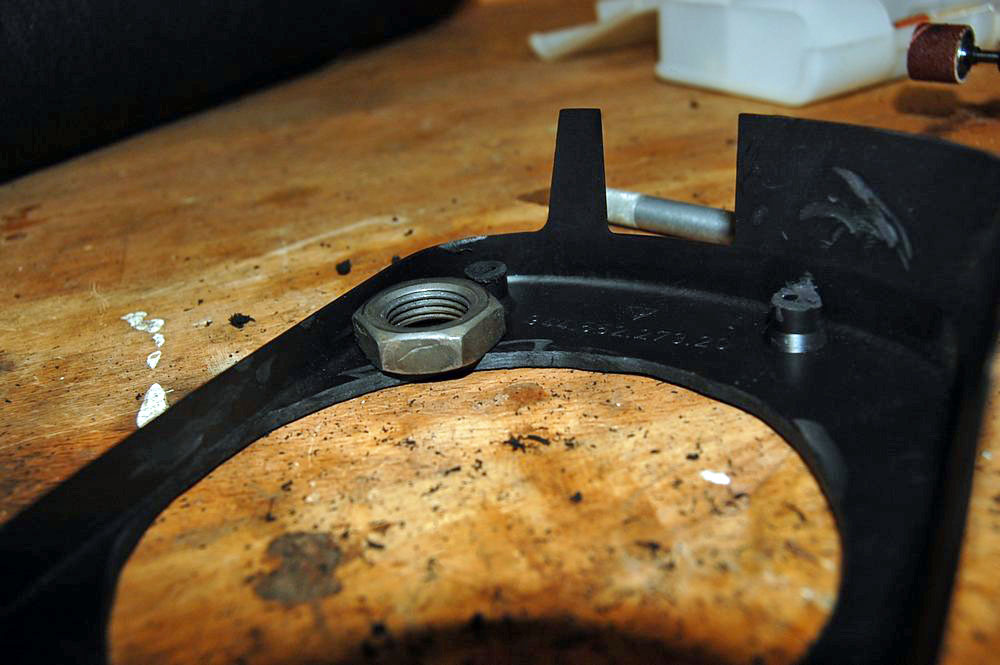
You will need to loosen the 8 mm nut in the below picture, and then push the switch assembly forward as much as you can, which will most likely be 1/2" or so. Once it's move forward, tighten the 8 mm nut. It's the nut at the 6 o'clock position.
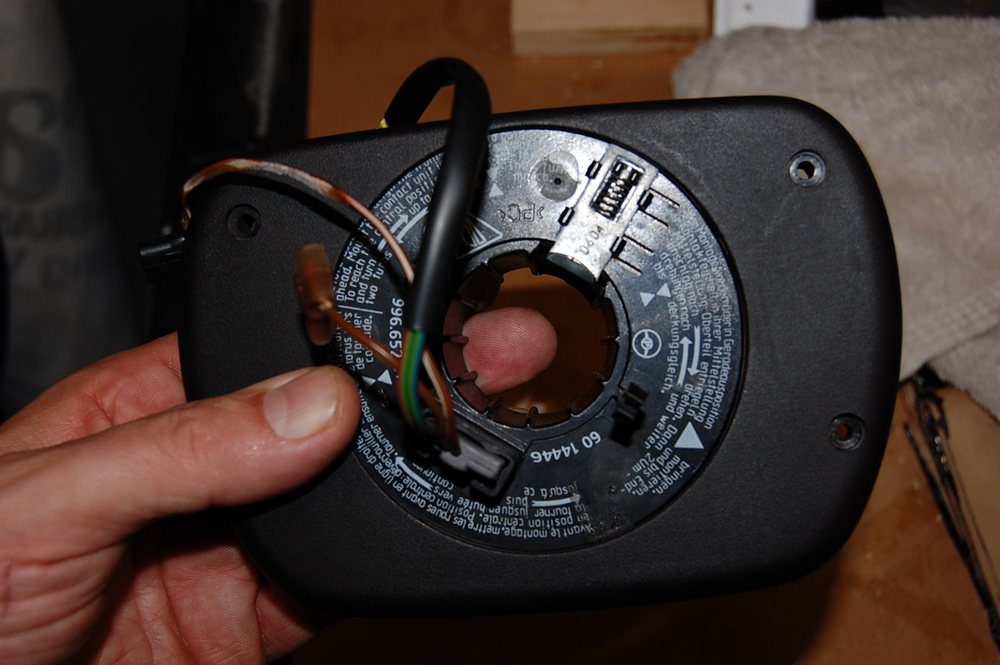
You will need to modify the NEW clock spring with parts from the old clock spring, and add an extension wire, which will ground out the horn circuit.
Cut the one connector off the new clock spring which has the brown/white and brown wire. Cut the brown/white off the old clock spring. Solder and heat shrink the two pieces together. This plugs into the OEM connector.
For the brown wire, just solder on a new 20" or so length wire. This is you new ground. the new wheel DOES NOT have the slip ring, and it needs a hard ground.

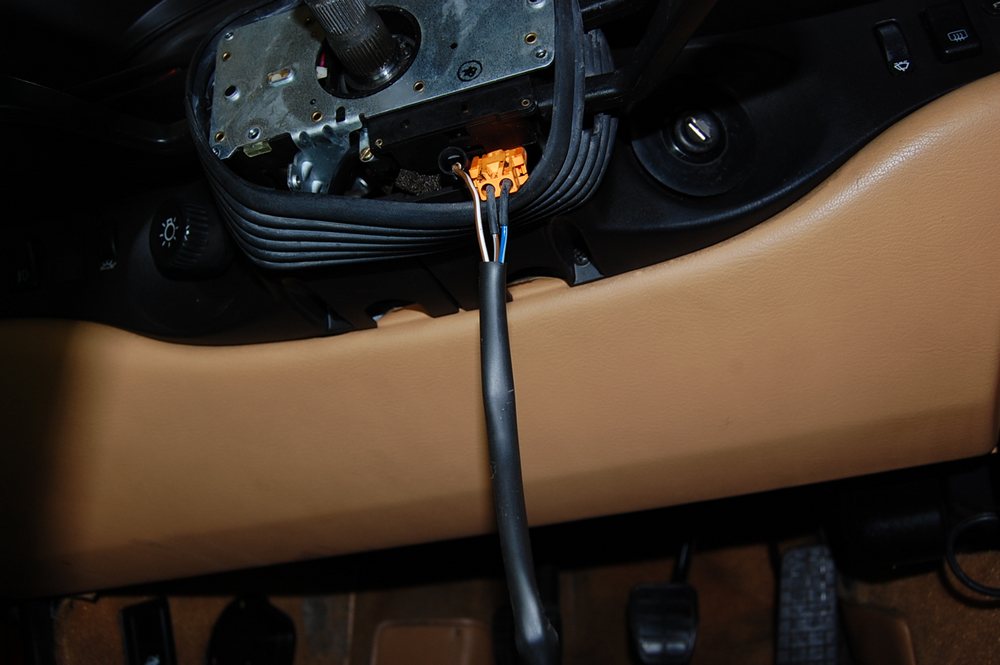
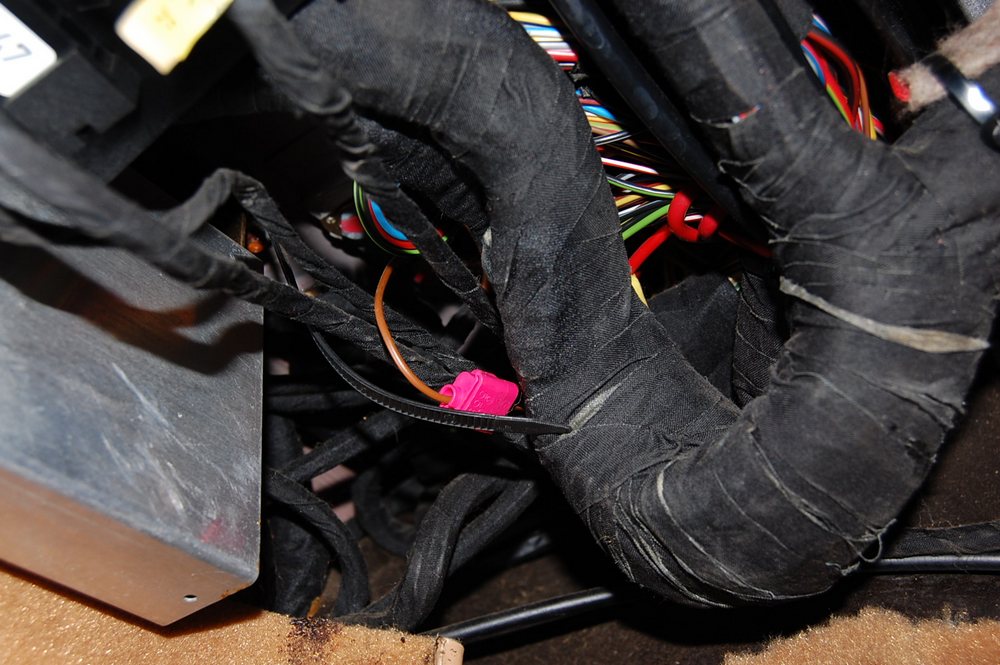
Once this is done, install the new clock spring. You're going to connect the brown ground wire to the forward left (at the left of your feet on a LHD car) to a ground wire. Look way up in there and you'll see the grounding points at the forward corner of the passenger compartment. I just used an insulation displacement connector and connected it to one of the ground (brown) wires. Make sure you route it correctly and tie/tape it off.
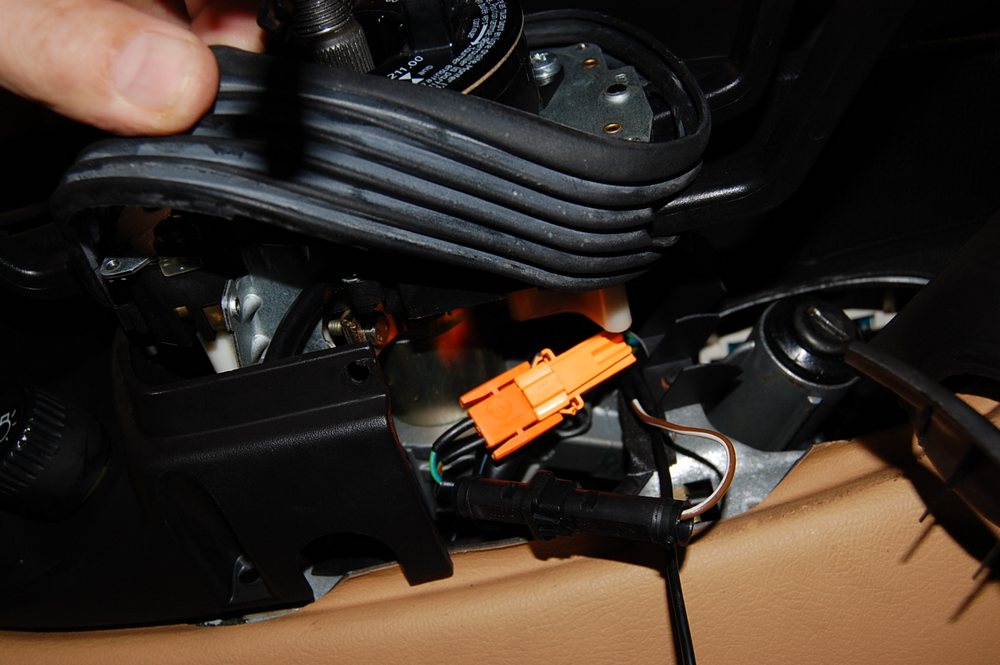
Here is the ground wire way up front, you can't see the wire I added, only the insulation displacement connector and the brown OEM ground wire.
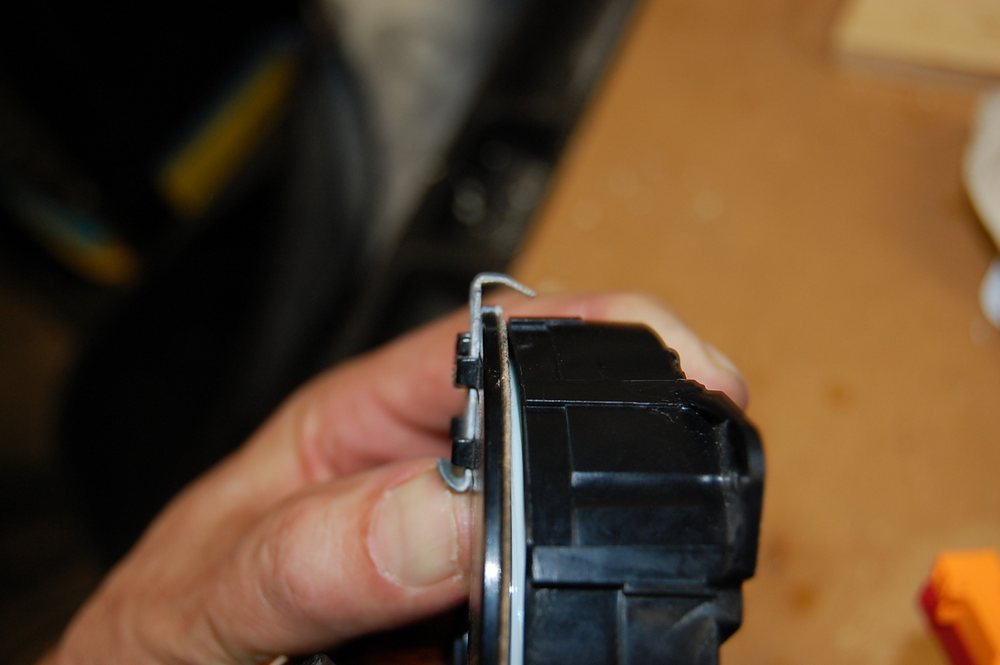
I might of gotten ahead of myself, before you put the clock spring back in, you're going to want to modify the plastic cover and the steering wheel.
You will need to use the Dremel to open up the inside diameter of the hole where the clock spring sits. About 1/8" all the way around if not a little more. It doesn't have to be perfect because the wheel will hide it.
Here are pictures of before (doesn't fit through) and after.
The clock spring goes so that the connector sits on top, it's a tight fit when everything is all in there.
You not only have to modify the inside diameter of it, but you need to cut down the plastic pieces that stand it off from the steering column. I did not do this at first, and then after I install the steering wheel, it rubbed, and was terrible. The wheel did not move smoothly.
I used the wheel nut as a guide. See how high the stand off is with the wheel nut next to it? I cut it down with a Dremel to about or just longer than the wheel nut. This did the trick.
Here is the unmodified stand off:
The picture isn't great, but you can see it's about the height of the wheel nut, do this on all four stand offs.
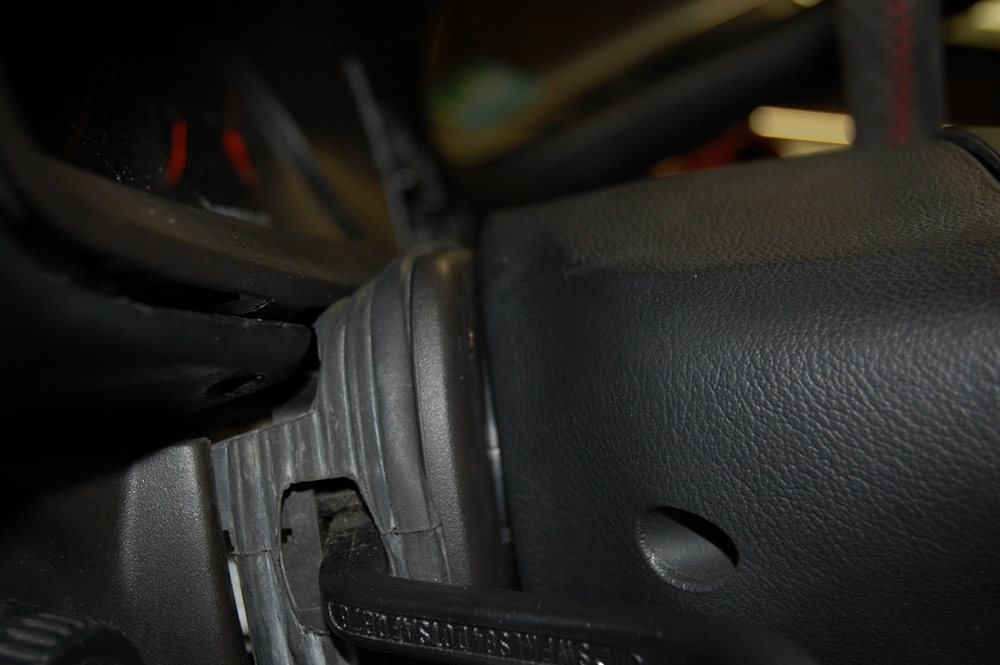
When you install everything, you need the basic clearance here....the first time I did it, there was no clearance between the two, and it rubbed. Kinda scary not having a free turning wheel. Always had to "break it away" when moving it.
When you do put everything back together, just put the rubber piece the best place and fit it can go back.
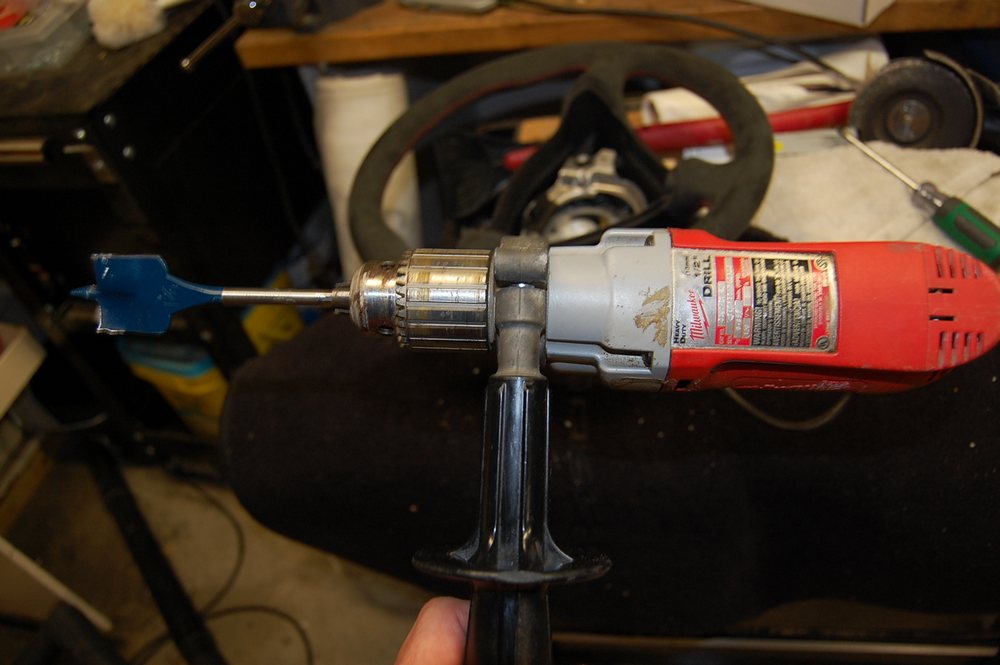
You have to modify the new steering wheel by machine out about 1/4" in depth on the nut side of the wheel. Otherwise you can't get the nut to engage.
Ideally, you would have a drill press and a 1 3/8" drill bit. I don't have a drill press, but I have a high torque, 0-900 RPM 1/2" drill and I bought a 1 3/8" wood drill bit. It easily cut into the aluminum. I machined it out over about 4 or 5 machining processes, where I did a trial fit. I vacuumed it out each time before putting it on the steering column. I got it to fit.
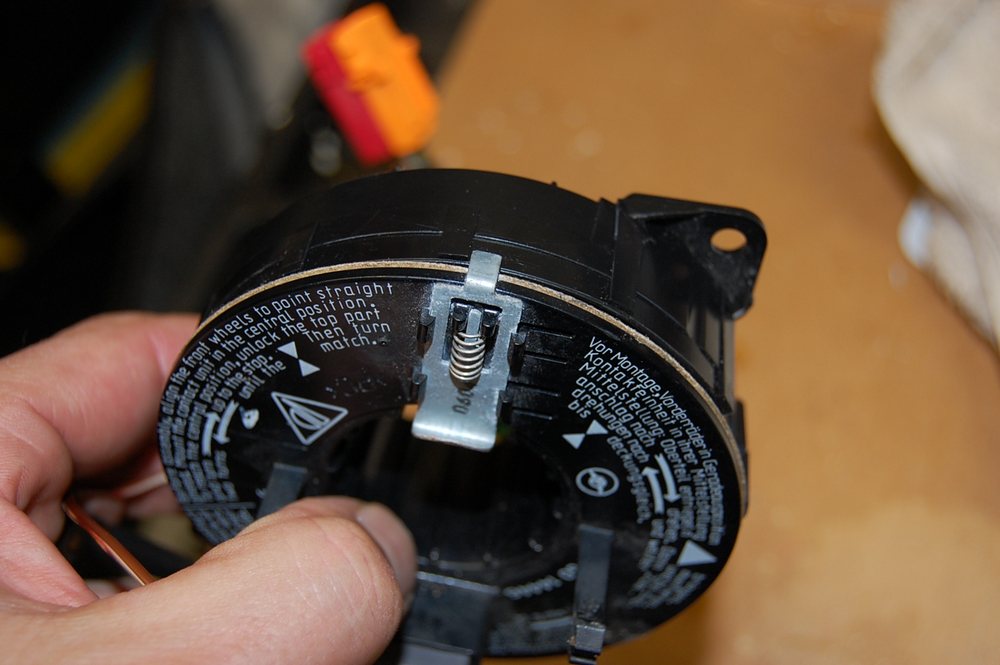
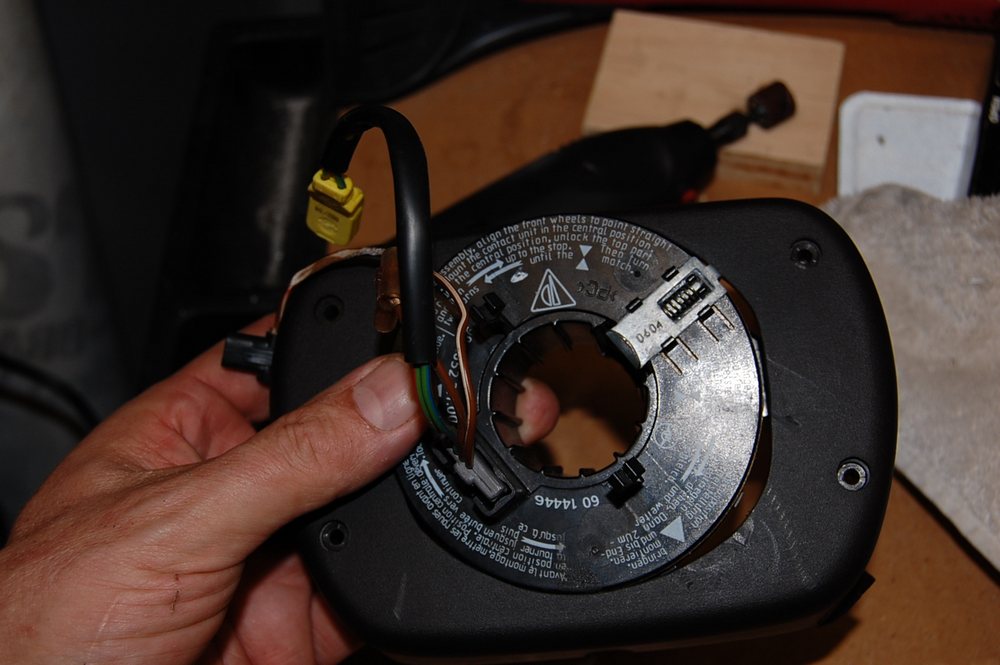
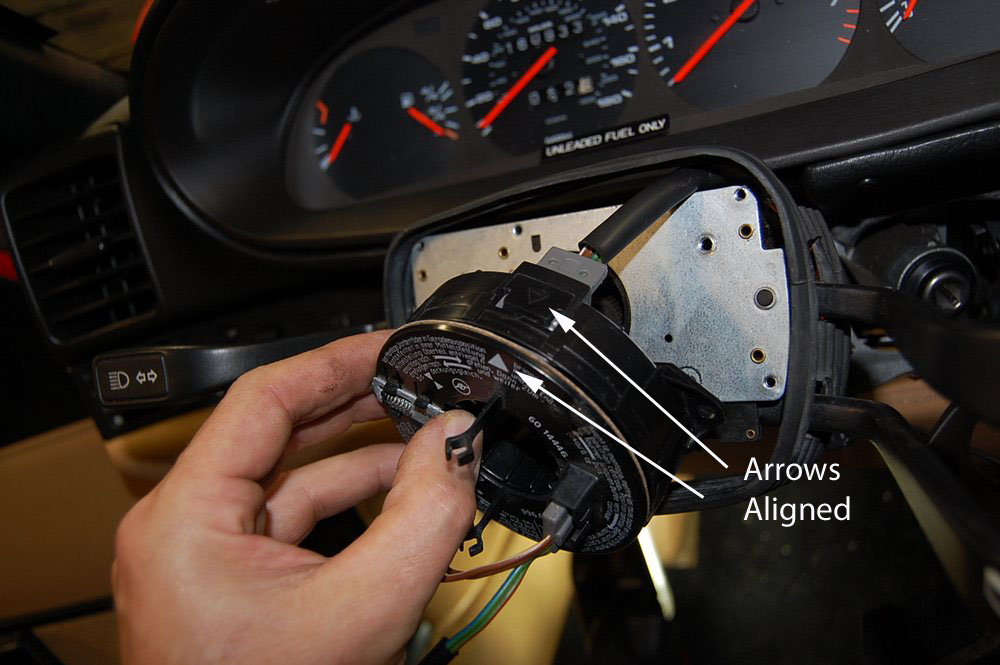
I did not mention how to set up the clock spring. It's really easy. The directions are actually on it.
Step 1: Ensure the steering wheel is aligned straight.
Step 2: Depress the locking tab to free it up so it rotates freely and turn it in the clockwise direction until it stops moving. It actually has a ribbon cable inside and at this point, all the slack is out of the cable. DO NOT force it past this point.
Step 3: Rotate it counter clockwise until the two arrow align (less than one turn). Once you are at this point, rotate it two turns counter clockwise (unwinds the ribbon cable) and then align the two arrows. Take your finger off the locking tab.
Step 4: Install the clock spring on the steering shaft.
That's it, this way in can turn the maximum clockwise direction without the ribbon cable being too unwound.
Here's the printed directions....right on the clock spring...that is genius!

Once everything is back on, screw the airbag back on to the steering wheel, once again, the angle of the T30 is very important, just be patient. Once you get one started, start the other screw, then tighten both.
Hook up the battery, check the horn, hopefully there will be no airbag light on and you'll have something like this, which is a great upgrade!
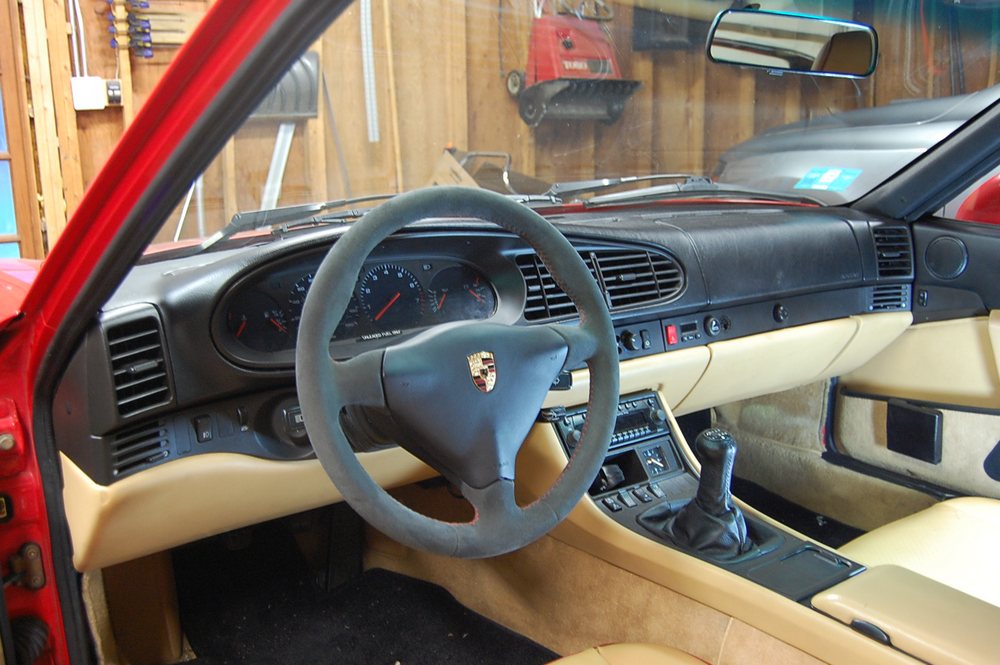
Hope this helps others!
To something more like this?
If so, this post is for you! It is based on the following threads I saw:
Thread Number 1
Thread Number 2
I know, it's iconic that I am posting a thread on how to retrofit a new steering wheel to my 20 year old car, but I haven't seen one in detail on the web. So why not?
First, you need to find yourself some new shiny for mounting on the steering hub. I initially choose a 4 spoke 993 steering wheel, but then found this 3 spoke alcantara wrapped wheel from a 993 GT3. I scored it very cheaply relatively speaking and I also found out that my four spoke wheel was actually MODIFIED by the previous owner (he forgot to mention this) and it would not fit a 968. A 4 spoke 993 wheel with airbag will run you $200-$350, a three spoke is more like $400 and up.
Once you find the steering wheel, you need a clock spring from a 964, 993 or 996, you can find them all over ebay for anywhere from $35 to $100. The part number I purchased was 996.652.211.00. The nice thing about this clock spring is that when it is removed from the car, you can't "unwind" it because of the spring loaded locking pin. I will discuss how to set it up later in the procedure, it's pretty much fool proof.
Things that you will need include:
� Steering Wheel
� Clock Spring
� Length of 16 gage wire about 20" long
� Insulation Displacement Connector
� Dremel Tool
� Torx T30 to Remove/Install Airbag
� 7/8" or Equivalent Metric Socket
� Various Basic Tools
Next step is to DISCONNECT the battery 3-4 hours before surgery. I read about this on the forum, this prevents the airbag light from coming on after everything is connected. I followed this rule twice (took me once to do the install, and another time to adjust everything) and it worked like a champ.
Put your key in the ignition and unlock it. Turn the wheel so you can get your T30 on the airbag torx screw (2) on the back of the wheel. The angle has to be just right to engage it, you'll know when you find it. Unscrew both screws and the airbag will basically fall in your lap. It is still connected by the one connector, just pry it off with a small screwdriver.
You can see the two airbag screws in the background, disconnect the red connector:
Once that is done, using the proper socket, unscrew the nut. See the blue plastic piece in the picture? That's the ground for the horn. This is the difference in setup between the old and new style steering wheels/clock springs. This uses a slip ring and brush (the brush is on the back side of the blue plastic piece).
That brush rides on this slip ring, the brass piece in the picture. This is what makes up the ground circuit for the horn relay. It goes something like this:
+12 VDC > Clock Spring > Wire > Horn Button > Wire > Slip Ring > Horn Relay Coil > Ground Connection
Here's the spring loaded brush that rides on the slip ring:
Take the four screws out and remove the plastic beauty cover.
To remove the clock spring, it's two screws. Take it off and you can actually pull the wires out and disconnect the connectors, or just wait until you get more clearance after taking the trim off.
At this point, do yourself a favor and take the trim off so you can get to the 8 mm bolt that holds the turn signal switch assembly tight to the steering column, it will need to be pushed back. I fought this and ended up doing this later. It's easy and quick. To get the trim off you:
� Pop the two heater slide pieces off
� Using a trim removal tool, pop the HVAC cover plate off
� Unscrew the four screws holding the HVAC panel in place
� Unscrew the visible screws under the steering wheel
� Remove the rubber piece around the ignition
� There is one additional screw to the left of the ignition, I did not find this one and broke the plastic piece
� Take the left side trim cover to the left of the fog light switch off, loosen the two screws
� Remove all the pieces.
� If they don't come off easily, you are missing a screw
It's hard to see but there are a few screws here, and once you get these off, you have to move the rubber piece up and out of the way, there is one adjacent to the ignition switch.
Loosen these two screws, I did not have to remove them. Either way, it's only a few seconds.
You will need to loosen the 8 mm nut in the below picture, and then push the switch assembly forward as much as you can, which will most likely be 1/2" or so. Once it's move forward, tighten the 8 mm nut. It's the nut at the 6 o'clock position.
You will need to modify the NEW clock spring with parts from the old clock spring, and add an extension wire, which will ground out the horn circuit.
Cut the one connector off the new clock spring which has the brown/white and brown wire. Cut the brown/white off the old clock spring. Solder and heat shrink the two pieces together. This plugs into the OEM connector.
For the brown wire, just solder on a new 20" or so length wire. This is you new ground. the new wheel DOES NOT have the slip ring, and it needs a hard ground.
Once this is done, install the new clock spring. You're going to connect the brown ground wire to the forward left (at the left of your feet on a LHD car) to a ground wire. Look way up in there and you'll see the grounding points at the forward corner of the passenger compartment. I just used an insulation displacement connector and connected it to one of the ground (brown) wires. Make sure you route it correctly and tie/tape it off.
Here is the ground wire way up front, you can't see the wire I added, only the insulation displacement connector and the brown OEM ground wire.
I might of gotten ahead of myself, before you put the clock spring back in, you're going to want to modify the plastic cover and the steering wheel.
You will need to use the Dremel to open up the inside diameter of the hole where the clock spring sits. About 1/8" all the way around if not a little more. It doesn't have to be perfect because the wheel will hide it.
Here are pictures of before (doesn't fit through) and after.
The clock spring goes so that the connector sits on top, it's a tight fit when everything is all in there.
You not only have to modify the inside diameter of it, but you need to cut down the plastic pieces that stand it off from the steering column. I did not do this at first, and then after I install the steering wheel, it rubbed, and was terrible. The wheel did not move smoothly.
I used the wheel nut as a guide. See how high the stand off is with the wheel nut next to it? I cut it down with a Dremel to about or just longer than the wheel nut. This did the trick.
Here is the unmodified stand off:
The picture isn't great, but you can see it's about the height of the wheel nut, do this on all four stand offs.
When you install everything, you need the basic clearance here....the first time I did it, there was no clearance between the two, and it rubbed. Kinda scary not having a free turning wheel. Always had to "break it away" when moving it.
When you do put everything back together, just put the rubber piece the best place and fit it can go back.
You have to modify the new steering wheel by machine out about 1/4" in depth on the nut side of the wheel. Otherwise you can't get the nut to engage.
Ideally, you would have a drill press and a 1 3/8" drill bit. I don't have a drill press, but I have a high torque, 0-900 RPM 1/2" drill and I bought a 1 3/8" wood drill bit. It easily cut into the aluminum. I machined it out over about 4 or 5 machining processes, where I did a trial fit. I vacuumed it out each time before putting it on the steering column. I got it to fit.
I did not mention how to set up the clock spring. It's really easy. The directions are actually on it.
Step 1: Ensure the steering wheel is aligned straight.
Step 2: Depress the locking tab to free it up so it rotates freely and turn it in the clockwise direction until it stops moving. It actually has a ribbon cable inside and at this point, all the slack is out of the cable. DO NOT force it past this point.
Step 3: Rotate it counter clockwise until the two arrow align (less than one turn). Once you are at this point, rotate it two turns counter clockwise (unwinds the ribbon cable) and then align the two arrows. Take your finger off the locking tab.
Step 4: Install the clock spring on the steering shaft.
That's it, this way in can turn the maximum clockwise direction without the ribbon cable being too unwound.
Here's the printed directions....right on the clock spring...that is genius!
Once everything is back on, screw the airbag back on to the steering wheel, once again, the angle of the T30 is very important, just be patient. Once you get one started, start the other screw, then tighten both.
Hook up the battery, check the horn, hopefully there will be no airbag light on and you'll have something like this, which is a great upgrade!
Hope this helps others!


Trending Topics
08-19-2014, 01:06 PM
#8
Drifting
Paul -
Thanks for the write-up. Can the horn be activated simply by pressing on the 2 and 10 o'clock positions of the triangular horn pad or do you have to press on the center of the pad? I like the former because those precious split-seconds count. Thanks.
Thanks for the write-up. Can the horn be activated simply by pressing on the 2 and 10 o'clock positions of the triangular horn pad or do you have to press on the center of the pad? I like the former because those precious split-seconds count. Thanks.
08-19-2014, 07:47 PM
#10
Team Owner
Join Date: Oct 2009
Location: one thousand, five hundred miles north of Ft. Lauderdale for the summer.
Posts: 28,705
Received 213 Likes
on
153 Posts
congrats, and welcome to the badass 996 steering wheel club. you kicked ***.
oh, and the secret handshake.... www.youtube.com/watch?v=FgY7eaYrc7A
oh, and the secret handshake.... www.youtube.com/watch?v=FgY7eaYrc7A
04-18-2015, 01:44 PM
#12
Track Day
Join Date: Feb 2015
Location: 02100 Rieti Italy
Posts: 15
Likes: 0
Received 0 Likes
on
0 Posts
Hi Paul and thanks for answer.
Why the 986/996 clock have 6 electric wires and 3 connector?
I need only 3 wires (common, up, down)...
Can how I find the right wire?
Thanks.
Pat
Why the 986/996 clock have 6 electric wires and 3 connector?
I need only 3 wires (common, up, down)...
Can how I find the right wire?
Thanks.
Pat
04-20-2015, 10:16 AM
#13
Rennlist Member
Thread Starter
The orange and red connectors are for the air bag and horn, my instructions show how to modify them for the 968. I would then assume that the blue connector is for the tiptronic. If you want, I can most likely figure it out with my 996 wiring diagrams....but it should be easy enough to test with a multi-meter. Do you have these components? Or are you just thinking about it now? Regardless, it would be easy to do.
04-29-2015, 09:02 AM
#14
Track Day
Join Date: Feb 2015
Location: 02100 Rieti Italy
Posts: 15
Likes: 0
Received 0 Likes
on
0 Posts
thanks paul. the blue connector is for the tiptronic, ok. but the blue has only two wires ... the tiptronic requires 3 wires (common, up, down).
What is the black connector (picture attached) in the clock side airbags?
Thanks.
Pat
What is the black connector (picture attached) in the clock side airbags?
Thanks.
Pat