When you click on links to various merchants on this site and make a purchase, this can result in this site earning a commission. Affiliate programs and affiliations include, but are not limited to, the eBay Partner Network.
Hey Cloud9! There are no secrets! I'll do the best I can:
Bilstein Escort Cup shocks, front and rear. Spring rate 900 front / 700 rear
M030 Front and rear sways with Racers Edge drop pinks and components
Had Delrin in the rear spring plate which I just replaced with Elephant Racing Polybronze bushings
Racers Edge Camber plates (front)
Racing dynamics upper chassis brace
Cage is not attached to the suspension. It is a full cage welded in. Pretty standard, but has a brace above the dash, which makes me feel safe!
Square set up 275/40R17 on 17x9.5 Porsche Cup 1 wheels.
Racers Edge A arm spherical bearings, front
RS BARN lower chassis brace
Elephant Racing Rear monoball trailing arm bearing
The car is lower than stock and height adjustable via the coilovers. I'm not sure what the actual ride height is.
What do you mean by: "Anything to compensate for the subterranean front roll center ..."
Thanks for sharing your car's information, and sorry for the slow response - been very busy with work. Our cars have a lot of the same (or similar) components. I seem to remember from your thread on your amazing torque tube repair that yours is a bit closer to a pure track car than mine; I still drive mine on the street, though mostly to and from the track. When I was doing the mods, I had considered possibly racing it someday, but I have bashed all thoughts of ever doing that out of my head - never in a million years - way too much constant maintenance, plus I don't have a trailer, a truck, or room for either, so it's strictly noncompetitive sessions for me at the local track (Driveway Austin), while I save up to compete in an arrive-and-drive series.
Considering it's just my "training tool", I went WAY overboard on the mods - like an addict, I just couldn't stop. Here are the major mods:
- Basically one of everything Racers Edge sells - solid/spherical bushings everywhere, camber plates, etc., except I went with the delrin spring plate bushings rather than the polybronze
- 2.25" i.d. Eibach coilovers (torsion bars deleted), 700/800 lb front/rear
- Racers Edge heavy duty geometry correcting control arms
- Racers edge billet hubs
- Double-adjustable Moton Clubsports with remote reservoirs (ridiculous overkill)
- Lowered about 1.5"
- Track oriented alignment - about -3.5 degree camber up front, about -2.3 degrees in back, but very little toe
- Welded half cage
- Design 1 Racing strut brace
- Design 1 Racing caster block brace
- Teflon steering rack bushing
- Weltmeister adjustable front sway bar
- M030 3-way adjustable rear sway bar
- Sparco Evo racing seat
- About 220 lbs taken out of the car, including fixed headlights, removal of front and rear bumper bars, 6 lb lithium ion battery, and too much other stuff to list. Still disappointingly porky at 2870 lbs.
- 944 Turbo S calipers with Zimmerman cross-drilled rotors
- 17 x 10.5” forged Signature SV103 wheels (49 mm offset), with 275/35-17 Maxxis RC1 tires all around. No spacers or fender modification were needed. The wheels weigh about 18 lbs.
The main goal here is to have fun, so I won't critique anything you or anybody else has done to their car, but I do have a couple of comments/questions. How did you come to select your tire size? 275/40-17's are about 0.7” taller than stock, which effectively lowers your numerical final drive ratio, costing you some revs coming out of the corners. Also, this is a big, heavy tire, and your wheels tip the scales at 27.5 lbs, and 275 is pretty wide for a 9.5” wheel on a track car. This is a controversial topic with many opinions, but Grassroots Motorsports has done a fair bit of investigation of the optimal wheel/tire width relationship, and concluded that it’s the width of the wheel that really matters; how wide of a tire you squeeze over it has little effect. Check out their December 2013 issue, where they cover this topic pretty thoroughly. So, next time around, you might want to consider a 245/40 or 255/40-17 – they’re a little cheaper, too. Just a suggestion.
951and944S has already commented on your springs. Those are an interesting choice, but I can understand the reasoning behind going so much heavier in the front than in the back (in terms of wheel rate). The car came from the factory with a staggered set-up, so when switching to a square set-up, you’re effectively adding more grip to the front relative to the rear, which pushes the bias toward oversteer. I originally had 1000 lb rear springs to go with my 700 fronts, and the car was a twitchy, tail-happy, uncontrollable mess. According to the formula for calculating spring rates based on the “optimal” spring frequency of about 150 cycles/min in the front, I should be running about 500 lb springs in the front, but I’m reluctant to move in that direction because I don’t want my car to get too tail-happy like it was before.
Regarding my comment on a subterranean roll center, what I meant is that when you lower a car, particularly one with a Macpherson strut front suspension, you of course lower the center of gravity, which is good, because it reduces the overall weight transfer during cornering, which increases grip, but it actually lowers the roll center, the point about which the car theoretically pivots during cornering, more than it lowers the CG. This is an outcome of the fact the when the car is lowered, the control arms’ inner attachment points are lower than the outer attachment points (the ball joints) – the arms are no longer parallel to the ground, in other words. The distance between the CG and the RC is called the roll couple, which constitutes a level arm that effectively induces sway during cornering. The longer the roll couple, the greater the torque about the lever arm, the more the car want to sway. This is fixable, but it’s either expensive, through the use of longer ball joint pins which bring the control arms back to level, or some people actually raise the inner control arm mounting points. To use the longer ball joint pins, you need the Racers Edge arms, which cost $1600. Also, it gets complicated, because if you raise the front roll center without simultaneously raising the real RC, you create a tilted roll axis (the line connecting the front and rear roll center), which does bad things, I’m told. There’s a guy named Bruce Karger in Houston who makes a modified torsion bar carrier replacement with raised trailing arm attachment points to balance out the front/rear roll centers. I have one of these (I know, what a shock), but haven’t installed it yet. There is a ton written on this general topic – just google roll center/center of gravity, and enough stuff will pop up to make your head spin.
All this stuff is interesting and good fun, but to me, the real goal of this hobby is the driving; I just want my car to be capable enough to not embarrass me, although I’ve clearly gone way over the deep end with all my mods. Do you have any type of data acquisition system? I have a pretty high end Aim system, including an Evo4S data logger, a GS Dash unit, a Smartycam HD video camera, and analog sensors for brake pressure, throttle position, and steering angle (I built my steering angle sensor myself). My next step is to corner the local track pro to do a few baseline laps in my car to see where he’s faster (no doubt everywhere!), and more importantly, why? Aim is hosting a data acquisition analysis hands-on seminar in my town in a few weeks, and I plan to go and immerse myself in the nuances of trying to understand where I have opportunities to improve my driving to lower my lap times. Then, once I’m satisfied I’d wrung about everything I can out of my car in its current configuration, I plan to install the longer ball joint pins, the bump steer kit that needs to go along with it, and Bruce’s bar, and rebalance everything with the appropriate springs, sway bar stiffness, and lastly, shock compression/rebound settings, see how much faster that makes the car, and recalibrate my driving to take advantage of it.
Anyway, sorry about the very long post, but I’d be interested to see if other people chime in with what they’ve done to their cars, what has worked, what they wished they hadn’t done, etc., so we can all learn from each others’ experiences.
Last edited by Cloud9...68; 01-30-2019 at 11:35 AM.
I have a similar game plan for my car and continuing to track / DE it but i'm still a ways behind where you're at.
I use to play the GP F1 simulator games on the PC with force feedback wheel and pedals. Would spend hours developing car setups, data logging laps and overlaying graphs...make a change, run 2 hot laps and in, graph, make adjustments, repeat. The graphics of the older game were not great by today's standards but the physics, data analysis, graphing and process of developing the car is/was all relevant and is what I would like to be doing with my 951...or as close as i can recreate. Sounds like you're there.
That's quite a conicidence, since I'm toying with the idea of doing what you're doing, but in reverse. In other words, I'm interested in building a simulator to use to practice my technique between sessions. From the research I've done, it appears possible to build a home simulator that does a good enough job of replicating the real-life experience to actually help you become a better, faster driver. "Free" extra, precious seat time, in other words. The only problem is that such a simulator, without motion, runs around $15K, including a good direct drive wheel, VR set-up, the rig, a seat that matches the one in my car, quality pedals and shifter, and a computer capable of running everything with high quality resolution, and of course the installation and set-up. To add motion, it's more like $30K. Would you mind if I send you an IM or two as I get closer to pulling the trigger on this, since you're clearly very knowledgeable and experienced with this stuff? Thanks.
You're free to PM me but I was playing a game on the PC and that has nothing to do with today's simulators.
I did build an adjustable race seat base and pedal deck pretty easily though. I have solid core doors on steel post legs for tables in my office/studio. The seat and pedals slide up and under the desk, I use a 43" TV for a monitor, wheel attaches to door/desk edge. No motion, I wear full over ear headphones and with the lights out I can get pretty immersed in it.
There's a couple good threads on simulators going in the race category. They've also had me thinking about simulators and maybe trying a sports car game. It's really the data, graphing and overlay capabilities that I liked in the GP games so I would want to find those capabilities in a sports car game as well. I haven't researched any of the latest games or simulators other than reading the mentioned threads.
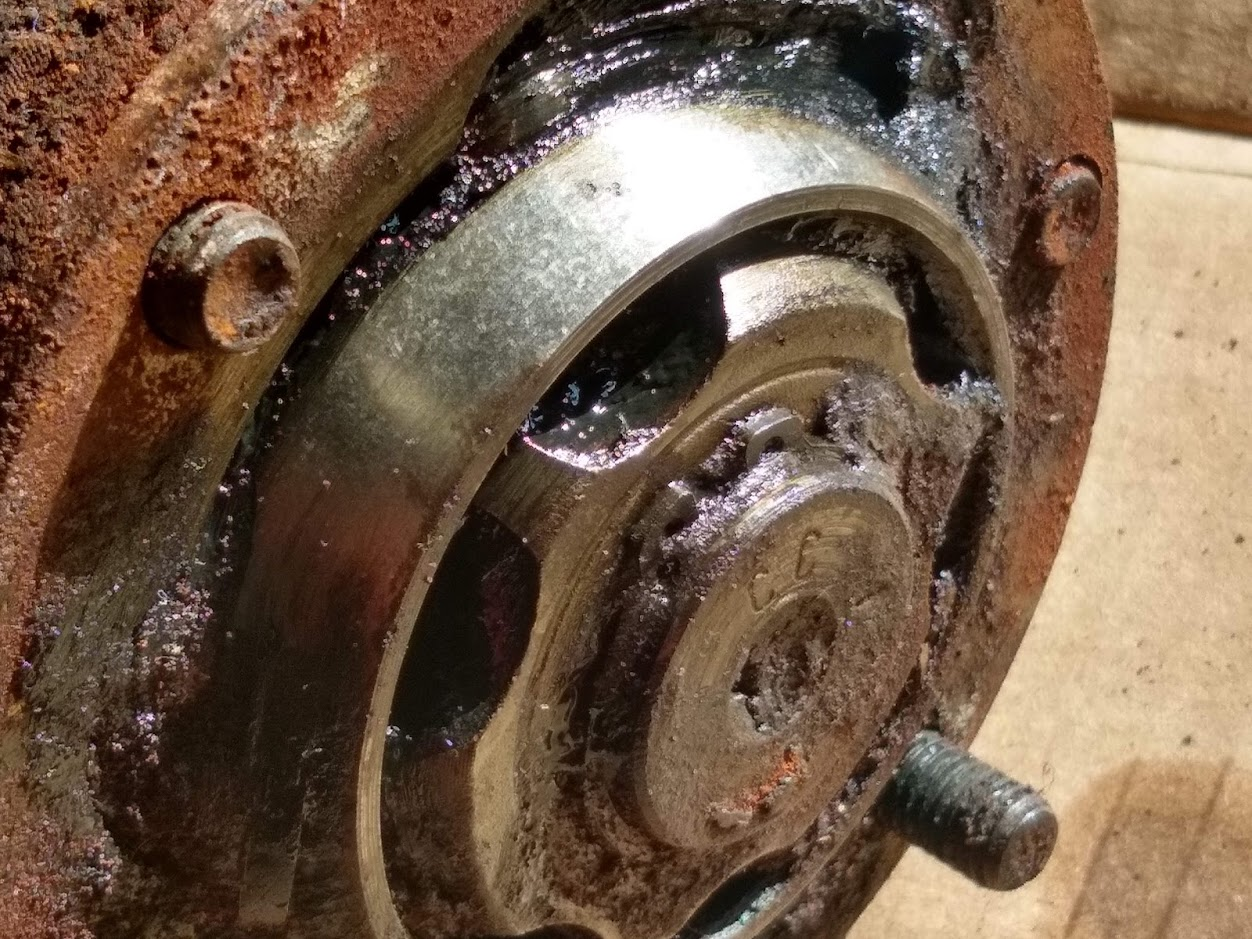
After cleaning CV joints last week and pulling some spares off the shelf, I selected 4 CV joints that had little to no signs of wear. Then greased them with Redline CV-2 and installed new OKG boots. All clean and ready to go into the car. One of the spares that I had. It doesn't look so great right now, but a couple of these showed just street-car wear and cleaned up beautifully.
I used old gasoline as a cleaner. This picture shows the outside surface of the three pieces. The outer housing has 3 lines toward the outer face. The middle cage has a flatter edge on the outer face (the inner face has a more pronounced bevel). The inner cog has a flat outer face with a single grove line.
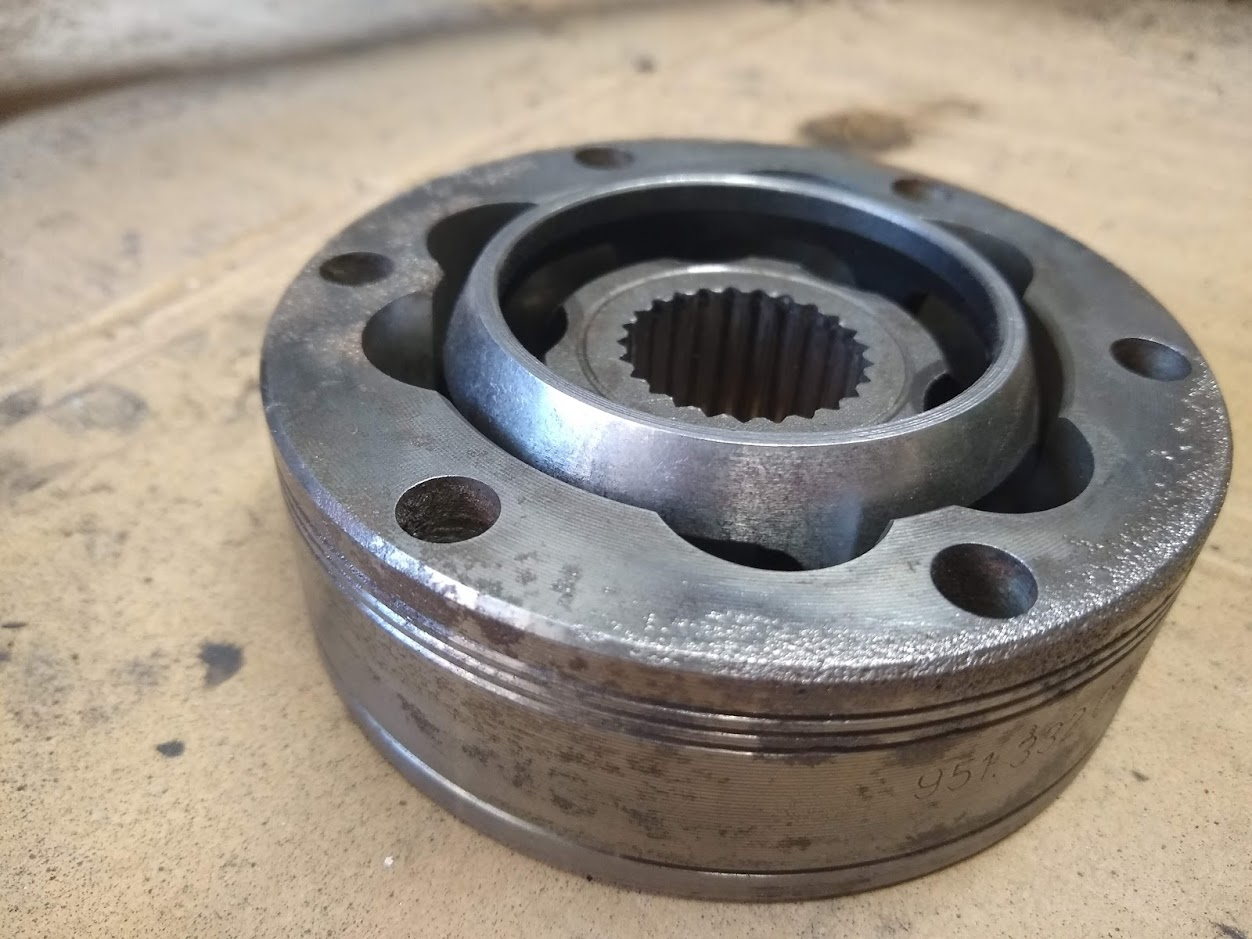
Four best CV Joints which were then stuffed with Redline CV-2. We managed to keep the work area very clean in the process.
I haven't posted each step along the way, but the car is whole! I've driven it around the block a few times. The clutch hydraulics work, but aren't right yet. I have a new slave because I had one on the shelf and I just ordered a new master clutch cylinder; then I'll bleed again. Bleeding the clutch is a pain and I've been doing it from the bottom. Next time I'll pitch the car rear end up which is supposed to help.
There is a small bang noise when I turn the wheel from center to either side. The noise comes from the opposite side of the turn (turn left, the noise is on the right side) and the noise is in the rear of the car. It actually sounds like the band is up high, near the top of the rear hatch where the hinges meet the frame. I think it must be something in the suspension and the vibration travels and only sounds like it is from the top. I am very certain that the entire rear end is tightened to torque specifications, but I will have to go through and check every bolt again. Could it be the natural noise of any of these new items??
1. Guard LSD - could it be that engaging each time the car changes direction?
2. I filled the transmission mount thus making in semi-solid. Could that stiffness be creating noise as the pressure shifts left to right and back again?
3. New Monoballs at the trailing arms
4. New poly-bronze bushings at the spring plate.
Give the hatch pins another half a turn in and see if the noise changes.
it is best to cycle the shocks through their travel multiple times before installation in the vertical position to purge the gas.
Thomas - I love it when you chime in because you know what you are doing, whereas I am learning as I go. Tightening hatch pins is easy enough and possibly needed as I installed a Lexan hatch about a year ago.
The shocks/struts did lay vertically (or maybe diagonally) for a few months while the car was apart, so this too is a superb thought. I'm trying to imagine cycling them through their travel and am thinking that's a physical exercise. Is there a good method for that? Remove the spring I guess. Does one keep the shock vertical? Do you hang it in the car from the top mount and push it by hand? Or use a jack against the lower mount? Do they move with simple arm strength once the springs are off? I've seen pictures of shocks in a press; is that the preferred method? (I have a press)
I'm curious to know some details.
you would need to pull the units off the car and remove the springs (and bump stops) to cycle them through their full travel while the units are upright.
if you set both units side by side, you can get the rebound adjustments synchronized. not really dynamic testing put close enough.
I took the rear shocks out to bleed them. Notice how close they are tot he trailing arm. I'm sure they have been this way, but no sure it's the best thing. Comment if you feel there is a solution to that or if it is just normal.
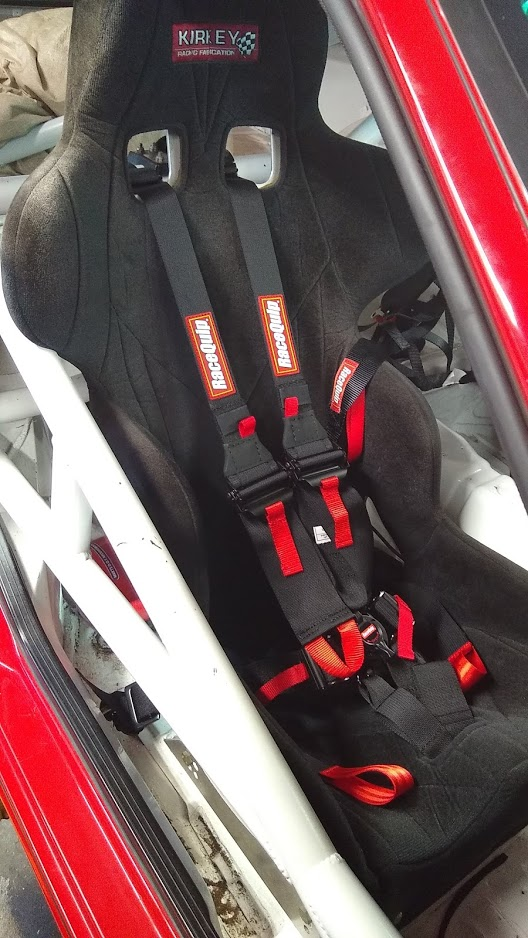
Then new seatbelts from Trackside Tim. Great prices and I am really pleased with the topnotch hardware. These are Racequip belts, FIA, good for 5 years and so much cheaper than Sabelts and Schroth and others. I have a friends car in the garage and these belts are just as nice as his Schroths. The adjustment hardware is all easy to use, the camlock is superb. The belts came with clip in hardware and eyebolts for all 6 ends. Everything you need to install and any situation.
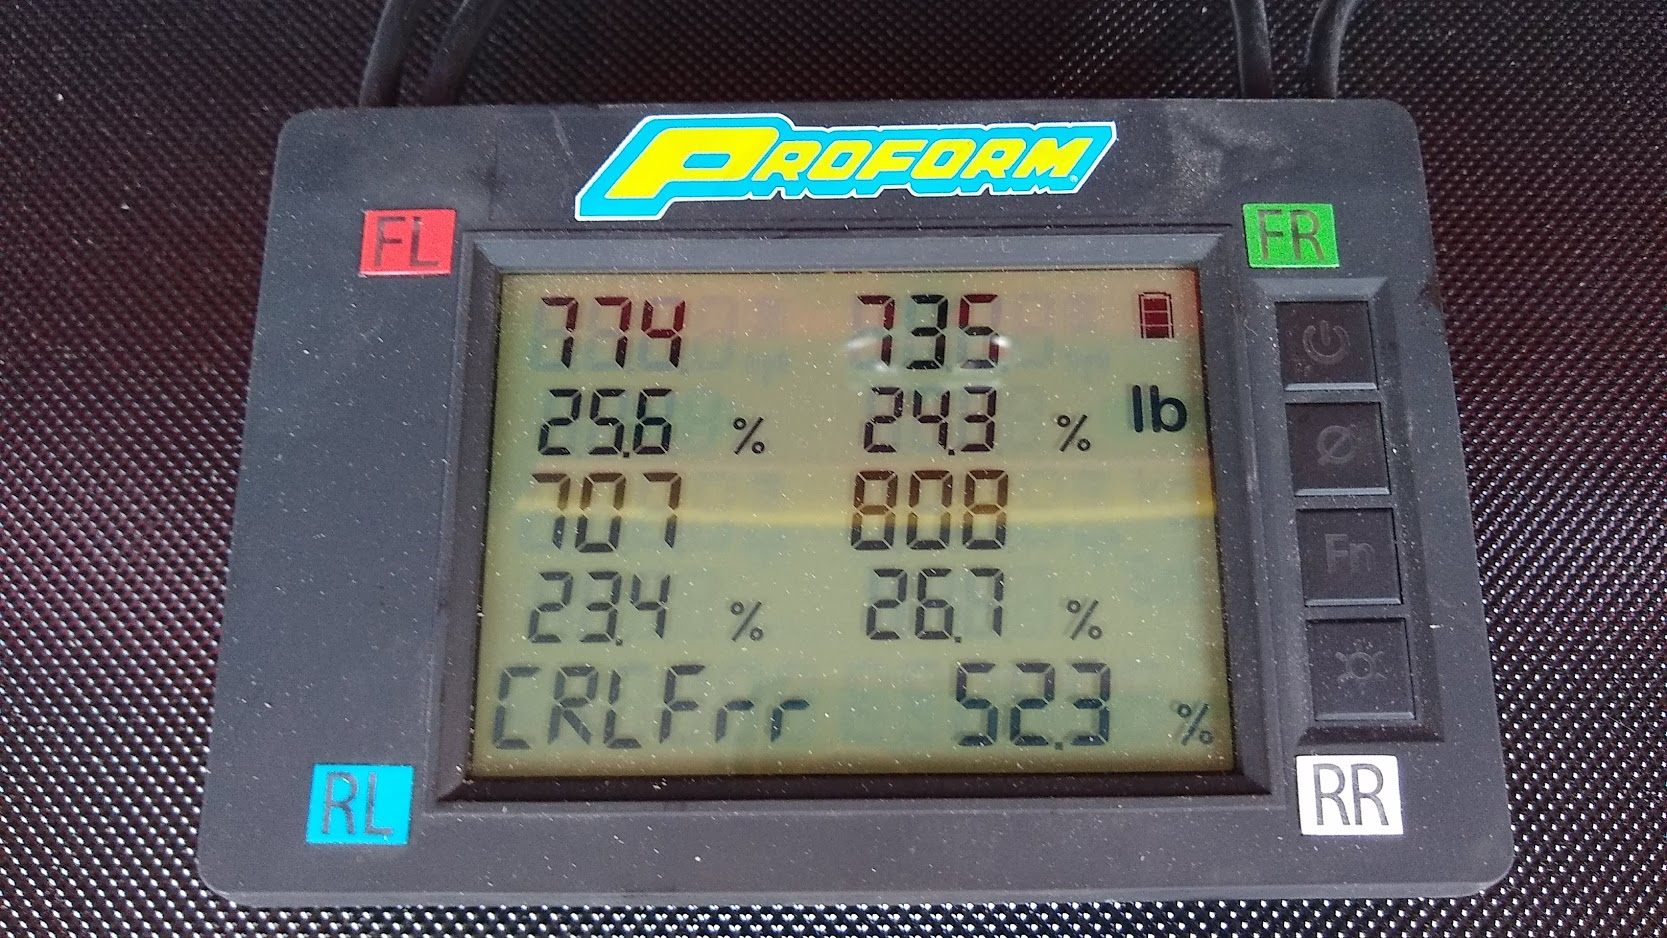
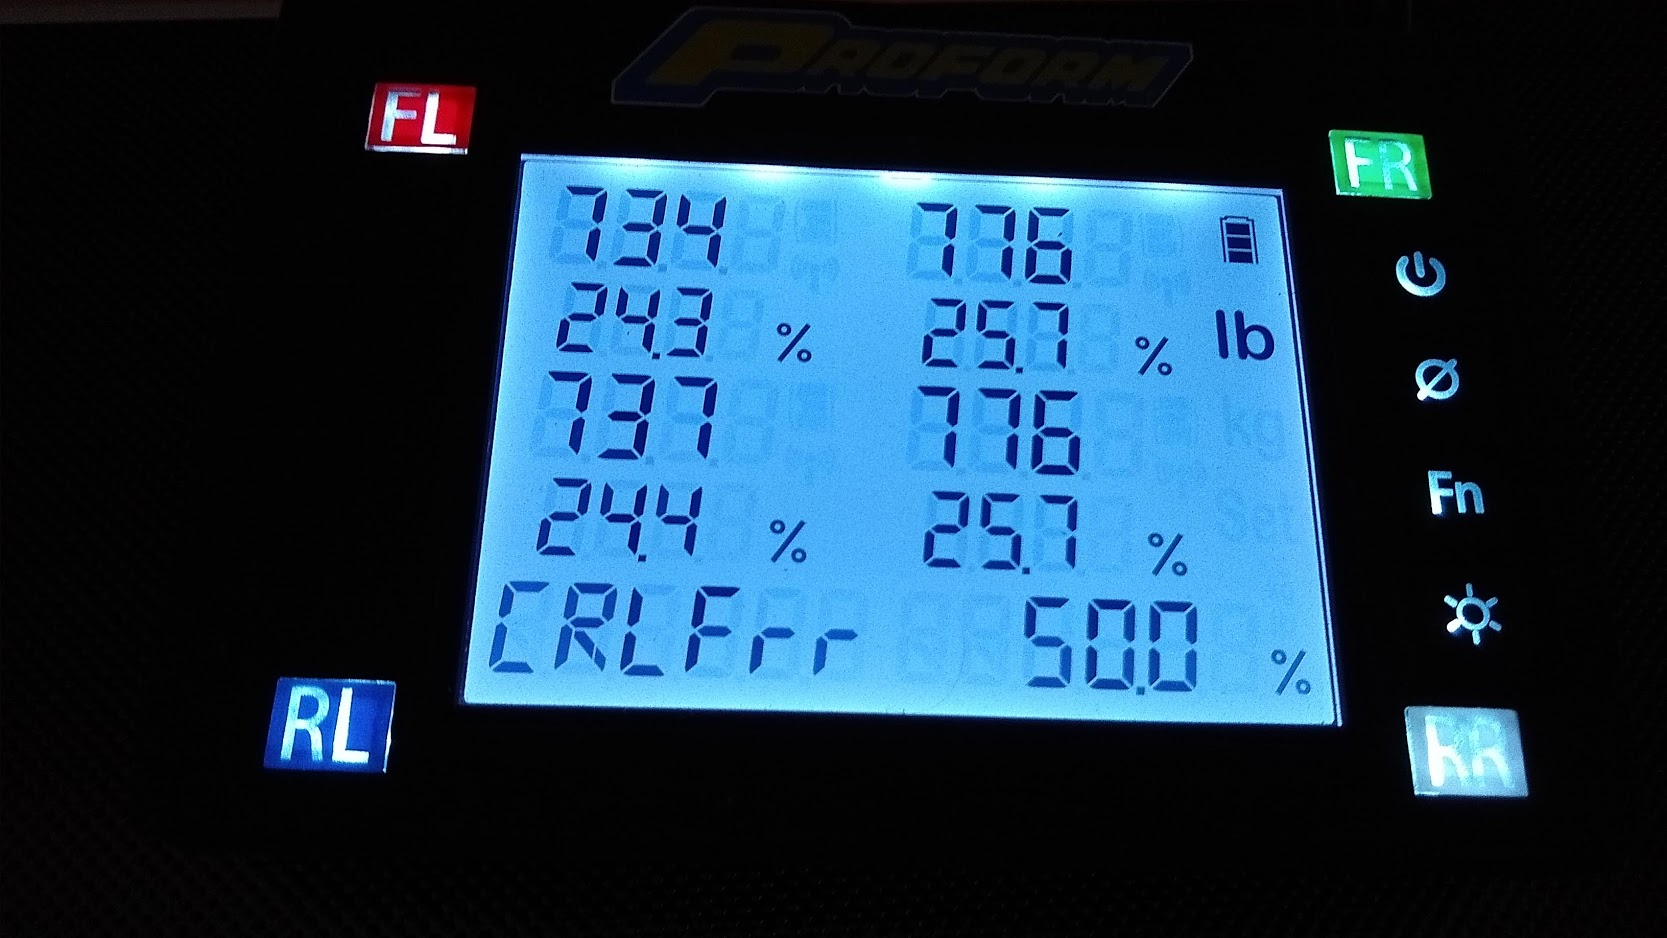
And I've started the alignment and corner balance process. I haven't messed with the alignment, but I wanted to play with the scales first. Here's the before numbers for a total weight of 3023 pounds.
And here is after messing around with the Springs. In fact I'll be redoing this entirely because I left the sway bars on. It's all a process that keeps getting redone as you move closer to the desired numbers.
I'm in the middle of major suspension work myself (installed extended ball joint pins from Racers Edge to bring the control arms back to parallel to the ground after significantly lowering the car, installed a bump steer kit to compensate for the longer ball joint pins, and I'm in the process of installing one of Bruce Karger's roll center raising, spherical bearing locating spring plate, trailing arm mounting bars). I was shocked to find out how much the longer ball joint pins affect the motion ratio. With the stock pins (and resulting tilted control arms), my motion ratio was a ridiculous 0.65. With the extended pins, it's back to a more normal (for a strut suspension) 0.88. I'm very confident in these numbers, as I used a very painstaking process to measure the deflection of the center contact patch of the tire relative to that of the strut, and got very repeatable results in the compression and rebound directions. So, for the past five years, I've been running a much lower front wheel rate that I had realized. No wonder the car has always had so much trouble keeping its rear end planted when accelerating out of turns!
I also installed a Weltmeister adjustable front sway bar a few months ago, and was perplexed why there was such a massive amount of preload. The control arm and the sway bar were too close to each other to allow adjustment of the drop link to remove the preload. But once I installed the longer ball joint pins, enough space opened up between the arm and the bar to give me plenty of room to set the bar to a neutral, nonloaded setting at static ride height. So, a word to the wise - lowering these cars has significant side-effects that need to be dealt with.
My car had delrin spring plate bushings, and at the start of this process, I found that the passenger side trailing arm was frozen in place - with the spring removed, I couldn't budge the arm either up or down, even hanging on it with all my weight. But after setting it down and lifting it a couple of times, I found that the bind had disappeared. This is a bit of a mystery, but I suspect I've been getting intermittent binding for some time, which has probably contributed to my car's spooky handling characteristics. The Aurora spherical spring plate bearings that Bruce included with his bar should put a stop to this.
Once I get everything back together (I will probably install a softer set of front springs than my current 700 lb/in, as this gives too high of a suspension frequency with my newly-corrected motion ratio), it's on to corner balancing, and alignment, which I will also do myself. It's been an interesting journey - I never intended to become a suspension dynamic expert, but given the cost of having someone else sort my suspension, it made sense to educate myself enough on the topic to become dangerous. Oh, and I have the same Proform scales that you do. So far, I've been happy with them, and they cost a lot less than Intercomp.
Last edited by Cloud9...68; 04-24-2019 at 05:27 PM.
Nice detail Cloud 9. Thank you. I'm not sure what "motion ratio" Is or how to measure it, but I'm glad that you got the numbers where you want them.
Today we started the process more properly and removed half of the sway bars. The corner balance went to 51% and I'll come back to that at the end. We set up and squared our strings and worked on camber and toe in the rear. Wow, they are hard to deal with and maybe I don't really understand the system. The tools gets inserted to adjust toe and the camber is adjusted on the same nut as the sway bar bar drop link. My driver's side camber has a range of adjustment from -3.25 to over -5. The passenger side camber as a range of adjustment from -1 to -3.25. I was looking to have -3.9 rear camber, but I adjusted both sides to -3.25 as that was the only value that I could get both sides to. I'm trying to figure out if I assembled something incorrectly or if my plates aren't perfectly level. There's certainly more checking to do.
Geez you guys are beyond my level of understanding. The only thing I’ve done is put big reds on the front and stock front brakes on the rear. Also added RS Barn oil coolers. I will be interested to experience these new braking characteristics.


 01-29-2019, 11:25 PM