When you click on links to various merchants on this site and make a purchase, this can result in this site earning a commission. Affiliate programs and affiliations include, but are not limited to, the eBay Partner Network.
Making a Torque Tube - replacing the 968 achilles heel when used as a race car
Porsche 968 Torque Tube Repair
At Watkins Glen, my 1992 Porsche 968 developed a thumping vibration going up the Esses. The feeling came on rather suddenly and I thought I might have corded a tire. My 968 was purchased the prior year and had been prepped by the prior owner. I was driving my 14th day of the season and the car had been doing great. I came into the pits and performed an inspection including having other eyes on the car. The tires were fine but something was creating a vibration over 5000rpm. We found a broken support to the alternator, so I removed that, had it welded at a muffler shop and thought I might be back in business. No such luck. The car felt like it was misfiring. Into the trailer and home it went. Watkins Glen - I'll see you again next year!
With misfires, I decided to change the plugs and wires, checked leak down, and open the valve cover to inspect. All that did nothing, but refreshing the wiring is not a bad thing to do regularly on a track car.
Not being registered, I try to avoid driving the car around, but that had to be done. That's when I noticed the details of the car's behavior. The car could rev smoothly if in the garage WITH the clutch depressed, but if the clutch was released the car was rough. (that's because the central shaft spins with the clutch released) The car could also glide down a hill or with momentum smoothly if the car was in neutral, but the car shook if it was rolling and in gear. (Again, with the clutch pressed, but the transmission in a gear, the central shaft spins)
The 968 and 944 layout from front to back is: Engine, flywheel, and clutch, Torque Tube, transaxle. The engine seemed smooth and the Transmission was fine in neutral. I suspected the problems were in the clutch, flywheel or torque tube.
What is a TORQUE TUBE anyway? I think of a car as having a drive shaft with u-joints to provide for movement of the suspension. The torque tube acts as the drive shaft, but has a fixed steel outer tube with a rotating shaft inside which is stabilized with 4 bearings. The outer tube is bolted to the clutch bell housing and the transmission bell housing. In a 968 or 944, the entire drivetrain is void of u-joints. The only flexible section is the actual drive axle from the side of the transaxle (differential) out to the wheel at the trailing arm. The alignment of the engine's crankshaft, torque tube and transmission input shafts are all in a perfectly straight line. I'm not an engineer, but I can think of two benefits of a torque tube in this configuration over a traditional drive shaft. First, the inner shaft is the rotating part and is much lighter weight than having a large shaft rotating - we install lightweight flywheels to make an engine more responsive and a lighter weight shaft aids in that. Second, and perhaps more importantly, is that in the case of an impact, the transmission, torque tube and engine form a structural and sturdy beam down the center of the car.
Time to inspect my 968's clutch throwout bearing and start the dismantling process. That was first on my list. What I found was a very damaged front short shaft. The short shaft is unique to the 968. The torque tube of the 944 has an inner shaft that extends directly through the clutch and into the flywheel. Because of that, to change the clutch on a 944 you need to remove the transmission at the back of the car, detach the torque tube and slide it backward so that the shaft pulls rearward out of the clutch. The 968 has a different design to avoid the 20 hour process to remove the transmission and slide back the torque tube. The shaft in the 968 torque tube ends at the front of the tube and then has a "short shaft" which is a coupler that slides over the long shaft and into the clutch and flywheel. A 1" diameter access hole is found in the very front of the 968 torque tube to allow access to a bolt which releases the short shaft, then you slide the short shaft rearward and you can remove the clutch without removing the transmission. Here are a few telling photos.
Comparison 944 versus 968 front end of the torque tube:
944: The shaft protrudes and will go through the clutch and into the flywheel bearing.
968: notice how the shaft just ends.
First I removed the exhaust, then the starter, then the clutch slave cylinder, then the clutch bell housing access cover. Here's the first damage found. This is the bolt that tightens the short shaft onto the long shaft that is accessed through the hole near the front of the torque tube. Obviously, it has been rubbing against the inside of the tube.
Once the above bolt was removed, I was able to slide the short shaft back and here's the second reveal of damage. Because the shaft is not stable, the bearing in the flywheel has broken and the splines of the shaft have hit the tube that provides pressure from the clutch lever.
So clearly, the problem is found, but what's the cause. The cause is a bad design in the first place - a bad decision made in Germany in the late 1980's.
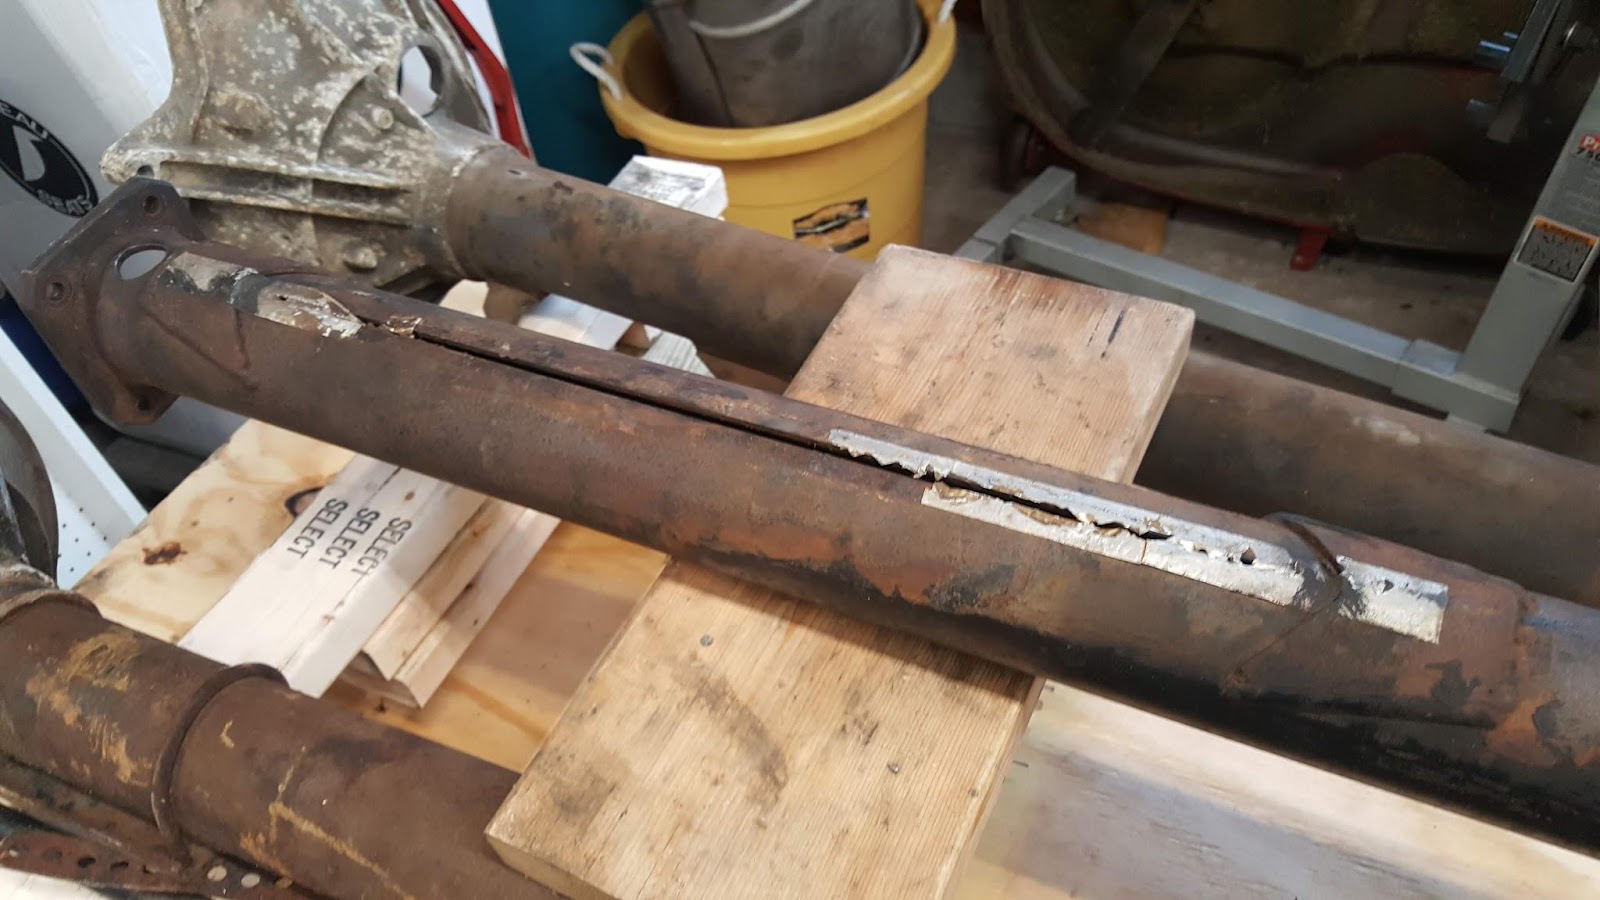
Torque Tubes from 1989 or 1990 through 1993.5 came with a split cut into the tube to reduce harmonics of the spinning shaft. In the next photo you see a long cut in the steel. That is the way the car was made - it's not broken, at least not by appearance. Part of the exhaust is still in place in the picture.
My 968 tube is the center tube in the next photo. It's the one with the foil tape exactly as seen in the previous photo. You might not even now anything is wrong, but in the middle of the area with the split, the tube has expanded by 0.037 inches.
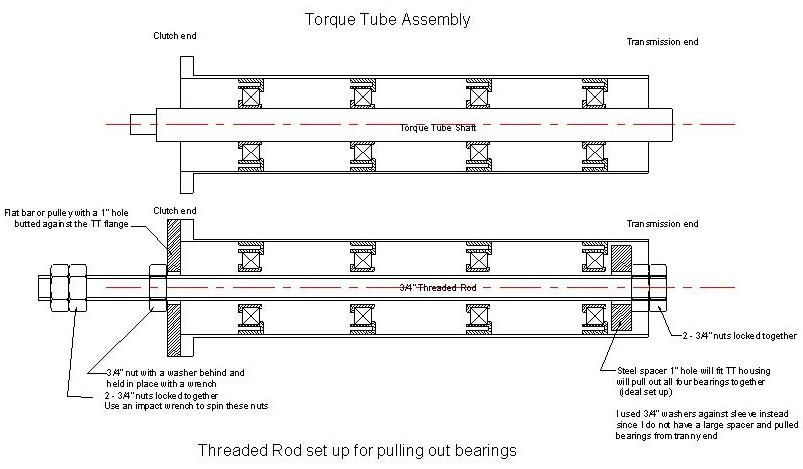
Here's a diagram of the 944 Torque Tube courtesy of Clark's Garage. Note the even distribution of the bearings.
In a split torque tube the front bearing is located in the area that has the split. If you race your 968, that bearing sees a lot of forces at high rpms and because the tube is split, the bearing is not held as tightly as is needed and the bearing slides rearward. Then the front part of the shaft is not well supported and it vibrates, creating the damage that occured in my car. Remember that these 968s have the 3.0 liter 4 cylinder motor that has two anti-vibration shafts. There is a lot of vibration sent from the engine crankshaft and it wants to push that tube open.
Replace the torque tube is the simple answer. It's a steel pipe with a shaft, four bearings, a steel front flange and a rear aluminum bell housing. Just order one, right? I wish. Some Porsche sites show that the part is discontinued while others have one to sell (maybe) for $3600. That's pricey for what seems like a simple part. In fact, it's far from simple and it's a critical component. But even worse, buying and replacing with another 968 split torque tube will lead to the same problem all over again. What is needed is a non-split 968 torque tube. Trying to find a used non-split 968 torque tube would be the obvious choice. Those were made and installed in some 1993 models and all (or most) 1994 model 968 Porsches. Not many of those cars existed to start with, so if you find one, buy it if you can.
I couldn't find one, so I made this plan. Buy a used 944 (pre 1989) non-split torque tube, cut it and reweld to match the length of the 968 tube and have it rebuilt with awesome bearings. The 968 tube measures 65-7/8 inches in length from the front of the flange to the rear face of the bell housing. The 944 measures 69-5/16 inches. That creates an obvious alteration of shortening 3-7/16" from the used 944 tube, but there are other things to do as well. The rear bell housings are different, but the 944 tube will mate up to the 968's G044 Transmission. I checked and it doesn't seal across the top, but there's not a lot you can do about that. The bolts holes fit perfectly and it will fit in the car. The front flange on the 968 has two sleeved bolts to provide more accurate and more secure orientation to the clutch bell housing. Also the front flange on the 968 has the corners removed. A critical item that can not be forgotten is the access hole on the bottom front of the tube to allow tightening of the short shaft onto the long shaft. Once we replicate the torque tube's exterior, I would send it out to get rebuilt with new bearings and a new inner shaft. Here are some detail photos of the differences mentioned:
968 Torque Tube:
And a 944 torque Tube:
Here are details to the project.
Step one. I purchased some used 944 torque tubes and had them shipped to me. I bought multiple as I have two 1992 Porsche 968. I found these at DCAuto.com.
Step two. I had already had conversations and email with the expert for Porsche Torque Tubes, Constantine Golovaty of Black Sea Research and Development. If you are reading this article, you likely have already read about Super Bearing and have seen Constantine online somewhere. He is in Georgia and rebuilds Porsche Torque tubes for many models. He has developed the Super Bearing which will be installed in my torque tubes. I also needed to find a good welder. David is the welder I know and is a local professor; he teaches welding at a University and is extremely talented. David is also a fan of Porsches and supports the idea of hobby racing. With the detail required, maybe you can find a good welder in your area, or maybe you have enough welding experience yourself. For me, I am so happy that the professor is willing to help out.
Step three: Once I received and unpacked the old 944 torque tubes, I had David visit and we called Constantine for a discussion and to make a plan. It was agreed to Tig weld, as this provides more control than Mig and penetration can be avoided more easily. The inside of the tube must be kept totally clean so the bearings can be slid in without damaging them. We measured the tubes and found that the 944 tubes would need to be made 3-7/16" shorter. We compared the tubes and found that the front flange of the 944 lacks details of the cut corners and the sleeved bolt guides. See photos above. We also decided to create a cuff for extra strength around the weld joint for integrity in case of an accident. (We later decided that with David's expert welding, this was both unnecessary and created other problems of potential distortion.)
Step four: Today is the day we cut the tubes. A 944 tube is the one we ultimately will use. Before cutting the 944 tube, we permanently marked two straight lines on it so that we can re-orient the front flange back onto the tube after shortening and have the bolts of the front flange in the exact orientation as original - that will be just one of the critical measurements. We laid an angle iron on the tube and etched 2 deep scores into it for the first 10 inches of the tube. Then, using a large pipe cutter with a new blade, we cut the 944 tube 2 inches from the front flange. Notice that the shaft is still in the tube. We had no reason to remove it yet.
Next, after measuring and remeasuring, we cut the tube again, removing 3.338 inches, which is a little less than the 3-7/16 inches we need to remove. We picked 3.338 based on how the pipe cutter was cutting and seeing that we would need to grind the end just slightly to remove metal that was being pushed inward during the cut. Also, if we need to grind a little to make it shorter, that would be easy, but needing the tube longer would be a bad thing.
We wrote this at the time of cutting: the second cut was 3-7/16 inches off to make a total of 66 inches. There will be some grinding off that allows for the other 1/8. The overall length of a finished tube is 65-7/8 - that's the target length which was the original length of the 968 tube.
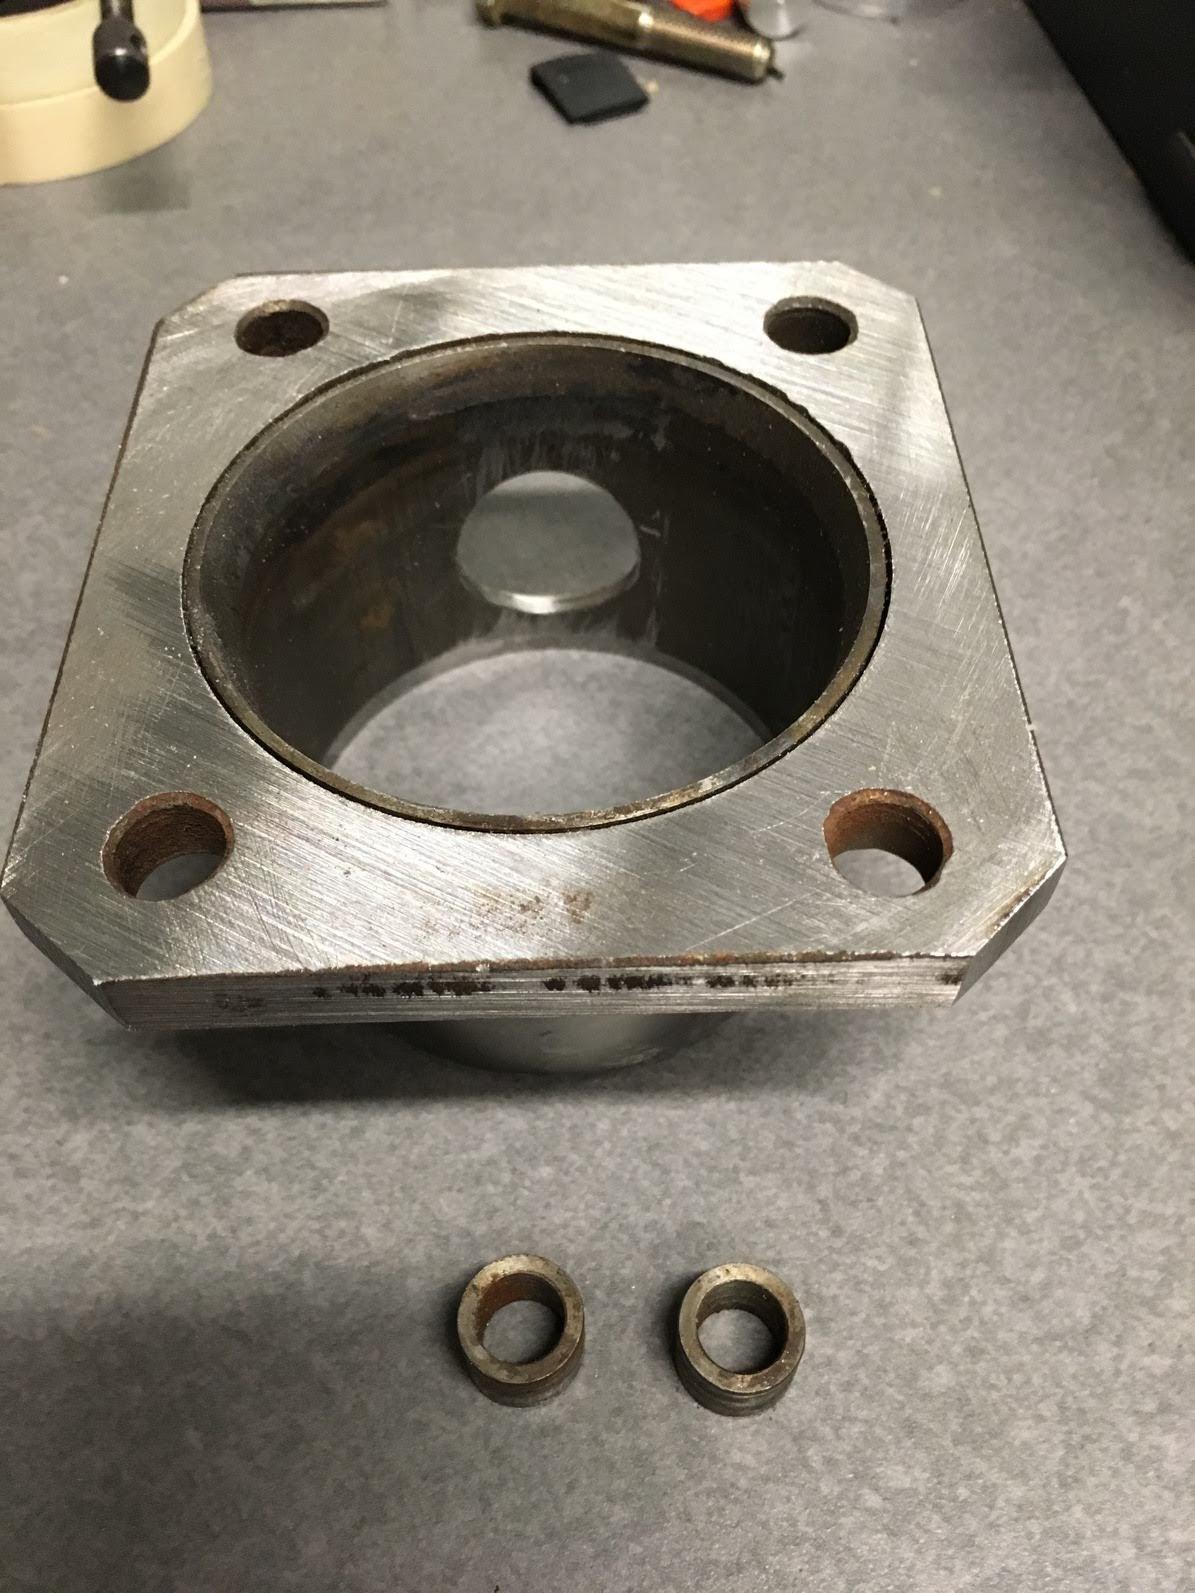
Since the 968 tube is garbage anyway, we decided to cut off the first 6 inches from the front (just past the welded plate that reinforces the split) so that we could more easily use it as a model. We carefully used a rotary cutter as the pipe cutter won't work with the split that's in the tube. In the picture you can see the details of the 968 front section: the trimmed off corners which may not really matter, the bolt sleeves that hold perfect alignment to the clutch bell housing, and the 1-inch diameter hole that allows access to the key bolt of the short shaft. That hole cannot be forgotten!
We then used the front section of the 968 tube that we removed as a model and modified the 944 front section to exactly match the 968 one. That work is being done in the machine shop.
Here's a good photo of the front of a 944 tube.
Step 5: Preparation of the front of the tube and gauges for the welding process. In the machine shop, David used the front of the 968 TT as a template and replicated it from the 944 piece that was cut off.
Also, David made two tools to ensure that the tube stayed straight during the welding process. The first is an insert, machined to.003 less than the inside diameter of the torque tube. It slides in perfectly and has no play, but if it cannot be removed then we know that the tube has been distorted from heat, the weld has penetrated the tube, or the two pieces being welded are not in alignment. The second tool David made is a jig to hold the tube on the outside while still accessing the seem to weld. Pictures are below.
Step 6: Next up was a test weld with a spare piece. In order to create a perfect and strong seem, the wall of the tube will get a flat section and a beveled section. The two pieces to be mated together will mate on the flat section and the weld material will fill the valley created by the bevel.
Here's a photo of the sample spot welded and then with the bevel filled with the weld joint.
Step 7: Prepare the tube for perfect mating. Both halves of the seem needed careful grinding in order to create a smooth inside seem and the bevel for the strong weld. A little was taken off the inside of the tube also to make sure the bearings could slide in easily and not incur any damage during that process. Here's a photo.
Step 8: In order to generate a clean strong weld, the metal needs to be cleaned. We are using parts that are 30 years old and oxidation creates issues with the weld, so some careful cleaning avoids any issues. We don't clean the etch lines off yet, because those are important for alignment. In this photo, you can also see the nice bevel that has been created.
Step 9: Using the two tools that David created, the pieces and lines up, the seam inspected and alignment triple checked. Then a spot weld is done on opposite sides of the tube.
Step 10: After each small weld, the inner diameter tool is checked to make sure the weld is tube is staying true. Welds are continued, moving around and across the tube. The outer tools is only used for the first 4 spot welds.
Step 11: Once the first layer of spot welds is complete, then the "valley" formed by the bevel is filled in with another series of welds. Again, David doesn't go right around the tube, but rather works in small sections across the tube from the previous weld in order to not distort the tube.
Step 12: The inside of the seam gets a little fine grinding to make sure it is totally ready for the new bearings to slide in.
Step 13: The tube is ready to be shipped to Constantine at Black Sea R&D.
If you've read this far, it's likely you have a torque tube failure. I'm so sorry if you do. This is not an easy fix. Get a hold of Constantine at Black Sea R&D for help. If I can help you, please reach out.
Thanks for posting such an in depth report. When I get my gearbox and LSD rebuilt I will make sure to have the Torque Tube done at the same time.
If 4 Black Sea R&D super TT bearings are good, wouldn't 5 be even better?
... and had been prepped by the prior owner. I was driving my 14th day of the season and the car had been doing great. .releases the short shaft, then you slide the short shaft rearward and you can remove the clutch without removing the transmission. Here are a few telling photos.
...
First I removed the exhaust, then the starter, then the clutch slave cylinder, then the clutch bell housing access cover. Here's the first damage found. This is the bolt that tightens the short shaft onto the long shaft that is accessed through the hole near the front of the torque tube. Obviously, it has been rubbing against the inside of the tube.
Once the above bolt was removed, I was able to slide the short shaft back and here's the second reveal of damage. Because the shaft is not stable, the bearing in the flywheel has broken and the splines of the shaft have hit the tube that provides pressure from the clutch lever.
So clearly, the problem is found, but what's the cause. The cause is a bad design in the first place - a bad decision made in Germany in the late 1980's.
....
Nice report. But I wonder, if the real cause of the problem was the not tightened to specs clamping sleeve to the central shaft. If the bolt was tightend to 59ftlb, it shouldn't be rubbing against the inside of the tube and the shaft shouldn't become unstable.
Hi Yogii, On the gearbox and LSD, mine are on their way back from Bill Radar Motorsports in Las Vegas. I've heard good things about them and they were fair and professional. The pictures of the work look great and I'll report back how it is. I had a Quailfe, but changed to a Guards Club LSD which should give stability under braking that the Quailfe doesn't. I've spoken with Constantine several times and I think he would agree that 5 bearings are not needed. In fact, some racers just use 3 and save the weight, which I think doesn't make sense. The big issue in the 968 is the tube itself and the lack of structural integrity of the factory cut split.
I see you signed off 968 Virgin - Congratulations! Enjoy it! I love both of mine, even with this known issue.
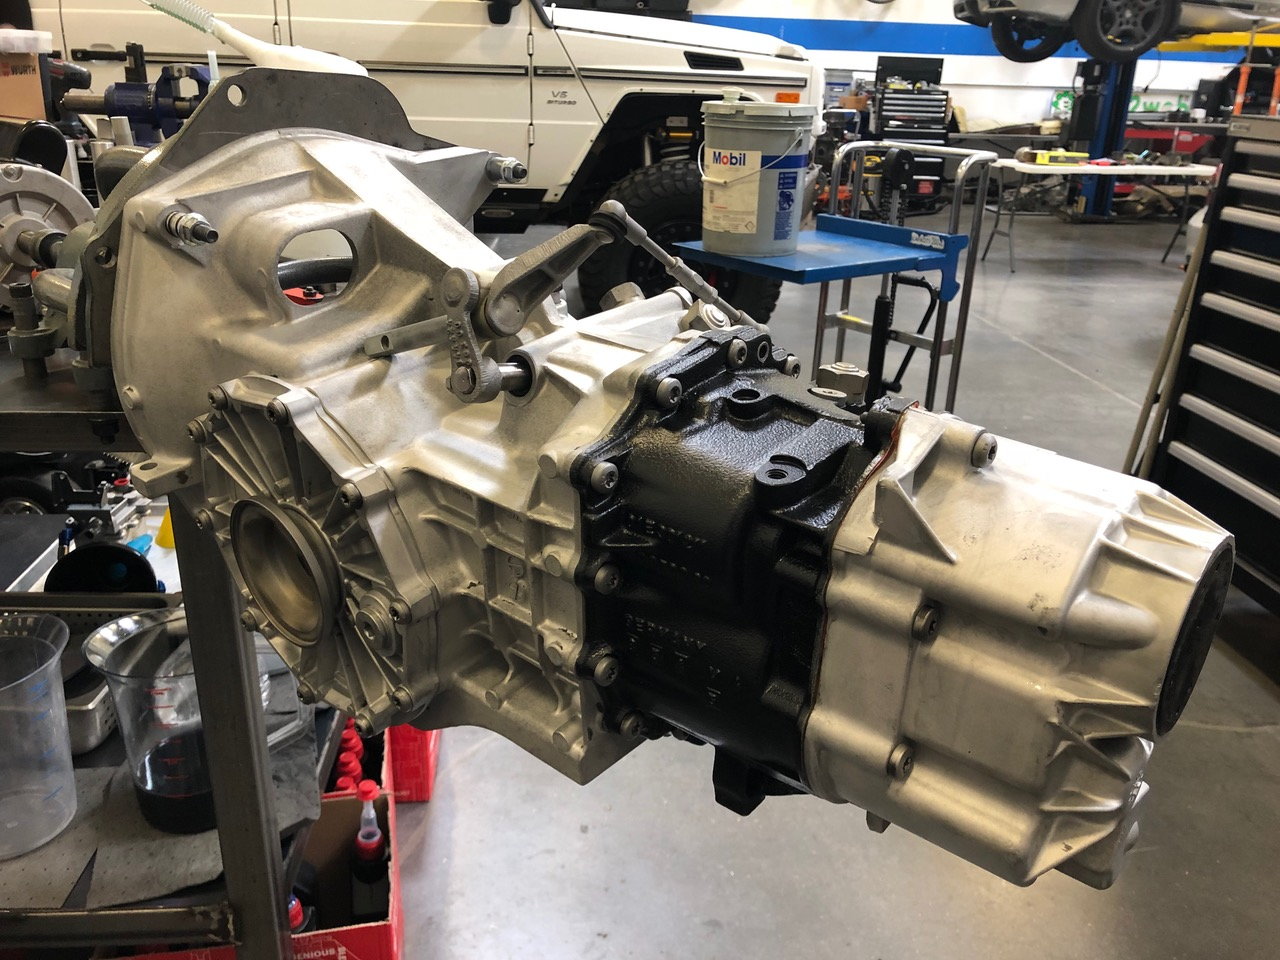
G44 Transmission rebuilt at Bill Radars Motorsports in LV.
I have a few 968's myself. All 92 and 93's. I found 2 solid tubes and had black sea bearings installed. This option is very interesting. Would it be possible to know about how much this work actually cost? You can PM me if you would like. Having this as an option could be a big deal as finding more solid tubes is clearly a challenge and god only knows how much the next one found could cost.
Excellent post - thanks for taking the time to document your work so thoroughly, and with such high quality pictures. I have a track-focused '92, and feel that my split torque tube is a ticking time bomb. As a precautionary measure, I installed a pair of clamps around the tube where the front bearing lives. Not sure if this is actually effective, but knock on wood, it's been several years since I did this, and so far, so good, after lots of very hard track miles.
I also have a PM for you on a different subject. Merry Christmas.
Great to see you finally post all the work you've done making a solid 968 torque tube (TT) from a solid 944 TT. Thanks for the kind words on our behalf and it was our pleasure to work with you in an advisory capacity with this venture. Many have discussed doing this, but to my knowledge, you are the first to have actually done it. It will be great to hear about your driving impressions once your racer is all back together.
For those following along, Porsche used a split TT design initially in the 1989 944S2 to quell the extra driveline vibrations from the new and larger 3.0 liter 4 cylinder engine used in them. This TT design was then carried into the 968 since the same engine was used. Porsche stopped using the split TT design sometime in 1994 through 1995 when the 968 model was retired. They stopped using the split TT since they added more weight to the crank assembly which quelled the vibrations without the need of the split TT.
To answer the observation by H.F.B. above, a loose pinch bolt on the short shaft would not result with the damage seen in the pictures above. Loose pinch bolts would result in deformed splines of both the coupler and drive shaft. We have seen this same failure before in 944S2s and 968s with split TTs when the front bearing unit fails.
To answer the question from Yogii, we have done one 944 TT with 5 Super Bearings due to the owners insistence. All 944 and 968 TTs came with four bearing units from the factory. The 968 is a bit shorter and 4 bearing units is more than enough to hold and support the drive shaft in the correct position needed for trouble free operation.
To follow up further on the comment from H.F.B., the pinch bolt for the short shaft was not loose at all. It is very clear from inspection and disassembly that the cause of failure was the expansion of the tube along the split portion, which resulted in the front bearing sliding rearward to the next bearing. That allowed the inner shaft to have enough side-to-side movement that the head of the pinch bolt hit the inner side of the tube.
About how many track hours were on your torque tube when it failed? The split tubes are definitely a concern on 968's, but there are a fair number of these cars used in track applications, so I'm surprised I don't hear about torque tube failures more often. Thanks.
Last edited by Cloud9...68; 12-27-2018 at 12:02 PM.
Cloud9..68 - The prior owner used the car on track for 6-7 years of SCCA regional racing. I have a log book, but I never figured his hours. That's a great question. Constantine might chime in that he gets calls about 968 TT failures, but I really don't know how common it is.
As far as split TT failures with both the 944S2 and 968s, we get about a dozen calls per year about failed split TTs. Most always it is due to catastrophic failure, not the more common "noisy TT" or a "while I'm in there" rebuild during a transmission or engine refresh. And I'm positive we do not hear about all such failures worldwide. You have to really do some searching or be in the know to find us.
The trouble is once the split TTs fail, they can't really be rebuilt with certainty due to the split widening too much. We have heard of people offering to do rebuilds on them and who scoff that it shouldn't be done. We don't do them since we know the full story behind them and can't guarantee them to our customers. Our one and only failure with rebuilding TTs was with a 944S2 years ago and that was with extra precautions taken. There are also many owners of 944S2 and 968s who do not know about the problems with split TTs until they get hit with a failure.
Due to our one failure, we investigated the problem very well and concluded it is too hard to mend the split back to OE ID specs. Getting it too loose or too tight will result in failure again.
The 944S2 owners can just switch them out with non-split TTs from other 944 variants which are plentiful and easily found.
The 968 owners have a hard time finding any non-split TTs due to limited supply, as John already point out, and is why he took on this brave project.
There are many failure associated with hard mounting 944 and 968 engines to the chassis to include reports of broken fasteners, cracks forming in critical areas of the chassis and sub-assemblies.
However it is hard to say if hard mounting the engine would hasten the failure of a split torque tube. I would surmise it is the increased g-force loads put onto the TT between the engine and transmission in racing that would cause the most problems. Then once the split widens, the drive shaft operation will move the front bearing from its assigned position and damage it. At that point, the increased length of unsupported drive shaft will cause damage to the short shaft and clutch parts. When John posted a picture of the short shaft clamp and clamp bolt showing it impacted into the side of the TT, we knew instantly what was wrong.
But this failure also happens to street driven cars that have never been on the track. Hard to keep a split tube from widening when it is subjected to loads seen by the TT.
This kind of reminds me of the pinion bearing problem, which is a similarly ticking time bomb, with no apparent rhyme or reason as to its likelihood of occurring. Some fail early in the car's life, some at well above 100K miles, and some never fail at all. But while pinion bearings can be replaced, the split torque tube issue appears to be much more serious, because unless you have the resources to venture into the amazing project isaacsracing has bravely undertaken, a TT failure appears to be terminal.
Does putting a series of heavy duty clamps around the split part of the tube help at all? Thanks.
 12-25-2018, 02:13 AM