When you click on links to various merchants on this site and make a purchase, this can result in this site earning a commission. Affiliate programs and affiliations include, but are not limited to, the eBay Partner Network.
Took some time to clean the A/C condenser in my coupe yesterday.
Thanks to Vandit and Earlydays for a few thoughts on the approach.
Not a difficult job at all. Only about an hour and a half into it, and that included other cleaning while in there.
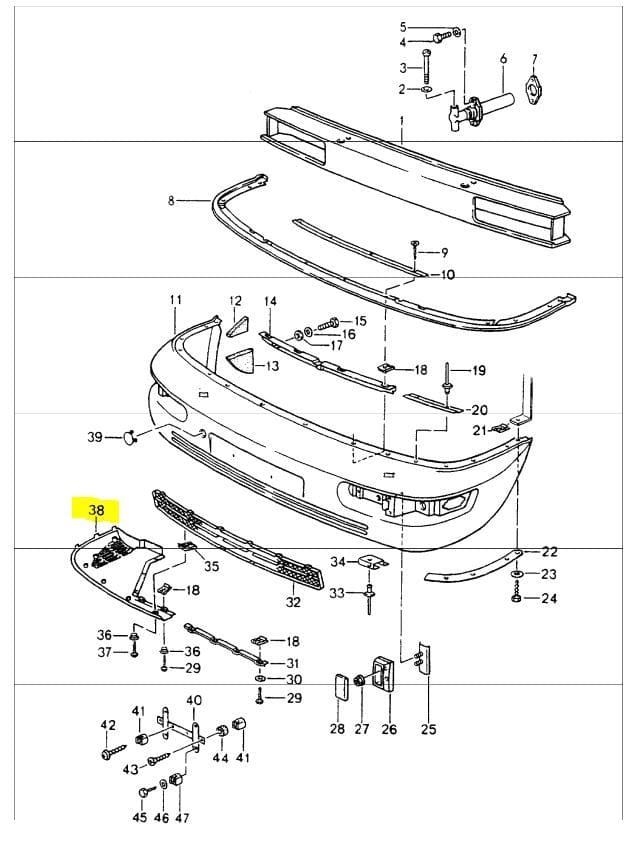
I removed the lower left front apron, which is the left version of what is shown as #38 in the parts catalog.
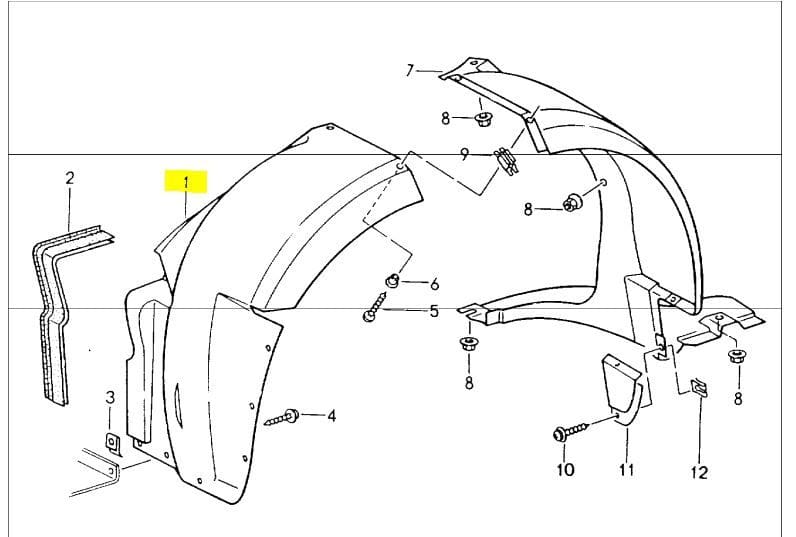
I also pulled the left wheel and removed the front fender liner, shown as #1 here:
From the bottom front of the car, I sprayed lots of cleaner/degreaser on the front of the condenser, and let it soak. Then I removed the hold down nuts on the fan on the back side, pulled the fan back, and soaked it with cleaner/degreaser. I did not fully remove the fan.
Fan partially pulled back for access:
I then rinsed everything off, from the back side, thereby gently washing everything out toward the front of the car; the direction from which it came. Very low water pressure here as I didn't want to risk bending any fins.
Put it all back together.
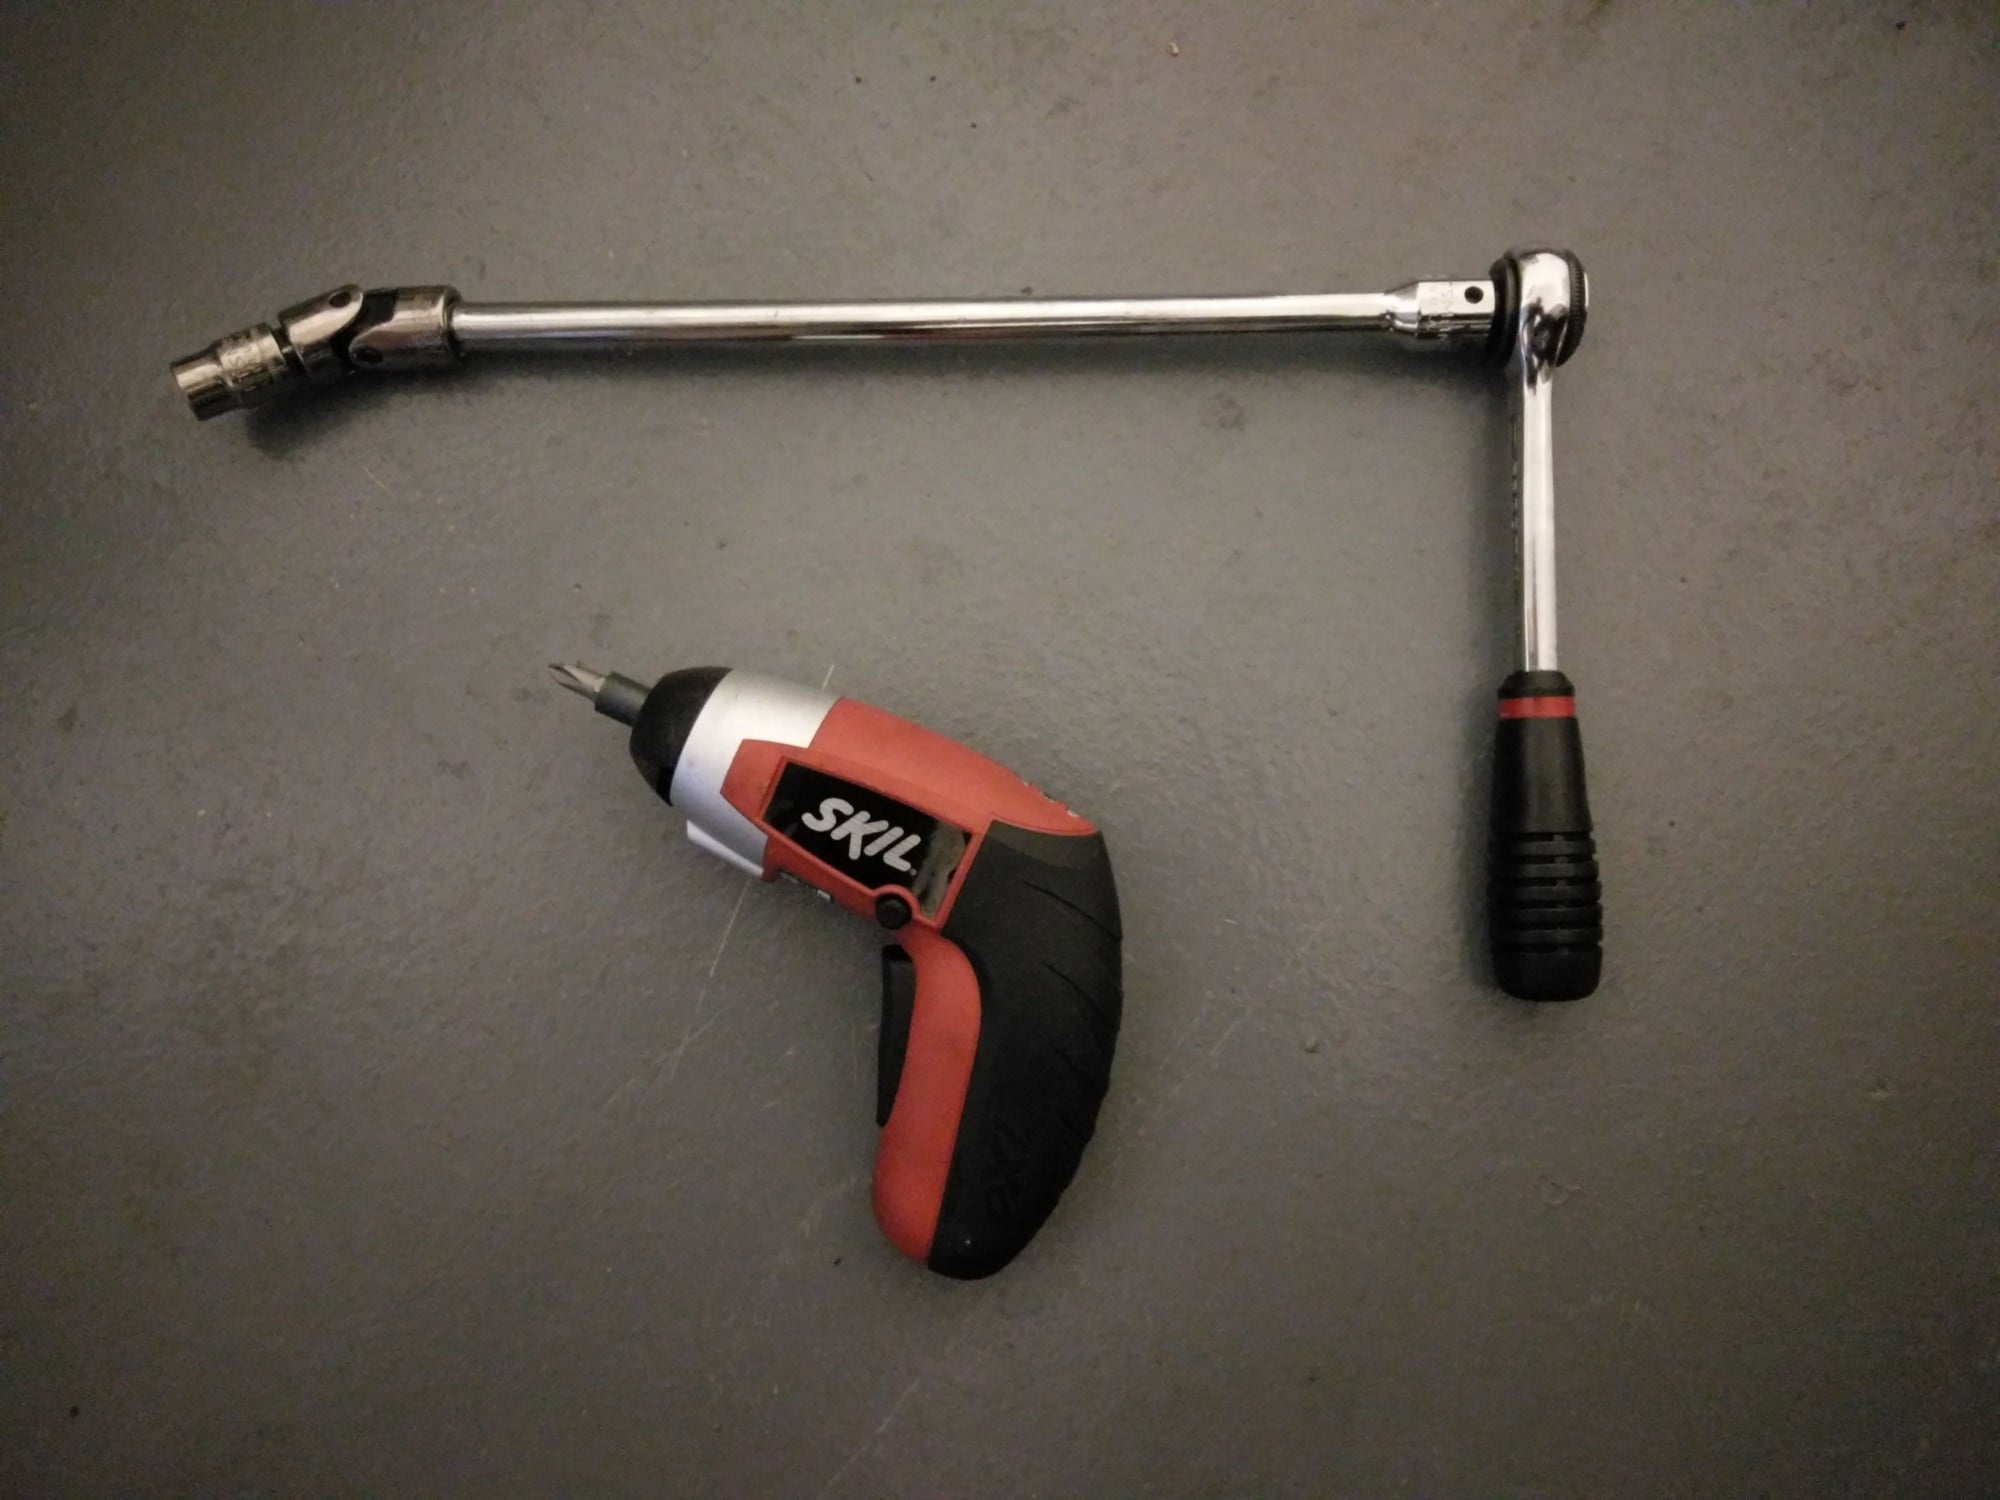
Oh and a couple of tools that made life easy. A 10mm socket on a long extention with an universal makes quick work of the condenser fan nuts, and the mini cordless drill for the screws. That little gem is my new favorite tool !!
Let's see if this helps with cooling. It sure won't hurt.
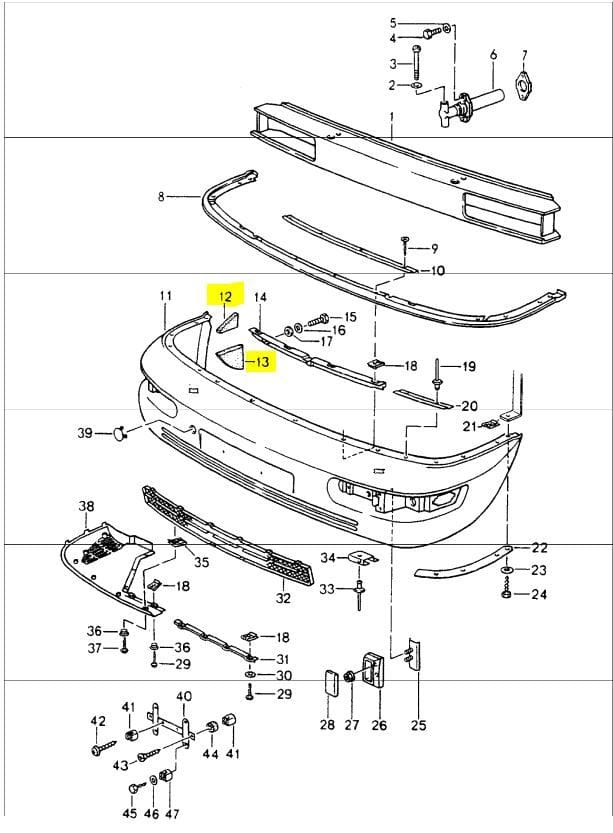
I am going to fully remove the bumper soon and do lots of other cleaning, also intend to replace the foam baffles (#12, #13 below), to insure proper air flow. I read about these, wasn't sure where they were, and Vandit reminded me about them and provided more detail. Many thanks!
I guarantee most 964s on the road are missing those bumper sealing wedges and allowing a bunch of airflow to go around the oil cooler and condenser rather than forcing it through the oil cooler and condenser.
Then people come on here and say their engine is running hot when driven hard and they get told they need to install a secondary oil cooler when all they might need to do is make sure their front bumper airflow management is working as designed.
+1
I was under the front of my 964 yesterday messing with brake scoops and noticed large chunks dropped onto the shark-gill lower opening of the AC area. I pulled at them with a hemostat and they crumbled - old foam, about a "pack of cigarettes" sized chunks.
Now on the to-do list is checking and renewing the seals around the oil cooler and AC side fans.
I was just around my condenser a few weeks ago to change the resistor, and didn't even look for these. Now I'll have to get back in there to check, so thanks for the heads up.
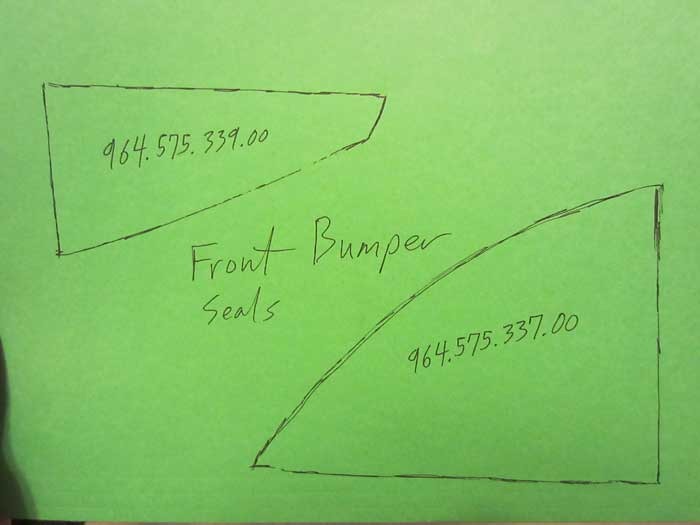
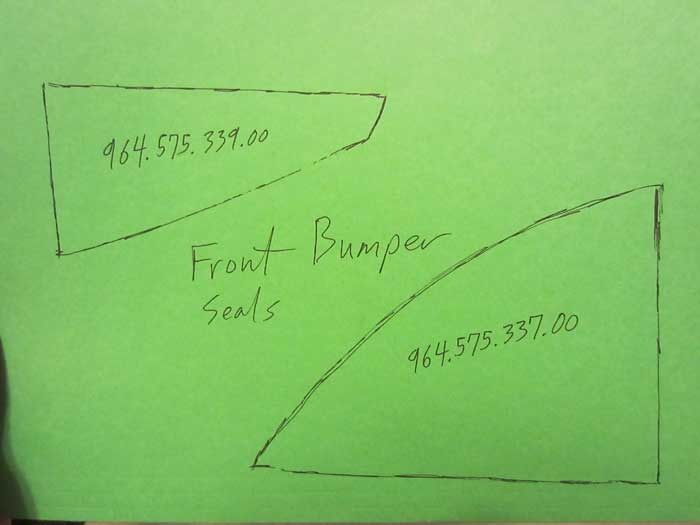
So are the foam baffles on both sides of the bumper for the A/C Condenser left and oil cooler right? The PET illustration shows them only on the right for the oil cooler and only 1 of each is listed with part number in the PET? Your pic above shows them on the left side of the bumper?
They are two part numbers, one of each on each side (oil cooler and condenser side), four pieces total. They are not side specfic but instead upper and lower specific.
Here you can see how the bumper seals work w/ the existing plastic baffling on the oil cooler side.
These pieces basically isolate the intake side of the bumper from the exhaust side of the bumper, forcing air through the cooler & condenser.
I understand what your saying, I just replaced the upper and lower foam blocks on the oil cooler right side only when I had my bumper repainted. When I removed the bumper (which I believe had never been off the car before) what was left of the old foam was present but on the the right oil cooler side only. There was no evidence of them being installed on the left condenser side of the bumper.
Here's a photo posted some years back by 911Jetta. You can see evidence of the foam on both sides. My car had similar witness marks on both sides of where the pieces once resided.
$15 for the upper
$18 for the lower.
(ref Pelican online.)
Hmmm...
It being a 'not-so-critical' part - along with having the as-built profiles above - makes this potentially a nice DIY foam carving project.
(Gather some closed cell... say, 'vinyley' pliable stuff found in electronic packing material.)
Blow up those pics above to the right scale as close'nuff carving profiles... Secure results with a little silicone caulking. Wait 24 hours' cure. Reassemble.
Either source, looks like a good little upkeep DIY.
I guess we will all be checking our bumpers this weekend. My a/c doesn't do very well at lower speeds / city driving, even with the condenser fan doing its job. Would be great if it was just this simple item.
I've just cut these for the Cooler side from a white plastic foam I had around. The cut-off drawings above were a good starting point for me, but I had to have those aligned on place.
Here are my cut-offs with the 964-575-337-00 having to be cut and shaped on the long radius side to fit the slope of the bumper.
3M yellow glue seems to work perfect for this DYI project. Next will be Resistor replacement, as I am in there, followed by new Oil cooler.

 07-03-2016, 12:48 PM