When you click on links to various merchants on this site and make a purchase, this can result in this site earning a commission. Affiliate programs and affiliations include, but are not limited to, the eBay Partner Network.
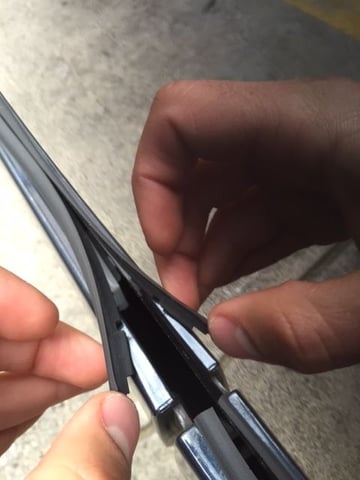
I recently changed the rubber seals on both side sills.
I bought OEM Porsche rubbers and all of the required plugs.
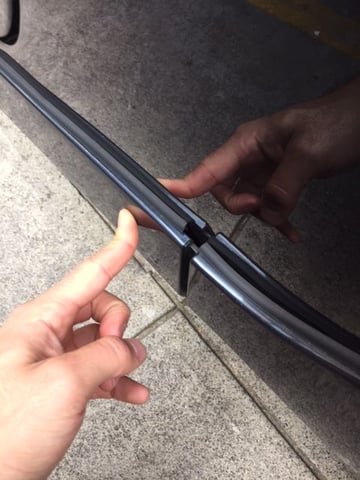
The last plug (of the long section, not the shark tail), just won't click in to place.
I've replaced both the white plastic clip and the red plug but can't get it back in.
Is anyone able to provide some tips or advice on this?
For those ones its sometimes easier to put the clip on the body and then press the sill onto the clip as the sill to clip joint is easier to lock into place than the clip to body joint. Also its very easy to slightly push/dent the wing in while trying to attach them the traditional way which makes things harder whichever method you use. Good luck
A few good hits with the palm of my hand got it done on mine. I had 1 stubborn plug too, but a few hits with the palm and it stayed. However, the rubber on your car seems short? My set fits perfectly (Porsche part, too)
If that rubber trim isn't aligned properly into the groove on the sill, it could be creating extra thickness that is keeping things from snapping into place.
The notch in the rubber that is visible in the pic should align with the shape of the groove on the sill backside.
I also have one that won't snap in correctly. I've replace the male and female parts, and tried the palm slams - but still no go. Curious to know if you are able to make it work with some of the advice here.
Thanks for the comments and suggestions, appreciated.
My rubber did fit correctly when first installed (about 6 weeks ago), but seems to have moved out of place or shortened in the time since while not sitting correctly. Will have to re-adjust.
I've belted it with my palm on many, many occasions but no luck (first installation and being frustrated at an incomplete job, when parking and being frustrated, walking past it and being frustrated, pulling over whilst thinking about it and being frustrated, after picking it up from a car wash and being frustrated, etc.)
Will try Jevvy's suggestion and pull it all off again and then plug the clip into the body first.
I shall report back with hopefully good results.
The bottom of that panel deforms easily under force. Take the shark fin off and support the backside of the metal with something that won't damage the panel then push the clip in. After it sets you can reinstall the shark fin.
The bottom of that panel deforms easily under force. Take the shark fin off and support the backside of the metal with something that won't damage the panel then push the clip in. After it sets you can reinstall the shark fin.
Thanks for this, good tip.
Will try first before removing the side sill again.
Set to fixing my poorly fitting side sill this morning.
First removed the shark fin but was unable to get behind the stubborn plug to support it.
So removed the side sill again, adjusted the rubber and did as Jevvy suggested, clipped the plug into the body first then attached the side sill.
Clipped back in with no problem and is now sitting flush for the first time in a long while.
Thanks for the suggestion Jevvy, for all others, this works a treat.

 06-15-2015, 12:29 AM