When you click on links to various merchants on this site and make a purchase, this can result in this site earning a commission. Affiliate programs and affiliations include, but are not limited to, the eBay Partner Network.
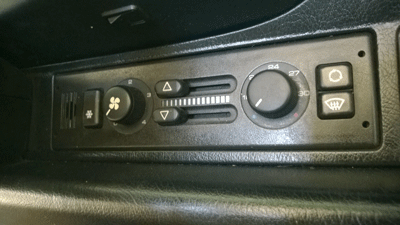
Got tired of looking at my worn CCU buttons (the usual suspects: AC, defroster and re-circulating).
Went looking for premade button graphics but they don't seem to have any for our old girls (lots of Audi, VW and GM). Right now, a new Sliverknit kit is higher $ priority than a fresh CCU unit especially as my AC is in unknown state.
These are v1 - printed on waterproof vinyl with matte overlay with the laser printer. Cutting/sizing was a pain, the sheets got jammed in the printer and yes, the photo highlights how badly the defrost is mispositioned so it definitely needs to be redone. Thinking a little heat from the heat gun would probably help even out the rough edges/corners.
Before I spend more time on this little project would love any feedback - good bad or ugly are all welcome.
After the decals wear off, the buttons on the right become detached where it seems the only thing able to put it back on is a wad of chewing gum..... I went the button replacement route.....
Wasn't aware you could buy the buttons on their own, thank you - that helps and is a much better alternative to the whole CCU unit. Besides the winter carpet project, just spent $1700 to get a gremlin in the fuel pressure unit fixed so I'm trying to be mindful of my pennies.
It's not just the buttons you're getting it's the actual switch that fits in the circuit board.
The one $130 switch I replaced covered both buttons on the right
Watching intently! I also have this problem. It bothered me so much I just sharpied over the remnants of the old markings--I'd rather just have blank buttons!
I changed both a/c switch button on left and replaced the right recirculating/hear switch buttons on right. I also bought a new faceplate also since the original was beat through the ages.
Not a bad do it yourself.....
Hardest part was getting the damn CCU out since mine was probably never taken out.
A good solution for this would sell well in the 964 community. I would definitely like some very thin plastic sticker that had the correct logos screen printed on them and perhaps covered in some kind of coating that would give it some durability to finger oils.
Quick note, I have no affiliation with this eBay seller. I used this laser jet white vinyl to print them on - they say their labels are permanent; fwiw it's been hot here, and I've been out in the heat with the top down and the labels are showing no signs of melting/moving. But checked this morning and still have the ability to remove them, which is good.
The snowflake button is a little shorter than the actual one to allow for the light to appear. The recirculating/defroster buttons are a little larger than the actual buttons - because they're right in your face, figured it'd be better to have extra space to play with. Once I've got time and it cools down, would like to see if these can be wrapped fully around the button with the help of a low heat gun similar to the process of applying Gus's most-excellent tail light film.
FWIW, print the buttons on regular paper before using the vinyl so you can play with the size to your taste. As mentioned, these are v1 and I haven't had time to go back and play with sizing again. If you want to change the size of the logos, PowerPoint is your best friend
Save the images to your desktop then insert them into a blank PPTX. From there you can resize and then right click to save in the new size. If you want more black to play with, create a rectangle shape fill it with black then place the logo on top of it. Select both the rectangle and the image then save as per above.
Would love to see how you guys get on with this project - would like to go back and re-do mine and would love to see good mods

 09-18-2014, 08:20 PM