When you click on links to various merchants on this site and make a purchase, this can result in this site earning a commission. Affiliate programs and affiliations include, but are not limited to, the eBay Partner Network.
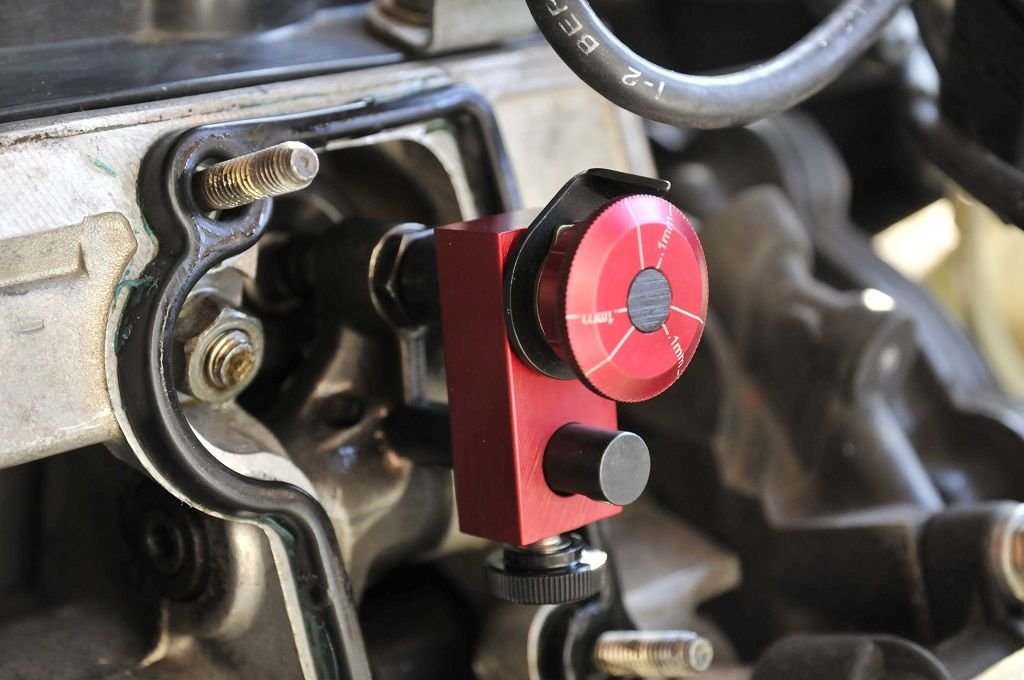
Before lifting the motor back in I thought I'd check the valve gaps. This provided the opportunity to use a cool new tool I bought a few months back.
This makes adjusting the gaps an absolute doddle with zero trial/error or guess work. I checked only the inlet valves for the moment. The exhaust side will be done with the motor back in the car. 2 valves needed minor adjustment (one tight, one loose). Took 5mins with this tool. I of course double check with a feeler gauge afterwards to confirm.
And here we have the motor back in and all buttoned up
Before lifting the motor back in I thought I'd check the valve gaps. This provided the opportunity to use a cool new tool I bought a few months back.
This makes adjusting the gaps an absolute doddle with zero trial/error or guess work.
I have one of those Kirk dealiedoos that I purchased for my old 3.2L but haven't gotten around to check/set my valves yet on the 964 yet. Glad to hear it works just as good as it sounds.
Here you can see the difference between the old G50 clutch fork (left) and the new one (right). Glad I swapped them as the lever arms look longer with larger contact feet.
Nice mate, now I know why my first release bearing failed
What lube did you use on the fork/RB join? I'm always scared to put too much on and the last few times its got a bit creaky after a few thou miles.
The tech manual said to use a molyB grease for the all clutch parts. I literally put a small dob behind each of the CB ears. To be honest tho, I don't think it'll make much difference on that interface as the pressure excerted on it will be so high it'll be wiped off. A few miles on a wet motorway it'd be gone anyway.
Not vems, I'm running a Typhoon 2 (Specialist Components). Wasted spark is still firmly on the menu and I have all the parts to do it. I wanted to get the LWF installed and the engine map tweaked before swapping over. I'll do it over winter. I'm watching the VEMs guys on the forum closely tho as I want gather more ideas on where/how to mount the coil packs.
Hi Gaz, the tool is pretty good. I played with it a few times on just one valve together with a set of feeler gauges so that I could get the feel of the tool. It's very accurate. The biggest bonus is that you can SEE if you've moving the gap when tightening the lock-off. You can pinch the knurled dial whilst tightening to prevent this happeneing. On the stubburn ones where this is more tricky to do, you can deliberatly overshoot the valve gap indicator on the dial and bring it back inline as you tighten the lock-off. It's bang on each time.
>interested to hear your first impressions of the Lwf
Me too Having the standalone ECU means I can dial out any undesirable behaviour.
Edited to add: Obviously not driven it yet but the clutch pedal certainly feels a bit heavier with this setup.
Before lifting the motor back in I thought I'd check the valve gaps. This provided the opportunity to use a cool new tool I bought a few months back.
This makes adjusting the gaps an absolute doddle with zero trial/error or guess work. I checked only the inlet valves for the moment. The exhaust side will be done with the motor back in the car. 2 valves needed minor adjustment (one tight, one loose). Took 5mins with this tool. I of course double check with a feeler gauge afterwards to confirm.
Cool tool. Does anyone have a write on how to use for our valve adjustment?
Not vems, I'm running a Typhoon 2 (Specialist Components). Wasted spark is still firmly on the menu and I have all the parts to do it. I wanted to get the LWF installed and the engine map tweaked before swapping over. I'll do it over winter. I'm watching the VEMs guys on the forum closely tho as I want gather more ideas on where/how to mount the coil packs.
Great stuff. Pioneering as always, Rob. I'll look forward to see how you get on.
Rob, did you buy that valve adjustment tool in the UK or did you have to order from pelican?Have the back of the car in bits and was about to do my valves whilst doing spark plug change and trying to resolve a few leaks. I was going to purchase the normal feeler gauge from type 911 but this looks easier to use?


 11-09-2014, 06:13 PM