
#1 Fuse keeps blowing
 05-27-2007, 05:16 PM
#1
Rennlist Member
Thread Starter

The fuse in the #1 spot which controls the fans in the front keeps blowing and none of the heater controls or vent switches work in the car. My mechanic thinks one of the blower motors in the trunk is seized. Adrian's book says the entire system is a one peice unit. Is this easy to remove and check? Do I need to remove the gas tank? Any help here is greatly appreciated.
 05-27-2007, 08:55 PM
#2
IHI KING!
Rennlist Member
Rennlist Member
Join Date: Aug 2001
Location: Nashua, New Hampshire, USA
Posts: 13,384
Received 222 Likes
on
176 Posts
I've had to replace both of my front fans. You can do it yourself. The passenger side (right)is relatively easy. The driver side (left) is not only because the AC hoses block access. The procedure for replacement is in the factory manual. I was a bit frustrated trying to get the two screws loosened but had made the mistake of assuming they are allen screws. They aren't. They are torx.
Edit: No need to drain the gas tank nor remove it.
For more details, see https://rennlist.com/forums/showthre...ght=fan+squeak
Edit: No need to drain the gas tank nor remove it.
For more details, see https://rennlist.com/forums/showthre...ght=fan+squeak
05-28-2007, 09:13 AM
#3
Rennlist Member
Thread Starter
Thanks alot for this. I unfortunately dont have the manual. Do I need to remove the black metal "firewall" between the overflow tank and the the servos? Is there an overview of the sequence of what gets removed?
05-28-2007, 10:59 AM
#4
IHI KING!
Rennlist Member
Rennlist Member
Join Date: Aug 2001
Location: Nashua, New Hampshire, USA
Posts: 13,384
Received 222 Likes
on
176 Posts
Yes, you have to remove the firewall. I replaced mine in 3 hours. Its tedious but managable.
This is the highlights of the process
1) Disconnect battery
2) Remove cover of heater/AC (2 screws at base of windshield)
3) Remove two screws holding fuse/relay box
4) Remove wire harness cover
5) Lay fuse/relay box on fender
6) Pull off electric plug from blower fan motor
7) Remove firewall
8) Remove two torx screws holding fan motor to housing
9) I used an old hacksaw blade to get the plastic retaining clips to release but you can improvise with almost anything that fits. If you look at the new blower/fan assembly, you will see them. Practice on the new fan. Once you have the hang of it, then go to the car and remove the old blower/fan.
10) Installation is the reverse
Note: The two motors rotate in opposite directions. They are not interchangable.
I hope this helps.
06-05-2007, 08:47 PM
#6
Rennlist Member
Thread Starter
OK- got everything removed and am confused. I took the cover off the blower and cannot find the "two torx screws" holding the fan in place. Are the bolts on the side facing the interior of the car? Do I need to remove the gas tank to remove the entire system to access the fan bolts?
06-05-2007, 09:25 PM
#7
IHI KING!
Rennlist Member
Rennlist Member
Join Date: Aug 2001
Location: Nashua, New Hampshire, USA
Posts: 13,384
Received 222 Likes
on
176 Posts
Sorry for the confusion. Its been 5-6 years since I did this.
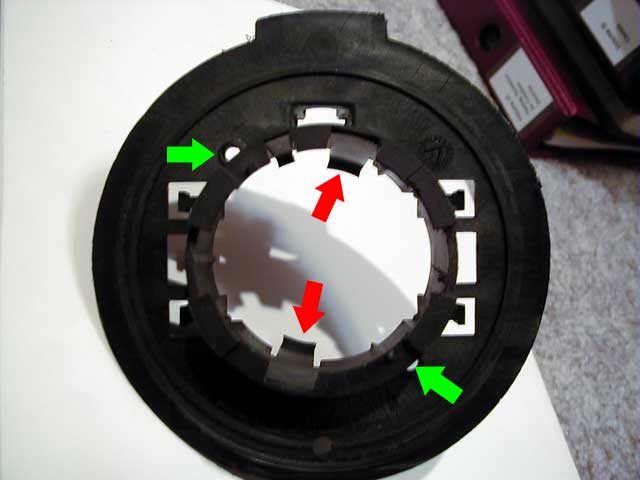
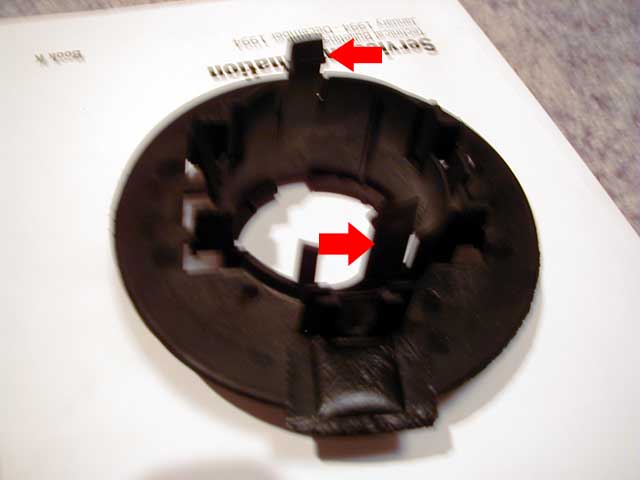
Correction on Step 8 - The torx screws are holding the fan housing cover on. The fan motor itself is held in by two clips.
Step 9 - The two clips are at 12 o'clock and 6 o'clock. If you have the new fan motor already, you will see the clips. I practiced depressing the clips with the old hacksaw blade on the new motor/fan on the workbench. Once I had an idea on how to do it, it was easier to do the one in the car.
I hope this makes sense.
Trending Topics
06-06-2007, 12:22 AM
#8
Technical Guru
Rennlist Member
Rennlist Member
Originally Posted by fiskarflugen
I took the cover off the blower and cannot find the "two torx screws" holding the fan in place.
 06-06-2007, 09:45 AM
#9
Rennlist Member
Thread Starter
Ah- Very helpful. I think I get this, but do I need to remove the entire assembly to release the fan motor or can I do it by leaving the plastic housing in place? Thanks