
Intake madness. Teardown begins....
 09-02-2018, 08:00 PM
#181

I didn't mean to make you get upset. I only saw the one switch on the intake your doing. when my idle switch wasn't set right I got a check engine light and the Idle was hunting. It brings the timing down to zero at idle. sorry to reply.
 09-02-2018, 08:11 PM
#182
Race Car
Thread Starter
I hope i didn't sound upset. Not at all. I enjoy all the commentary...so no worries....I'm glad you all are following and participating. So if when i respond i sound snatchy...I'm just sitting here typing and throwing stuff out into the wind...

I can't wait to see your car btw...one of these days we will find some time to get the entire 964 special interest group together. I've been almost entirely out of commission for shows and such this summer w the job and the new baby. Maybe at caffeine and carburetors in new Canaan if they have another this fall...
I can't wait to see your car btw...one of these days we will find some time to get the entire 964 special interest group together. I've been almost entirely out of commission for shows and such this summer w the job and the new baby. Maybe at caffeine and carburetors in new Canaan if they have another this fall...
09-02-2018, 08:19 PM
#183
Race Car
Thread Starter
I had a little problem going on in my head...sometimes these little details kill me.
Remember this?
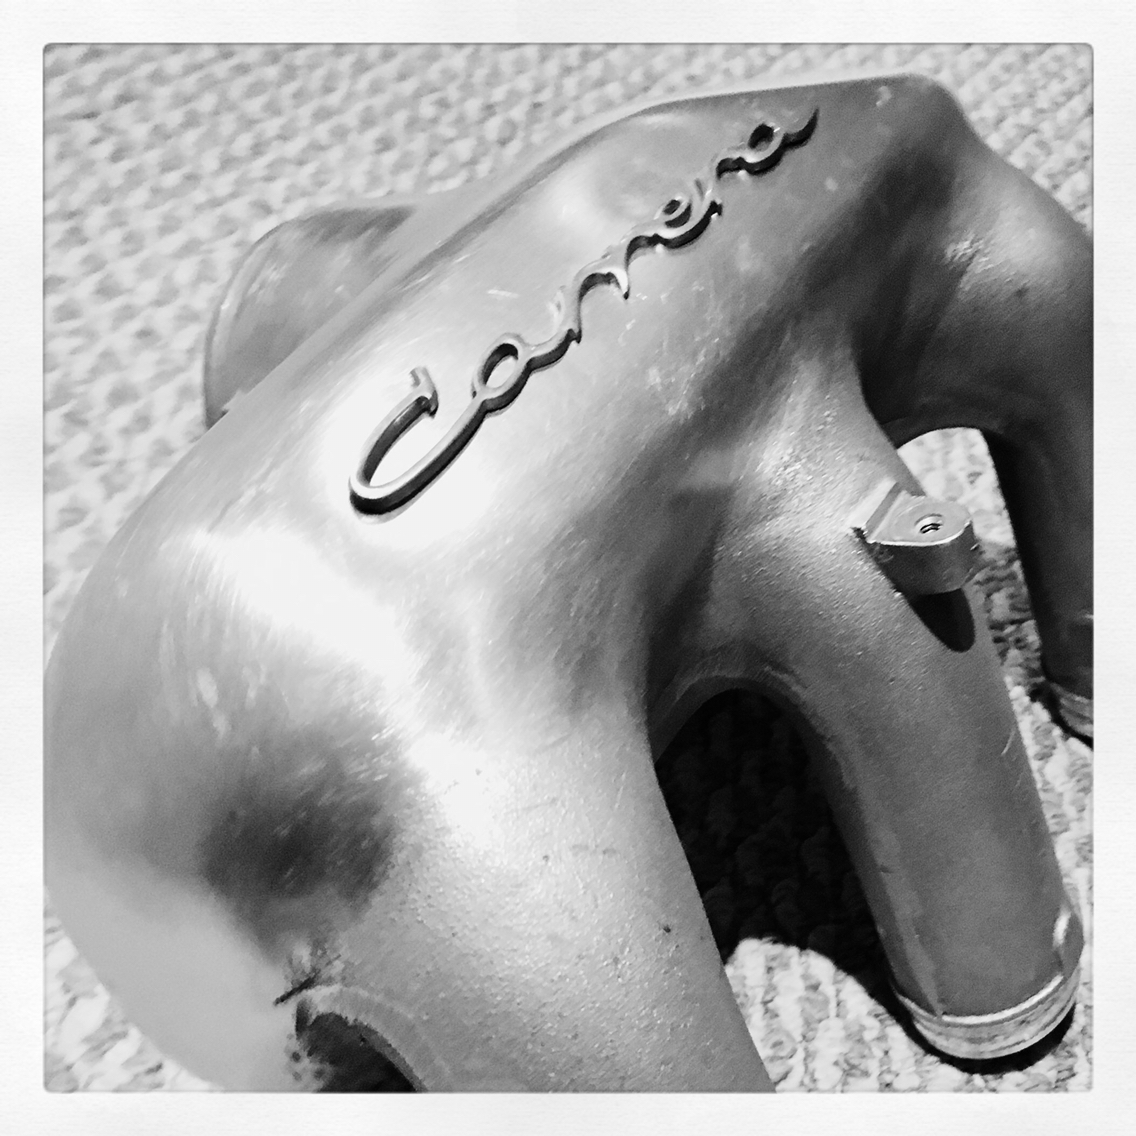
I'm still working on this one. Need to finish the prep on the manifold before the emblem can be glued. But....
The emblem is from a 356. So it's not quite right for a 964. The "C" is all wrong.
On the rear decklid, we see this:

Don't judge- the car is dirty.
Anyway...when i lift the hood, seeing this would kill me:
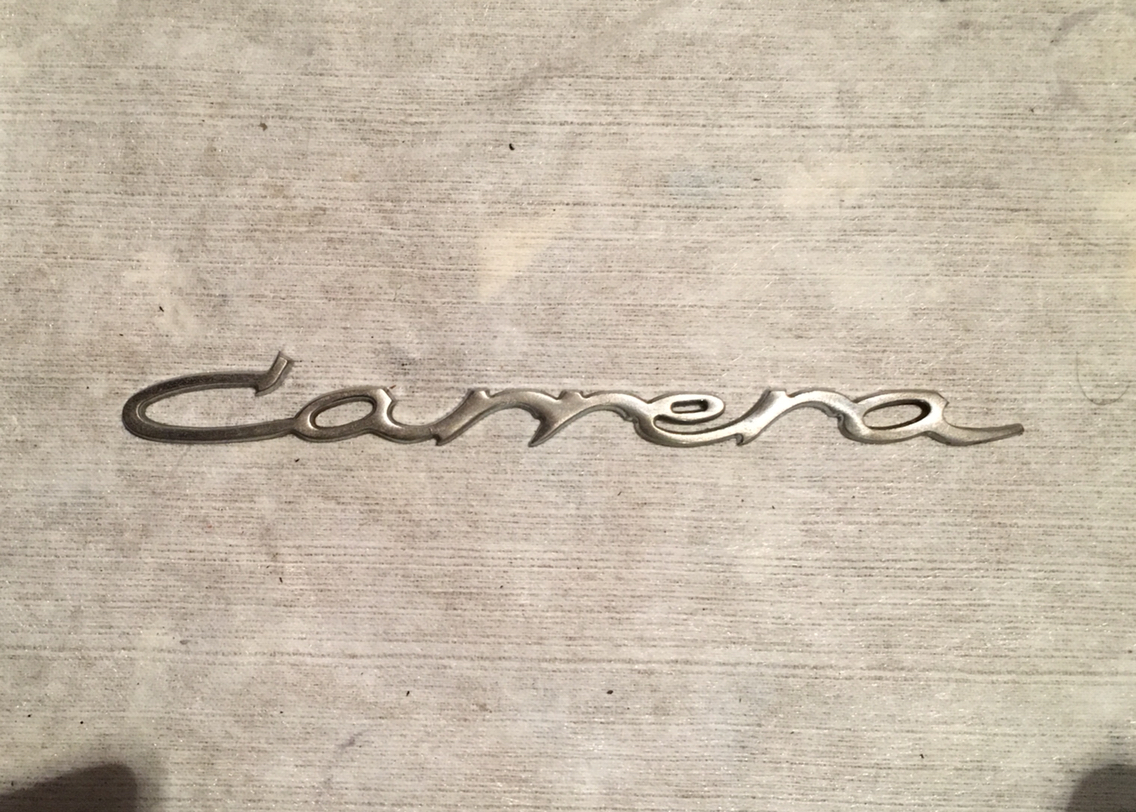
It's just all wrong. So it needed to be modified to be juuuuuuuust right.....
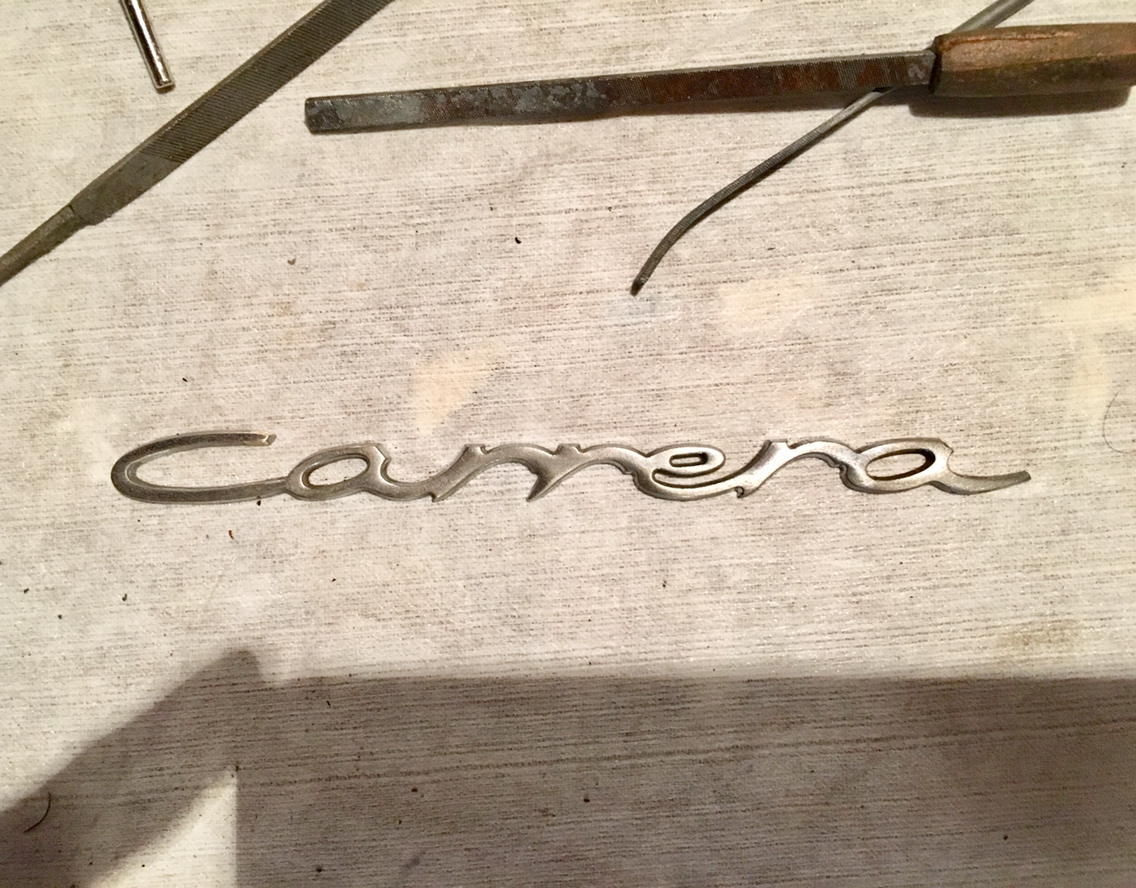
Out came the dremel and the jewelers files...a little sand paper at the end. And 356 becomes 964...or at least close enough to it.
Now i feel a little better. And can proceed.
Remember this?
I'm still working on this one. Need to finish the prep on the manifold before the emblem can be glued. But....
The emblem is from a 356. So it's not quite right for a 964. The "C" is all wrong.
On the rear decklid, we see this:
Don't judge- the car is dirty.
Anyway...when i lift the hood, seeing this would kill me:
It's just all wrong. So it needed to be modified to be juuuuuuuust right.....
Out came the dremel and the jewelers files...a little sand paper at the end. And 356 becomes 964...or at least close enough to it.
Now i feel a little better. And can proceed.
09-02-2018, 08:55 PM
#184
Instructor

Goughary that emblem-on-intake looks spectacular. What emblem are you using? 356 clearly but is that the usual plastic tail emblem or were you able to locate a metal one?
This intake rebuild is going onto my winter project list for sure.
This intake rebuild is going onto my winter project list for sure.
09-02-2018, 09:11 PM
#185
Race Car
Thread Starter
The 356 had a large one and a small one. This is the small. It's a vintage metal one. I picked it up a long time ago for nothing. These have two pins on the back, and on this one, both pins were broken, so for a resto it was useless. I always figured I'd come across somewhere to use it...lol...and now i know!
But. It really had to either be modified, or i was going to have to buy the large 356 badge for the hood as well...but then i was going to have to make a 4 out of a 993 Carrera 4 decklid badge. Cuz the 993 Carrera badge is closer in size to the large 356 badge.
All that said. He typeface for the badge on our car is correct for the period. The 356 typeface is just wrong on all levels for a 90s car.
If anyone wants a 356 large or small badge, they are available new for 125 dollars approx at stoddard and many others. They are all gold, but that can be stripped.
09-02-2018, 09:24 PM
#186
Instructor
Cool, thanks.
If you can find a metal �3.6� you might consider that for the intakes as opposed to a �4�... after all the motor is neither C2 nor C4; the displacement marking would make a nice addition - e.g. �Carrera 3.6�
Great style point wither way though; the attention to detail is admirable.
If you can find a metal �3.6� you might consider that for the intakes as opposed to a �4�... after all the motor is neither C2 nor C4; the displacement marking would make a nice addition - e.g. �Carrera 3.6�
Great style point wither way though; the attention to detail is admirable.
09-02-2018, 09:41 PM
#187
Race Car
Thread Starter
Anyone ever binge watch a season of Rocky and Bullwinkle?
And now here's something we hope you'll really like!
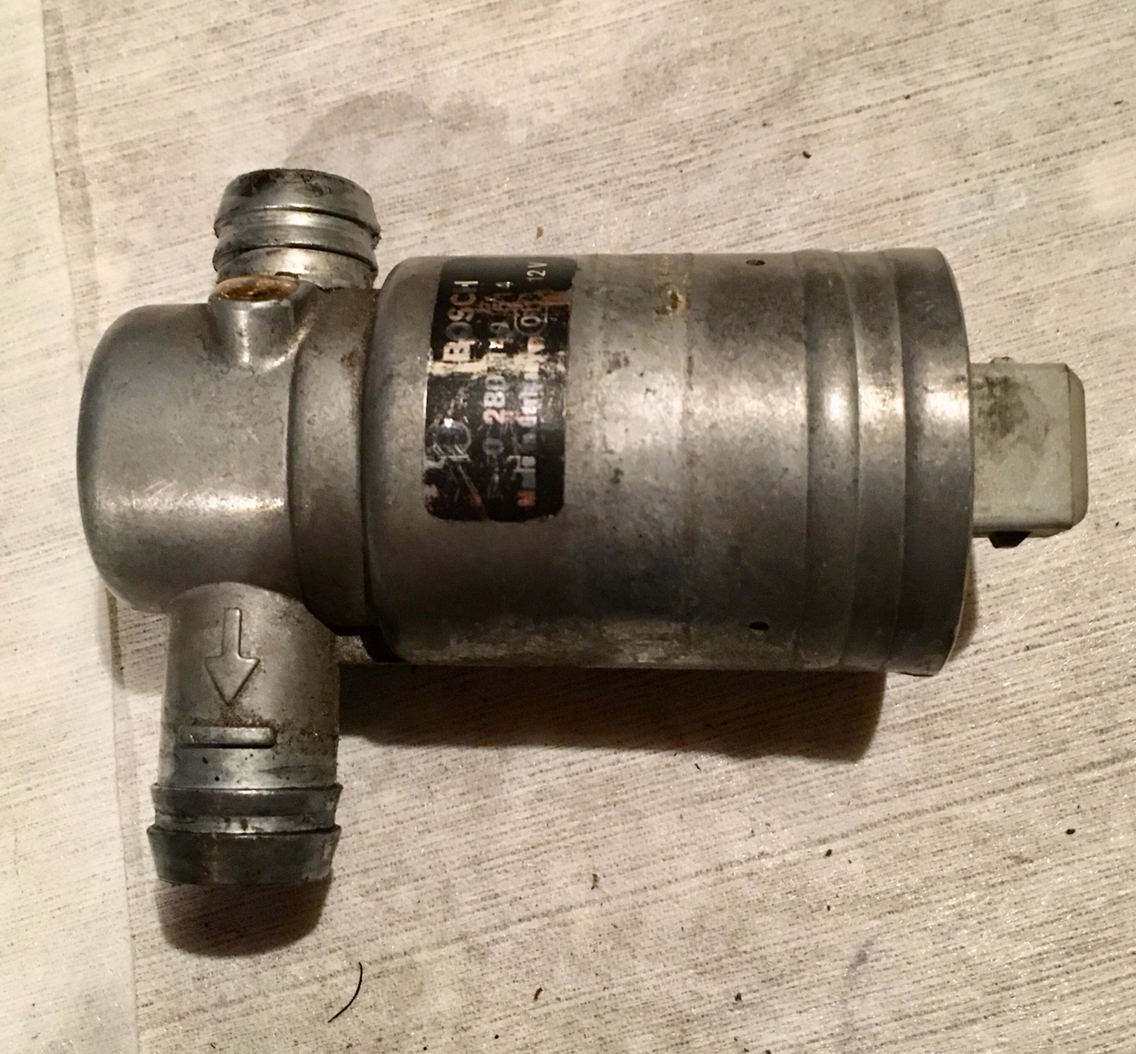
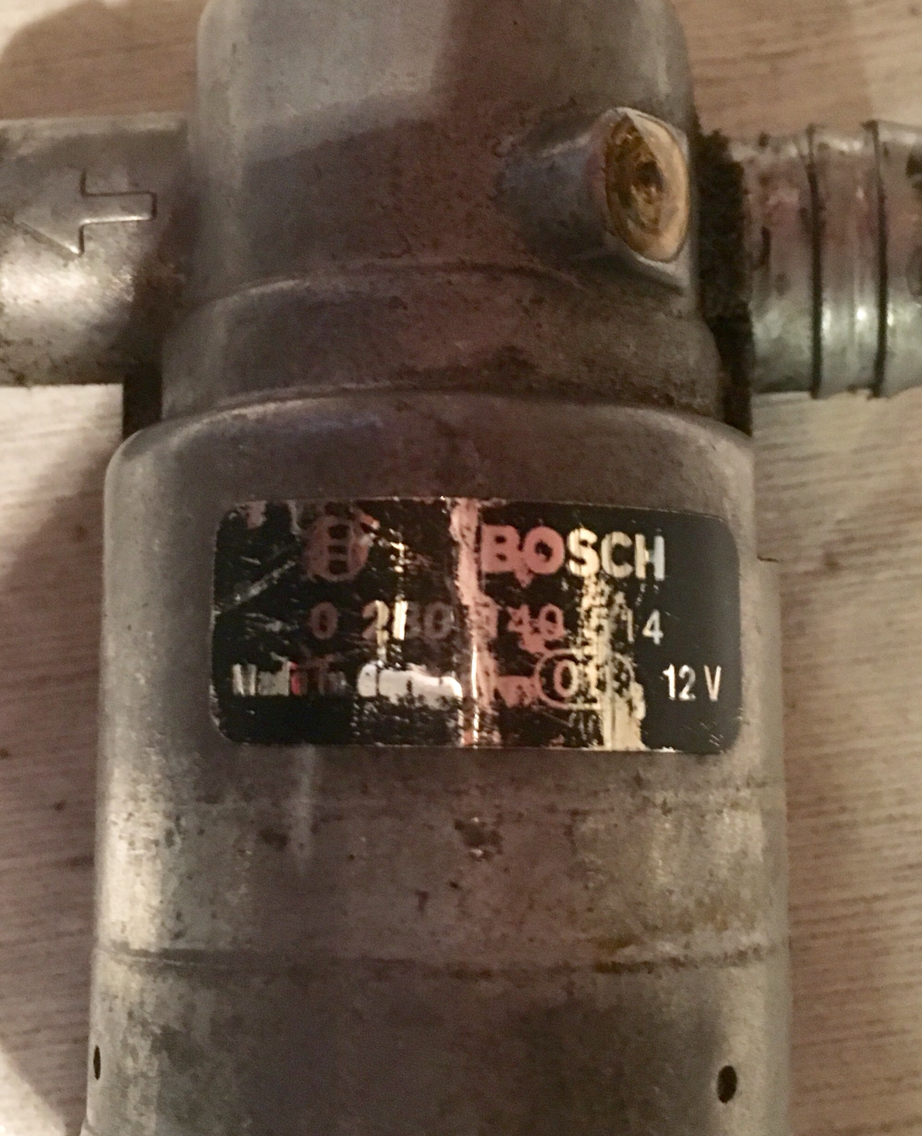
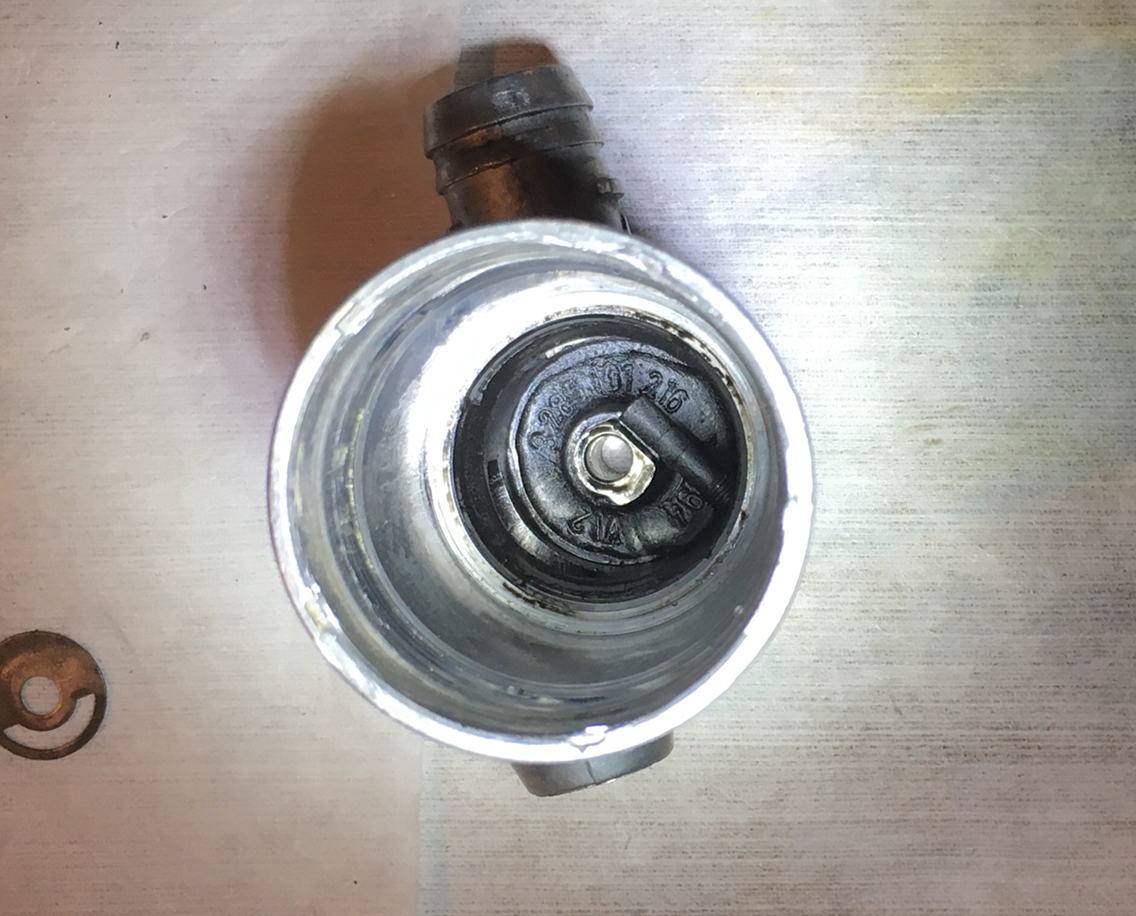
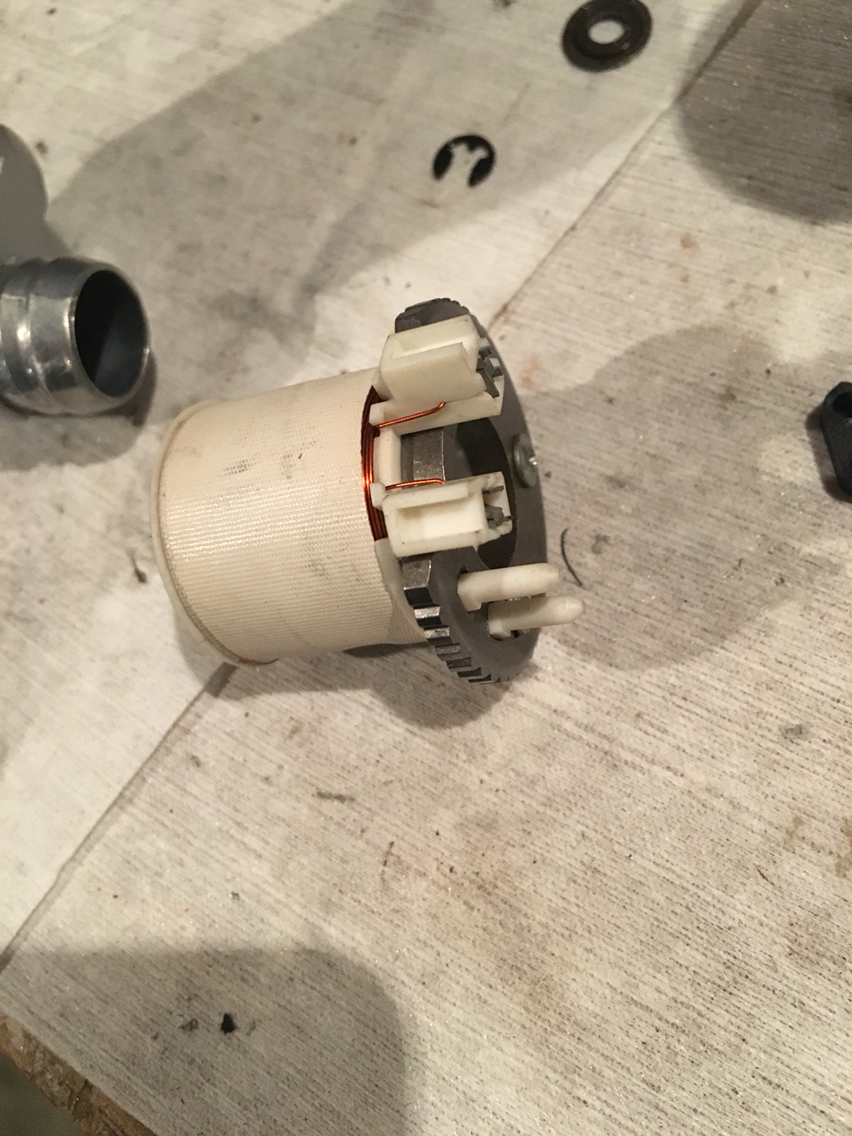
This thing is seized solid. Exactly what most of the ones i have ever serviced are. Again- I'm amazed at how much gunk is traveling through this intake. And how much it crud's up everything. This is not from over filling the oil. This is normal use. And it is telling us that not only do the vac valves and isv, etc need regular service and cleaning, but that the Porsche engineers didn't expect it. For what ever reason.
Anyway. I could have just shot some carb cleaner in there, which works fine. And that would have loosened it up and it would have likely functioned fine.
But...since it's an extra, and I've never had an extra.....i decided to take it apart.
We had a thread recently discussing the isv, and if one got dissected there and if this is redundant...my apologies. But I'm fascinated. So let's dig in...
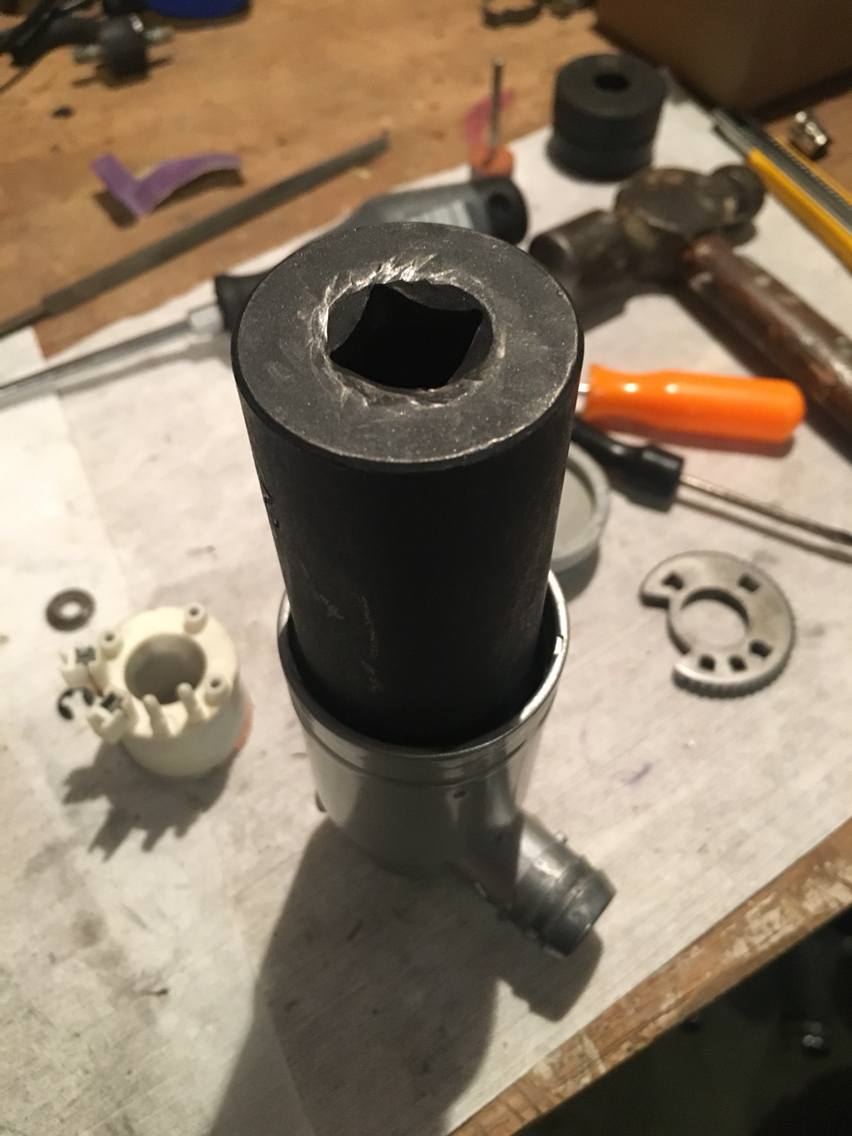
First - how the hell does it come apart???
I ground down the peens on the plastic side, where the plug is. And that cap was not coming off. At all.
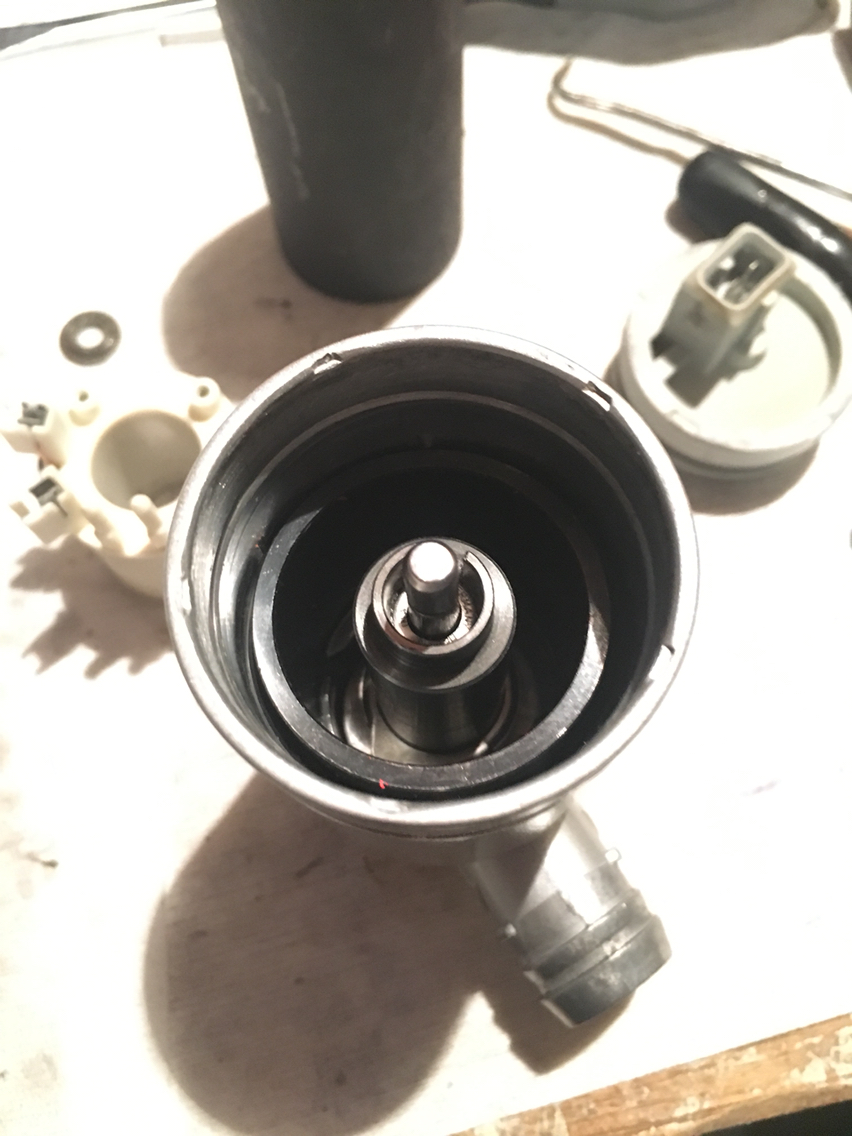
So i thought "what better way to get this apart than brute force?"....couldn't think of one. So i got a punch and a hammer, and put the punch on the shaft on the opposite side, and whacked it out. Pop. All good. Apart it is.
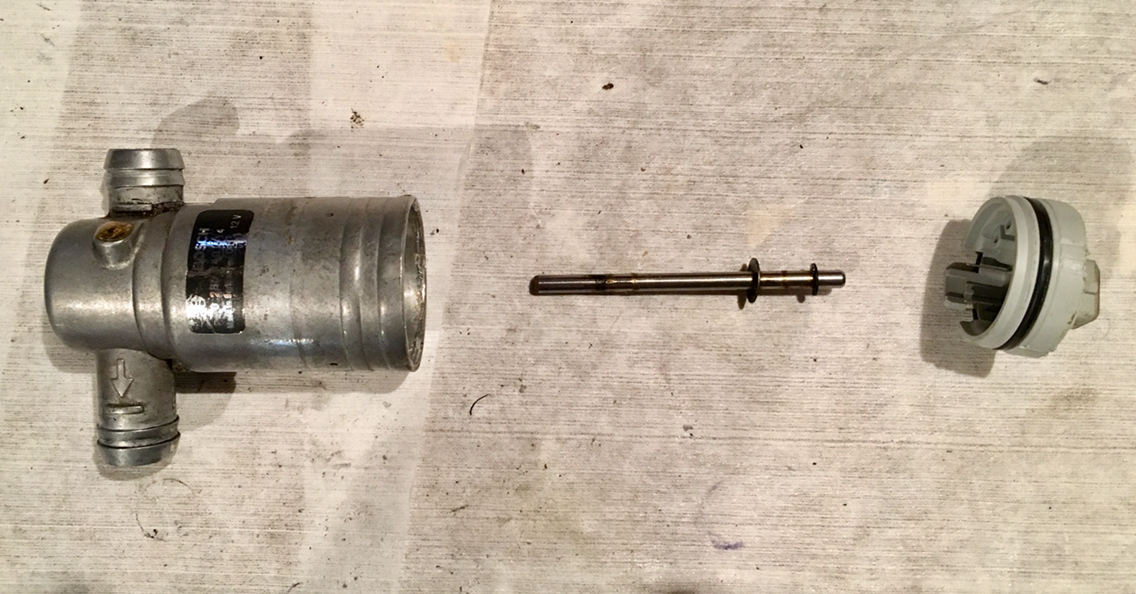
Turns out, the shaft is press fit into the tail end of the housing. Easy enough. It stays put, and everything inside rotates on the stationary shaft.
From there, it's three small screws and the whole thing comes apart.
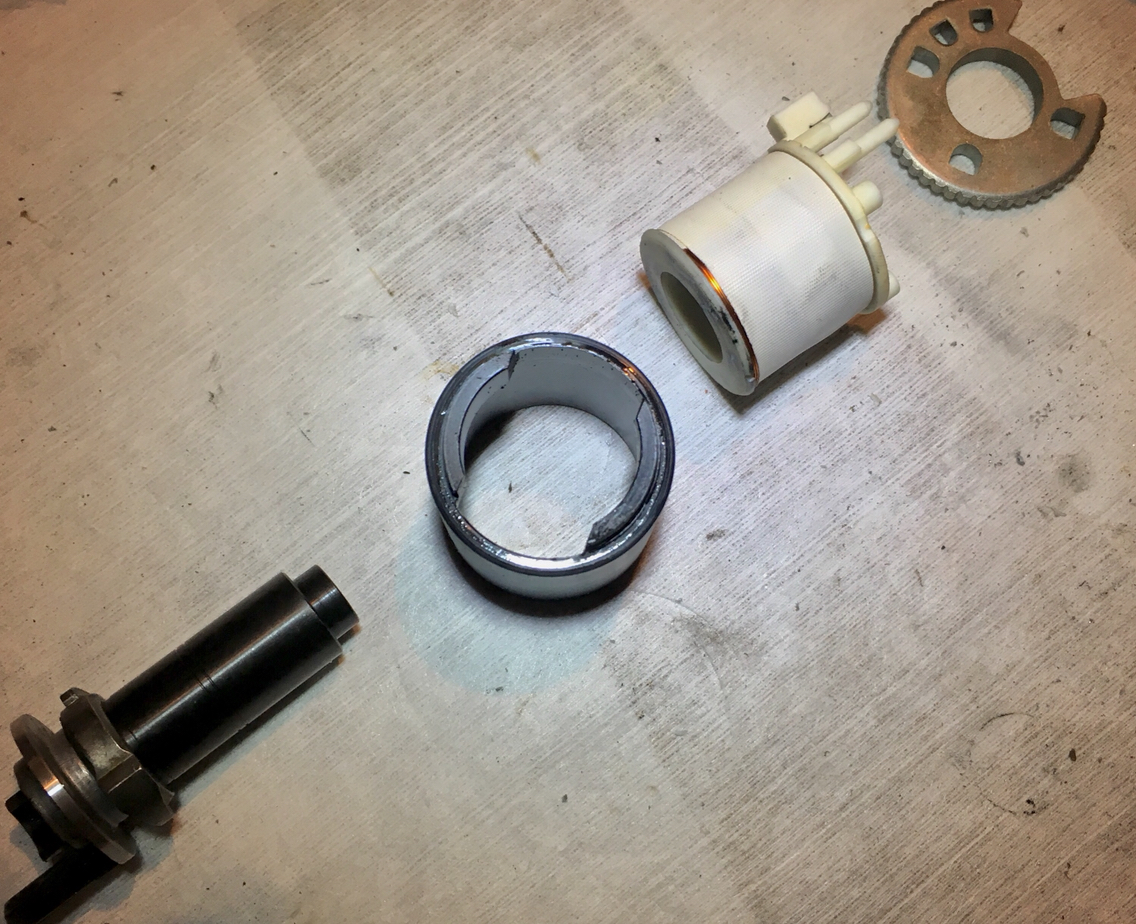
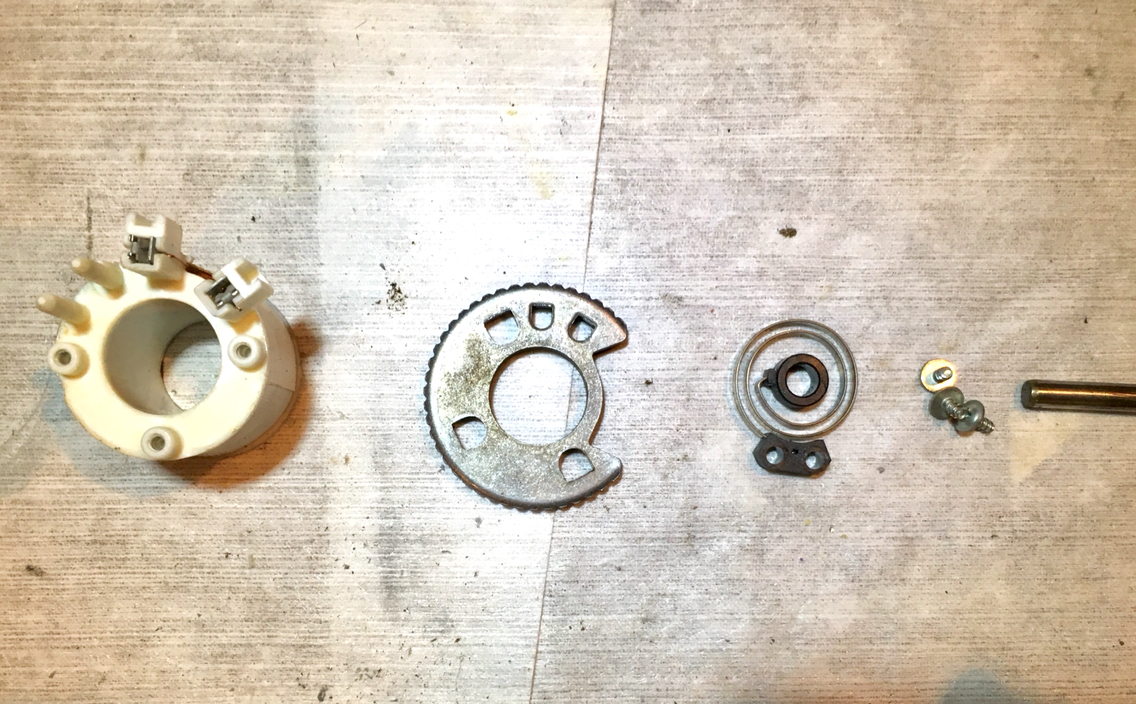
And then not to belabor anything, cuz I've done no work on it yet. Here are individual pics of the components:
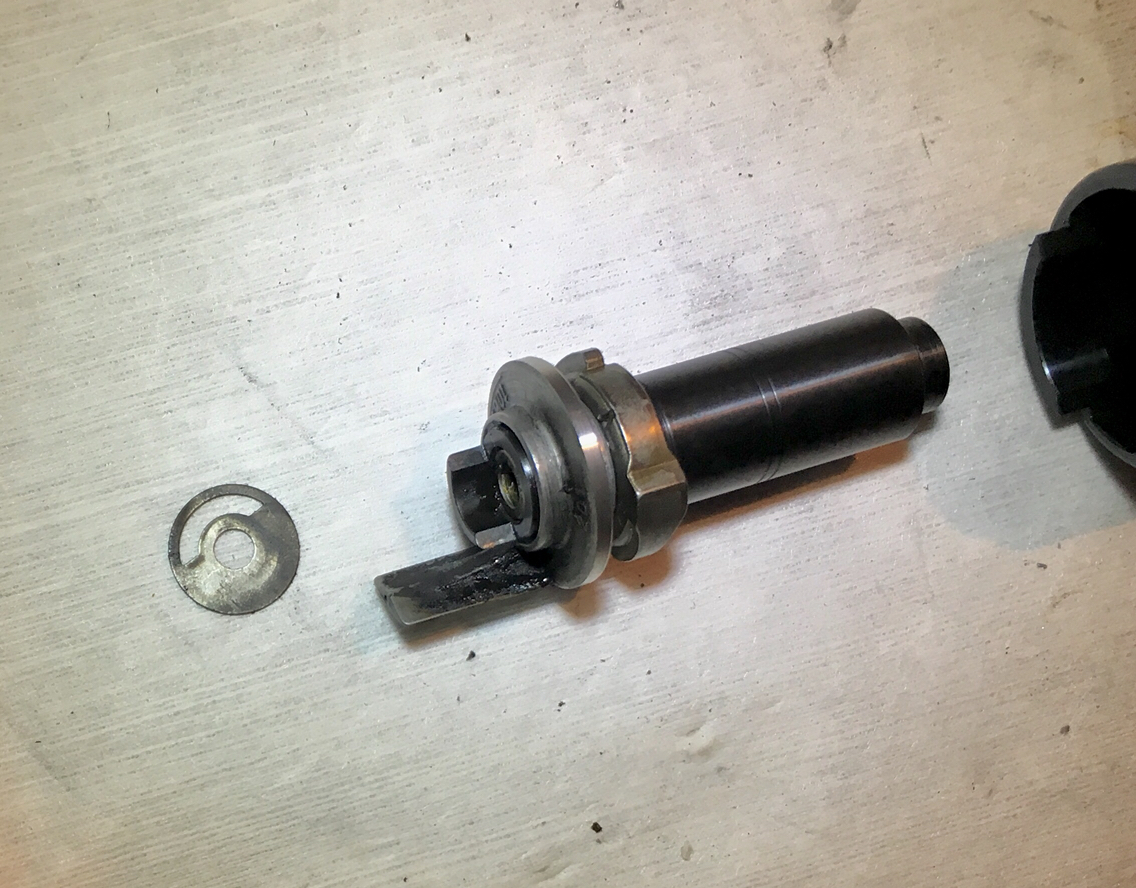

Now having had one apart...two observations...
1. Likely one should not be using carb cleaner or brake cleaner in there. It's electrical and has an electro magnetic motor that runs the flap back and forth. So maybe electronics cleaner is a better way to clean it out.
2. This should be disassembled to clean properly, the bearings should be cleaned and greased, and so i will be modifying this to be openable.
And now here's something we hope you'll really like!
This thing is seized solid. Exactly what most of the ones i have ever serviced are. Again- I'm amazed at how much gunk is traveling through this intake. And how much it crud's up everything. This is not from over filling the oil. This is normal use. And it is telling us that not only do the vac valves and isv, etc need regular service and cleaning, but that the Porsche engineers didn't expect it. For what ever reason.
Anyway. I could have just shot some carb cleaner in there, which works fine. And that would have loosened it up and it would have likely functioned fine.
But...since it's an extra, and I've never had an extra.....i decided to take it apart.
We had a thread recently discussing the isv, and if one got dissected there and if this is redundant...my apologies. But I'm fascinated. So let's dig in...
First - how the hell does it come apart???
I ground down the peens on the plastic side, where the plug is. And that cap was not coming off. At all.
So i thought "what better way to get this apart than brute force?"....couldn't think of one. So i got a punch and a hammer, and put the punch on the shaft on the opposite side, and whacked it out. Pop. All good. Apart it is.
Turns out, the shaft is press fit into the tail end of the housing. Easy enough. It stays put, and everything inside rotates on the stationary shaft.
From there, it's three small screws and the whole thing comes apart.
And then not to belabor anything, cuz I've done no work on it yet. Here are individual pics of the components:
Now having had one apart...two observations...
1. Likely one should not be using carb cleaner or brake cleaner in there. It's electrical and has an electro magnetic motor that runs the flap back and forth. So maybe electronics cleaner is a better way to clean it out.
2. This should be disassembled to clean properly, the bearings should be cleaned and greased, and so i will be modifying this to be openable.
09-02-2018, 09:44 PM
#188
Race Car
Thread Starter
Originally Posted by jonathant
Cool, thanks.
If you can find a metal �3.6� you might consider that for the intakes as opposed to a �4�... after all the motor is neither C2 nor C4; the displacement marking would make a nice addition - e.g. �Carrera 3.6�
Great style point wither way though; the attention to detail is admirable.
If you can find a metal �3.6� you might consider that for the intakes as opposed to a �4�... after all the motor is neither C2 nor C4; the displacement marking would make a nice addition - e.g. �Carrera 3.6�
Great style point wither way though; the attention to detail is admirable.
They never made numbers this small. And the Carrera actually is just the right length for that spot on the passenger side intake manifold. So the plan right now is just the one badge on the one side.
I do all this stuff in my head...and just modify the ideas as i go. So in the end...we will see how it comes out at the unveil!
09-02-2018, 11:25 PM
#189
Race Car
Thread Starter
And one last thing for the day. I refitted the tangled web of now Kevlar lined hoses. The one up top that faces north, will later be turned to face south and it fits itself through the bend in the left hand side....like tying your shoes. What a mess.
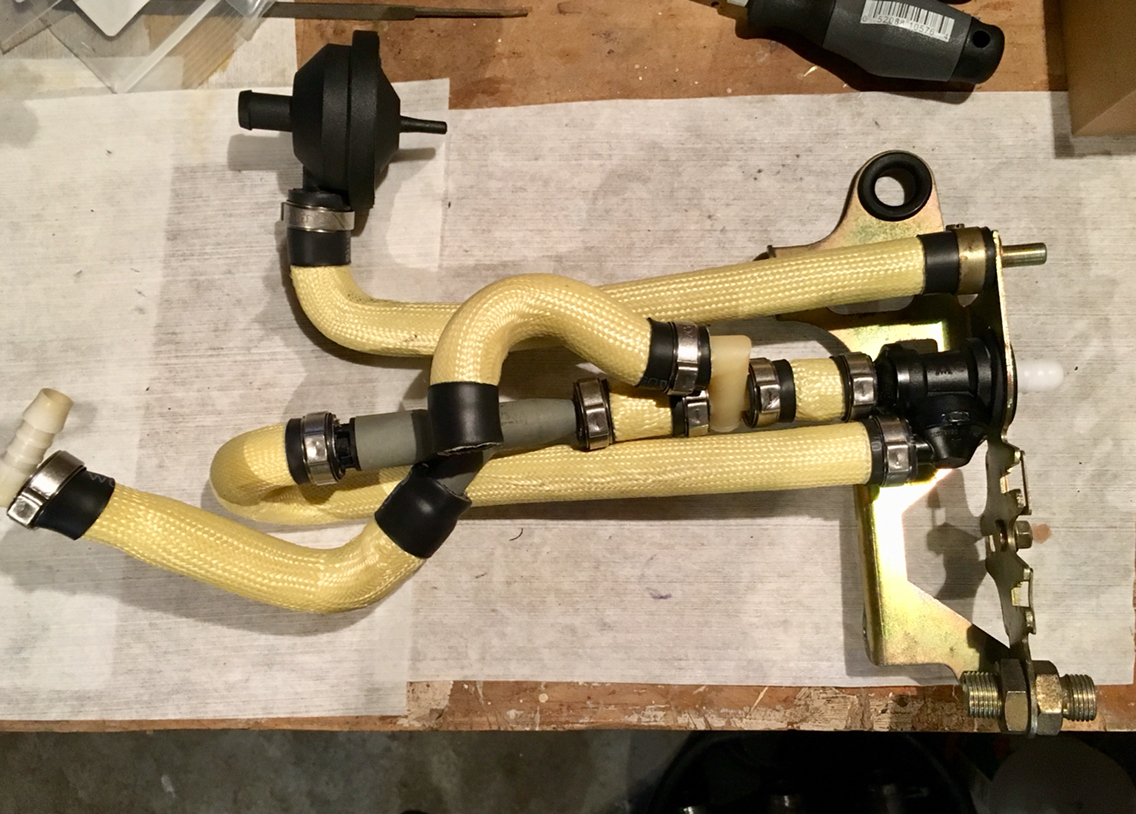
None of the Oetiker clamps are tightened yet. That all happens later when I'm ready to fit the whole thing together.
When i first tore this apart, it didn't occur to me how simple and brilliant the design actually is. Once you understand the mess, it's pretty simple. This whole unit uses oetiker clamps for a reason. It's a unit. Where it attaches to everything else, the manifold on the driver side for banks 1-3, and the throttle body, etc, they used hose clamps. You un-do a couple clamps and the unit comes out. Can then be serviced, and knitted and knotted back together and reinstalled as a lump of a unit again. Easy enough.
09-03-2018, 04:19 PM
#190
Race Car
Thread Starter
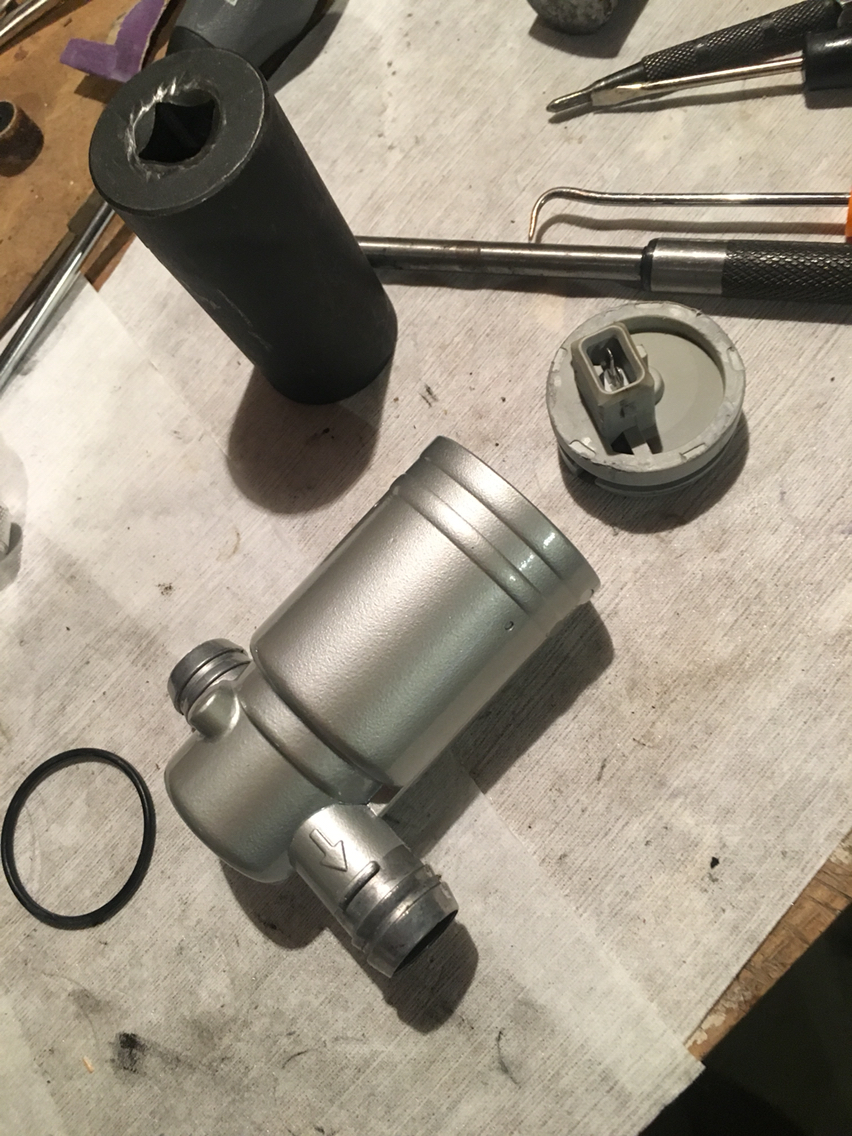
A little ISV work today. Primed and painted.
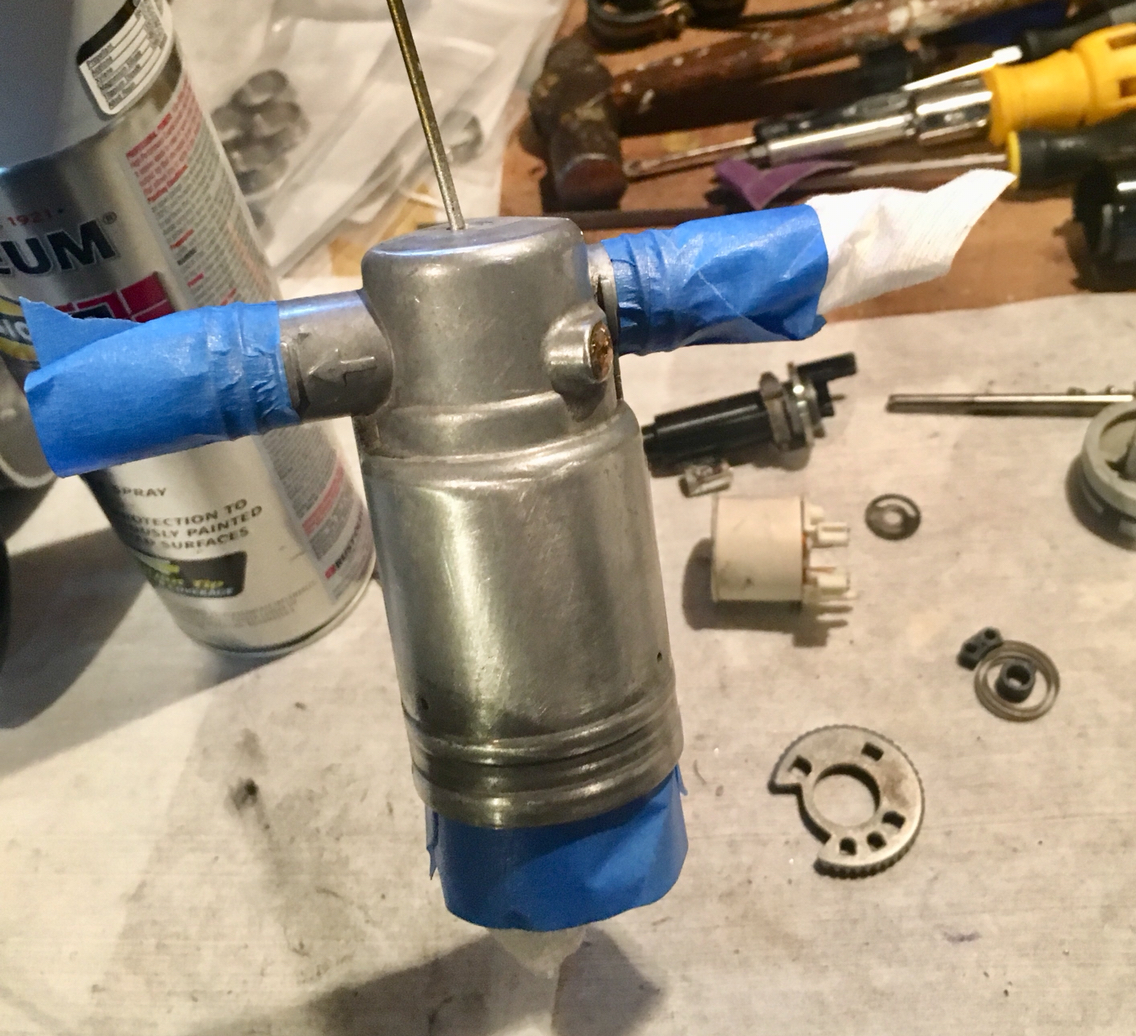
I don't have an after picture just yet. But it came out nice. It's kind of a stupid idea to paint this. It's held on, in the early intake, with a hose clamp. So the paint is just going to get scratched up.
Anyway. I cleaned the internals today and properly greased the bearings. I'd like to make the cap removable so next service i can just take it apart. So I'm thinking rather than peening, I'll throw a couple dots of jb weld on it. Easy enough to remove the jb when cleaning becomes necessary after a few years.
09-03-2018, 07:40 PM
#191
Race Car
Thread Starter
Ok. We are ready to rebuild.
Need to let the paint cure and harden for a bit prior. I wonder if i can get the inside clean and grease free enough to ceramic coat the inside. Might help prevent gumming up....
Need to let the paint cure and harden for a bit prior. I wonder if i can get the inside clean and grease free enough to ceramic coat the inside. Might help prevent gumming up....
09-03-2018, 07:56 PM
#192
Race Car
Thread Starter
Remember back in the beginning - when i was cleaning stuff and i gave up on the intake sleeves?
They were all crusty, and i couldn't get that stuff off to save my life.
I later bought a new set. Those were hard...so in they went to a bath of wintergreen oil and alcohol. They came out huge and way over expanded. (They have since shrink back down to the correct size). But in the meantime, not wanting to buy yet another set of seals, i got to thinking. I have another set of seals from another intake that i have...and they are crusty too. So after cleaning and degreasing - they look like this:
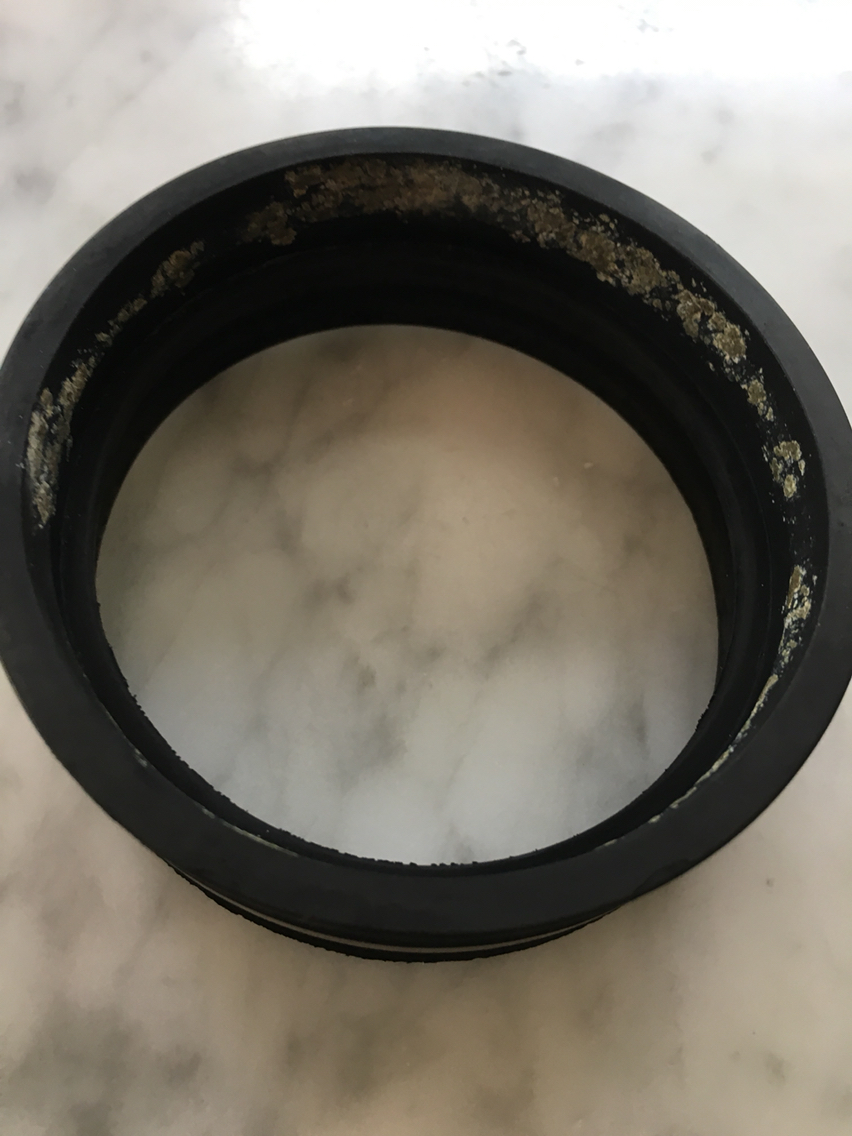
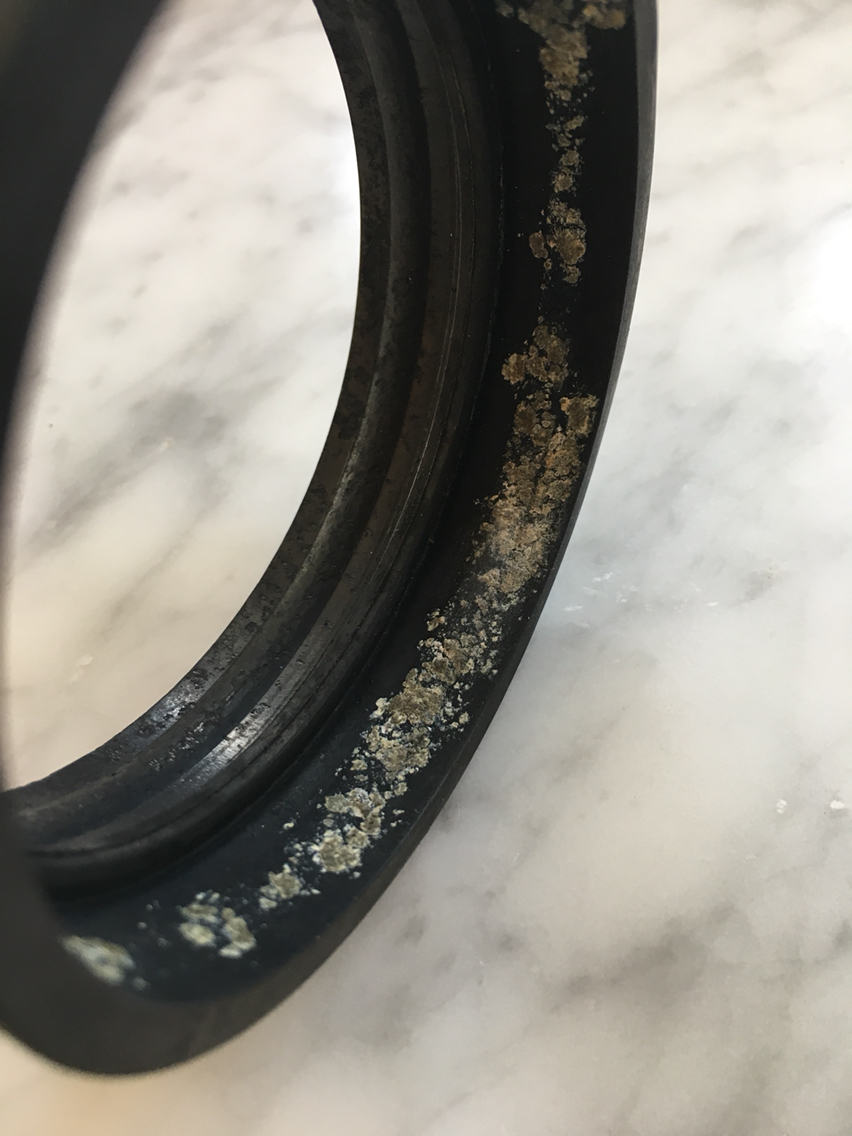
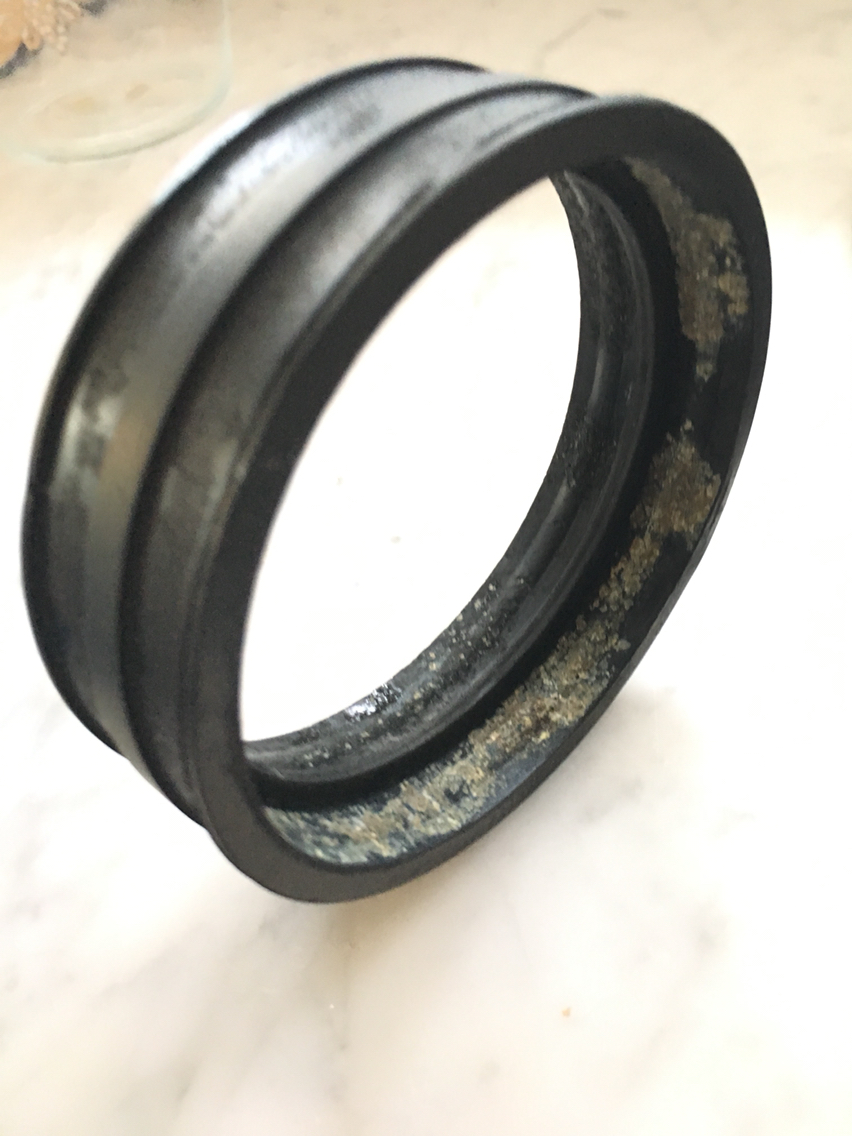
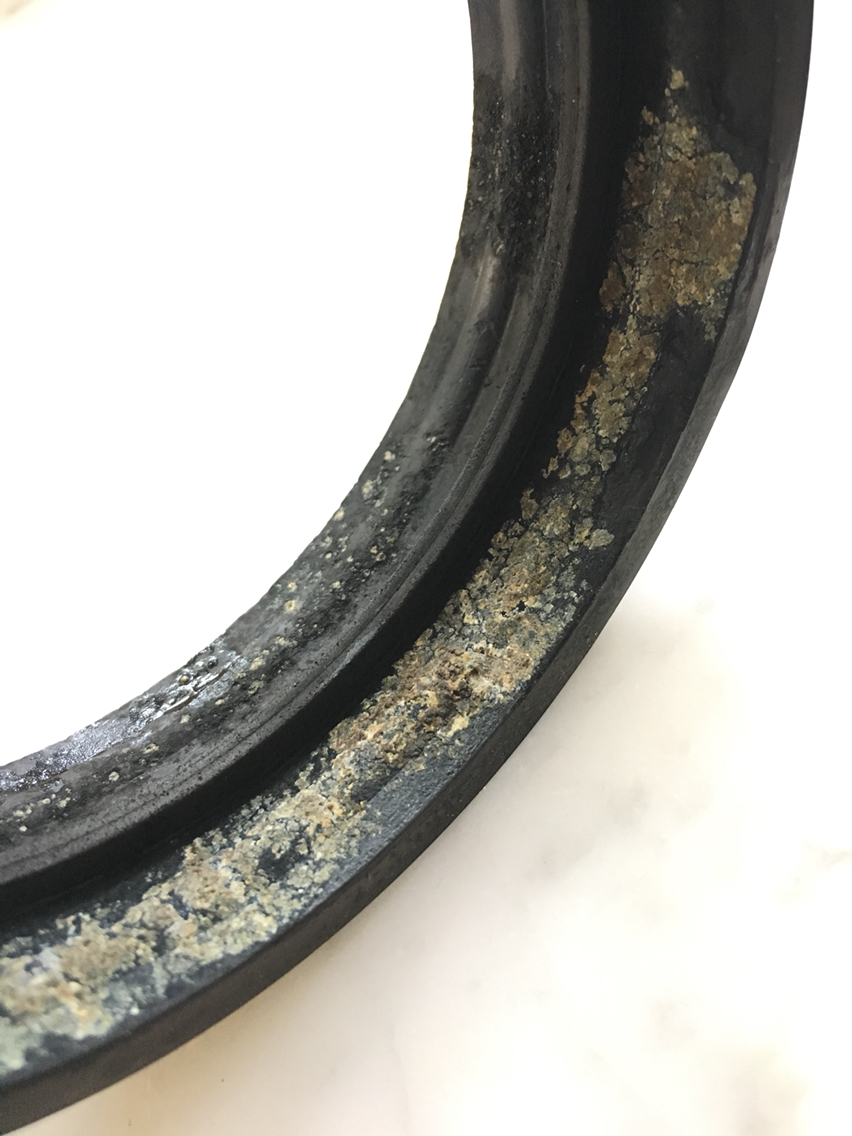
This crusty stuff is hard and feels like cement. And it's bonded to the rubber somehow. Now, since the aluminum on the throttle body is corroded and missing chunks that look to be the exact opposite shape of the crusty nasty on my rubber seals...I'm guessing it's corrosion. Basically aluminum rust.
Sooooo, what is the best way to get rid of rust and not eat through the substrate???
CLR.
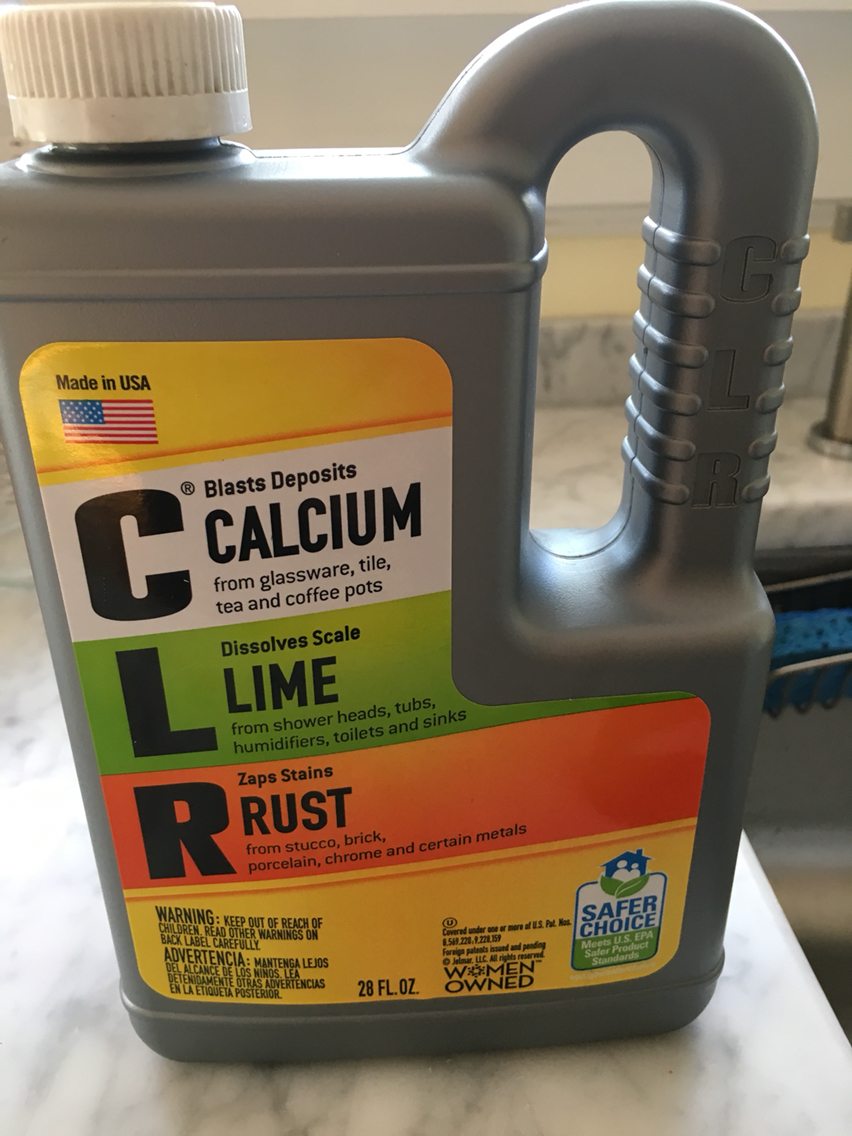
Well maybe not "the best"...but i happen to have some around. So it's worth a shot, right?
I had tried, all kinds of chemicals, then Dawn dishwashing liquid, wd40, and spray 9. Nothing would touch this stuff.
Until i has the brilliant idea to try something made for the task.
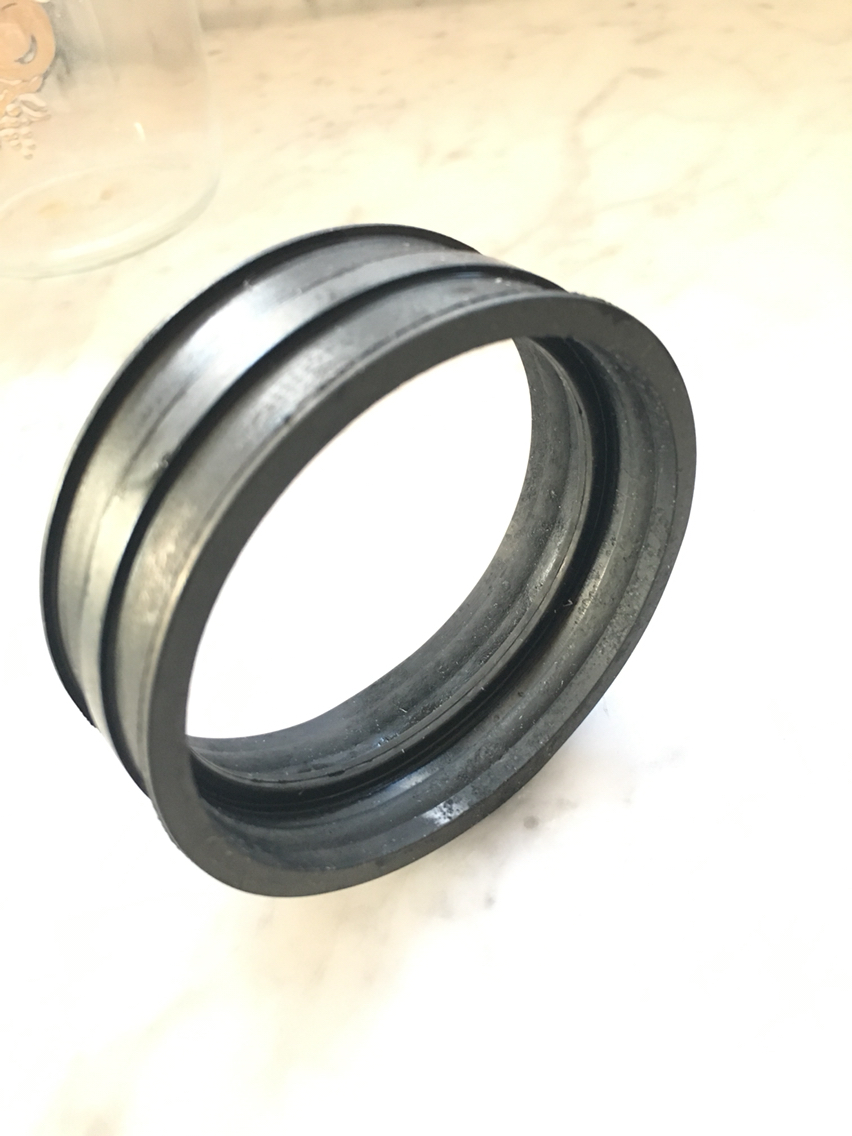
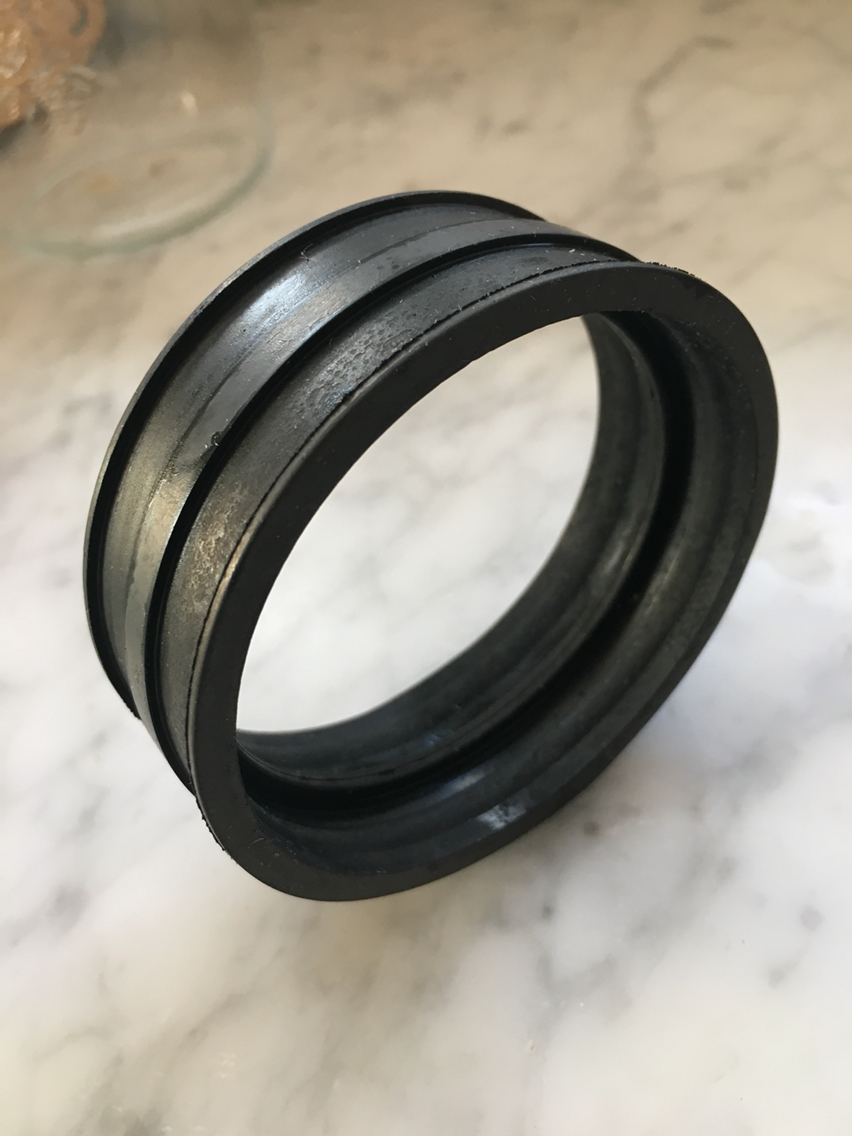
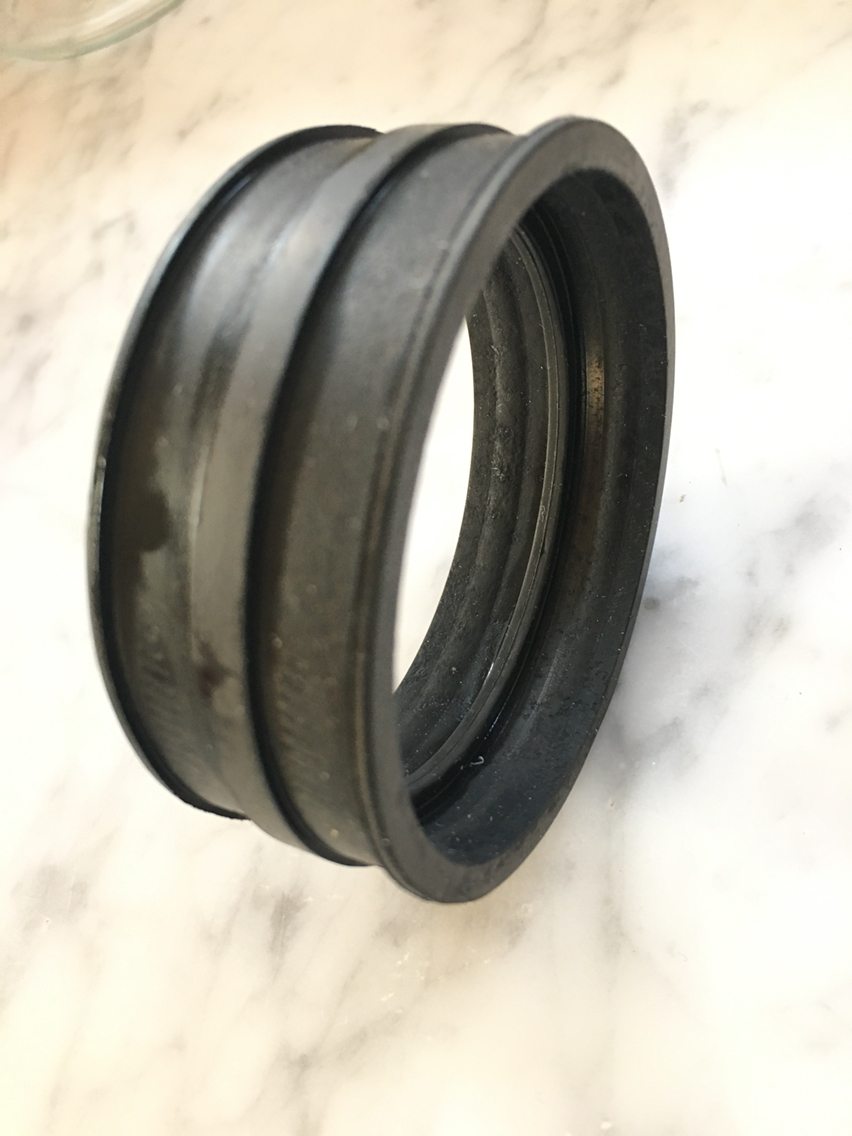
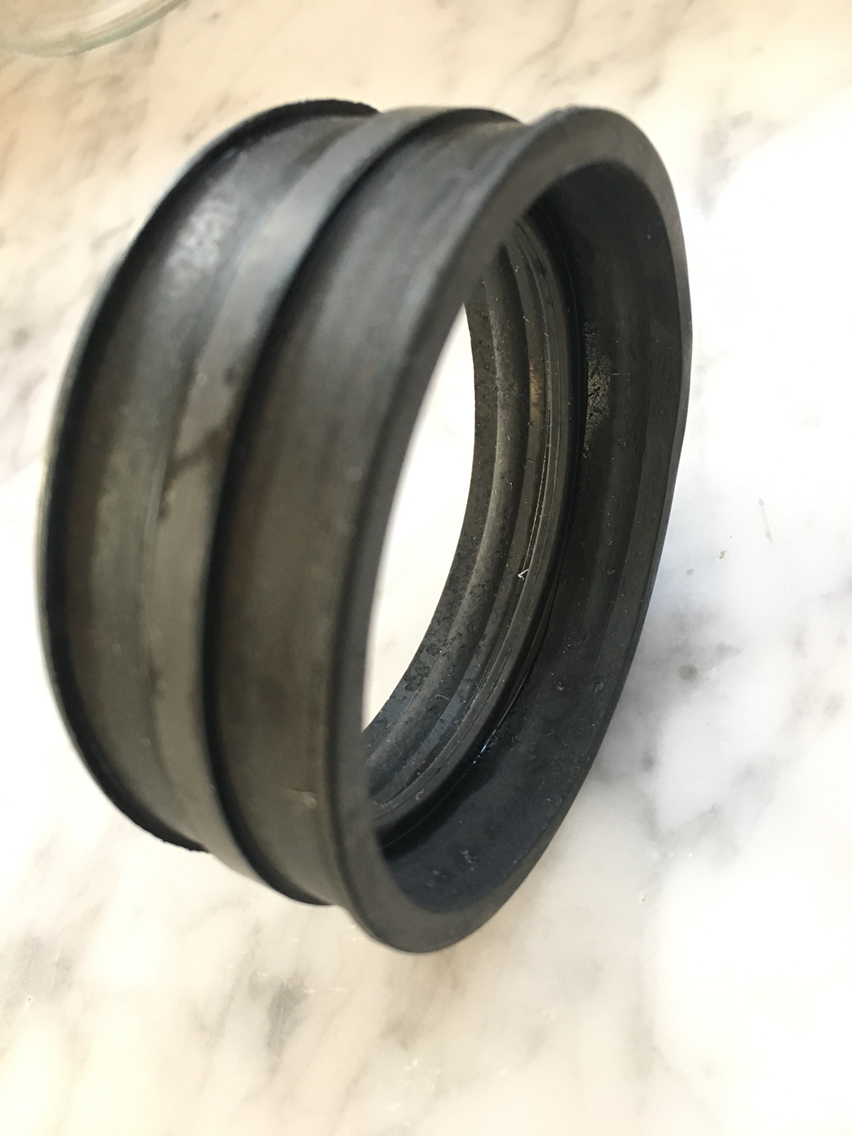
Hope those show well. I'm amazed. It took a while, and periodically i rubbed them with a toothbrush. Now that they are dry, i can see on a couple of them that there are still some spots. So I'll hit those again. But wow.
Pretty much everyone with an aluminum throttle body is going to have this problem. The plastic ones should have zero of this kind of thing.
Chalk one up for why plastic....
They were all crusty, and i couldn't get that stuff off to save my life.
I later bought a new set. Those were hard...so in they went to a bath of wintergreen oil and alcohol. They came out huge and way over expanded. (They have since shrink back down to the correct size). But in the meantime, not wanting to buy yet another set of seals, i got to thinking. I have another set of seals from another intake that i have...and they are crusty too. So after cleaning and degreasing - they look like this:
This crusty stuff is hard and feels like cement. And it's bonded to the rubber somehow. Now, since the aluminum on the throttle body is corroded and missing chunks that look to be the exact opposite shape of the crusty nasty on my rubber seals...I'm guessing it's corrosion. Basically aluminum rust.
Sooooo, what is the best way to get rid of rust and not eat through the substrate???
CLR.
Well maybe not "the best"...but i happen to have some around. So it's worth a shot, right?
I had tried, all kinds of chemicals, then Dawn dishwashing liquid, wd40, and spray 9. Nothing would touch this stuff.
Until i has the brilliant idea to try something made for the task.
Hope those show well. I'm amazed. It took a while, and periodically i rubbed them with a toothbrush. Now that they are dry, i can see on a couple of them that there are still some spots. So I'll hit those again. But wow.
Pretty much everyone with an aluminum throttle body is going to have this problem. The plastic ones should have zero of this kind of thing.
Chalk one up for why plastic....
09-04-2018, 10:33 PM
#193
Race Car
Thread Starter
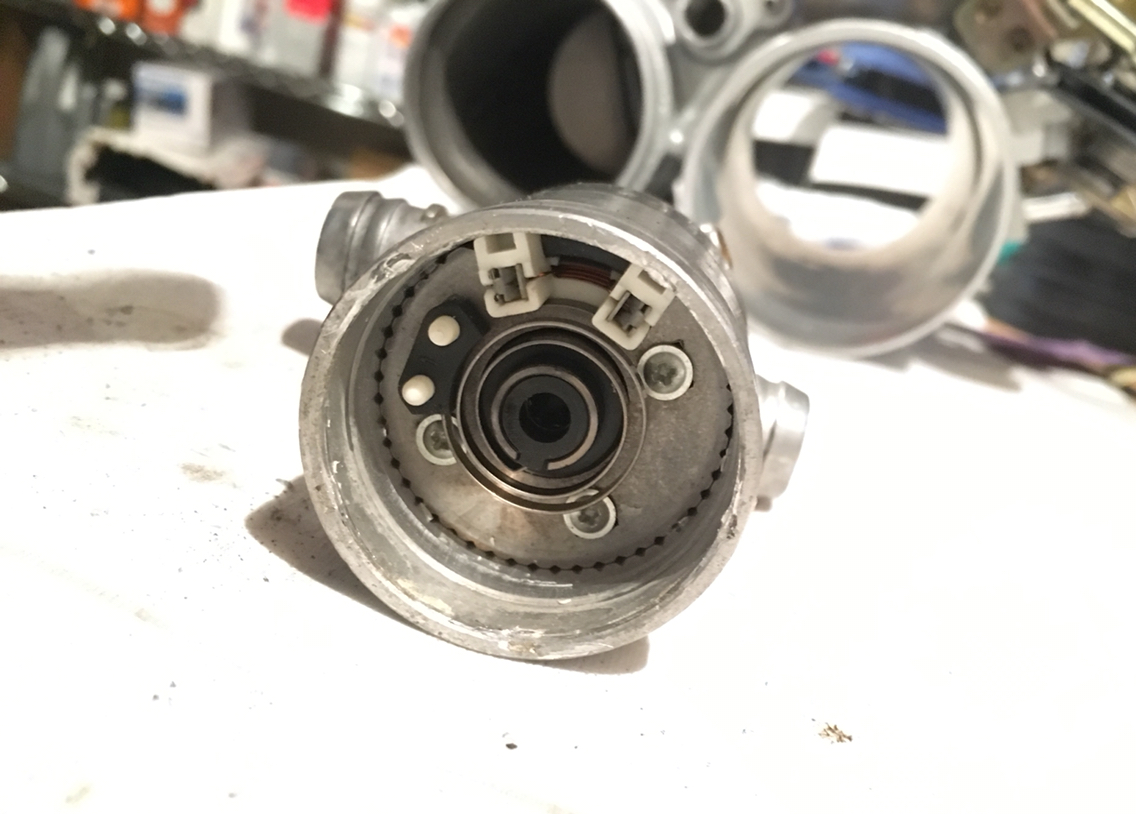
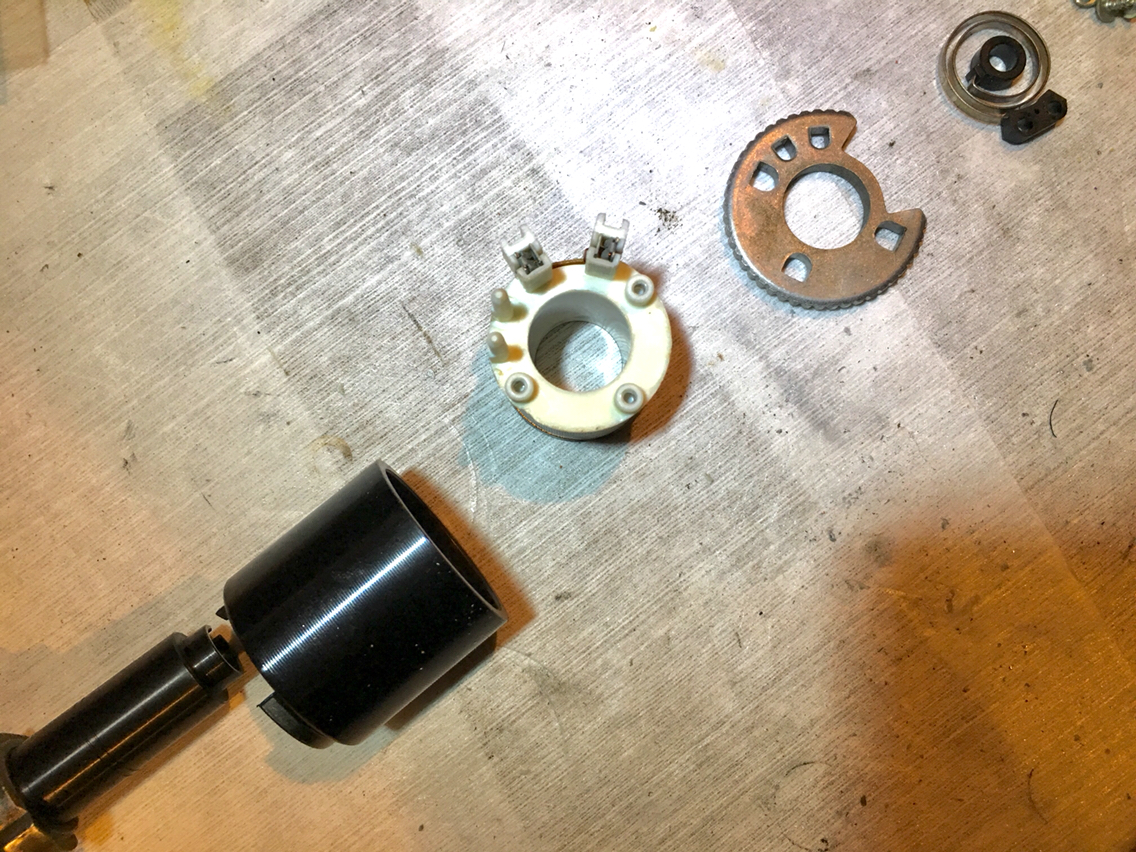
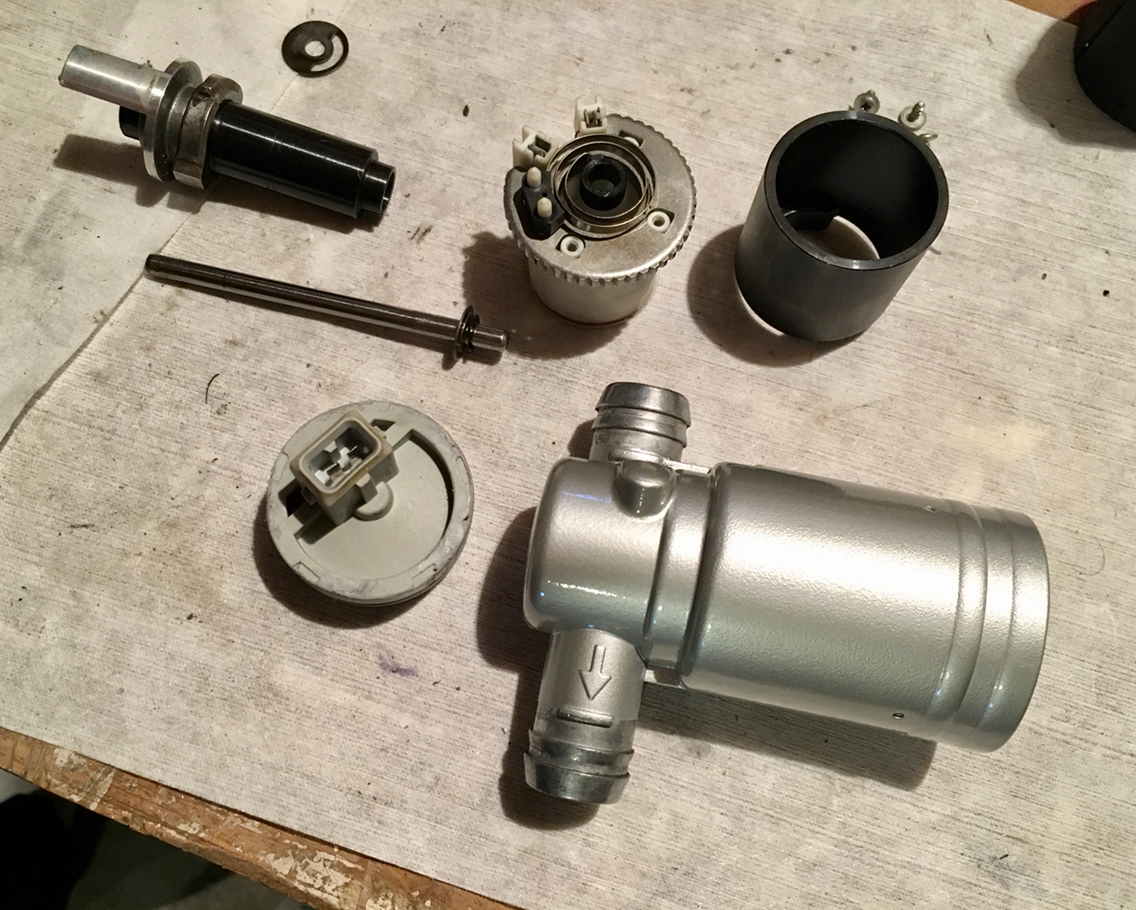
Back to the isv. Let's see if i can make this clear....
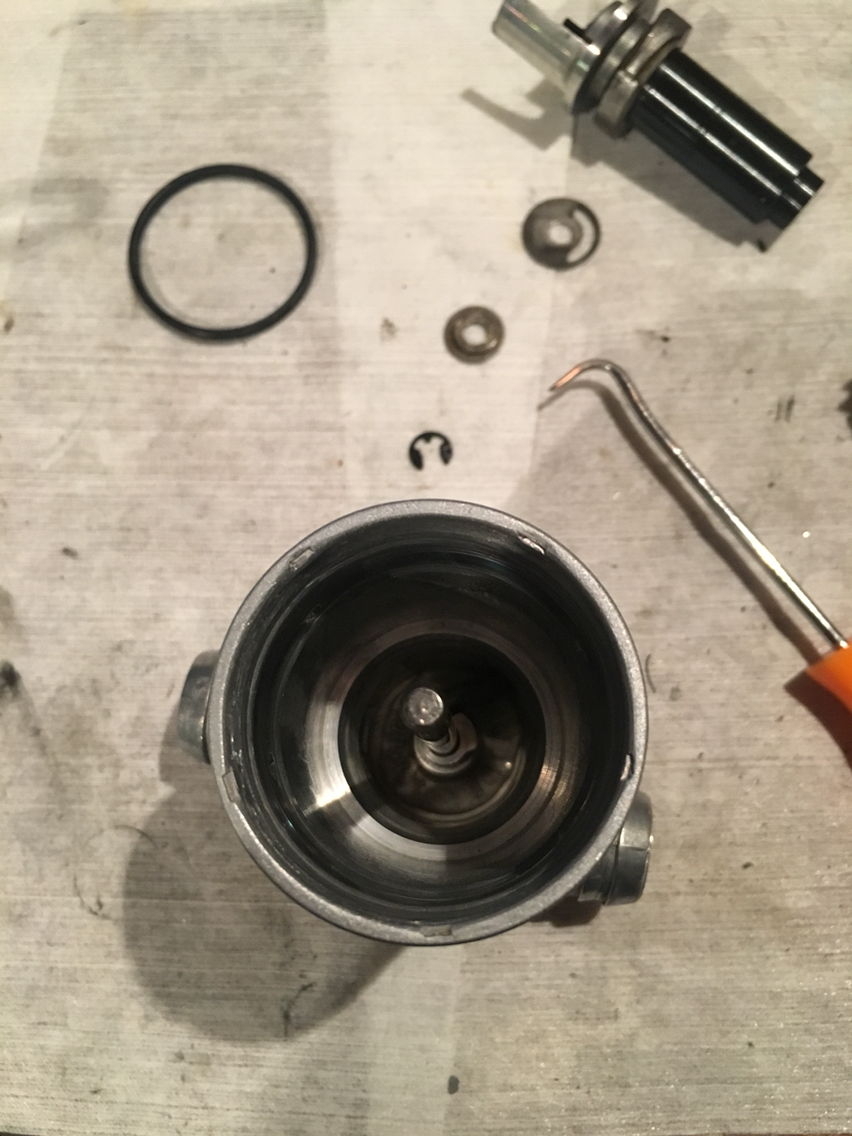
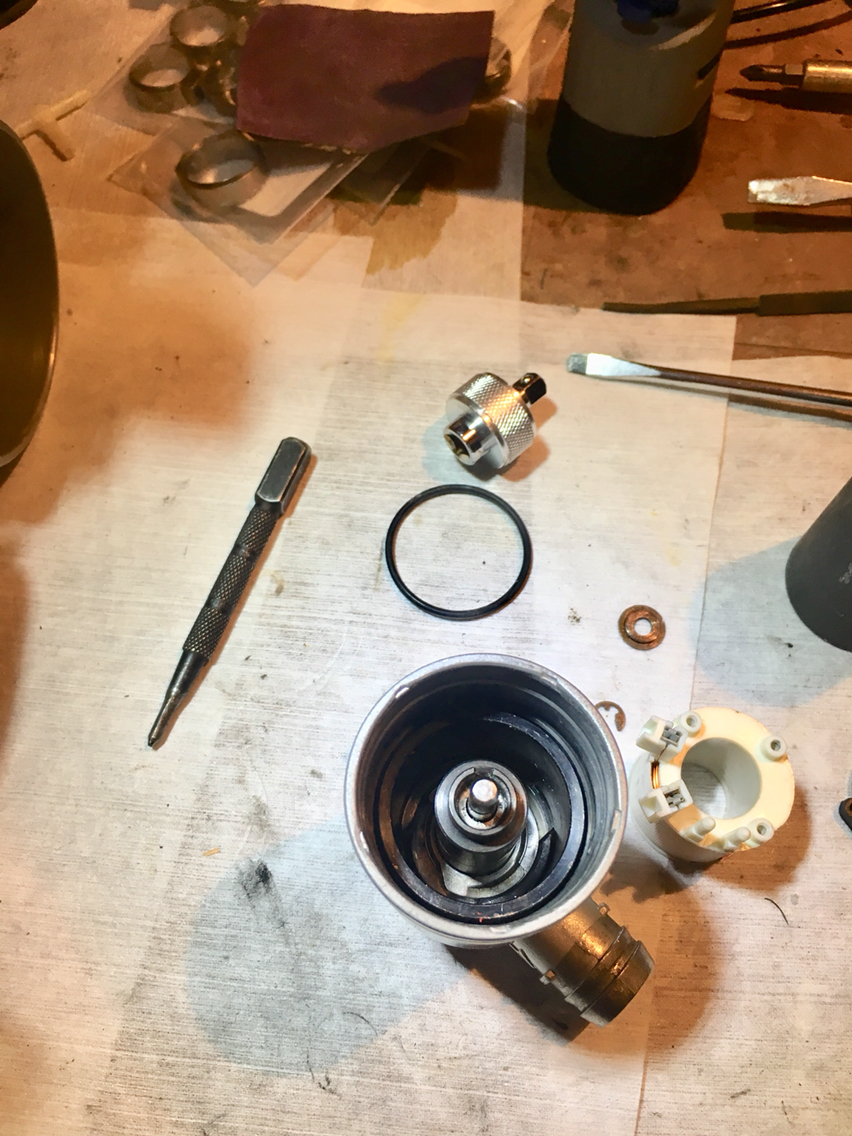
On disassembly, there is no reason to take out the shaft, and effectively, your job will be easier if you don't. There is an E clip at the top of the shaft. If you can't get the plastic cap off after grinding away the peens, the only way is going to be to press out the shaft like i did. But if you get the cap to wiggle out- it's only in there with an oring and it's plugged onto the spool...so it will come out if you work at it. Wiggle wiggle...
Anyway. Once the cap is off, take the e clip off, then the spacers. Then the spring straight up.
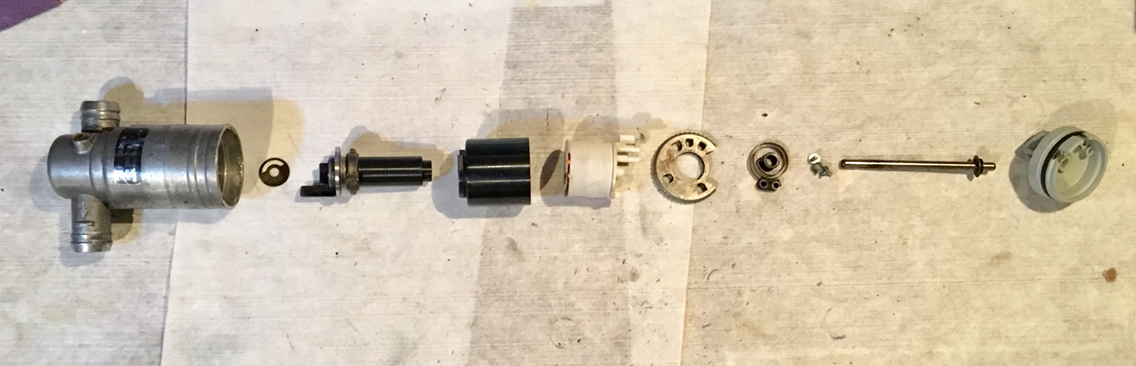
The rest is pressed in. So turn the unit with the open side facing toward the bench and slam it into the bench a couple times. The spindle that rotates in the shaft is heavy. That will act as a battering ram and pop the silver gear looking thing out. Mark that and it's orientation prior to this step. You'll have to reassemble it in the exact same place as before.
Once it's all out. Clean it up. Regrease the bearings- not easy cuz they are tiny needle bearings...and then grind down the peens and anythjng that will impede reassembly.
Make sure you know the order of the pieces going back in. Spacers and all.
Then installl the spindle and this thing:
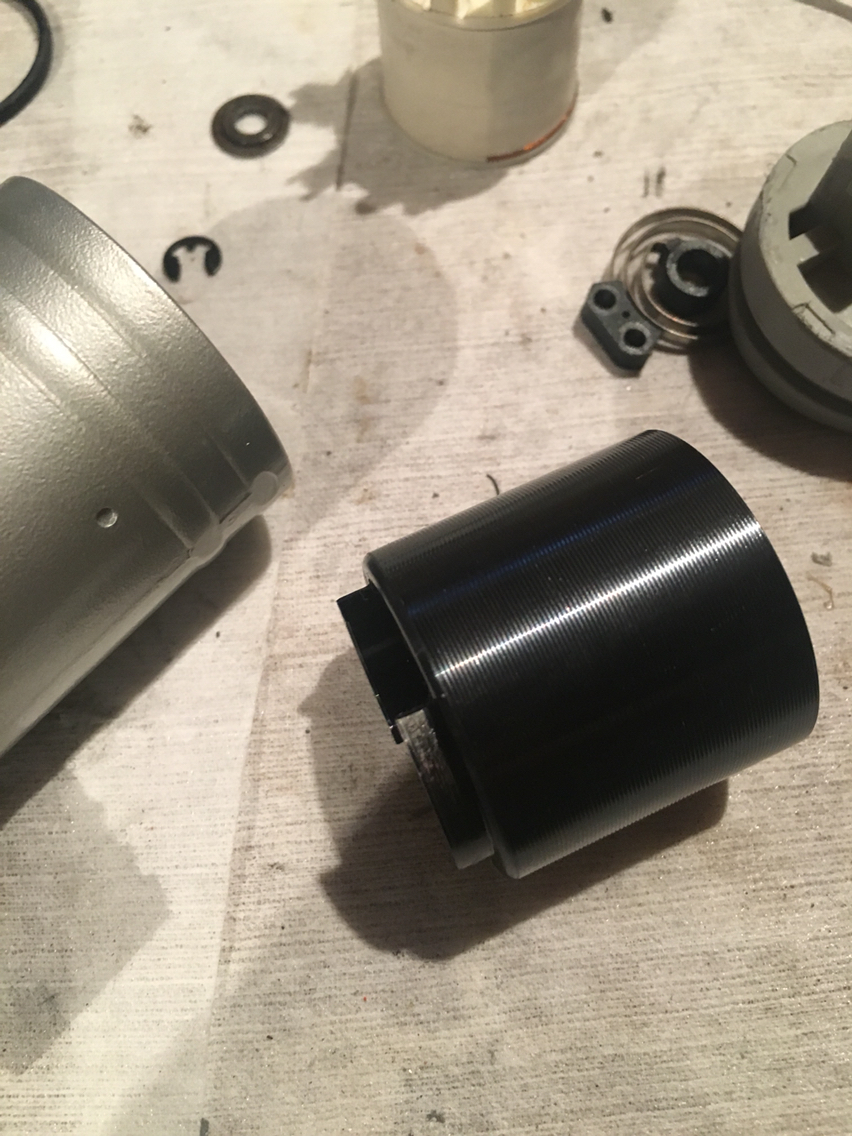
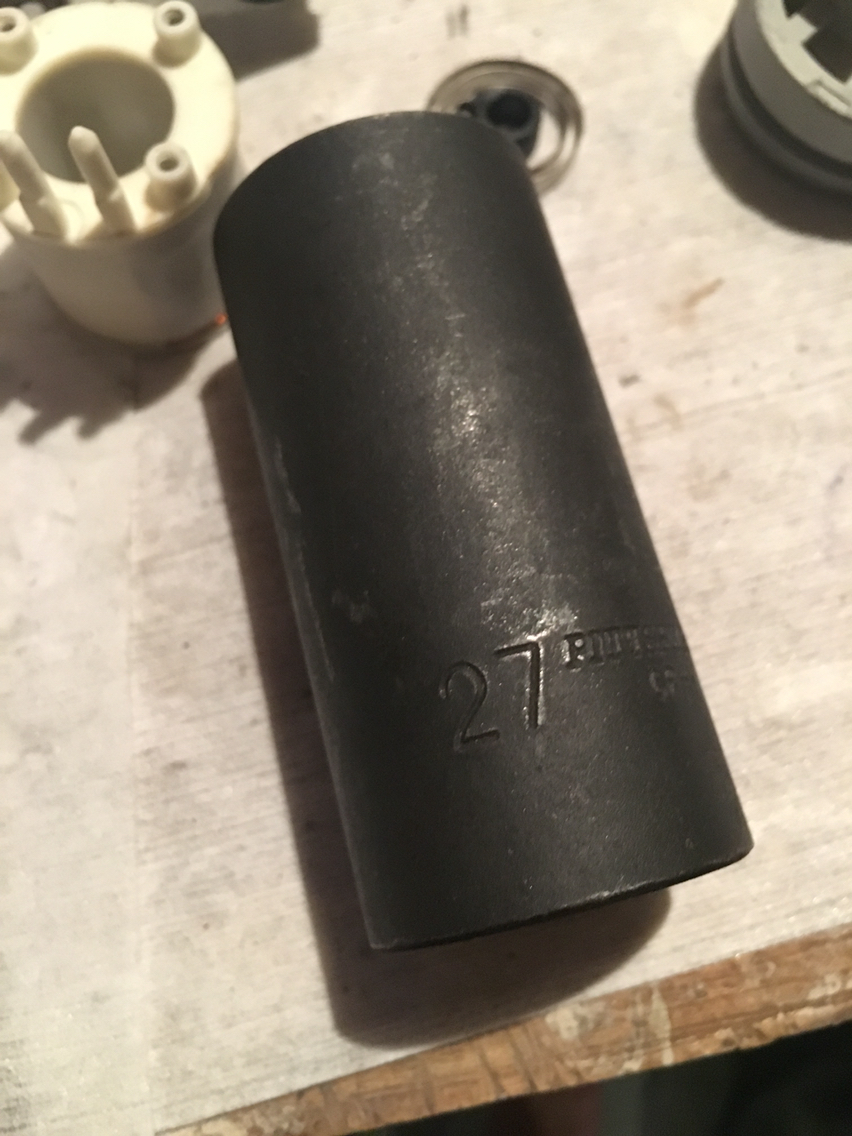
Spindle first , then that thing and then press with a 27mm socket
And now you should be here:
Then screw the silver gear looking thing to the top of the spool, assuming you took it apart- you didn't need to...
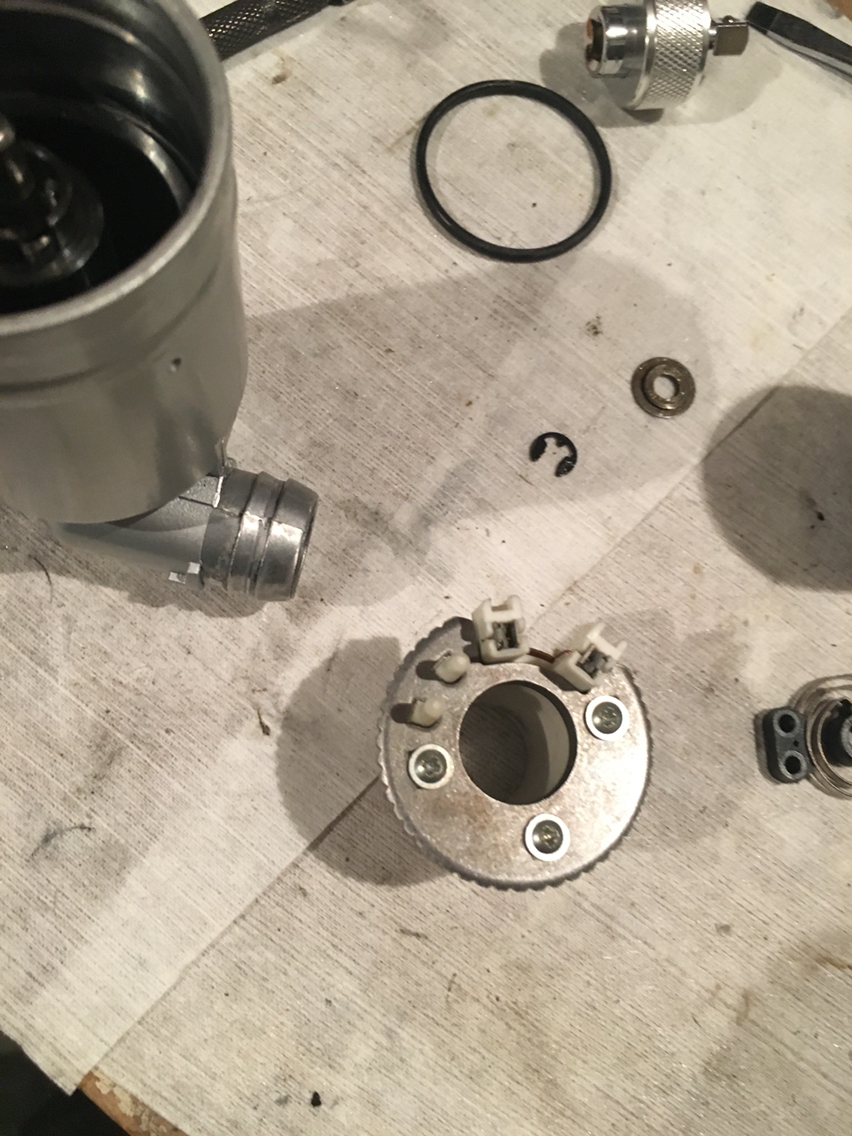
Slip that into the unit oriented as it has been. Press carefully with a small socket toward the center. Make sure you are going in nice and straight. Then install the spring and the spacers and the e clip.
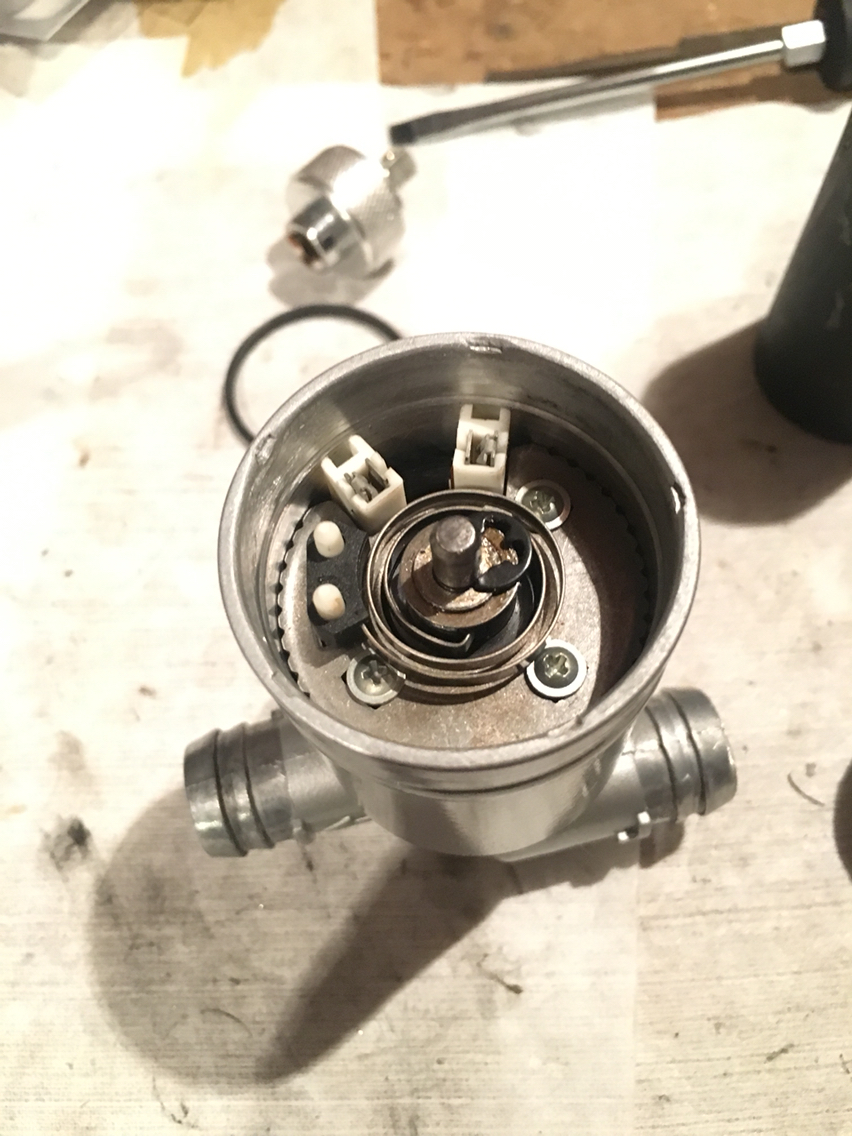

And you are ready to put the cap back on. The cap is not under pressure. And the e clip holds all the important stuff from moving. So I'm going to put a bead of silicone on the rim once the cap is installed, to hold it in place, and all done. Serviceable ISV.
On disassembly, there is no reason to take out the shaft, and effectively, your job will be easier if you don't. There is an E clip at the top of the shaft. If you can't get the plastic cap off after grinding away the peens, the only way is going to be to press out the shaft like i did. But if you get the cap to wiggle out- it's only in there with an oring and it's plugged onto the spool...so it will come out if you work at it. Wiggle wiggle...
Anyway. Once the cap is off, take the e clip off, then the spacers. Then the spring straight up.
The rest is pressed in. So turn the unit with the open side facing toward the bench and slam it into the bench a couple times. The spindle that rotates in the shaft is heavy. That will act as a battering ram and pop the silver gear looking thing out. Mark that and it's orientation prior to this step. You'll have to reassemble it in the exact same place as before.
Once it's all out. Clean it up. Regrease the bearings- not easy cuz they are tiny needle bearings...and then grind down the peens and anythjng that will impede reassembly.
Make sure you know the order of the pieces going back in. Spacers and all.
Then installl the spindle and this thing:
Spindle first , then that thing and then press with a 27mm socket
And now you should be here:
Then screw the silver gear looking thing to the top of the spool, assuming you took it apart- you didn't need to...
Slip that into the unit oriented as it has been. Press carefully with a small socket toward the center. Make sure you are going in nice and straight. Then install the spring and the spacers and the e clip.
And you are ready to put the cap back on. The cap is not under pressure. And the e clip holds all the important stuff from moving. So I'm going to put a bead of silicone on the rim once the cap is installed, to hold it in place, and all done. Serviceable ISV.
 09-05-2018, 09:55 AM
#195
Burning Brakes
I might start on the ISV project this weekend, since I have an old one handy.

