
Fuel Filler Neck Replacement
 06-04-2005, 11:42 AM
#1
Professor of Pending Projects
Rennlist Member
Rennlist Member
Thread Starter
I took the time to change my fuel filler neck today to avoid the fuel smell, in the trunk and outside, every time I made a hard turn. Here are the steps I did. I hope it helps!!
(Please know that there is another site from a fellow Rennlister with similar documentation and for all practical purposes this thread is not really needed. The one in John's WebSite is based on a Rennlist post but I could not find the original post here... and I wanted Rennlist to have its own I guess, so... anyway, here is the link to that one Curing the Fuel Odour Problem in the 964 Trunk
And here is mine:
If your car is experiencing fuel odor in the trunk or outside there are a few things to check I will start with the least expensive ones:
1. Check the condition of all hoses, and that all hose clamps are secured. This also includes the tube going to the carbon canister, and removing bottom cover to check fuel pump area.
2. Fuel cap seal. This seal can be purchase separately for around US$3-4.00 or you can just buy a new fuel cap.
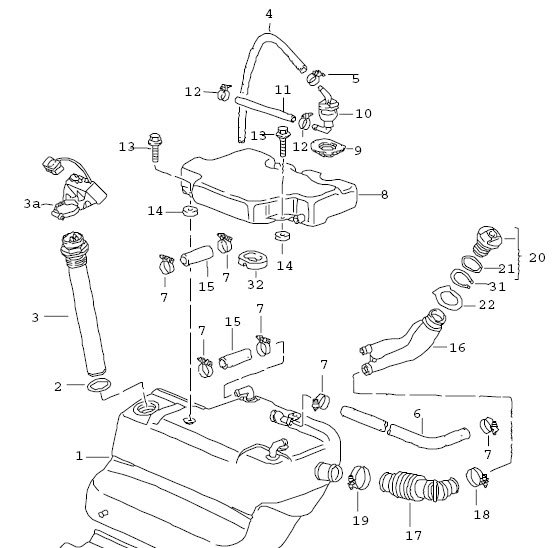
3. Vent valve at the top of the small fuel tank on the drivers side could be craked. Part No. 964 201 175 01 (This is a US$30-40.00 part). #10 in the Diagram 1
4. Fuel filler neck... reason for this thread
Fuel cap and cap seal... Start by replacing the seal or the complete cap.


Diagram 1 - FUEL SHUT OFF VALVE - Part No. 964 201 175 01 (This is a US$30-40.00 part). #10 in the diagram
If everything else fails then it is time to change the Fuel Filler Neck. As of this writting, this part is in its 7th revision with the most recent part number being 964 201 043 07.
Edit/Correction - Please take notice:
Here are photos comparing the old and the new:
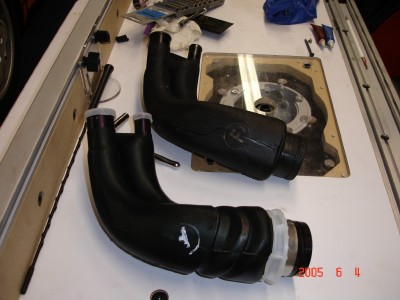
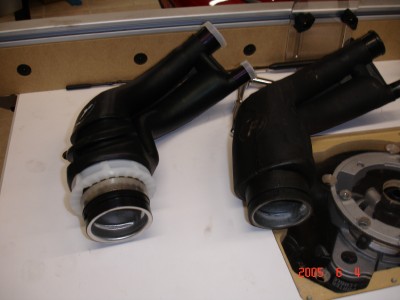
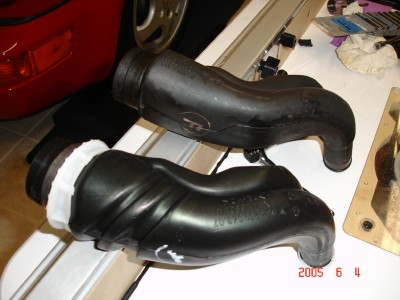
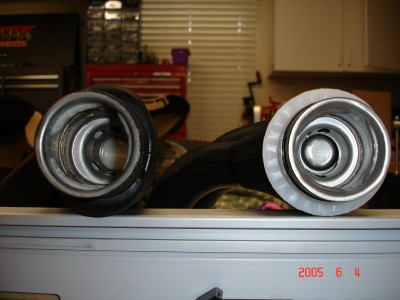
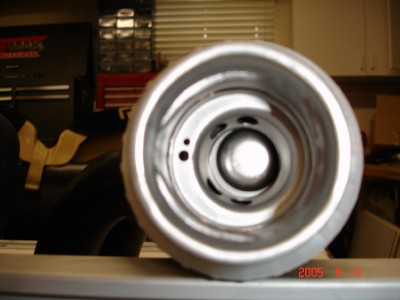
New:

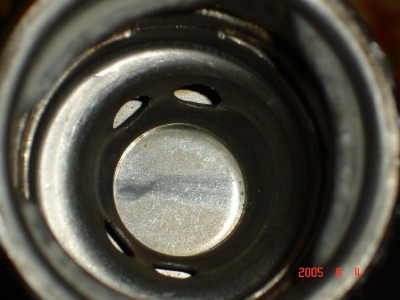
Old:

(Please know that there is another site from a fellow Rennlister with similar documentation and for all practical purposes this thread is not really needed. The one in John's WebSite is based on a Rennlist post but I could not find the original post here... and I wanted Rennlist to have its own I guess, so... anyway, here is the link to that one Curing the Fuel Odour Problem in the 964 Trunk
And here is mine:
If your car is experiencing fuel odor in the trunk or outside there are a few things to check I will start with the least expensive ones:
1. Check the condition of all hoses, and that all hose clamps are secured. This also includes the tube going to the carbon canister, and removing bottom cover to check fuel pump area.
2. Fuel cap seal. This seal can be purchase separately for around US$3-4.00 or you can just buy a new fuel cap.
3. Vent valve at the top of the small fuel tank on the drivers side could be craked. Part No. 964 201 175 01 (This is a US$30-40.00 part). #10 in the Diagram 1
4. Fuel filler neck... reason for this thread
Fuel cap and cap seal... Start by replacing the seal or the complete cap.
Diagram 1 - FUEL SHUT OFF VALVE - Part No. 964 201 175 01 (This is a US$30-40.00 part). #10 in the diagram
If everything else fails then it is time to change the Fuel Filler Neck. As of this writting, this part is in its 7th revision with the most recent part number being 964 201 043 07.
Edit/Correction - Please take notice:
Originally Posted by JasonAndreas
PET shows 964-201-043-06 as the current regular filler neck and 964-201-043-07 for 964s with options M150 - (operates with leaded gas) and/or M193 (version for japan).
New:
Old:
Last edited by Wachuko; 11-20-2009 at 09:24 AM. Reason: Adding additional source of gas smell...
 06-04-2005, 12:13 PM
#2
Professor of Pending Projects
Rennlist Member
Rennlist Member
Thread Starter
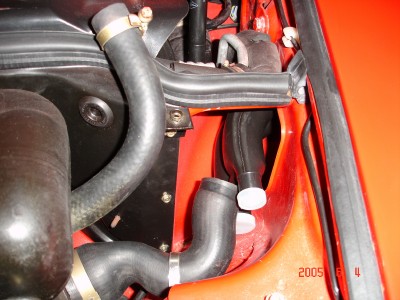
To remove the old filler neck start by opening the bonnet/hood and removing the carpet in the left side of the car (closer to the gas cap).
This is what you will see:
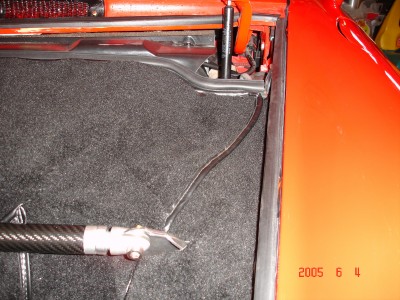

You will see two hoses. Loosen the clamps. The first hose clamp requires a 7mm socket or the use of a flat screwdriver. I found the use of the socket to be faster.

Pull the hose out of the way to reach the second one. For the second hose clamp you can only use a flat screwdriver.

Once loose, pull the hose from the filler neck. Now on to the other end.
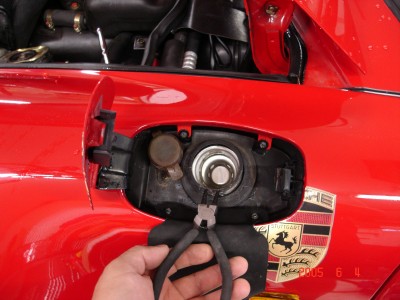
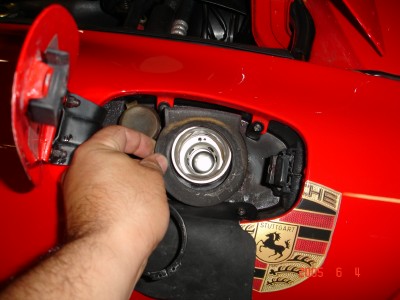
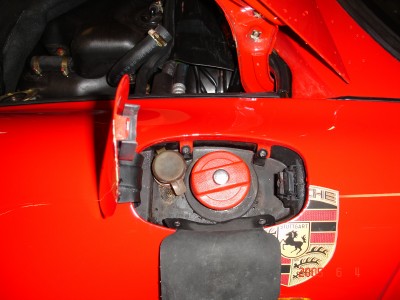
Open your fuel tank filler door (if you don�t know how to do that by now please stay away from any work on this car). Proceed to unscrew/remove gas cap.

Using large snap ring(circlip ring) pliers take out the snap ring (circlip ring) that holds the filler neck in place.
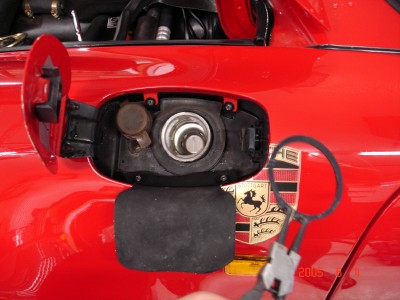
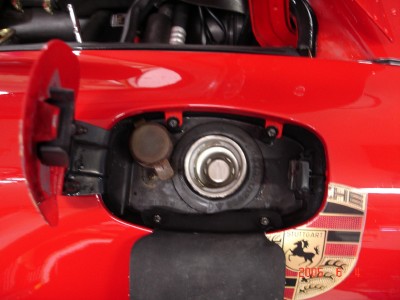
Remove the plastic washer that is under it. Please take notice of its direction. It needs to be installed back in the same way or you will cover the drain hole if installed incorrectly (squared end goes up, between the two bolts).

Snap ring (circlip ring) and plastic washer removed:
Now that the hoses are out of the way and the filler neck free� wiggle the old filler neck out� it helps to push it gently from the outside with one hand while you pull it out from the inside with the other hand.
This is what you will see:
You will see two hoses. Loosen the clamps. The first hose clamp requires a 7mm socket or the use of a flat screwdriver. I found the use of the socket to be faster.
Pull the hose out of the way to reach the second one. For the second hose clamp you can only use a flat screwdriver.
Once loose, pull the hose from the filler neck. Now on to the other end.
Open your fuel tank filler door (if you don�t know how to do that by now please stay away from any work on this car). Proceed to unscrew/remove gas cap.
Using large snap ring(circlip ring) pliers take out the snap ring (circlip ring) that holds the filler neck in place.
Remove the plastic washer that is under it. Please take notice of its direction. It needs to be installed back in the same way or you will cover the drain hole if installed incorrectly (squared end goes up, between the two bolts).
Snap ring (circlip ring) and plastic washer removed:
Now that the hoses are out of the way and the filler neck free� wiggle the old filler neck out� it helps to push it gently from the outside with one hand while you pull it out from the inside with the other hand.
06-04-2005, 12:16 PM
#3
Professor of Pending Projects
Rennlist Member
Rennlist Member
Thread Starter
Installing is, as they say, the reverse of removing�
Insert the new filler neck. Make sure as you are inserting it back in place that it comes out enough to see the groove where the snap ring goes. Notice I have not removed the plastic temporary caps at the end... those need to come out before you hook up the hoses...
Install the hoses. Tighten the clamps
Install the plastic washer (squared side up).
Install the snap ring. Screw the gas cap back in place.
Close the fuel door.

Install the carpet. Close the bonnet/hood and you are done!! If you did like me (I let the gas go very, very low before tackling this task) go to the gas station and refuel. Check for any vapor leaks (do not smoke or light a cigarette while you do this, please�)
EDIT:

Insert the new filler neck. Make sure as you are inserting it back in place that it comes out enough to see the groove where the snap ring goes. Notice I have not removed the plastic temporary caps at the end... those need to come out before you hook up the hoses...
Install the hoses. Tighten the clamps
Install the plastic washer (squared side up).
Install the snap ring. Screw the gas cap back in place.
Close the fuel door.
Install the carpet. Close the bonnet/hood and you are done!! If you did like me (I let the gas go very, very low before tackling this task) go to the gas station and refuel. Check for any vapor leaks (do not smoke or light a cigarette while you do this, please�)
EDIT:
Originally Posted by Marc Shaw
It is impressive though how much gas stink the carpet can hold so I'd suggest cleaning that well...
Last edited by Wachuko; 09-15-2005 at 03:10 PM.
06-04-2005, 10:51 PM
#4
Professor of Pending Projects
Rennlist Member
Rennlist Member
Thread Starter
Originally Posted by Marc Shaw

Well done - got the same part last week but have yet to put it in. Excellent write up.

Comment: snap rings and pliers are also called "circlip" rings and pliers, in case anyone can find a set of snap pliers.
Question: aside from snapping photos, how long did it take you?
Marc
I will update with both names to avoid confusion
All in all, less that 40 minutes (that included drinking an expresso with my father-in-law.
 06-06-2005, 12:02 AM
#5
Professor of Pending Projects
Rennlist Member
Rennlist Member
Thread Starter
Originally Posted by 911 2
is it the same procedure for a 1991 964 turbo 2 i can smell fuel also in the car can this be caused by the filler neck problem
Last edited by Wachuko; 09-15-2005 at 03:11 PM.
06-06-2005, 12:14 AM
#6
Professor of Pending Projects
Rennlist Member
Rennlist Member
Thread Starter
Originally Posted by Smokin
Jaime,
Excellent tutorial... Thanks... I think I may need to do this in the near future. I have a few questions for you though...
1. Is there an easy way to tell if you have the newer neck or one of the older revisions by just looking at it? Where is the part number located? Do I need to take it out just to check the part number?
2. Where did you buy your part? At the dealership or online?
Thanks again... Great pics...
Rick
New:
Old:
Notice the extra two holes on the border of the new one
I bought mine from Sunset Imports ... but I can't find the invoice... it was one of those invoices I threw away before the wife got a hold of it... it had a set of 1:43 water cooled Porsche set, all the maintenance kit, valve cover (ouch), etc... I have a spreadsheet where I wrote down the cost as US$ 95.96, best to call Sunset Porsche and validate.
06-06-2005, 12:17 AM
#7
Professor of Pending Projects
Rennlist Member
Rennlist Member
Thread Starter
Originally Posted by ThomasC2
Great pics and info! Much easier than I thought.
How much does the filler neck cost?
How much does the filler neck cost?
See previous post...
I have a spreadsheet where I wrote down the cost as US$ 95.96, best to check by calling Sunset Imports... when I was searching for the part it was the lowest price I could find.