Replacing Evaporator
 02-24-2004, 12:05 PM
#1
Professor of Pending Projects
Rennlist Member
Rennlist Member
Thread Starter
OK, starting the next project for my car. Sent email to validate what was needed to replace the evaporator and change to R134a:
A) New receiver drier, R134a charge port adapters, necessary o-rings for ports you will open, R134a oil, R134a charge and oil record sticker, $100.00
B) New after market copper (yours is aluminum) evaporator with new expansion valve $368.00
C) Check your hoses attached to the compressor, the set two hoses are prone to leakage and wear, $256.00 for the set.
D) Evacuation, charge and test should be done by an competent ac shop with R134a equipment.
E) Added based on comments from rennlisters: You will also need the hot air hoses (more like a flexible aluminum and paper hose). Two (L and R) about US$22.00 from dealer. Believe me there is no way to save them... so have them ready.
I was told gas tank will need to come out for this. I will take photos along the way and start as soon as the parts get here.
Anyone has done this and has suggestions, "while you are there" thoughts, or things to look out for?
 02-24-2004, 01:11 PM
#2
Addict
Rennlist Member
Rennlist Member
No experience on the 964 AC yet, but I have experience on similar systems. We need great AC in the Southeast, so don't skimp.
It is a "big ticket" item, but if you are going this far, why not also replace the compressor? The compressor shaft seal is prone to leak, and a worn compressor does not develop as much pressure. Also, the compressor oil needs to be drained completely if you have been running R12. You can expect many trouble-free years and ice cold air from a new compressor. Avoid the temptation to use a rebuilt compressor. A new one costs twice as much, but will last 4 times longer and work better (experience with Nippondenso compressors on my 300E). If you do the math, the new compressor is much cheaper in the long run, and you will be cooler.
It is important to flush all pipes, hoses, and heat exchangers remaining in the car. Wear particles and the old oil need to go. In the good old days people used freon to blow the system out. I use "zero residue" brake cleaner to flush the system, and then chase everything left with a procedure the shops can't use. The cleaning procedure works great, and is not dangerous if you take precautions. This will surely bring some gefaws but here it is:
Purchase a brass hardware store fitting to attach an AC service hose to a propane tank (camping type, or the barbeque grill type both work). Your AC loop with have at least two open ends where components are out of the loop. If there is a service fitting in the isolated section, Block one end, and leave one end open. Invert the tank to introduce liquid propane to the system at the nearest service fitting. The liquid will boil its way out with enough turbulence and force to pick up the old oil and any debris. Then block the other end of the system, and flush in the opposite direction. Repeat for any other isolated section of the freon loop. If there is no service fitting in a section, just blow in both directions. Propane physical properties are identical to R22, only flammable. Just make sure you deal with the fire/explosion risk. Risk is managed by keeping ignition sources away, and keeping concentrations below the flammability limits. Propane is flammable over a limited concentration range. Do this in an open space, preferably outdoors. A fan or a breeze will dilute the mix below flammable limits very quickly after the gas exits to the atmosphere. The other hazard is freeze burns if you come into contact with the propane or touch anything chilled by it. Usual disclaimers if you do manage to blow yourself up!
 03-07-2004, 01:20 AM
#3
Professor of Pending Projects
Rennlist Member
Rennlist Member
Thread Starter
I was to order the parts that day I posted my reply but did not. I wanted to use the car for a few weeks before parking it... I have been a long time without it (see post regarding starter and ignition wires)... you know the feeling, and I started to clean up the garage and install cabinets and tile (doing it myself)... so this is on hold for a month or so...
Anyway, here is a copy of the email I got from them (received on Mon, 23 Feb 2004 5:52:42 AM EST):
"A) New receiver drier, R134a charge port adapters, necessary orings for ports you will open,
R134a oil, R134a charge and oil record sticker, $100.00
B) New after market copper (yours is aluminum) evaporator with new expansion valve $368.00
C) Check your hoses attached to the compressor, the set two hoses are prone to leakage and wear, $256.00 for the set.
D) Evacuation, charge and test should be done by an competent ac shop with R134a equipment.
Griff,
1-800-451-7225 (EST)
Jaime Diaz wrote:
Hi,
I am converting my 1991 Porsche 964 (911) C4 A/C system to use R-134a.
1) Do you have a kit to do so? What is included in the kit and what is the cost?
2) Seems that my evaporator is leaking. Do you sell evaporators for my car and what is the cost?
3) I will need to also change the expansion valve along with the evaporator. What is the cost of this?
4) Any additional parts you know I will also need to get this done? Please list them and provide pricing.
So there, pretty much a conversion and replacement of evaporator and expansion valve and any other additional part required.
Please send me a quote. Thanks!!!
Jaime O. Diaz"
 10-25-2004, 07:41 PM
#5
Professor of Pending Projects
Rennlist Member
Rennlist Member
Thread Starter
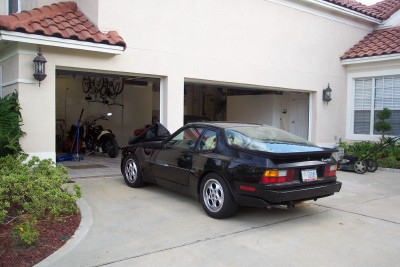
Ok.. started by removing the carpet and disconnecting the battery
then proceeded to remove the A/C compressor (Before doing anything please remember to take it to a A/C service center to empty the system from the old freon...)
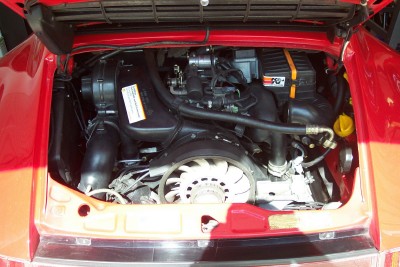
Remeber to disconnect the cable/plug to the compressor
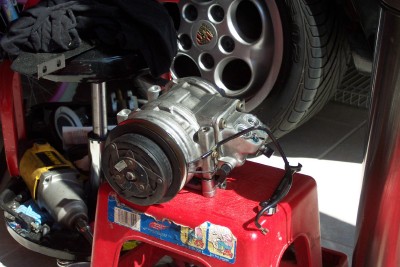
and the hoses. Everything can be done with a long 13mm socket and a 13mm open wrench for the tensioner bolt. The bottom square nuts will fall if you do not hold them so be prepared to search for them with a magnet if you drop them.
Also, once you remove the hoses be careful not to turn the compressor or you will be cleaning oil from the floor.
Remove the A/C belt... in case, like what I did, you want to take the car out for a spin to get rid of as much gas as possible before pulling out the gas tank...
That is all for now... back to the garage to continue with the task.
then proceeded to remove the A/C compressor (Before doing anything please remember to take it to a A/C service center to empty the system from the old freon...)
Remeber to disconnect the cable/plug to the compressor
and the hoses. Everything can be done with a long 13mm socket and a 13mm open wrench for the tensioner bolt. The bottom square nuts will fall if you do not hold them so be prepared to search for them with a magnet if you drop them.
Also, once you remove the hoses be careful not to turn the compressor or you will be cleaning oil from the floor.
Remove the A/C belt... in case, like what I did, you want to take the car out for a spin to get rid of as much gas as possible before pulling out the gas tank...
That is all for now... back to the garage to continue with the task.
Last edited by Wachuko; 11-20-2006 at 05:43 PM.
10-26-2004, 11:52 AM
#6
Addict
Rennlist Member
Rennlist Member
Join Date: Nov 2001
Location: Arizona, USA
Posts: 223
Likes: 0
Received 0 Likes
on
0 Posts
Tips and suggestions:
You'll need to remove the radio and the climate control unit to get at one of the bolts which holds the airbox in place. It's a real pain to get at, but be patient.
Anytime you can't seem to get something out, look for a hidden bolt or two. When you remove the fuel tank, there are two lines you have to disconnect from underneath the car - if you have a lift, it's not so bad.
When you remove the box, there are several ducts which need to be disconnected before it will come out. Use a large blunt object to gently depress the little tabs and work the ducts off. Be patient here.
Before you reinstall the entire assembly, make sure all the servo arms are connected to the appropriate mechanisms, especially the one underneath the box. It is impossible to touch when everything is back in place.
The heater hoses in the passenger compartment will need to be replaced as well. They're inexpensive and since you'll end up destroying one, if not both, get them now. A real pain to reinstall because you have to compress them by hand. Connect to the box first, then compress it to connect to the heater duct coming up from the floorboard.
Those are the more memorable items. If I think of anything else I'll let you know.
10-26-2004, 02:24 PM
#7
Professor of Pending Projects
Rennlist Member
Rennlist Member
Thread Starter
Thanks Rich!
Then I must be in the easy phase
Let me continue. You will need Volumes I and VI of the workshop manuals for this task.


Then I must be in the easy phase
Let me continue. You will need Volumes I and VI of the workshop manuals for this task.
Last edited by Wachuko; 11-20-2006 at 05:44 PM.
Trending Topics
10-26-2004, 02:35 PM
#8
Professor of Pending Projects
Rennlist Member
Rennlist Member
Thread Starter
I made some space to have better access to the jacks and stuff...

The 951 sits outside today waiting his turn...
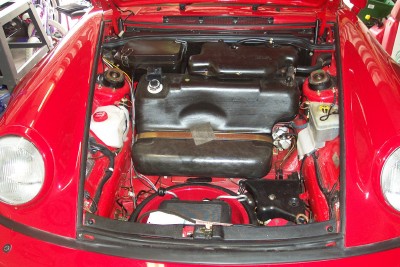
Start by removing the weather strip and the plastic black cover.
Then remove the overflow tank - Three 10mm bolts and a few hoses to loosen up. It is good to have a socket with a magnet to avoid droping the bolts. Also know that there are three plastic spacers under the overflow tank (with each bolt). Be careful not to loose those.
The 951 sits outside today waiting his turn...
Start by removing the weather strip and the plastic black cover.
Then remove the overflow tank - Three 10mm bolts and a few hoses to loosen up. It is good to have a socket with a magnet to avoid droping the bolts. Also know that there are three plastic spacers under the overflow tank (with each bolt). Be careful not to loose those.
Last edited by Wachuko; 11-20-2006 at 05:46 PM. Reason: re-attaching photos
10-29-2004, 07:20 PM
#9
Professor of Pending Projects
Rennlist Member
Rennlist Member
Thread Starter
Sorry for the delay... the time off I took from work ended up being for honey-do's instead of working in the car 
Anyway... here we go...
Next you will need to move the fuse block to start removing the bolts inside the fuse box (this is to be able to remove the front firewall...

You will need a few car covers (vinyl, leather, whatever you have/use) to cover the body panels and avoid scratching the paint).
Continue to remove the screws in the fuse box. Two 7mm screws inside the fuse box, three 10mm bolts, and three additional 7mm bolts next to the fuel hoses that go to the filler neck. I disconnected both hoses to the filler neck to make it easier to reach the bottom 7mm bolt.

Once all bolts are out you can safely remove the front firewall. Just be carefull around the fuse block cables.

Car without the front firewall:


Anyway... here we go...
Next you will need to move the fuse block to start removing the bolts inside the fuse box (this is to be able to remove the front firewall...
You will need a few car covers (vinyl, leather, whatever you have/use) to cover the body panels and avoid scratching the paint).
Continue to remove the screws in the fuse box. Two 7mm screws inside the fuse box, three 10mm bolts, and three additional 7mm bolts next to the fuel hoses that go to the filler neck. I disconnected both hoses to the filler neck to make it easier to reach the bottom 7mm bolt.
Once all bolts are out you can safely remove the front firewall. Just be carefull around the fuse block cables.
Car without the front firewall:
10-29-2004, 07:24 PM
#10
Professor of Pending Projects
Rennlist Member
Rennlist Member
Thread Starter
Originally Posted by Arjan B.
Yeah, the expansion valve would interest me too, mine is the cause of leak. I loose the gas in about 6 or 7 months each time. With trace fluid I discovered the leak overthere,
You have to clean up your garage defnetely..........
You have to clean up your garage defnetely..........
Arjan, at this point you have good access to the expansion valve. Maybe someone else can do it without removing as many parts as I have done... but I is really easy to this point and gives you plenty of space to work.
I hope that helps!
Next is the removal of the fuel tank... more to come.
(on a side note, I have higher resolution images if anyone needs them. It is just easier to load them in this size for the post)
10-30-2004, 12:16 AM
#11
Professor of Pending Projects
Rennlist Member
Rennlist Member
Thread Starter
Let's continue with the tank removal..
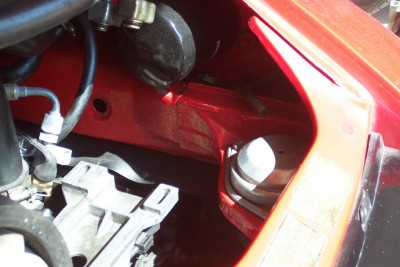
Remove metal strap holding down the tank. One 13mm bolt on the right. The left side comes off easy, just disengage from the hook.


I started to remove the bottom covers to look at how the steering boots condition (all fine)... amazing to see the original cosmoline all over the front diff... anyway... also removed the cover to where the two bottom hoses need to be removed.

And it looks hard to get to the screw to free the hoses... will deal with this in the morning.

I will also take the opportunity to clean everything under the car... off with the cosmoline and the dirt under there...
Back to the top... you need to remove the fresh air grill. This is a two piece item. Frame and mesh. Needs to come off to get to two bolts inside. Also a good time, in my case, to repaint the mesh and frame as age is showing....


Since the car is raised I removed the left side wheel and removed the underfender covers to have access to the dryer.

Remove metal strap holding down the tank. One 13mm bolt on the right. The left side comes off easy, just disengage from the hook.
I started to remove the bottom covers to look at how the steering boots condition (all fine)... amazing to see the original cosmoline all over the front diff... anyway... also removed the cover to where the two bottom hoses need to be removed.
And it looks hard to get to the screw to free the hoses... will deal with this in the morning.
I will also take the opportunity to clean everything under the car... off with the cosmoline and the dirt under there...
Back to the top... you need to remove the fresh air grill. This is a two piece item. Frame and mesh. Needs to come off to get to two bolts inside. Also a good time, in my case, to repaint the mesh and frame as age is showing....
Since the car is raised I removed the left side wheel and removed the underfender covers to have access to the dryer.
Last edited by Wachuko; 11-20-2006 at 06:34 PM.
10-30-2004, 12:18 AM
#12
Professor of Pending Projects
Rennlist Member
Rennlist Member
Thread Starter
In case you want to see what the other side in the fender looks like

All for now. I will continue in the morning. Time for
All for now. I will continue in the morning. Time for
10-30-2004, 04:33 PM
#13
Professor of Pending Projects
Rennlist Member
Rennlist Member
Thread Starter
Arjan,
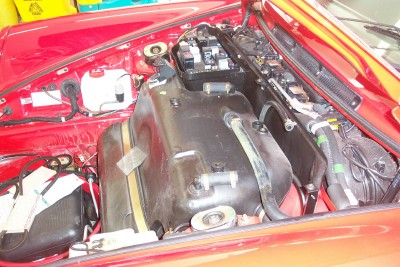
A few more photos for you. Since I am removing the evaporator I did not need to remove the expansion valve but since you need photos to guide you throught the process here you go...
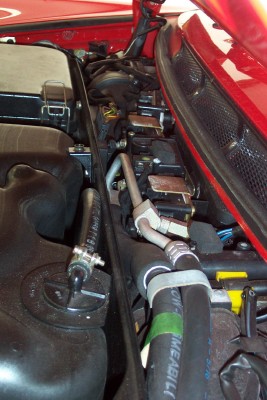
Remove the 10mm bolt holding the hose and alum pipe.

once that is removed you will have access to the 3mm hex bolts. Get a good hex wrench... not worth it screwing up with these bolts...

A few more photos for you. Since I am removing the evaporator I did not need to remove the expansion valve but since you need photos to guide you throught the process here you go...
Remove the 10mm bolt holding the hose and alum pipe.
once that is removed you will have access to the 3mm hex bolts. Get a good hex wrench... not worth it screwing up with these bolts...
10-30-2004, 04:44 PM
#14
Professor of Pending Projects
Rennlist Member
Rennlist Member
Thread Starter
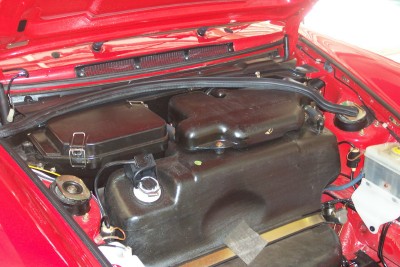
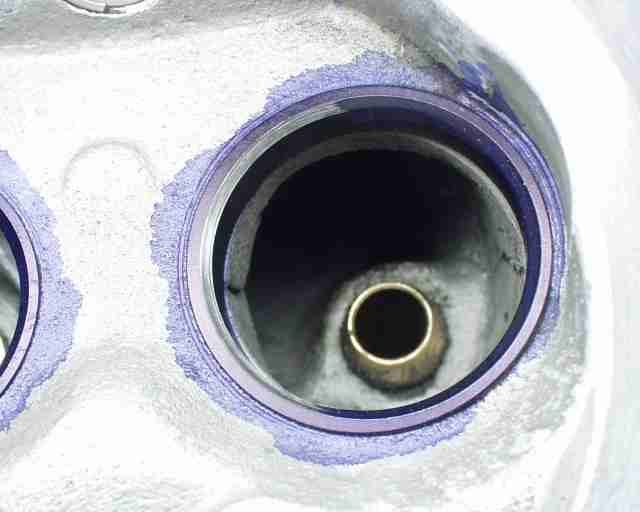
Again, using a good 3mm hex wrench remove the two bolts.

Valve out... replace all O-rings when putting in the new...

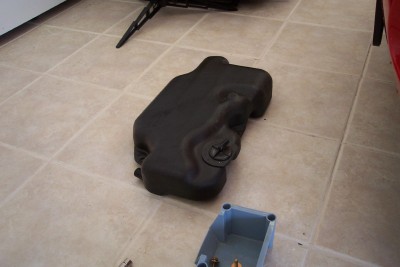
BTW... the fuel tank is also out now. Two hoses in the bottom to loose. One from the fuel pump with a flat screwdriver and the other one from the conector to the hard line with a 17mm wrench and a 19mm wrench. Be prepared to catch the excess fuel in the line. Even after trying to empty the tank completely from the top there was a good 10 quarts of fuel between the tank and the lines.


I have to check the parts diagram but I believe this is the fuel pump:

All for now... family is asking for some quality time
Valve out... replace all O-rings when putting in the new...
BTW... the fuel tank is also out now. Two hoses in the bottom to loose. One from the fuel pump with a flat screwdriver and the other one from the conector to the hard line with a 17mm wrench and a 19mm wrench. Be prepared to catch the excess fuel in the line. Even after trying to empty the tank completely from the top there was a good 10 quarts of fuel between the tank and the lines.
I have to check the parts diagram but I believe this is the fuel pump:
All for now... family is asking for some quality time
11-02-2004, 11:43 AM
#15
Professor of Pending Projects
Rennlist Member
Rennlist Member
Thread Starter
OK, slow progress... since the tank is out and now is to the difficult task of removing the housing where the evaporator is located... all that mess gives me the chills... I also need to look up in PET the part number for the air hose and buy them before hand based on Rich's suggestion.
So instead I went to AutoZone and got two cans of cleaner for the lines... (somehow the thought of blowing up using the propane method was not for me... ).
).
Will post more photos as soon as I start again.
So instead I went to AutoZone and got two cans of cleaner for the lines... (somehow the thought of blowing up using the propane method was not for me...
).Will post more photos as soon as I start again.