Clutch slave cylinder replacement: Tips that can save you!
 02-07-2005, 01:28 AM
#1
RL Community Team
Rennlist Member
Rennlist Member
Thread Starter

Tonight I spent a couple hours learning the hard way how NOT to replace the clutch slave cylinder! It was a rough one! I've got a pretty thrashed left forearm from the work. Ouch!
My cabrio has been having clutch problems for a bit - frequently the pedal will hang, not returning to its correct rest position. And now, it has frequently been difficult to shift. I did a bleed a couple weeks ago, but no improvement happened. So, I ordered a replacement cylinder from Vertex - it appears to be the same model as the unit that was in place on my car.
Well, here are the basics, with important parts underlined:
This is an entirely left-handed procedure - so don't try it if you've got a retarded left hand!!!
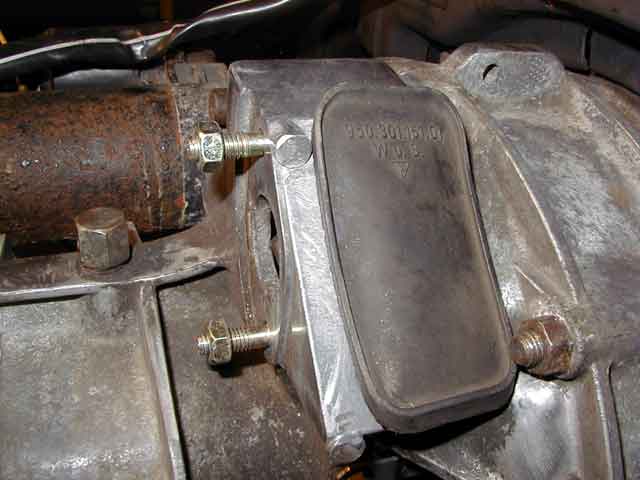
Removal of only the left rear wheel is needed. The undertray needs to be removed if you've got it in place. With jackstands under the car so you don't lose your left arm, or potentially worse, you can reach up to the slave cylinder to remove it. A 13mm combination wrench and socket are needed to remove the two nuts that hold the slave cylinder to the transmission top. Remove the top nut first, then the bottom. It's too hard to remove the top nut if it's under tension from the cylinder as it starts to push itself out - it's a heck of a lot easier to remove the top nut first, then the lower 13mm nut.
Be sure to remove the 17mm hydraulic hose attachment before you completely remove the slave cylinder off the transmission. Otherwise you'll thrash the hydraulic line trying to grip the cylinder hard enough to undo the 17mm hose end. I could have saved some scrapes reinstalling the cylinder after removing it, so I could get enough leverage to get that line off.
Once the cylinder is off, and the hydraulic line is detached, it's interesting that the clutch pedal will fall to the ground. You have to pull it back when you are done with everything, before bleeding.
Replace the cylinder with the new one. Now for the important part: do not test the cylinder without mounting it!!!. In other words, do not press on the clutch pedal to test its operation. The slave cylinder is spring loaded, so it is at its maximum travel already - press the clutch pedal and you'll actually blow the guts out of the slave cylinder! You can put it back together (yes I did this twice) but save yourself the sore fingers and mess of brake fluid!
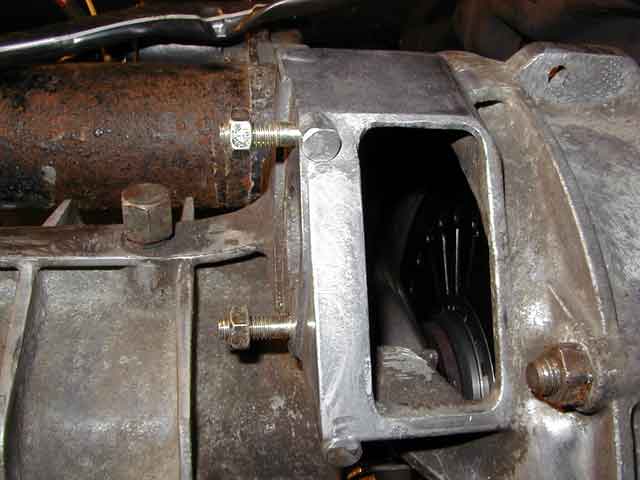
Now to remount the cylinder it is imperative that you get the actuating arm in the slot on the clutch arm. Take your finger and feel for it, so you know where to aim the cylinder when installing it. I installed it the first time NOT aligned correctly - blew the guts out of the cylinder! Replaced the guts, and reinstalled it correctly. The best way to reinstall is to tighten the lower nut first (easiest to get on first) then the upper. Since I already had a mess of brake fluid, it was easier to have the bleeder open when placing the cylinder back on - it needs to be compressed to be installed, and hard to compress if the bleeder is not open.
Then do a bleed of the clutch system, and all done! Took it for a test drive and it feels great! Once my forearm heals, I'll replace the one on the coupe, too!
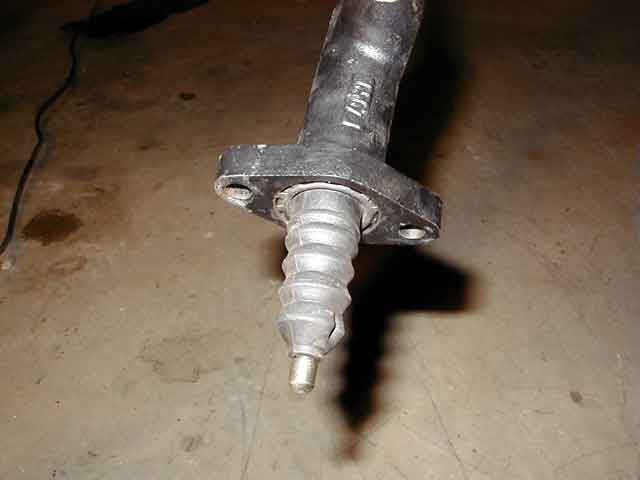
The pics below show the action; the close-up shows the metal pressed-in ring that gets shot out if you're not careful!
My cabrio has been having clutch problems for a bit - frequently the pedal will hang, not returning to its correct rest position. And now, it has frequently been difficult to shift. I did a bleed a couple weeks ago, but no improvement happened. So, I ordered a replacement cylinder from Vertex - it appears to be the same model as the unit that was in place on my car.
Well, here are the basics, with important parts underlined:
This is an entirely left-handed procedure - so don't try it if you've got a retarded left hand!!!
Removal of only the left rear wheel is needed. The undertray needs to be removed if you've got it in place. With jackstands under the car so you don't lose your left arm, or potentially worse, you can reach up to the slave cylinder to remove it. A 13mm combination wrench and socket are needed to remove the two nuts that hold the slave cylinder to the transmission top. Remove the top nut first, then the bottom. It's too hard to remove the top nut if it's under tension from the cylinder as it starts to push itself out - it's a heck of a lot easier to remove the top nut first, then the lower 13mm nut.
Be sure to remove the 17mm hydraulic hose attachment before you completely remove the slave cylinder off the transmission. Otherwise you'll thrash the hydraulic line trying to grip the cylinder hard enough to undo the 17mm hose end. I could have saved some scrapes reinstalling the cylinder after removing it, so I could get enough leverage to get that line off.
Once the cylinder is off, and the hydraulic line is detached, it's interesting that the clutch pedal will fall to the ground. You have to pull it back when you are done with everything, before bleeding.
Replace the cylinder with the new one. Now for the important part: do not test the cylinder without mounting it!!!. In other words, do not press on the clutch pedal to test its operation. The slave cylinder is spring loaded, so it is at its maximum travel already - press the clutch pedal and you'll actually blow the guts out of the slave cylinder! You can put it back together (yes I did this twice) but save yourself the sore fingers and mess of brake fluid!
Now to remount the cylinder it is imperative that you get the actuating arm in the slot on the clutch arm. Take your finger and feel for it, so you know where to aim the cylinder when installing it. I installed it the first time NOT aligned correctly - blew the guts out of the cylinder! Replaced the guts, and reinstalled it correctly. The best way to reinstall is to tighten the lower nut first (easiest to get on first) then the upper. Since I already had a mess of brake fluid, it was easier to have the bleeder open when placing the cylinder back on - it needs to be compressed to be installed, and hard to compress if the bleeder is not open.
Then do a bleed of the clutch system, and all done! Took it for a test drive and it feels great! Once my forearm heals, I'll replace the one on the coupe, too!
The pics below show the action; the close-up shows the metal pressed-in ring that gets shot out if you're not careful!
 02-08-2005, 02:36 PM
#2
Rennlist Member
When I replaced my clutch slave a couple years ago, I couldn't get it back on with just one hand so I used two.
Left arm goes straight up from beneath to the clutch slave cyl, right forearm goes straight across through the top of the wheel well - one ends up essentially embracing the wheel hub. I recall removing the flexible brake cooling duct to provide access across the top.
I also found a closed-end box ratchet wrench easier to wield than a ratchet with socket in the tight space near the clutch slave cyl.
In any case, congratulations Garrett on your victory.
02-08-2005, 05:17 PM
#3
Technical Guru
Rennlist Member
Rennlist Member
Here are some more pictures;
with the rubber plug removed so you can see what your doing...
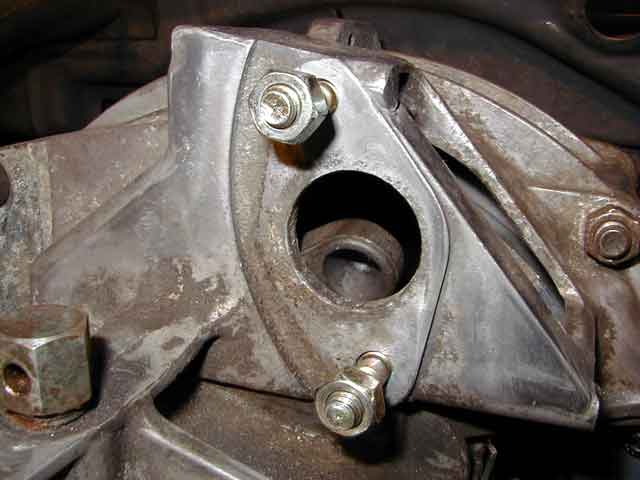
in this picture a hex socket is pretending to be a slave cylinder

the top of the release fork where the slave cylinder plunger fits in.
a slave cylinder...
If you remove the nut in the picture below and the little aluminum mount there is a black rubber stopper that should have some extra "Olista Longtime 3EP" grease left in it from the factory. I removed the stopper so you can see where the grease should be. Take a tiny bit of that grease and put it on the end of the slave cylinder plunger tip before you install the slave cylinder, this prevents corrosion and the chatter some people complain of.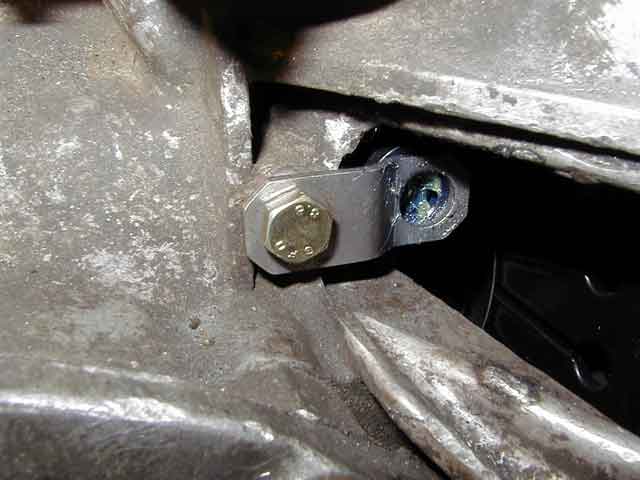
with the rubber plug removed so you can see what your doing...
in this picture a hex socket is pretending to be a slave cylinder
the top of the release fork where the slave cylinder plunger fits in.
a slave cylinder...
If you remove the nut in the picture below and the little aluminum mount there is a black rubber stopper that should have some extra "Olista Longtime 3EP" grease left in it from the factory. I removed the stopper so you can see where the grease should be. Take a tiny bit of that grease and put it on the end of the slave cylinder plunger tip before you install the slave cylinder, this prevents corrosion and the chatter some people complain of.
02-09-2005, 12:37 AM
#4
Rennlist Member

Join Date: Sep 2003
Location: Monroe, OH
Posts: 83
Likes: 0
Received 0 Likes
on
0 Posts
Yip, installed mine with the rod not engaging the actuating arm too. After installation, very proud of myself, I stepped on the clutch pedal - which nicely dropped to the floor. So I get to do it all over again.
Regards,
Geo
Regards,
Geo