
951 Maintenance/Performance List
 06-08-2017, 01:57 PM
#91
Drifting
You need to loosen all the exhaust bolts and snug the headers to the crossover first, there is a method. If anything else make the holes on the header flanges at the head a little bigger to allow for some movement.
 06-08-2017, 07:48 PM
#92
Instructor
Thread Starter

Join Date: Sep 2013
Location: Spokane, WA
Posts: 206
Likes: 0
Received 0 Likes
on
0 Posts
Ok, good to know. I was going to just equally tighten at the head, crossover, and turbo until they were tight. So I guess the turbo and crossover connections should be tight first, then see if I can get the headers on the exhaust studs.
I was trying to make sure I had the exhaust turbine clocked right too, which it looks like it is.
I was trying to make sure I had the exhaust turbine clocked right too, which it looks like it is.
06-09-2017, 05:43 PM
#93
Instructor
Thread Starter
Join Date: Sep 2013
Location: Spokane, WA
Posts: 206
Likes: 0
Received 0 Likes
on
0 Posts
I'm not quite sure what you mean now, but I've seen people saying you might have to slot those holes before?
It seems like the only way they could go on it to put the headers on the studs (while sliding it onto the crossover if it's tightened), then place the bolts through the crossover connections. Then everything is in place and you just tighten it.
So I just took everything back apart, loosened the turbine housing, then loosely put everything back together. Then I slowly and evenly tightened things, snugged the crossover/header bolts, crossover/turbine bolts, and then head nuts. Then tightened the turbine housing to clock it in the correct position, but it looked about the same. When I loosened everything back up, there was a much smaller gap between the headers/crossover.
So for the final install, it sounds like Danno's order makes the most sense?
0. install exhaust to downpipe and tighten fully.
1. install headers loosely, just 5-threads or so on each nut
2. install crossover, hold up with jack and install turbo-end first
3. install crossover on turbo loosely, install all four bolts & 3 nuts, but don't tighten
4. using screwdriver through header & crossover flanges, wiggle and install six bolts from the top down.
5. install 6 nuts loosely, about 5-threads each
6. fully tighten crossover pipe at turbo.
7. fully tighten header nuts
8. fully tighten bolts & nuts at header to crossover flange.
https://rennlist.com/forums/944-turb...ml#post1088375
It seems like doing it more evenly would be better, and it seems like it would be better to do the head nuts last as they have more wiggle room? Not sure.
06-17-2017, 06:47 PM
#94
Instructor
Thread Starter
Join Date: Sep 2013
Location: Spokane, WA
Posts: 206
Likes: 0
Received 0 Likes
on
0 Posts
How do these adapter plates go onto the tial F38? The issue is that the tial holes are threaded on the output and the adapter plates are also threaded, so when I put the bolts in, there's no way for it to pull the adapter plate to the WG, it forces there to be a gap between them. Do I need to drill the threads out of the WG holes like they are on the input side?
Also, which bolts go in which holes? I assumed the short bolts when into the WG, but there are 6 short/6 long and only 4 WG holes.
Also, which bolts go in which holes? I assumed the short bolts when into the WG, but there are 6 short/6 long and only 4 WG holes.
07-05-2017, 01:04 PM
#95
Instructor
Thread Starter
Join Date: Sep 2013
Location: Spokane, WA
Posts: 206
Likes: 0
Received 0 Likes
on
0 Posts
I finally got it started, and I'm surprised it actually did. I put everything back together and wired all the vitesse stuff well enough to start at least. I had a few more issues, but got them fixed at least. The turbo water line was a big pain and ended up breaking, but it was a lot easier to work with the heater hose replacements after that. Lart's brake lines didn't fit, his fuel lines have multiple fittings that need tightened, so I sprayed fuel everywhere at first, bleeding the clutch sucked, getting it to prime was tough. Compressed air in the dipstick tube worked after a lot of fast cranking without it. Glad I tried that before starting to tear things apart. There was a concerning amount of smoke coming straight off the headers; I'm assuming it was just burning off some oil, but it was pretty smokey. I need to warm it up and set the idle, it dies if I don't give it some gas. I resealed the throttle body so the screw is probably off. Then I got an Autozone steering rack, torqued the banjo with a torque wrench and installed everything and it leaked at the banjos. I took it off and either the banjo surface was messed up or torquing it lower than their stated spec broke the threads and ruined my washers. And now they have no stock, so I'm going to try an O'Reilly on that's been ordered.
So currently I have the more urgent SFR testpipe install issue I posted about and a couple other problems. I took the spring off the clutch pedal so I could feel better to bleed it and it seems like it will be hard to put back. There is a little play in the pedal, but I was going to see how it felt driving. I'm not sure how to set the master cylinder rod length if there's air in the line though. Hard to tell if it's air or I have the cylinder adjusted too far from engaging. I was going to see after driving and try to adjust to the 3mm play.
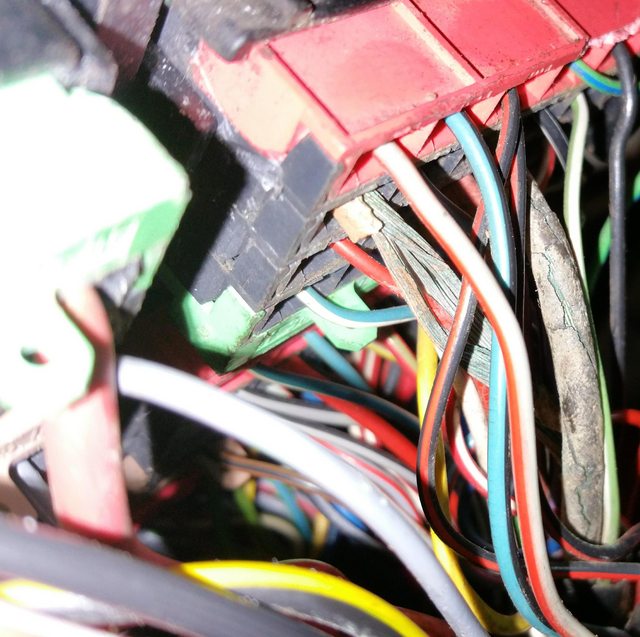
Then when cleaning grounds, I noticed these wires going to the relay box. How do I get these plugs out, they're in there pretty good and hard to get a hold of. It looks like there's just one clip on the side. And if I can get them out, how would I get the wires out and replace the connector on the wire going into the plug? It would be nice to replace those 2 wire ends that are corroded and have missing/cracked insulation.
Otherwise I'm pretty close to being done. The most invasive thing I've done before this was change a timing belt on a 1.8T and swap springs/shocks. It certainly took longer than I thought, and was more frustrating, but I think it will be worth it.
So currently I have the more urgent SFR testpipe install issue I posted about and a couple other problems. I took the spring off the clutch pedal so I could feel better to bleed it and it seems like it will be hard to put back. There is a little play in the pedal, but I was going to see how it felt driving. I'm not sure how to set the master cylinder rod length if there's air in the line though. Hard to tell if it's air or I have the cylinder adjusted too far from engaging. I was going to see after driving and try to adjust to the 3mm play.
Then when cleaning grounds, I noticed these wires going to the relay box. How do I get these plugs out, they're in there pretty good and hard to get a hold of. It looks like there's just one clip on the side. And if I can get them out, how would I get the wires out and replace the connector on the wire going into the plug? It would be nice to replace those 2 wire ends that are corroded and have missing/cracked insulation.
Otherwise I'm pretty close to being done. The most invasive thing I've done before this was change a timing belt on a 1.8T and swap springs/shocks. It certainly took longer than I thought, and was more frustrating, but I think it will be worth it.
Last edited by bradthebold; 07-05-2017 at 01:43 PM.
07-09-2017, 06:45 PM
#96
Instructor
Thread Starter
Join Date: Sep 2013
Location: Spokane, WA
Posts: 206
Likes: 0
Received 0 Likes
on
0 Posts
It idles very rough now that it's running. It won't run without giving it some gas for a few minutes, then it will roughly idle on its own. Fully warm, it almost sounds ok. I'm only getting ~13-14inHg vacuum though (16.5-17.5 AFR), so I pressure tested and it seemed ok. A slight leak around the intake manifold double banjo I tried to tighten the best I could and air flowing sound in the valve by the diagnostic plug, but no evidence of leaking.
Warming it up it has to be around 1200rpm and it sounds ok at -18 vacuum, but if you give it any gas it stumbles hard and will continually stumble over 1500rpm. Even warm, if you tap the gas it will go up, then drop way down and die.
I replaced fuel filter, soft lines, FPR, and injectors. It has old gas in it though.
I changed spark plugs, but just cleaned the distributor cap/rotor and the wires looked ok. I'm waiting for a wasted spark setup and didn't want to waste money replacing these just to get rid of them. Seems like misfiring is the most likely issue? Should I replace the wires if they look ok, or just try the cap/rotor first?
I also wired in the piggyback, MAP sensor, boost controller, wideband w/MAP, v-knock, and MAF if it could be a wiring issue.
It ran fine before I took it apart though. Planning on ordering bosch rotor/cap, beru wires, and a new dme relay.
Last edited by bradthebold; 07-10-2017 at 02:51 AM.
07-09-2017, 09:16 PM
#97
Instructor
Thread Starter
Join Date: Sep 2013
Location: Spokane, WA
Posts: 206
Likes: 0
Received 0 Likes
on
0 Posts
I drove it around the block and it drove better than it idles. If you let up on the gas, it dips down to ~300rpm and dies or slowly works its way back up to ~850rpm. My speedometer doesn't work now, but more concerning is the power steering doesn't work. I resealed the pump and replaced the rack and reservoir, cranked the wheel left to right 20 times in the air with the car off and on. Drove around the house and it sucked a lot more down after that and made grindy/whiny sounds. Filled it up, cranked left to right in the air and on the ground and still no power steering on my test drive and the reservoir is full. Just checked everything again and the short soft return line going into the cooler was bent going into the cooler that might affected flow. I bend the hardline a little to get a better angle on the soft line and hopefully that will fix it, otherwise I'm not sure.
Last edited by bradthebold; 07-10-2017 at 02:53 AM.
07-10-2017, 10:40 PM
#98
Instructor
Thread Starter
Join Date: Sep 2013
Location: Spokane, WA
Posts: 206
Likes: 0
Received 0 Likes
on
0 Posts
Well, I cleaned the ignition coil terminals and twisted all the plug wires and it runs a ton better for some reason, still undriveable, but better. It's still rough at idle, but better and less misfire sounding. Still only 13-14inHg and lean. Just giving it a tiny bit of gas but still staying around 850rpm helps it to ~17inHg but still 16 AFR. Any amount of gas then letting up still almost/sometimes does kill it though. But after 1000rpm it sounds normal and revs much better, no more stumble. Still lean though and set off the knock light a couple times.
I ordered a cap/rotor since they were worn looking, but I don't know if that will fix the almost dying or lean or vacuum issue. I'm pretty sure there's no vacuum leak though.
I ordered a cap/rotor since they were worn looking, but I don't know if that will fix the almost dying or lean or vacuum issue. I'm pretty sure there's no vacuum leak though.
07-11-2017, 06:17 PM
#99
Instructor
Thread Starter
Join Date: Sep 2013
Location: Spokane, WA
Posts: 206
Likes: 0
Received 0 Likes
on
0 Posts
Searching, it looks like it's probably a ISV or TPS issue. Weird since it was fine before, but I'll test and clean them. Really don't want to take the IM off though; getting the dipstick tube re-attached with 2 o-rings on it was one of the worst jobs of everything. Still, it's lean everywhere. I don't know if that would fix it.
07-11-2017, 11:36 PM
#100
Instructor
Thread Starter
Join Date: Sep 2013
Location: Spokane, WA
Posts: 206
Likes: 0
Received 0 Likes
on
0 Posts
The ISV vibrates with the key on, so it gets power at least. Then I tested the TPS and it was within spec measuring resistance at the DME and KLR plugs and it's properly adjusted. Unplugging it runs way better though. It drops idle vs raising very high like I've read, but even cold idling at ~550rpm it made 16inHg at 14.9 AFR. Does that mean the TPS really is the problem despite proper resistance?
The O2 sensor looked ok, I brushed it and blew it off/out. Didn't replace the DME temp sensor.
The O2 sensor looked ok, I brushed it and blew it off/out. Didn't replace the DME temp sensor.
Last edited by bradthebold; 07-12-2017 at 12:08 AM.
07-12-2017, 02:42 AM
#101
Intermediate

Join Date: May 2015
Posts: 31
Likes: 0
Received 0 Likes
on
0 Posts
Searching, it looks like it's probably a ISV or TPS issue. Weird since it was fine before, but I'll test and clean them. Really don't want to take the IM off though; getting the dipstick tube re-attached with 2 o-rings on it was one of the worst jobs of everything. Still, it's lean everywhere. I don't know if that would fix it.
07-12-2017, 03:52 AM
#102
Instructor
Thread Starter
Join Date: Sep 2013
Location: Spokane, WA
Posts: 206
Likes: 0
Received 0 Likes
on
0 Posts
I can't help you with much, unfortunately, but I can help you with one simple thing. To make installing the dipstick tube onto the intake manifold a 30 second job, remove it, and cut a slot into the mounting tab, below where the 10mm bolt screws in. Once this channel is opened up, you never have to remove or install that bolt ever again. Just loosen it slightly and slide the dipstick tube down over the bolt while inserting the bottom of the tube into the oil pan. Tighten up the bolt and you're good to go.
07-21-2017, 10:45 PM
#103
Instructor
Thread Starter
Join Date: Sep 2013
Location: Spokane, WA
Posts: 206
Likes: 0
Received 0 Likes
on
0 Posts
I replaced the DME temp sensor, the 02 sensor, the DME relay, cleaned and tested the ISV, replaced the distributor cap and rotor, got new gas, and ziptied/tightened every vacuum connection. It kind of runs better than before. It will cold idle now without dying, but warm idle is bad. Any gas and it dips way down and it died almost every time I stopped test driving it. Still low vacuum at idle and lean most places. 16-17AFR cruising and mild acceleration, ~14.7 at with a little more acceleration. The only 'leak' I hear pressure testing is air going through that emissions(?) valve by the diagnostic port, should it be?
And still no power steering. A little whining noise on some turns, but no power. Going to take the pump back apart and make sure everything looks ok.
https://www.youtube.com/watch?v=JCEa...ature=youtu.be
Can't get it to embed. Inside of gauge is vacuum, outside is AFR.
And still no power steering. A little whining noise on some turns, but no power. Going to take the pump back apart and make sure everything looks ok.
https://www.youtube.com/watch?v=JCEa...ature=youtu.be
Can't get it to embed. Inside of gauge is vacuum, outside is AFR.
Last edited by bradthebold; 07-23-2017 at 03:22 AM.
07-22-2017, 01:54 AM
#104
Addict
Rennlist Member
Rennlist
Site Sponsor
Rennlist Member
Rennlist
Site Sponsor
Your car is running lean. Many items could cause a lean condition. Some of which:
- Check the FQS setting, make sure it's not set to pull fuel
- Take the PiggyBack out of the equation by using the shorting plug. If it helps, then the values in the PB need adjustments.
- Verify you have a 3bar static fuel pressure.
- A voltage drop between MAF sensor and DME causes lean AFRs. Compare MAF signal at sensor and DME #7.
- A vacuum leN causes len idle/cruise, rich under boost.
- A bad engine temp sensor or TPS
If you have the Motronic Monitor use it. It saves you lots of diagnostics time.
07-22-2017, 10:59 PM
#105
Instructor
Thread Starter
Join Date: Sep 2013
Location: Spokane, WA
Posts: 206
Likes: 0
Received 0 Likes
on
0 Posts
Having the piggyback bypassed made no difference, so I think it's wired correctly.
The FQS was at +3% when I checked it, and then I set it back to zero before I started the engine initially . I just set it to +6% and it was rich at idle, in the 12s. I set it back to +3% and it was right at 14.5-14.7 and ~15in vacuum. As it warmed up it got leaner, low 15's when warm, but just giving it enough gas to trip the TPS (<1k RPM) it was right at 14.7 and vacuum improved to 18.5in. Giving it gas, it still stumbles and goes lean ~18.5AFR at 2k rpm, but progressively gets better with increasing RPM. >4k rpm it's smoother and at 14.7 holding it there. I haven't driven it, but revving it still drops down to ~500rpm and slowly builds back up.
Haven't checked fuel pressure yet or any voltage drop.
Doesn't seem like a vacuum leak unless that emission valve leaks to atmosphere. Haven't boosted yet though.
Replaced the temp sensor, TPS resistance tests ok at least.
No Mo-monitor