When you click on links to various merchants on this site and make a purchase, this can result in this site earning a commission. Affiliate programs and affiliations include, but are not limited to, the eBay Partner Network.
This is going to sound like rather pedantic question I know, but I'm trying to do as much prep work as I can, to make the job as smooth as possible....if possible.
To get at the 6mm hex turbo mounting bolts which tool is preferable, you think? I've found two options. This one:
I found it much easier to remove the alternator and access them from the front of the car up top. That eliminates the need for extendo bendo rachets from way under the car.
I found it much easier to remove the alternator and access them from the front of the car up top. That eliminates the need for extendo bendo rachets from way under the car.
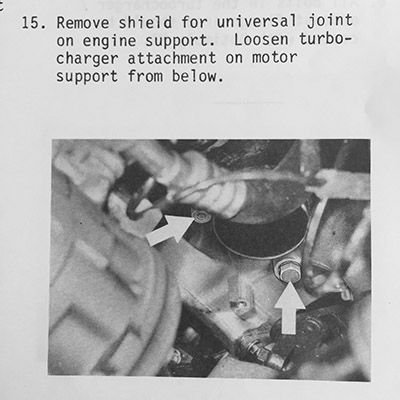
Although some of the bolts can be accessed from the top, I believe that there are a couple that have to accessed from underneath, in particular, the 6mm hex bolts.
Yes, I have read that it's easier to get to those bolts with the alternator removed, and the steering rack moved about 3 inches or so. I've also read that it can be done without removing either. I will do whatever I can to avoid stripping the bolts. That's my prime concern.
The first time I did it I loosened the steering rack and reached up there with long extensions and universal joint attachments. It slipped alot and I couldn't get a solid turn on the mounting bolts. So I pulled the alternator and used a small rachet with a small pipe, maybe one super short extension and it couldn't have been easier, especially when retightening those bolts. I'll never reach from below again. Theres a heat shield over the steering knuckle that needs removed first. I left mine off. And I'm glad I did for it makes getting in there so much easier. I've done about 4 turbo swaps on these cars. The first time took me 8 to 10 hours. Now I can get it done in 4 or so hours. Theres a learning curve for what works best. Some bolts can be tricky but all and all pretty simple.
The first time I did it I loosened the steering rack and reached up there with long extensions and universal joint attachments. It slipped alot and I couldn't get a solid turn on the mounting bolts. So I pulled the alternator and used a small rachet with a small pipe, maybe one super short extension and it couldn't have been easier, especially when retightening those bolts. I'll never reach from below again. Theres a heat shield over the steering knuckle that needs removed first. I left mine off. And I'm glad I did for it makes getting in there so much easier. I've done about 4 turbo swaps on these cars. The first time took me 8 to 10 hours. Now I can get it done in 4 or so hours. Theres a learning curve for what works best. Some bolts can be tricky but all and all pretty simple.
So to be clear, removing the alternator allows easier access to the 6mm hex mounting bolts. Then what bolts are left that must be accessed from underneath? The M8s pictured below right? I believe they are 13mm.
Yes removing the alternator allows easy access to the turbos mounting bolts. Theres a heat sheild in that area that guards the steering nuckle if your car still has it. It's small and curved. I believe it has to be removed first. It's held on by two bolts. But basically to do the job you'll need to remove the intake manifold, airbox, hard pipes, fuel rail. Unbolt the exhaust crossover pipe from the turbos side and the down pipe where the cat back attaches to it, remove the steering nuckle heat shield and remove the turbo mounting bolts. In a nut shell. Obviously coolant will spill if you don't drain it first. It's really not as bad as it sounds.
Uh huh. That's not the impression I get reading some of the threads. It looks like a challenge especially from the point of view of an amateur wrencher. But it must be done, and done well.
Parts Needed via Clark's Garage
944 111 205 03 Turbocharger Outlet Flange Seal Ring
944 111 205 04 Turbocharger Inlet Flange Seal Ring
944 111 205 03 Turbocharger Outlet Pipe to Cat Pipe Flange Seal Ring
999 707 043 40 Turbocharger Supply Line O-Ring (top of turbocharger) (Note correct part #)
900 174 058 40 Turbocharger Oil Discharge O-Ring (between bottom of turbo and motor mount bracket)
999 707 043 40 Turbocharger Oil Inlet Flange O-Ring (top of turbocharger bearing housing) (Note correct part #)
N 013 814 8 (900-123-007-30-M131) Turbocharger Oil Supply Line Banjo Bolt Seal Rings (2 Needed)
My addition to Clark's list:
AOS seals
lower 999-701-661-40-M17
upper 999-701-613-40-M104
Intake Manifold Gasket 944-110-163-05-M17

 02-03-2016, 07:54 PM