
Another homemade door panel
 10-25-2011, 02:36 PM
#16
Nordschleife Master
Great writeup, i have thought about doing this before also.. love the way the RS style door cards look. Just i am not sure i can live without the arm rest..  .
.
How does the 6.5" speaker mount? On the door or on a speaker enclosure / pod?
. How does the 6.5" speaker mount? On the door or on a speaker enclosure / pod?
 10-25-2011, 04:06 PM
#17
Nordschleife Master
for the record i only have the rear speakers driven by an aftermarket head unit and i don't miss the extra oomph at all. but then again im getting older...
09-28-2015, 08:15 PM
#18
Rennlist Member

Would you mind posting a pic of the door panels installed in the car? Looks like a great winter project. Yours is the best example I've come across.
09-30-2015, 10:10 AM
#20
Rennlist Member
Here is how I did it on my lightweigth doors I used to have on my -89 TC. I made the top part from shet alu and dressed them in alcantara and TC brodery and using red seems for the rest. Doorcard was thin plywood with black vinyl.
The car is now on its way back to fully stock again.
The car is now on its way back to fully stock again.
09-30-2015, 01:38 PM
#21
Rennlist Member
Here is how I did it on my lightweigth doors I used to have on my -89 TC. I made the top part from shet alu and dressed them in alcantara and TC brodery and using red seems for the rest. Doorcard was thin plywood with black vinyl.
The car is now on its way back to fully stock again.
The car is now on its way back to fully stock again.
09-30-2015, 05:17 PM
#22
Rennlist Member
10-01-2015, 09:26 AM
#23
Rennlist Member
Here is how I did it on my lightweigth doors I used to have on my -89 TC. I made the top part from shet alu and dressed them in alcantara and TC brodery and using red seems for the rest. Doorcard was thin plywood with black vinyl.
The car is now on its way back to fully stock again.
The car is now on its way back to fully stock again.
10-01-2015, 12:09 PM
#24
Rennlist Member
Thanks! This pic is how it looked before I started a rebuild and return to fully stock Turbo Cup configuration. I liked that look but I think the stock look is so much better but I am getting old 
When it comes to doorcards I would say that the starter of this thread is spot on with a factory style look and simple and cost effective modification compared to how I did it.
When it comes to doorcards I would say that the starter of this thread is spot on with a factory style look and simple and cost effective modification compared to how I did it.
10-01-2015, 05:42 PM
#26
Rennlist Member
I've got to say. I'm so tempted to do something like the original poster did, potentially with a slightly shorter red "pull". Love the clean minimalist look. I guess I'm torn by the larger question to keep my 86 951 completely stock or change some things here and there (rear seat delete, RS panels, etc.)
10-01-2015, 06:20 PM
#27
Rennlist Member
Thanks! This pic is how it looked before I started a rebuild and return to fully stock Turbo Cup configuration. I liked that look but I think the stock look is so much better but I am getting old
When it comes to doorcards I would say that the starter of this thread is spot on with a factory style look and simple and cost effective modification compared to how I did it.
When it comes to doorcards I would say that the starter of this thread is spot on with a factory style look and simple and cost effective modification compared to how I did it.
10-01-2015, 06:49 PM
#28
Rennlist Member
11-14-2015, 11:23 AM
#29
Addict
Lifetime Rennlist
Member
Lifetime Rennlist
Member
Join Date: May 2001
Location: Hotlanta - NE of the Perimeter
Posts: 12,269
Received 267 Likes
on
154 Posts
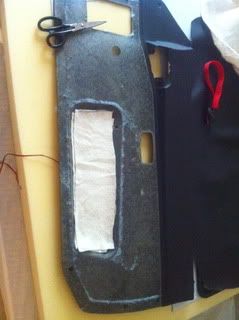
So, here's what I did. This is super easy so anyone can do it. First, get a stock door panel strip it down to just the panel, like this:

Then turn it over and remove the old staples holding the vinyl on the main part of the panel:
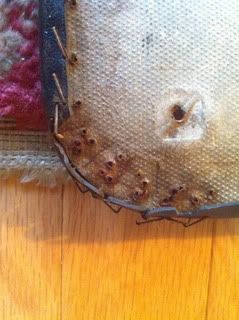
Peel the vinyl off the bottom part of the panel carefully until it's all the way off. Don't cut it, as you will use it to make the template for the new vinyl.
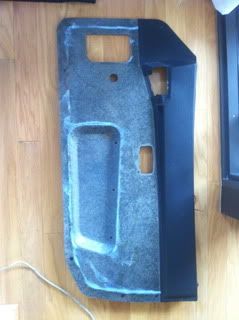
The panel will then look like this:
Use the old piece of vinyl to cut the new piece. Put it face down on the back of the sheet of new vinyl and trace the contour. Make sure on the sides and bottom, there is about an inch or so of extra vinyl to wrap around the panel. The top should exactly follow the contour of the old piece.
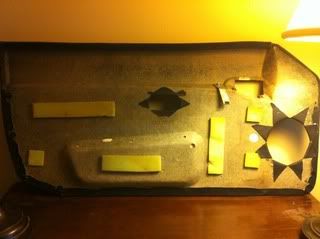
I filled the void under where the old armrest was with batting to make it about level with the front of the panel. Then I put a layer of batting over the whole panel and spray glued it in place. I don't have pictures of this step. I cut the holes out for the door handle and speaker after I glued them on. Oh, before gluing on the batting, I cut the speaker hole out to accommodate a standard 6 1/2" round speaker.
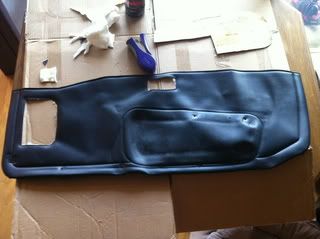
After that, lay the new vinyl piece over the batting (once the glue is dry) and line up the contour along the top. On one side, fold the vinyl over and staple it (you'll take the staples out later so it doesn't matter if it pokes through). Then go to the other side of the panel and do the same.
Fold the vinyl over in a few places along the bottom and staple that as well.
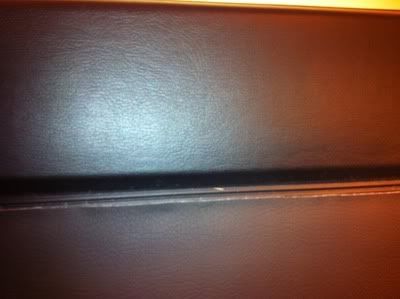
Next, run a bead of hot glue along the panel right at the top of the new piece of vinyl and glue the top of the new vinyl along the seam (where the new vinyl will meet the existing vinyl on the top part of the panel.
Next, start at the top on one side and remove the staple you put in to hold it. Pull the vinyl tight (but not too much to pull the vinyl out of place) and start gluing the vinyl on to the back of the panel. Glue it all the way around to the top of the other side, removing the few staples you put in as you go.
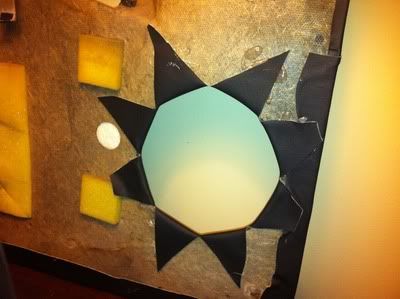
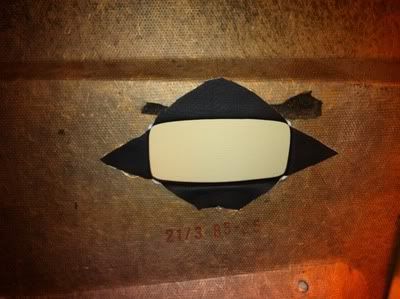
Then make a hole in the center of the vinyl where the hole should be for the speaker and door handle. slit the vinyl out to the edge (see pic), pull it through to the back fairly tight and hot glue it down.
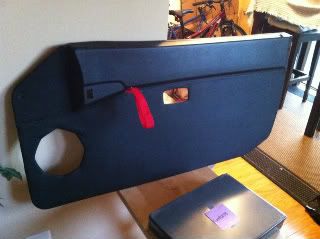
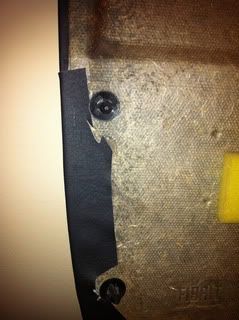
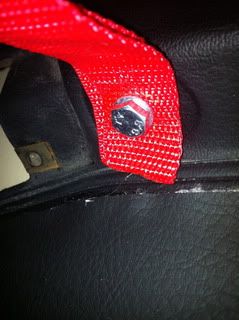
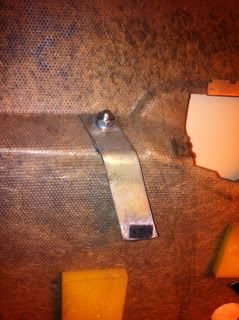
Then, all I did was drill a hole through both ends of a length of red webbing and bolted it through with a washer on each side to the bracket that hooks on the door. This bolts through the existing hole where the armrest bolted in. See pics.
That's all. It's not perfect right up close, but it looks pretty good and it really easy. All the materials can be gotten at a craft store for about $50. I got the highest quality vinyl they had, so cost me a little more. The first one took a while, but the second one only took me about an hour and a half start to finish.

Then turn it over and remove the old staples holding the vinyl on the main part of the panel:
Peel the vinyl off the bottom part of the panel carefully until it's all the way off. Don't cut it, as you will use it to make the template for the new vinyl.
The panel will then look like this:
Use the old piece of vinyl to cut the new piece. Put it face down on the back of the sheet of new vinyl and trace the contour. Make sure on the sides and bottom, there is about an inch or so of extra vinyl to wrap around the panel. The top should exactly follow the contour of the old piece.
I filled the void under where the old armrest was with batting to make it about level with the front of the panel. Then I put a layer of batting over the whole panel and spray glued it in place. I don't have pictures of this step. I cut the holes out for the door handle and speaker after I glued them on. Oh, before gluing on the batting, I cut the speaker hole out to accommodate a standard 6 1/2" round speaker.
After that, lay the new vinyl piece over the batting (once the glue is dry) and line up the contour along the top. On one side, fold the vinyl over and staple it (you'll take the staples out later so it doesn't matter if it pokes through). Then go to the other side of the panel and do the same.
Fold the vinyl over in a few places along the bottom and staple that as well.
Next, run a bead of hot glue along the panel right at the top of the new piece of vinyl and glue the top of the new vinyl along the seam (where the new vinyl will meet the existing vinyl on the top part of the panel.
Next, start at the top on one side and remove the staple you put in to hold it. Pull the vinyl tight (but not too much to pull the vinyl out of place) and start gluing the vinyl on to the back of the panel. Glue it all the way around to the top of the other side, removing the few staples you put in as you go.
Then make a hole in the center of the vinyl where the hole should be for the speaker and door handle. slit the vinyl out to the edge (see pic), pull it through to the back fairly tight and hot glue it down.
Then, all I did was drill a hole through both ends of a length of red webbing and bolted it through with a washer on each side to the bracket that hooks on the door. This bolts through the existing hole where the armrest bolted in. See pics.
That's all. It's not perfect right up close, but it looks pretty good and it really easy. All the materials can be gotten at a craft store for about $50. I got the highest quality vinyl they had, so cost me a little more. The first one took a while, but the second one only took me about an hour and a half start to finish.
As others have already said - looks really good!
Any further updates?