
Rod bearing and lower balance shaft reseal pictorial
 05-11-2011, 06:14 AM
#1
Nordschleife Master
Thread Starter
Here is another chapter in my series of pictorials for jobs you don’t want to do, but may have to eventually..
Here are some of the previous ones including..
Clutch Replacement
https://rennlist.com/forums/944-turb...pictorial.html
Turbo Swap
https://rennlist.com/forums/944-turb...pictorial.html
Headgasket
https://rennlist.com/forums/944-turb...y-project.html
As usual these are not meant to be a how-to, but rather a ‘what am I getting myself into’ guide plus showing some tips and tricks that may help you out.
The basic work I did was reseal the lower balance shaft housing and replace the rod bearings with all the little while your in there things ontop of that.
The first question you may be asking is ’can I do this myself?’. Obviously the answer for this depends on a number of things. But if you are relatively good mechanically and have the right tools this is very do-able yourself. I find a lot of people totally blow out of proportion the difficulty of some work on these cars. I don’t mean to give the false sense that this is as easy as an oil change, but I think it is certainly do-able if mechanically inclined and have the right tools.
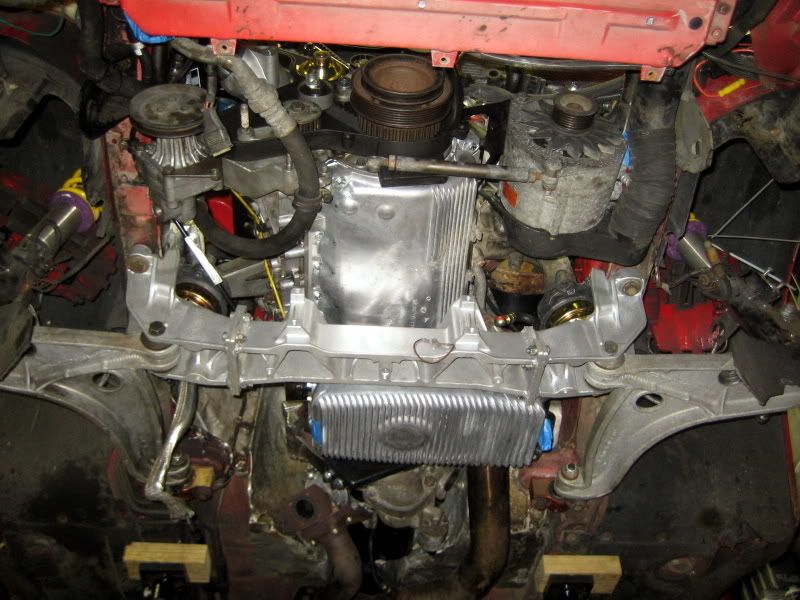
Many probably do not have access to a lift and will be doing this on jackstands. I was lucky to have access to my buddies lift in his garage to do this. But like most people I have been ’slumming it’ in the driveway using jackstands for a long time so I know what is and is not do-able. Even with access to the lift, I did probably 90% of the work with the car on jackstands prior to getting it up in the air. The only stuff really done on the lift was removing and reinstalling the oil pan and installing the cross member.
I think the most important thing is to have a good set of jackstands available. I am not talking the cheapo ones you get from your local autostore, I am talking heavy duty ones that allow you to get the car atleast 18” off the ground. Your typical 12” stands are useless for anything that require you to be under the car. The higher you get the car, the easier your life will be, and also the better your odds of getting the pan on correctly with no leaks are.
How much time should you get aside? I think 20-25hrs is reasonable for a first timer doing this on jackstands. Don’t forget you should probably get an alignment afterwards also.
Some may argue its easier to just pull the engine to do this and that may be true.. But if you don’t have the equipment to do this it is still very do-able with the engine in the car.
Here are some of the ‘while your in there’ things you may consider doing at the same time..
-Replace steering shaft
-Replace tie rods, steering rack, power steering lines..etc.
-Replace steering rack bushings
-Reseal lower balance shaft housing…. This is not exactly a while your in there item, but it requires removal of the passenger side engine upright to get the cover off. With the cross member out, its no better time to do this. The catch is you will need to remove the balance shaft belt, power steering bracket / front cover. At this point, you may consider just replacing the belts and resealing the front end while its all apart.
-Replace lower balance shaft bearings
-Replace motor mounts
-Modify cross member to 3pc... this allows you to remove the crossmember without having to support the engine from above and remove the control arms. This should also preserve your wheel alignment aswell. I figure this will save you about 1.5-2hrs off this job in the future and potentially also a few hundred bucks on a wheel alignment.
-Modify crossover to 2pc...this allows removal the the oil pan without having to take out the entire crossover pipe and intake manifold. I figure this saves you about an 1-1.5hrs total in the future, not to mention will cut some time off turbo removal in the future. Also saves you from needing to replace intake manifold gaskets and the 3 sealing rings for the crossover pipe.
-Install baffle in oil pan
-Replace oil pickup tube
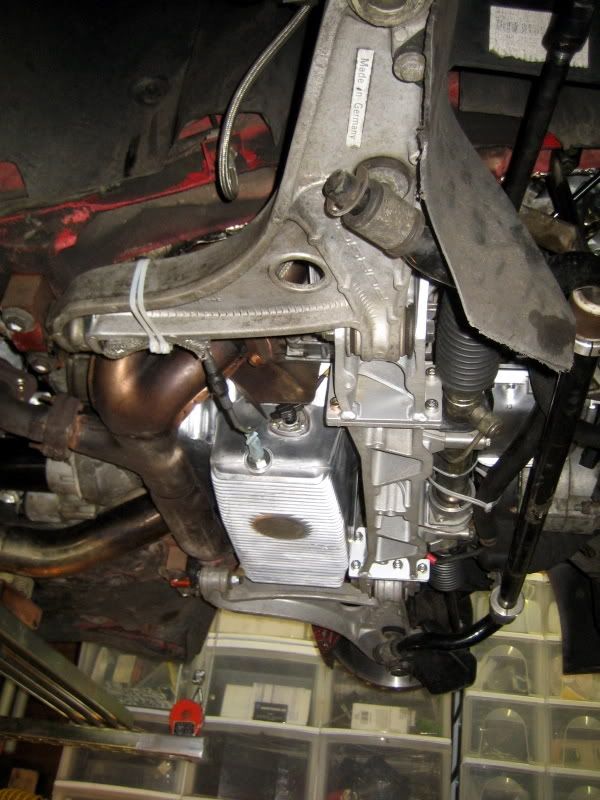
-Reseal oil cooler
-Replace oil pressure sender
Now keep in mind this is just one way to get this job done..
Crossover removal requires you to get the intake manifold off. Now with a modified 2pc crossover you can skip the step of getting the intake manifold off. If your as good at me at removing the intake this will save you about 45 minutes and having to replace the crushring for the turbo inlet.
To get the cross member out, you need to support the engine from above. There are a few ways to do this, here are two. First method is the ghetto $10 Home Depot method using some chain, a 4ft piece of super strut and a few pieces of scrap 2x4. This method will work in a pinch, but it has its problems. The big issue is the engine will sag anywhere from 1-2 inches as the slack is taken up on the chain. This can make it really difficult to get the cross member back in, requiring you to jack up the engine from the oil pan later on.
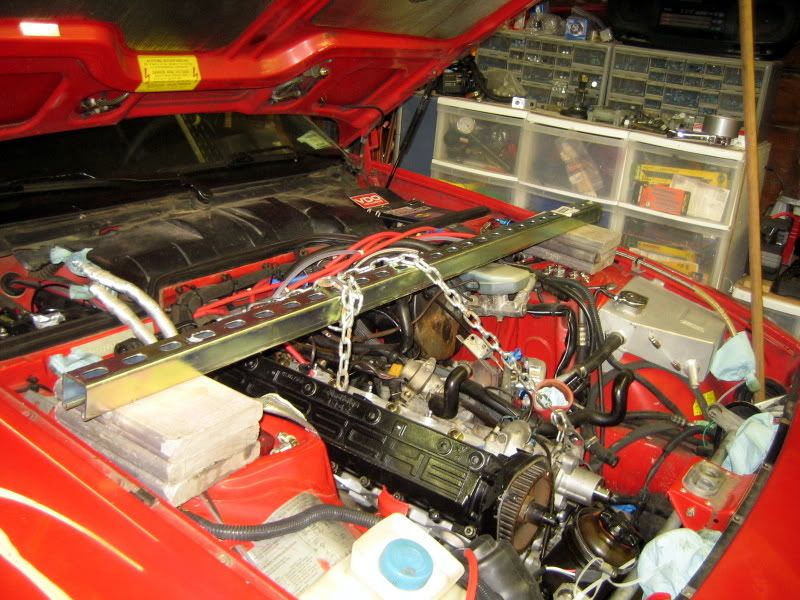
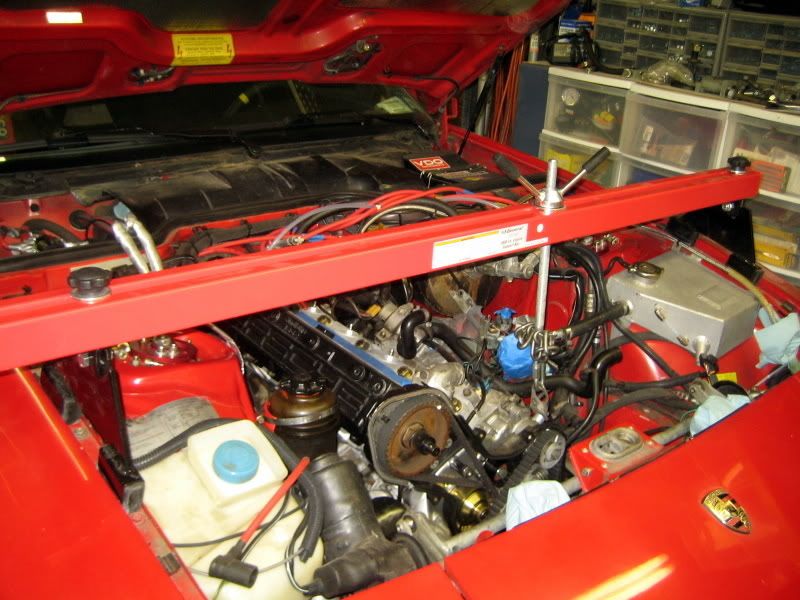
Option 2 is buying a engine support brace. I picked this up from my local Harbor Freight, it was on sale for like $60 and is well worth it I think. You may only use this a few times in your wrenching lifetime but it will make replacing engine mounts, dropping sub frames or anything of that sort on other cars easy. The factory manual shows a tool very similar to this.. All you need to do is just hook it up to the front hoist ring. Turning the handle allows you to raise and lower the engine via the threaded rod making things very easy with getting the cross member back in, especially if you are replacing worn out motor mounts (the engine can sit as much as 5mm higher with new mounts).
Here are some of the previous ones including..
Clutch Replacement
https://rennlist.com/forums/944-turb...pictorial.html
Turbo Swap
https://rennlist.com/forums/944-turb...pictorial.html
Headgasket
https://rennlist.com/forums/944-turb...y-project.html
As usual these are not meant to be a how-to, but rather a ‘what am I getting myself into’ guide plus showing some tips and tricks that may help you out.
The basic work I did was reseal the lower balance shaft housing and replace the rod bearings with all the little while your in there things ontop of that.
The first question you may be asking is ’can I do this myself?’. Obviously the answer for this depends on a number of things. But if you are relatively good mechanically and have the right tools this is very do-able yourself. I find a lot of people totally blow out of proportion the difficulty of some work on these cars. I don’t mean to give the false sense that this is as easy as an oil change, but I think it is certainly do-able if mechanically inclined and have the right tools.
Many probably do not have access to a lift and will be doing this on jackstands. I was lucky to have access to my buddies lift in his garage to do this. But like most people I have been ’slumming it’ in the driveway using jackstands for a long time so I know what is and is not do-able. Even with access to the lift, I did probably 90% of the work with the car on jackstands prior to getting it up in the air. The only stuff really done on the lift was removing and reinstalling the oil pan and installing the cross member.
I think the most important thing is to have a good set of jackstands available. I am not talking the cheapo ones you get from your local autostore, I am talking heavy duty ones that allow you to get the car atleast 18” off the ground. Your typical 12” stands are useless for anything that require you to be under the car. The higher you get the car, the easier your life will be, and also the better your odds of getting the pan on correctly with no leaks are.
How much time should you get aside? I think 20-25hrs is reasonable for a first timer doing this on jackstands. Don’t forget you should probably get an alignment afterwards also.
Some may argue its easier to just pull the engine to do this and that may be true.. But if you don’t have the equipment to do this it is still very do-able with the engine in the car.
Here are some of the ‘while your in there’ things you may consider doing at the same time..
-Replace steering shaft
-Replace tie rods, steering rack, power steering lines..etc.
-Replace steering rack bushings
-Reseal lower balance shaft housing…. This is not exactly a while your in there item, but it requires removal of the passenger side engine upright to get the cover off. With the cross member out, its no better time to do this. The catch is you will need to remove the balance shaft belt, power steering bracket / front cover. At this point, you may consider just replacing the belts and resealing the front end while its all apart.
-Replace lower balance shaft bearings
-Replace motor mounts
-Modify cross member to 3pc... this allows you to remove the crossmember without having to support the engine from above and remove the control arms. This should also preserve your wheel alignment aswell. I figure this will save you about 1.5-2hrs off this job in the future and potentially also a few hundred bucks on a wheel alignment.
-Modify crossover to 2pc...this allows removal the the oil pan without having to take out the entire crossover pipe and intake manifold. I figure this saves you about an 1-1.5hrs total in the future, not to mention will cut some time off turbo removal in the future. Also saves you from needing to replace intake manifold gaskets and the 3 sealing rings for the crossover pipe.
-Install baffle in oil pan
-Replace oil pickup tube
-Reseal oil cooler
-Replace oil pressure sender
Now keep in mind this is just one way to get this job done..
Crossover removal requires you to get the intake manifold off. Now with a modified 2pc crossover you can skip the step of getting the intake manifold off. If your as good at me at removing the intake this will save you about 45 minutes and having to replace the crushring for the turbo inlet.
To get the cross member out, you need to support the engine from above. There are a few ways to do this, here are two. First method is the ghetto $10 Home Depot method using some chain, a 4ft piece of super strut and a few pieces of scrap 2x4. This method will work in a pinch, but it has its problems. The big issue is the engine will sag anywhere from 1-2 inches as the slack is taken up on the chain. This can make it really difficult to get the cross member back in, requiring you to jack up the engine from the oil pan later on.
Option 2 is buying a engine support brace. I picked this up from my local Harbor Freight, it was on sale for like $60 and is well worth it I think. You may only use this a few times in your wrenching lifetime but it will make replacing engine mounts, dropping sub frames or anything of that sort on other cars easy. The factory manual shows a tool very similar to this.. All you need to do is just hook it up to the front hoist ring. Turning the handle allows you to raise and lower the engine via the threaded rod making things very easy with getting the cross member back in, especially if you are replacing worn out motor mounts (the engine can sit as much as 5mm higher with new mounts).
Last edited by Techno Duck; 05-11-2011 at 06:35 AM.
 05-11-2011, 06:15 AM
#2
Nordschleife Master
Thread Starter
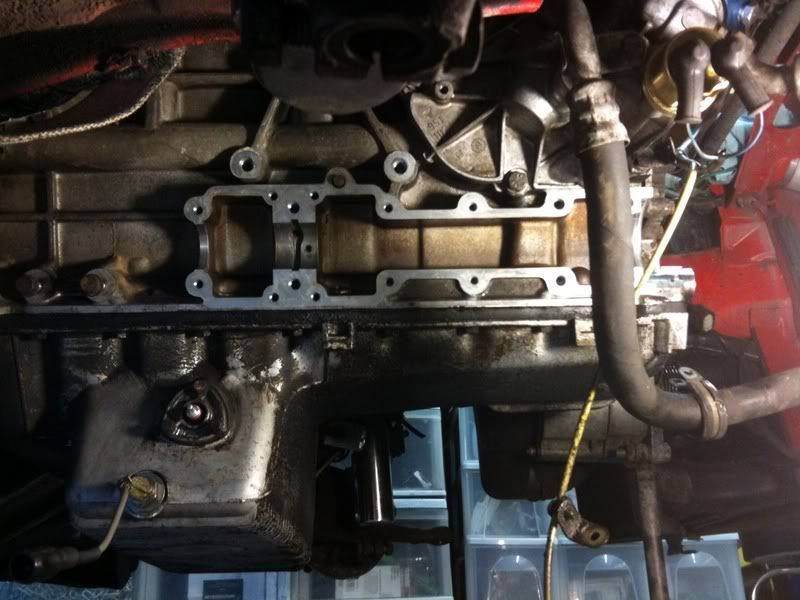
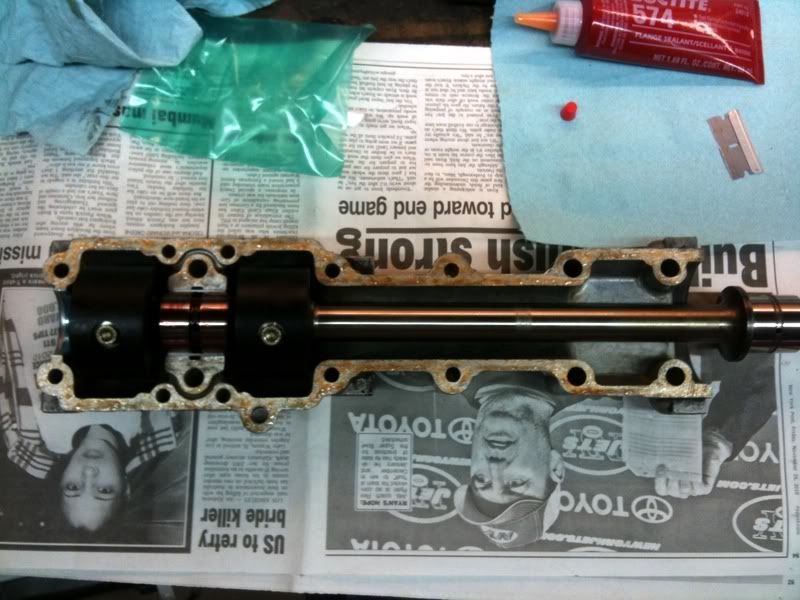
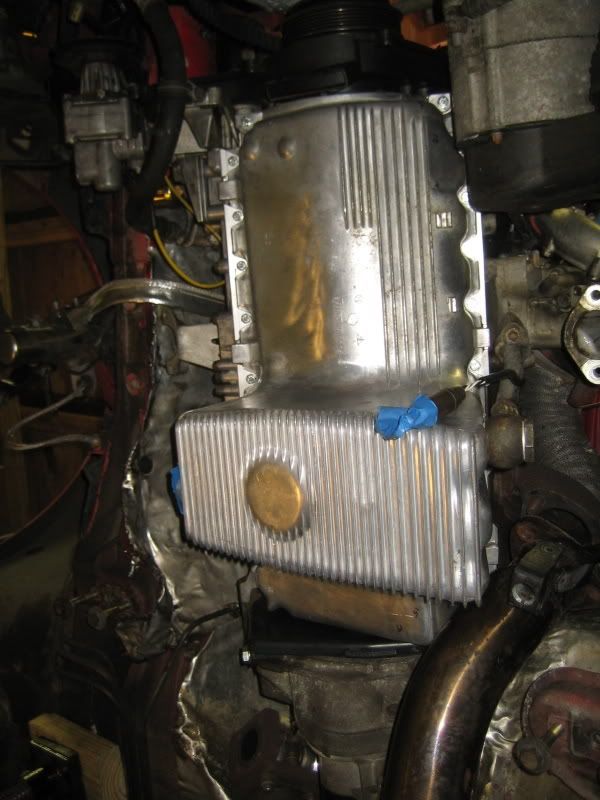
Now with the cross member out and belts off I removed the lower balance shaft housing. I forgot the cutoff date (I think its ‘87) but later cars did not have a separate bearing cap. This means be prepared for the balance shaft to come off with the cover. With the earlier cars the balance shaft will stay put on the engine due to the separate bearing cap. Here is the cleaned up mating surface.
A very common leak is from the rear o-ring around the cap. I think every 951 I have worked on has had a leak, or was starting to get a leak from this spot due to how close it sits to the headers. This was the only oil leak on my engine and it was not bad. It would only sweat oil and under exterme circumstances (coming off the track after a 20 minute session) may leave 1 drop of oil on the ground. But it would still make a mess and leave a light coat of oil on everything aft. I am pretty **** about having a clean engine / undercarriage so this was a ‘must do’ with the cross member out.
Note damaged bearing (left one). The balance shaft almost fell on my face when i popped the cover off... have a friend around to hold the front of the balance shaft for you so this doesn't happen!
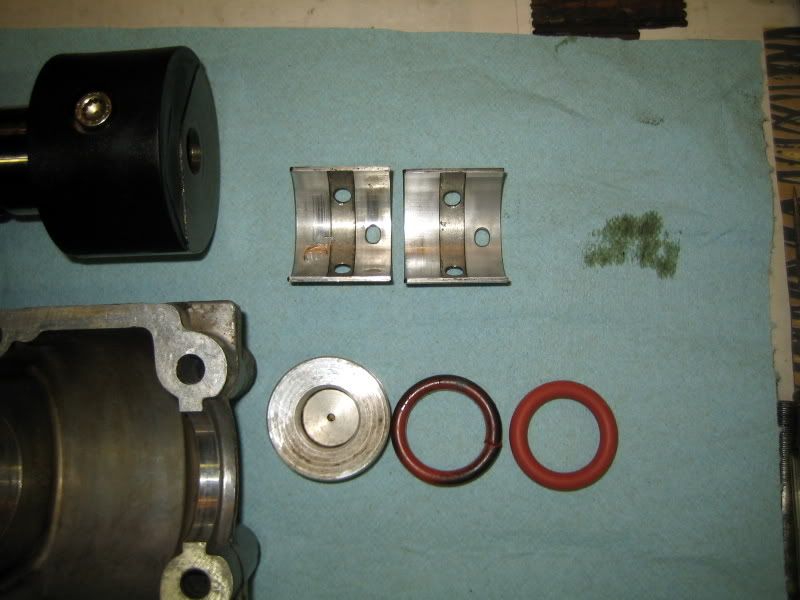
Here is the balance shaft cover ready to go back in. You need to use Loctite 574 for the mating surface to the block. The factory manual states you should use a roller to apply the 574, I have tried this and I prefer to just lay a bead on the cover and dab it with my finger so everything spreads out relatively evenly. I coated the o-ring in hylomar. I installed new bearings for the balance shafts also. The original bearings did not have much wear on them at 125k miles..but I figured its apart anyhow and they were only $20 or so. Apply a liberal coat of assembly lube to the new bearings.
Getting the cover back on can be troublesome by yourself. You will need a helper to hold the front of the balance shaft in place while you get the cover on. Its much easier with the early style where the balance shaft mounts to the block. Make sure you follow the torque sequence carefully and make sure you follow the right one.. The early and late style covers have different sequences. Now assuming you torqued down the cover correctly and also are careful to install and torque the power steering bracket correctly, you may find the balance shaft is hard to spin by hand, this is normal and is just drag caused by the assembly lube. Once you get it turning by hand it will move with some slight effort. This is the second time I have resealed a lower cover and it still sorta bugs me out how hard it can be to turn. But once the assembly lube is flushed out with regular oil it will all be back to normal.
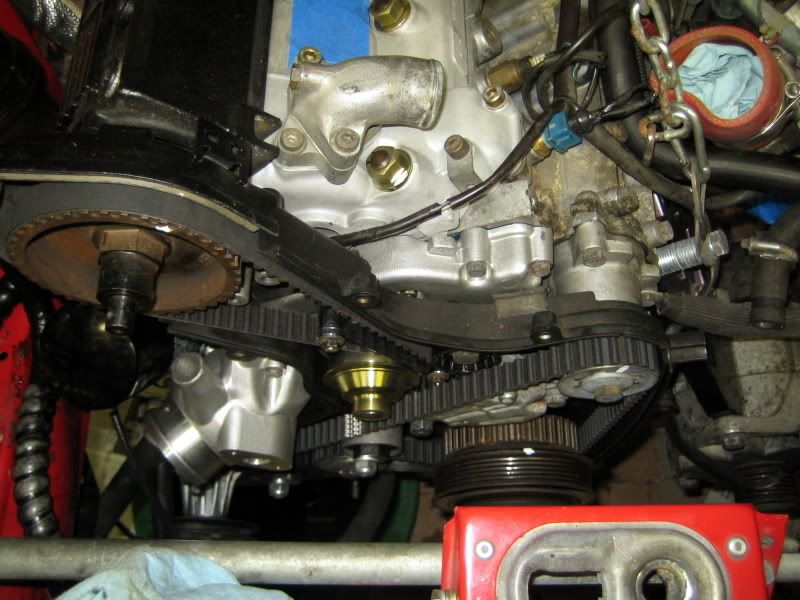
Now with the cover back on, I reinstall my belts so I can spin the engine by hand and access all the rod bearings. I resealed the entire front end and replace the water pump ‘while I was in there’.
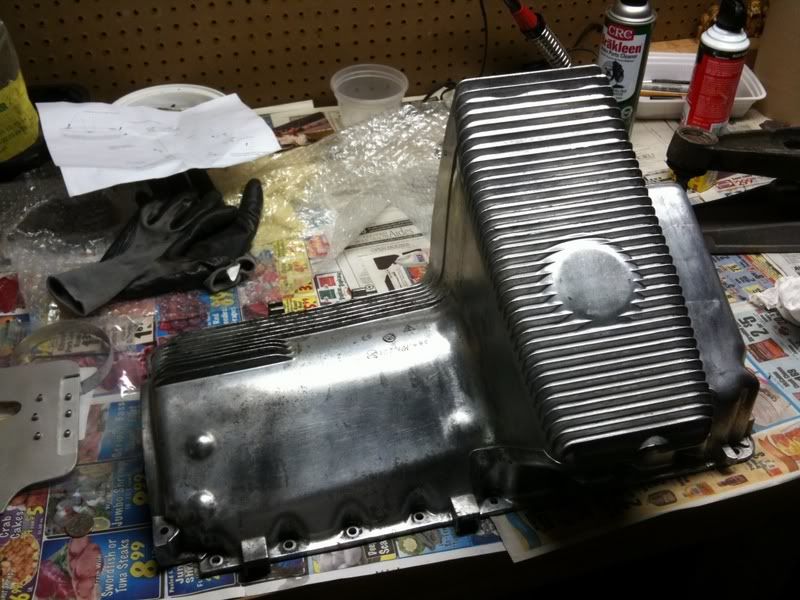
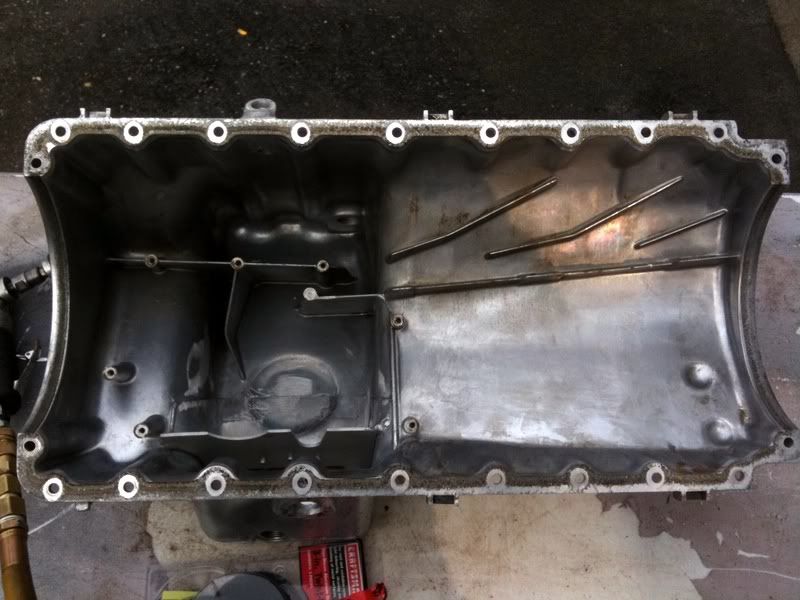
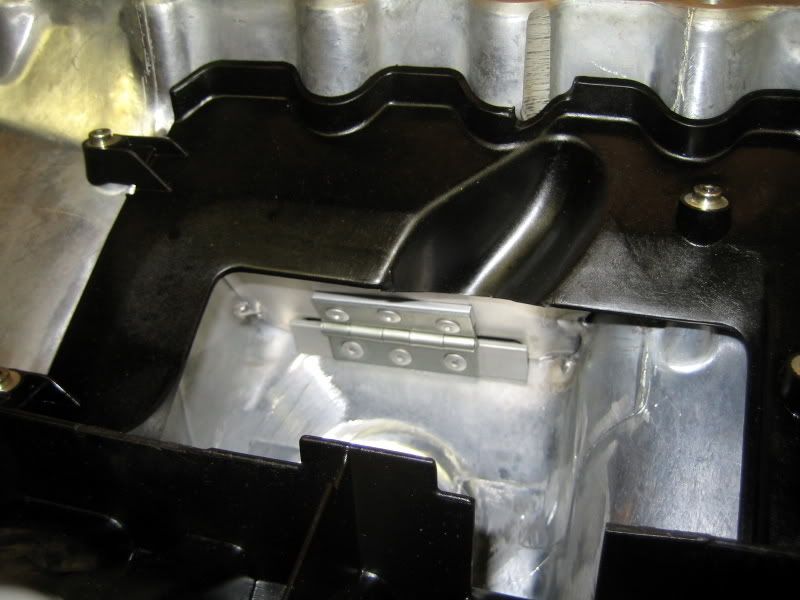
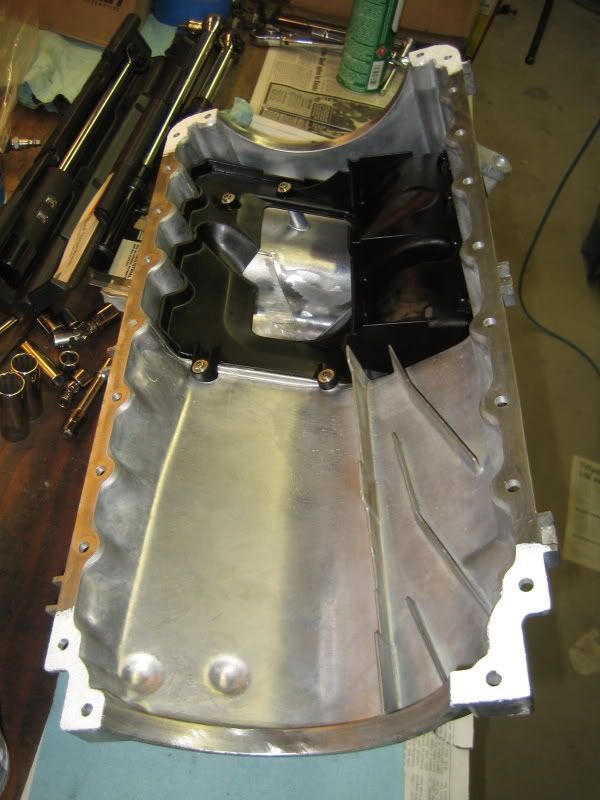
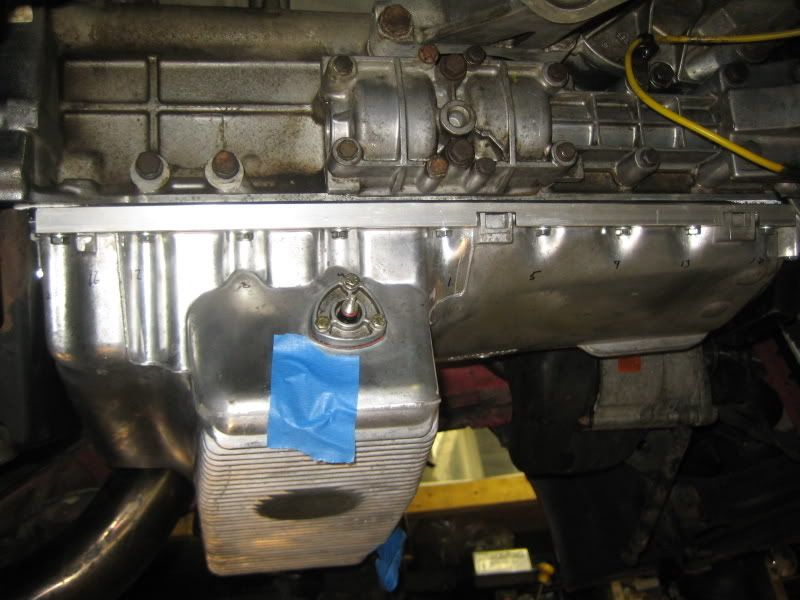
Now its time to drop the pan. This can be messy so be prepared for it. My pan was a disaster and was covered in 25 years of crap. My gloves were covered in grease and grime, so no before pictures. But I cleaned the pan up and had the oil pan baffle welded in by a friend of mine.
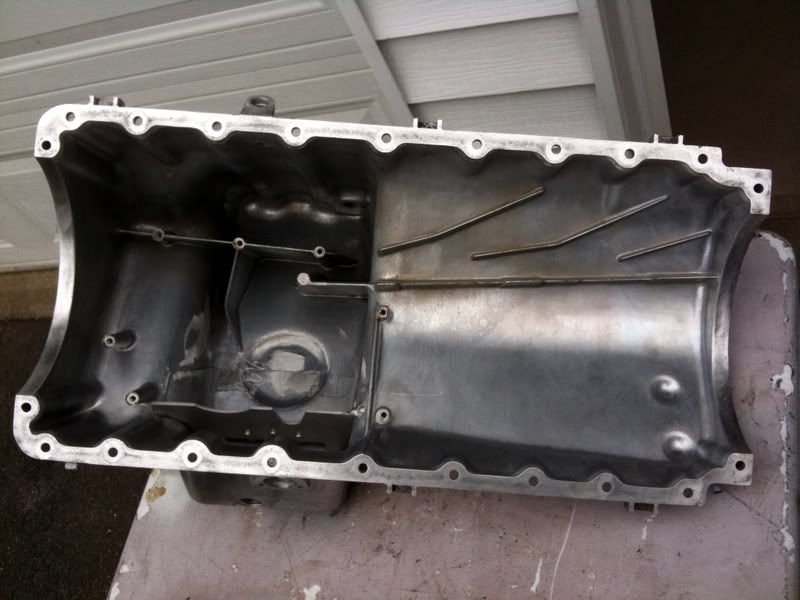
Baffle final position (not welded in yet).
To clean the mating surface of the pan, I used a die grinder with brillo pad disc attachments. I forgot the exact name for them but they are available at most hardware stores and Sears. These saved me hours of scraping the old gasket off with a razor blade. I do not having pictures of it, but cleaning the block side of the oil pan gasket mating surface was easy. I just carefully used a razor blade.. There was not much to clean as the gasket came off cleanly on this side for me. All I needed to do was get the old silastic (sealant) off the corners.
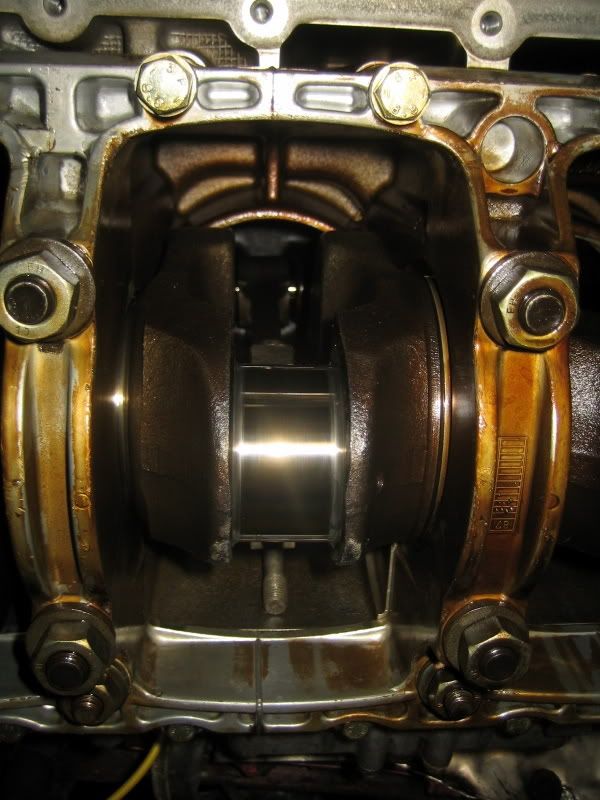
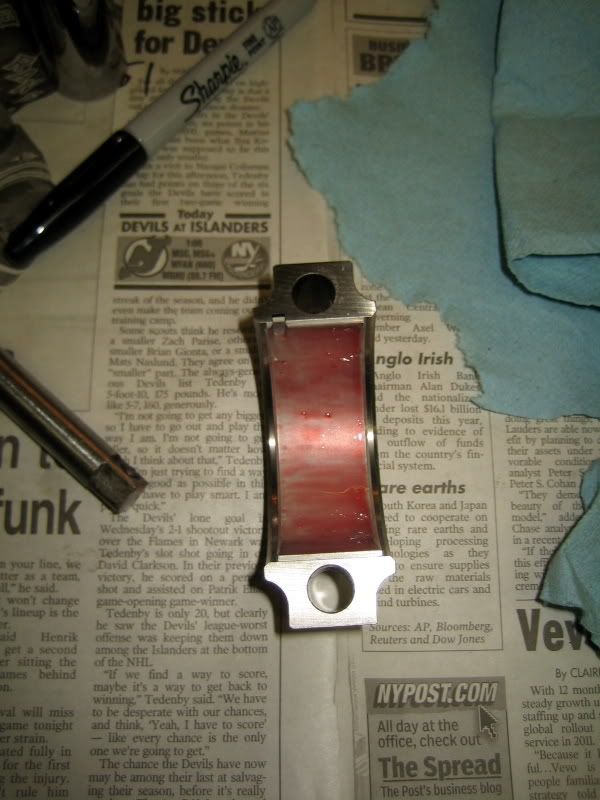
Now it was time to start replacing the bearings. This is very straight forward. Use a 12pt socket and remove the rod nuts. You can usually wiggle the bearing cap by hand back and fourth to get it off, just give it a tap with a deadblow hammer and it will start to loosen up enough to wiggle off by hand. Remove the old bearing and clean the bearing cap. Now to get the other bearing out, you need to CAREFULLY push up on the rod. It does not take much effort to do this and you need to be very careful you do not damage the crank journals with the studs sticking out of the rods. Push the rod up enough so you can rest the rod up against the side of the block. Here is one of the crank journals exposed..
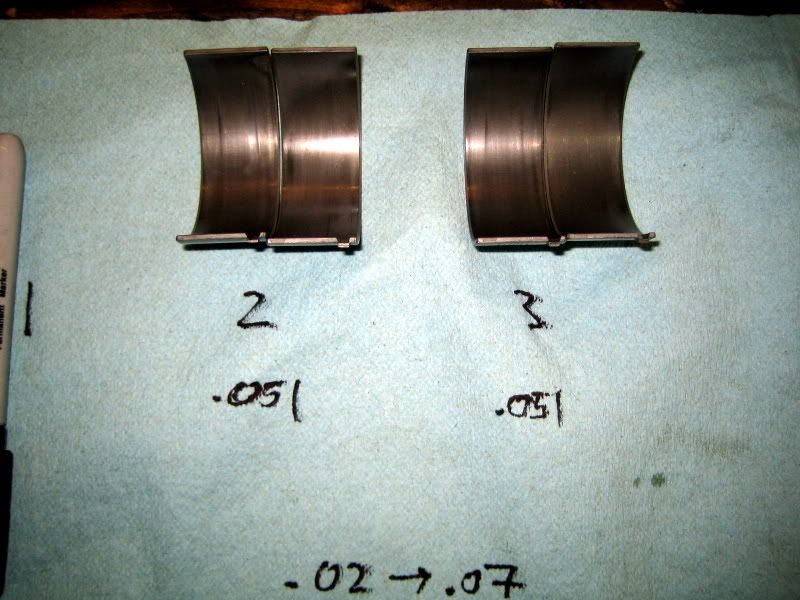
You may choose to plastigauge to see what the clearances are at the crank. In my opinion its not 100% necessary but not a bad idea to atleast have a record of it. My bearings were original with 125k miles and plenty of track days on them. Oil pressure was great, so I was not concerned about them being out of spec really. But I checked them anyhow. The #2 and #3 bearings all fell somewhere in the .051mm range with the tolerance being between .02 and .07 as per the factory manual. #1 and #4 were the same. Note, that this is for standard clearance bearings.
Now clean up both the rod and bearing cap bearing mating surface aswell as the crank journal. Install your new bearings in the rod and bearing cap and give them a good coat of assembly lube. I like to also spread assembly lube on the crank journal aswell.. You cant overdo it really.
With assembly lube on everything, pull down on the rod and seat the bearing. Be very careful you don’t damage the crank journal with the studs sticking out!!

Torque down with new rod nuts as per the factory manual and that’s it, really very easy.. No rocket science here. With the engine set at TDC, you can do the #2 and #3 bearings first. Once done, rotate the engine by hand and you can do the #1 and #4.
Now at the very least I would inspect the oil pickup tube for cracks. Personally I would just replace it if you have the pan off. Cost is about $110 (make sure you order the right one!) and is cheap insurance.
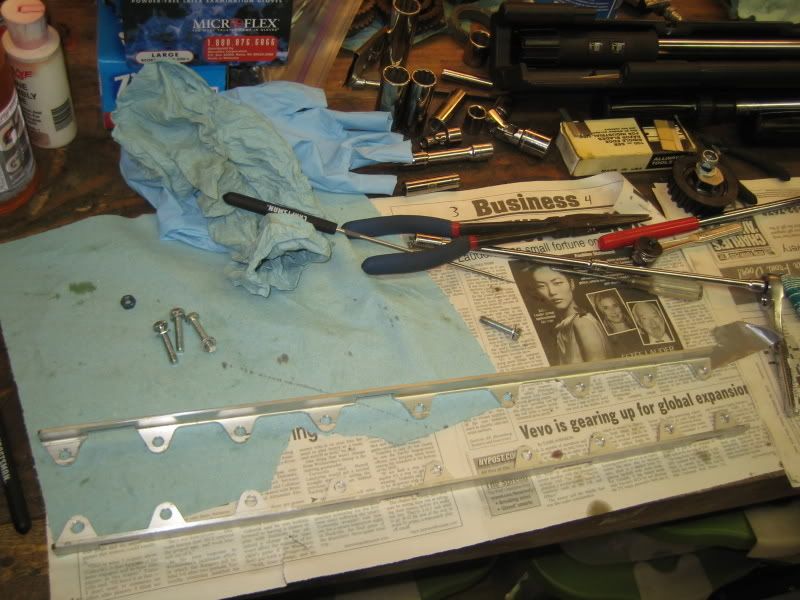
New and original pickup tube with the return tube.

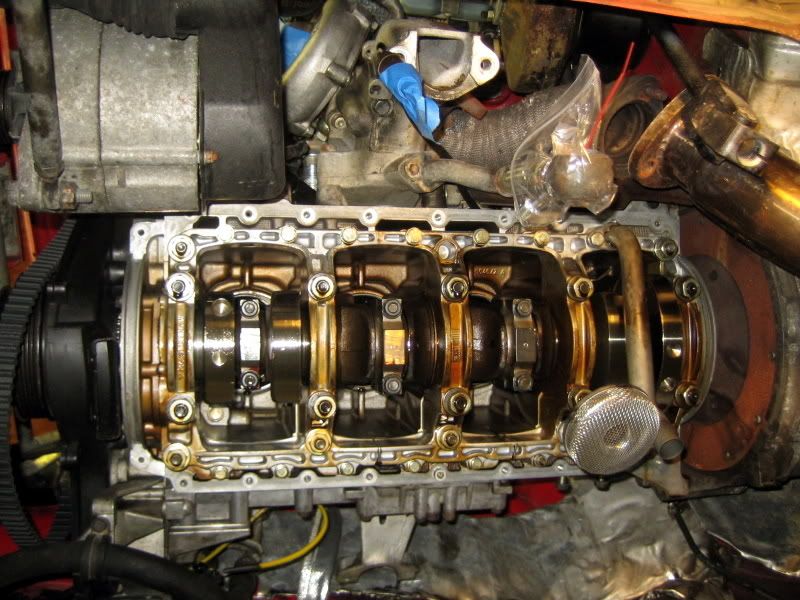
Bottom end back together..

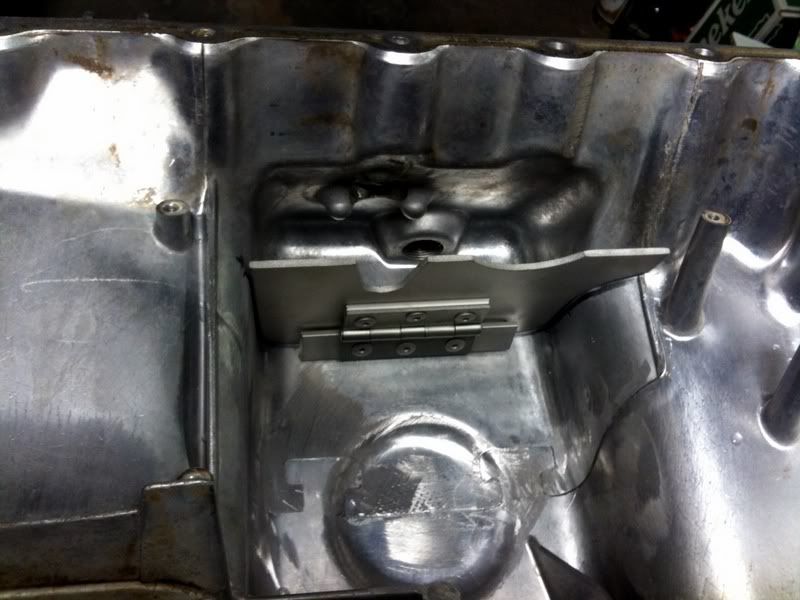
Now its time to get the pan ready to go back on. Now I recommend test fitting the oil level sensor in the pan with the plastic baffle and weld in baffle in. Get an idea on how you need to rotate the level sensor to get it to clear everything correctly. I did not do this and spent the better part of an hour trying to get that level sensor back in. It is a very tight squeeze and will only slide in at a very specific angle (atleast in my case). Both baffles in place..
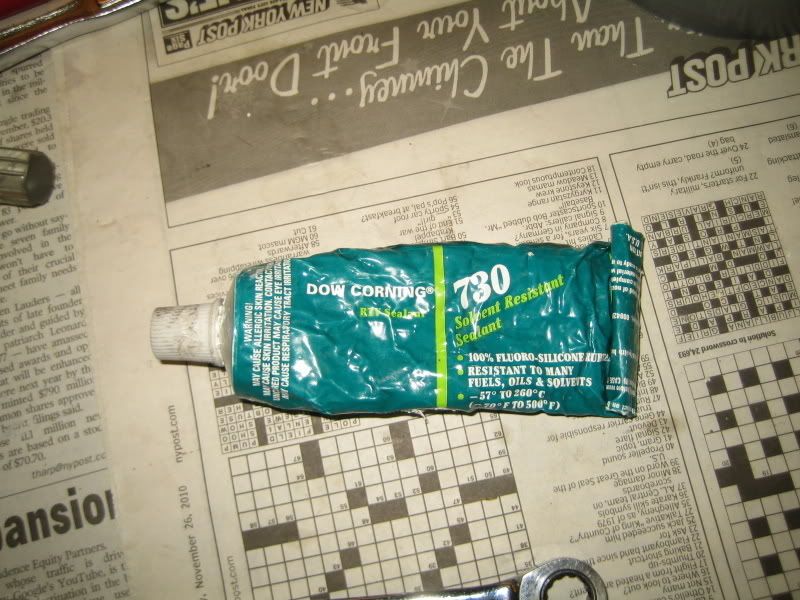
Now everyone has an opinion on how to install the gasket. I go with the factory method of using Silastic 730 on the corners. This is my second time doing an oil pan gasket and I have not had leaks. This is with using and not using gasket retainers. This stuff is expensive ($100 a tube or so). It stinks like hell and is a pain to work with because its so tacky. There are alternatives others have used with success like Yamabond or just installing it dry.. The choice is yours, but this has worked for me twice.
Corners of pan coated..
Pan with gasket ready to go..
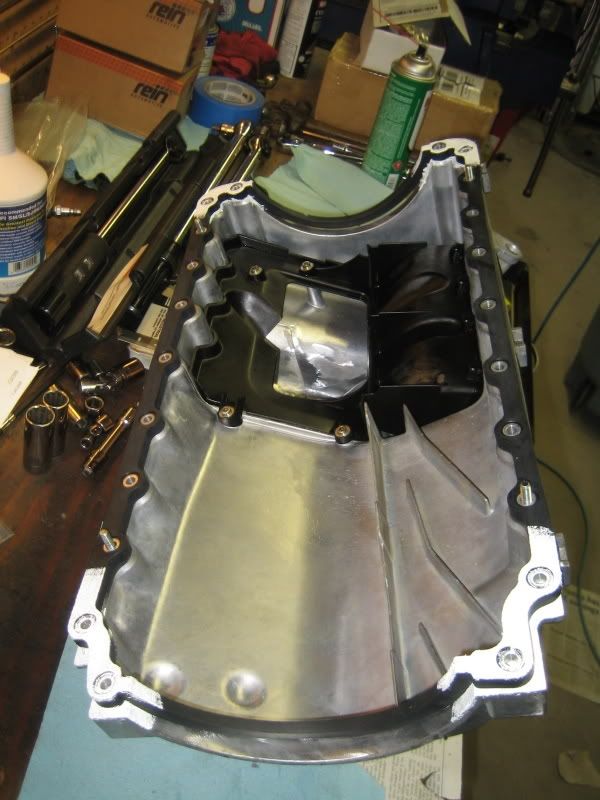
I chose to use gasket retainers this time around.
Now this is the part where having the car as high as possible off the ground comes in handy. Getting the pan on and lined up is probably the hardest part and even with the car on a lift I find its tricky. You may want to practice a few times just getting the pickup tube to clear the baffle without the pan gasket on or any sealant on the pan corners. This will just give you an idea what angle you need to hold it at to clear everything.
Now holding the gasket in place can give you some trouble. The first time I did this I used dental floss and tied the gasket to the pan in a few spots. Once you get the pan on with a few bolts threaded in, cut the floss and pull it out. This time around I just duct taped a few of the bolts to the pan to hold the gasket in place. I find its easiest to get the 4 long corner bolts in first. Then line up the gasket retainers and start threading the other bolts in.
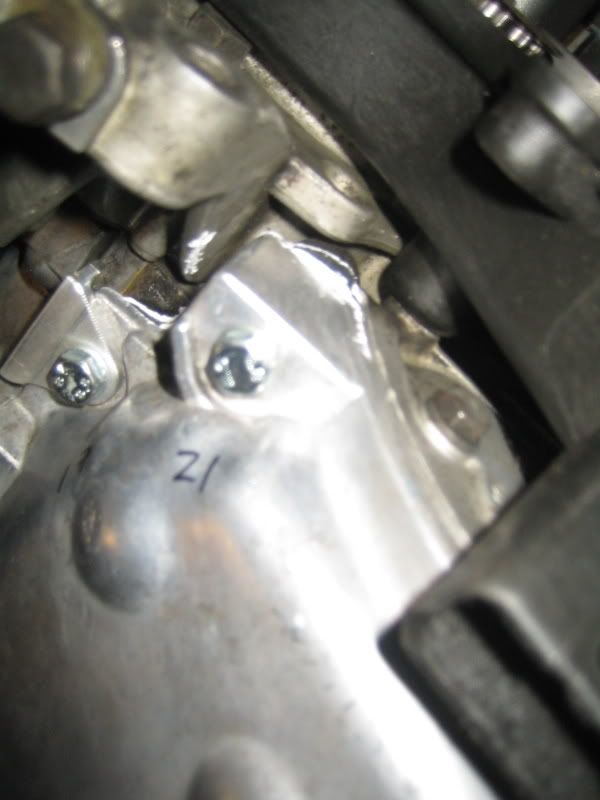
Now when it comes to torquing down the pan, I just use a sharpie and put numbers on the pan so its easy to follow the torque sequence. The factory torque sequence is 3 steps. I do each step 2 or even 3 times making it more like 9 step torque sequence. Ive found that when doing the hand tight step, I can go around in sequence 1 or 2 extra times getting everything snug by hand, same with the 2nd step of the sequence. This is very important so when you actually start putting torque on the oil pan bolts it does not cause the gasket to bulge out due to it being uneven.
It seems everyone has concerns about the corners bulging out, in particular the front. This is how mine looks..
Now with the pan back on, reassembly is the opposite of disassembly...
A very common leak is from the rear o-ring around the cap. I think every 951 I have worked on has had a leak, or was starting to get a leak from this spot due to how close it sits to the headers. This was the only oil leak on my engine and it was not bad. It would only sweat oil and under exterme circumstances (coming off the track after a 20 minute session) may leave 1 drop of oil on the ground. But it would still make a mess and leave a light coat of oil on everything aft. I am pretty **** about having a clean engine / undercarriage so this was a ‘must do’ with the cross member out.
Note damaged bearing (left one). The balance shaft almost fell on my face when i popped the cover off... have a friend around to hold the front of the balance shaft for you so this doesn't happen!
Here is the balance shaft cover ready to go back in. You need to use Loctite 574 for the mating surface to the block. The factory manual states you should use a roller to apply the 574, I have tried this and I prefer to just lay a bead on the cover and dab it with my finger so everything spreads out relatively evenly. I coated the o-ring in hylomar. I installed new bearings for the balance shafts also. The original bearings did not have much wear on them at 125k miles..but I figured its apart anyhow and they were only $20 or so. Apply a liberal coat of assembly lube to the new bearings.
Getting the cover back on can be troublesome by yourself. You will need a helper to hold the front of the balance shaft in place while you get the cover on. Its much easier with the early style where the balance shaft mounts to the block. Make sure you follow the torque sequence carefully and make sure you follow the right one.. The early and late style covers have different sequences. Now assuming you torqued down the cover correctly and also are careful to install and torque the power steering bracket correctly, you may find the balance shaft is hard to spin by hand, this is normal and is just drag caused by the assembly lube. Once you get it turning by hand it will move with some slight effort. This is the second time I have resealed a lower cover and it still sorta bugs me out how hard it can be to turn. But once the assembly lube is flushed out with regular oil it will all be back to normal.
Now with the cover back on, I reinstall my belts so I can spin the engine by hand and access all the rod bearings. I resealed the entire front end and replace the water pump ‘while I was in there’.
Now its time to drop the pan. This can be messy so be prepared for it. My pan was a disaster and was covered in 25 years of crap. My gloves were covered in grease and grime, so no before pictures. But I cleaned the pan up and had the oil pan baffle welded in by a friend of mine.
Baffle final position (not welded in yet).
To clean the mating surface of the pan, I used a die grinder with brillo pad disc attachments. I forgot the exact name for them but they are available at most hardware stores and Sears. These saved me hours of scraping the old gasket off with a razor blade. I do not having pictures of it, but cleaning the block side of the oil pan gasket mating surface was easy. I just carefully used a razor blade.. There was not much to clean as the gasket came off cleanly on this side for me. All I needed to do was get the old silastic (sealant) off the corners.
Now it was time to start replacing the bearings. This is very straight forward. Use a 12pt socket and remove the rod nuts. You can usually wiggle the bearing cap by hand back and fourth to get it off, just give it a tap with a deadblow hammer and it will start to loosen up enough to wiggle off by hand. Remove the old bearing and clean the bearing cap. Now to get the other bearing out, you need to CAREFULLY push up on the rod. It does not take much effort to do this and you need to be very careful you do not damage the crank journals with the studs sticking out of the rods. Push the rod up enough so you can rest the rod up against the side of the block. Here is one of the crank journals exposed..
You may choose to plastigauge to see what the clearances are at the crank. In my opinion its not 100% necessary but not a bad idea to atleast have a record of it. My bearings were original with 125k miles and plenty of track days on them. Oil pressure was great, so I was not concerned about them being out of spec really. But I checked them anyhow. The #2 and #3 bearings all fell somewhere in the .051mm range with the tolerance being between .02 and .07 as per the factory manual. #1 and #4 were the same. Note, that this is for standard clearance bearings.
Now clean up both the rod and bearing cap bearing mating surface aswell as the crank journal. Install your new bearings in the rod and bearing cap and give them a good coat of assembly lube. I like to also spread assembly lube on the crank journal aswell.. You cant overdo it really.
With assembly lube on everything, pull down on the rod and seat the bearing. Be very careful you don’t damage the crank journal with the studs sticking out!!
Torque down with new rod nuts as per the factory manual and that’s it, really very easy.. No rocket science here. With the engine set at TDC, you can do the #2 and #3 bearings first. Once done, rotate the engine by hand and you can do the #1 and #4.
Now at the very least I would inspect the oil pickup tube for cracks. Personally I would just replace it if you have the pan off. Cost is about $110 (make sure you order the right one!) and is cheap insurance.
New and original pickup tube with the return tube.
Bottom end back together..
Now its time to get the pan ready to go back on. Now I recommend test fitting the oil level sensor in the pan with the plastic baffle and weld in baffle in. Get an idea on how you need to rotate the level sensor to get it to clear everything correctly. I did not do this and spent the better part of an hour trying to get that level sensor back in. It is a very tight squeeze and will only slide in at a very specific angle (atleast in my case). Both baffles in place..
Now everyone has an opinion on how to install the gasket. I go with the factory method of using Silastic 730 on the corners. This is my second time doing an oil pan gasket and I have not had leaks. This is with using and not using gasket retainers. This stuff is expensive ($100 a tube or so). It stinks like hell and is a pain to work with because its so tacky. There are alternatives others have used with success like Yamabond or just installing it dry.. The choice is yours, but this has worked for me twice.
Corners of pan coated..
Pan with gasket ready to go..
I chose to use gasket retainers this time around.
Now this is the part where having the car as high as possible off the ground comes in handy. Getting the pan on and lined up is probably the hardest part and even with the car on a lift I find its tricky. You may want to practice a few times just getting the pickup tube to clear the baffle without the pan gasket on or any sealant on the pan corners. This will just give you an idea what angle you need to hold it at to clear everything.
Now holding the gasket in place can give you some trouble. The first time I did this I used dental floss and tied the gasket to the pan in a few spots. Once you get the pan on with a few bolts threaded in, cut the floss and pull it out. This time around I just duct taped a few of the bolts to the pan to hold the gasket in place. I find its easiest to get the 4 long corner bolts in first. Then line up the gasket retainers and start threading the other bolts in.
Now when it comes to torquing down the pan, I just use a sharpie and put numbers on the pan so its easy to follow the torque sequence. The factory torque sequence is 3 steps. I do each step 2 or even 3 times making it more like 9 step torque sequence. Ive found that when doing the hand tight step, I can go around in sequence 1 or 2 extra times getting everything snug by hand, same with the 2nd step of the sequence. This is very important so when you actually start putting torque on the oil pan bolts it does not cause the gasket to bulge out due to it being uneven.
It seems everyone has concerns about the corners bulging out, in particular the front. This is how mine looks..
Now with the pan back on, reassembly is the opposite of disassembly...
Last edited by Techno Duck; 05-11-2011 at 06:32 AM.
05-11-2011, 06:37 AM
#4
Nordschleife Master
Thread Starter
Well the baffle is not welded with a full bead, just 4 tacks on each side (as per LR's instructions). So there is a slight gap inbetween the pan and the baffle. Oil draining may take a little longer as a result but i actually think it will make oil changes slightly less messy without a giant surge of oil dumping out when you take the plug off. Either way, you can stick a long screwdriver through the drain plug hole and push the trap door of the baffle up to get all the oil out.

Trending Topics
05-11-2011, 07:47 PM
#8
Track Day

Join Date: Aug 2010
Posts: 23
Likes: 0
Received 0 Likes
on
0 Posts
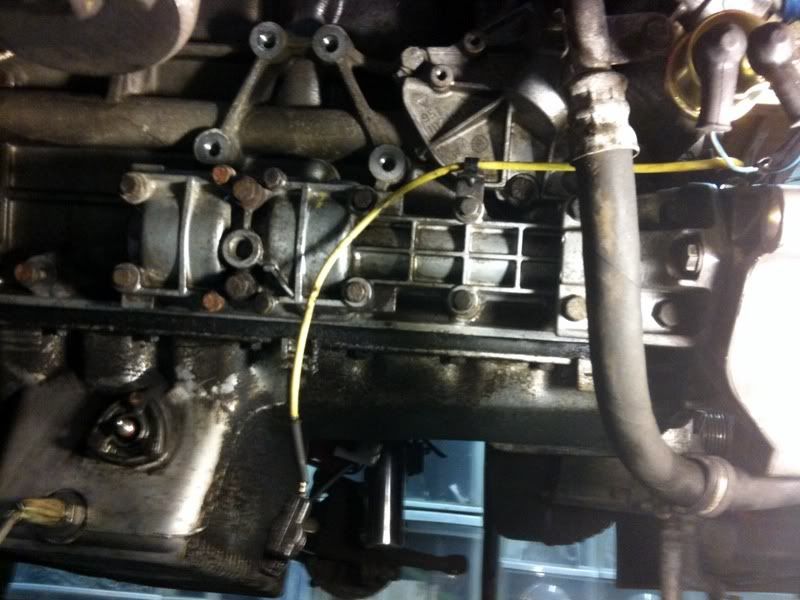
This is great! I wish I had this to look at for reference when I did my oil pan gasket...quick question, tho I'm afraid it might be stupid, but what's the yellow wire for on the side of the engine? You can see it hanging next to the balance shaft housing. I saw it while I was doing my gasket but it wasn't connected to anything.
05-11-2011, 08:13 PM
#9
Burning Brakes
 05-12-2011, 03:32 AM
#12
Instructor
Join Date: Jul 2009
Location: Vancouver, BC, Canada
Posts: 112
Likes: 0
Received 0 Likes
on
0 Posts
Thanks for sharing! I'm doing my rod bearings tomorrow night (oil pan is removed at present), your writeup had a couple great tips in it that should help smooth things out
05-12-2011, 08:15 AM
#14
Addict
Rennlist Member
Rennlist Small
Business Sponsor
Rennlist Member
Rennlist Small
Business Sponsor
Nice write up – thanks for taking the time!
One thing that I will add – do not overtighten the pan bolts!! The strip very easily. The gasket compresses quite a bit before it rests on the internal stops (the little sleeves that are in every gasket bolt hole). You have to snug it up in many steps or you will overstress one bolt.
The best thing for cleaning up the gasket surface (and other areas too!) are ‘roll-locks’ and a 90 degree air tool. Make sure you use the right ones for aluminum – some of them are very aggressive.
The gasket retainers are overkill for a new gasket. If you pan gasket is bulging out you have way too much crankcase pressure and you should be fixing that problem instead of applying a large Band-Aid.
05-12-2011, 09:24 AM
#15
Three Wheelin'

Awesome, thanks for this, I've been planning on the BS reseal for the near future, that rear o-rings are non-existent and I don't want to just RTV it since the engine is mostly apart as it is. Hopefully I'll be doing this work with the engine out of the car.