
Rod bearing and lower balance shaft reseal pictorial
 05-12-2011, 11:50 AM
#16
Instructor
Join Date: May 2003
Location: Cambridge Ma
Posts: 176
Likes: 0
Received 0 Likes
on
0 Posts
Thanks for the great write up!! Does anyone sell all seals needed as a kit? I'm currently doing the turbo and just got inspired to do all the seals while I'm in there.
QUOTE=Techno Duck;8544059]Here is another chapter in my series of pictorials for jobs you don�t want to do, but may have to eventually..
Here are some of the previous ones including..
Clutch Replacement
https://rennlist.com/forums/944-turb...pictorial.html
Turbo Swap
https://rennlist.com/forums/944-turb...pictorial.html
Headgasket
https://rennlist.com/forums/944-turb...y-project.html
As usual these are not meant to be a how-to, but rather a �what am I getting myself into� guide plus showing some tips and tricks that may help you out.
The basic work I did was reseal the lower balance shaft housing and replace the rod bearings with all the little while your in there things ontop of that.
The first question you may be asking is �can I do this myself?�. Obviously the answer for this depends on a number of things. But if you are relatively good mechanically and have the right tools this is very do-able yourself. I find a lot of people totally blow out of proportion the difficulty of some work on these cars. I don�t mean to give the false sense that this is as easy as an oil change, but I think it is certainly do-able if mechanically inclined and have the right tools.
Many probably do not have access to a lift and will be doing this on jackstands. I was lucky to have access to my buddies lift in his garage to do this. But like most people I have been �slumming it� in the driveway using jackstands for a long time so I know what is and is not do-able. Even with access to the lift, I did probably 90% of the work with the car on jackstands prior to getting it up in the air. The only stuff really done on the lift was removing and reinstalling the oil pan and installing the cross member.
I think the most important thing is to have a good set of jackstands available. I am not talking the cheapo ones you get from your local autostore, I am talking heavy duty ones that allow you to get the car atleast 18� off the ground. Your typical 12� stands are useless for anything that require you to be under the car. The higher you get the car, the easier your life will be, and also the better your odds of getting the pan on correctly with no leaks are.
How much time should you get aside? I think 20-25hrs is reasonable for a first timer doing this on jackstands. Don�t forget you should probably get an alignment afterwards also.
Some may argue its easier to just pull the engine to do this and that may be true.. But if you don�t have the equipment to do this it is still very do-able with the engine in the car.
Here are some of the �while your in there� things you may consider doing at the same time..
-Replace steering shaft
-Replace tie rods, steering rack, power steering lines..etc.
-Replace steering rack bushings
-Reseal lower balance shaft housing�. This is not exactly a while your in there item, but it requires removal of the passenger side engine upright to get the cover off. With the cross member out, its no better time to do this. The catch is you will need to remove the balance shaft belt, power steering bracket / front cover. At this point, you may consider just replacing the belts and resealing the front end while its all apart.
-Replace lower balance shaft bearings
-Replace motor mounts
-Modify cross member to 3pc... this allows you to remove the crossmember without having to support the engine from above and remove the control arms. This should also preserve your wheel alignment aswell. I figure this will save you about 1.5-2hrs off this job in the future and potentially also a few hundred bucks on a wheel alignment.
-Modify crossover to 2pc...this allows removal the the oil pan without having to take out the entire crossover pipe and intake manifold. I figure this saves you about an 1-1.5hrs total in the future, not to mention will cut some time off turbo removal in the future. Also saves you from needing to replace intake manifold gaskets and the 3 sealing rings for the crossover pipe.
-Install baffle in oil pan
-Replace oil pickup tube
-Reseal oil cooler
-Replace oil pressure sender
Now keep in mind this is just one way to get this job done..
Crossover removal requires you to get the intake manifold off. Now with a modified 2pc crossover you can skip the step of getting the intake manifold off. If your as good at me at removing the intake this will save you about 45 minutes and having to replace the crushring for the turbo inlet.
To get the cross member out, you need to support the engine from above. There are a few ways to do this, here are two. First method is the ghetto $10 Home Depot method using some chain, a 4ft piece of super strut and a few pieces of scrap 2x4. This method will work in a pinch, but it has its problems. The big issue is the engine will sag anywhere from 1-2 inches as the slack is taken up on the chain. This can make it really difficult to get the cross member back in, requiring you to jack up the engine from the oil pan later on.
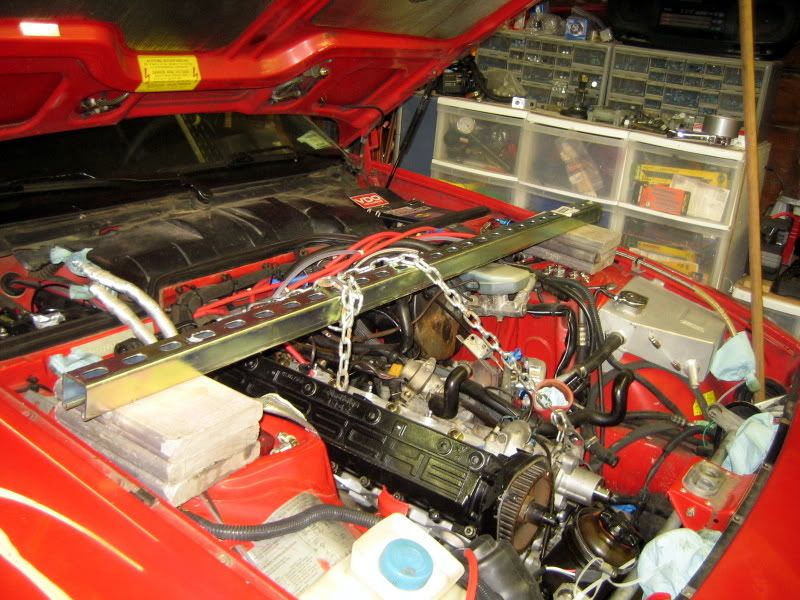
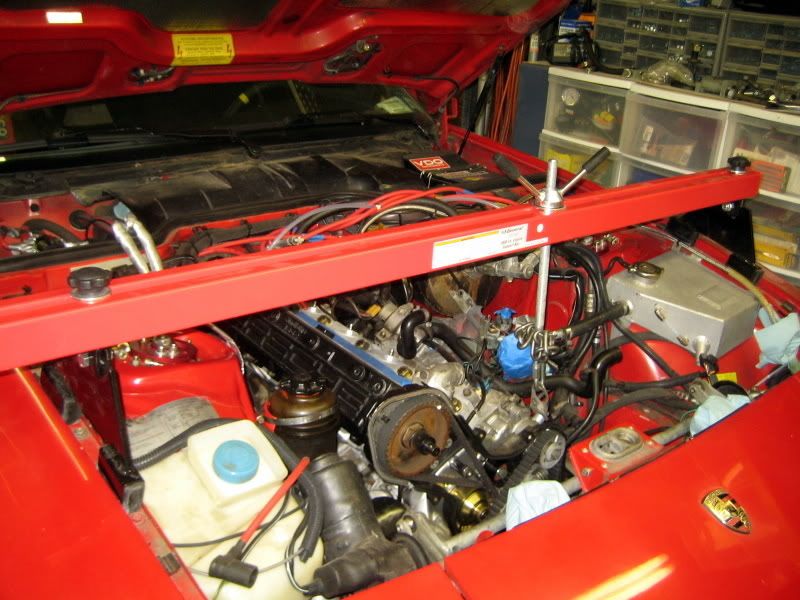
Option 2 is buying a engine support brace. I picked this up from my local Harbor Freight, it was on sale for like $60 and is well worth it I think. You may only use this a few times in your wrenching lifetime but it will make replacing engine mounts, dropping sub frames or anything of that sort on other cars easy. The factory manual shows a tool very similar to this.. All you need to do is just hook it up to the front hoist ring. Turning the handle allows you to raise and lower the engine via the threaded rod making things very easy with getting the cross member back in, especially if you are replacing worn out motor mounts (the engine can sit as much as 5mm higher with new mounts).
 [/QUOTE]
QUOTE=Techno Duck;8544059]Here is another chapter in my series of pictorials for jobs you don�t want to do, but may have to eventually..
Here are some of the previous ones including..
Clutch Replacement
https://rennlist.com/forums/944-turb...pictorial.html
Turbo Swap
https://rennlist.com/forums/944-turb...pictorial.html
Headgasket
https://rennlist.com/forums/944-turb...y-project.html
As usual these are not meant to be a how-to, but rather a �what am I getting myself into� guide plus showing some tips and tricks that may help you out.
The basic work I did was reseal the lower balance shaft housing and replace the rod bearings with all the little while your in there things ontop of that.
The first question you may be asking is �can I do this myself?�. Obviously the answer for this depends on a number of things. But if you are relatively good mechanically and have the right tools this is very do-able yourself. I find a lot of people totally blow out of proportion the difficulty of some work on these cars. I don�t mean to give the false sense that this is as easy as an oil change, but I think it is certainly do-able if mechanically inclined and have the right tools.
Many probably do not have access to a lift and will be doing this on jackstands. I was lucky to have access to my buddies lift in his garage to do this. But like most people I have been �slumming it� in the driveway using jackstands for a long time so I know what is and is not do-able. Even with access to the lift, I did probably 90% of the work with the car on jackstands prior to getting it up in the air. The only stuff really done on the lift was removing and reinstalling the oil pan and installing the cross member.
I think the most important thing is to have a good set of jackstands available. I am not talking the cheapo ones you get from your local autostore, I am talking heavy duty ones that allow you to get the car atleast 18� off the ground. Your typical 12� stands are useless for anything that require you to be under the car. The higher you get the car, the easier your life will be, and also the better your odds of getting the pan on correctly with no leaks are.
How much time should you get aside? I think 20-25hrs is reasonable for a first timer doing this on jackstands. Don�t forget you should probably get an alignment afterwards also.
Some may argue its easier to just pull the engine to do this and that may be true.. But if you don�t have the equipment to do this it is still very do-able with the engine in the car.
Here are some of the �while your in there� things you may consider doing at the same time..
-Replace steering shaft
-Replace tie rods, steering rack, power steering lines..etc.
-Replace steering rack bushings
-Reseal lower balance shaft housing�. This is not exactly a while your in there item, but it requires removal of the passenger side engine upright to get the cover off. With the cross member out, its no better time to do this. The catch is you will need to remove the balance shaft belt, power steering bracket / front cover. At this point, you may consider just replacing the belts and resealing the front end while its all apart.
-Replace lower balance shaft bearings
-Replace motor mounts
-Modify cross member to 3pc... this allows you to remove the crossmember without having to support the engine from above and remove the control arms. This should also preserve your wheel alignment aswell. I figure this will save you about 1.5-2hrs off this job in the future and potentially also a few hundred bucks on a wheel alignment.
-Modify crossover to 2pc...this allows removal the the oil pan without having to take out the entire crossover pipe and intake manifold. I figure this saves you about an 1-1.5hrs total in the future, not to mention will cut some time off turbo removal in the future. Also saves you from needing to replace intake manifold gaskets and the 3 sealing rings for the crossover pipe.
-Install baffle in oil pan
-Replace oil pickup tube
-Reseal oil cooler
-Replace oil pressure sender
Now keep in mind this is just one way to get this job done..
Crossover removal requires you to get the intake manifold off. Now with a modified 2pc crossover you can skip the step of getting the intake manifold off. If your as good at me at removing the intake this will save you about 45 minutes and having to replace the crushring for the turbo inlet.
To get the cross member out, you need to support the engine from above. There are a few ways to do this, here are two. First method is the ghetto $10 Home Depot method using some chain, a 4ft piece of super strut and a few pieces of scrap 2x4. This method will work in a pinch, but it has its problems. The big issue is the engine will sag anywhere from 1-2 inches as the slack is taken up on the chain. This can make it really difficult to get the cross member back in, requiring you to jack up the engine from the oil pan later on.
Option 2 is buying a engine support brace. I picked this up from my local Harbor Freight, it was on sale for like $60 and is well worth it I think. You may only use this a few times in your wrenching lifetime but it will make replacing engine mounts, dropping sub frames or anything of that sort on other cars easy. The factory manual shows a tool very similar to this.. All you need to do is just hook it up to the front hoist ring. Turning the handle allows you to raise and lower the engine via the threaded rod making things very easy with getting the cross member back in, especially if you are replacing worn out motor mounts (the engine can sit as much as 5mm higher with new mounts).
[/QUOTE]
 05-12-2011, 12:12 PM
#17
Three Wheelin'

Crankcase Gasket kit: LR, 944-100-901-03
Headgasket (Widefire) kit: LR, LR-951-WFGS
AOS Upper and Lower seals: LR, Upper: 999-701-613-40, Lower: 999-701-661-40
Balance Shaft rear seal: LR, 999-701-875-40 2x needed
Loctite 574: LR, 000-043-010-00
Front Engine Reseal w/ Races: Paragon, 944.101.000.02
Dipstick Seal: PP-900.174.044.40
Dipstick Tube Spacer: PP-944.107.329.00
Things I know that aren't on the list: turbo oil seals.
Does this seem pretty complete to others? What am I missing?
05-12-2011, 10:54 PM
#18
Addict
Lifetime Rennlist
Member
Lifetime Rennlist
Member
Crankcase Gasket kit: LR, 944-100-901-03
Headgasket (Widefire) kit: LR, LR-951-WFGS
AOS Upper and Lower seals: LR, Upper: 999-701-613-40, Lower: 999-701-661-40
Balance Shaft rear seal: LR, 999-701-875-40 2x needed
Loctite 574: LR, 000-043-010-00
Front Engine Reseal w/ Races: Paragon, 944.101.000.02
Dipstick Seal: PP-900.174.044.40
Dipstick Tube Spacer: PP-944.107.329.00
Does this seem pretty complete to others? What am I missing?
- Balance shaft seals, spacer sleeves, shaft gaskets (onion skin)
- O-rings for balance shaft front housings
- Cam seal, o-ring, spacer sleeve, shaft gasket
*and I always install a new cheezehead bolt for the cam gear after removing it once... not worth chancing a stripped head in the future
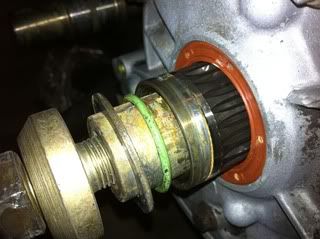
- Crank seal, o-ring seal, oil pump gear sleeve (if you have a front seal leak, you MUST replace this gear, it gets a groove over time, see pic below)
Also:
- AOS upper/lower o-rings are same size on some cars, different on others
- LR recommends 2 o-rings on the dipstick tube
 09-15-2012, 12:23 AM
#19
Track Day

Fantastic! the pictures are going to help me a ton. One question if you still get this or to anyone else who has dropped the oil pan; where do you put the jack stands? I have done a lot to my 944 and have always used the cross member for jack stands in the front but of course, it�s coming out! Any help or pictures would be great.
11-14-2012, 11:41 PM
#21
Rennlist Member
I can't seem to find the torque specs for the 2 nuts holding the bearing cap on for an 86'. I searched the forums and Clark's garage. Anyone have this? Thanks.
01-02-2013, 10:29 AM
#24
5th Gear

Join Date: Nov 2011
Posts: 5
Likes: 0
Received 0 Likes
on
0 Posts
Okay, you know what they say about keeping your mouth shut to avoid looking stupid......well, here goes...
With the proper support under the pivot points of the A-arms/ engine mounts, etc., is it possible to remove the center section of the aluminum cross member once the steering rack is out of the way to access the oil pan for removal?
Seems this might be a little easier (at least looking at it) than removing the lower suspension components.
01-02-2013, 12:29 PM
#25
Addict
Lifetime Rennlist
Member
Lifetime Rennlist
Member
With the proper support under the pivot points of the A-arms/ engine mounts, etc., is it possible to remove the center section of the aluminum cross member once the steering rack is out of the way to access the oil pan for removal?
Seems this might be a little easier (at least looking at it) than removing the lower suspension components.
Seems this might be a little easier (at least looking at it) than removing the lower suspension components.
From your comment, it sounds like you are supporting the car from the control arm or the rear (caster) pivot point itself. That's not a great idea since you are going to want to remove the rear caster blocks so that you can swing the control arms out of the way before dropping the engine crossmember. Besides, putting your jack stands under the frame rails will provide the most stability whether or not you remove the caster blocks.
Removing the front and rear control arm mount bolts (at the crossmemeber and the caster blocks) is actually quite easy - just use a coat hanger or two to suspend the control arms up and out-of-the-way while you pull the crossmember. You'll need to get an alignment when you're done, but you'll have full access and plenty of clearance to pull the crossmember out.
01-02-2013, 04:30 PM
#26
Three Wheelin'
Just wanted to say a big thanks for this tutorial....it along with Clark's and another one elsewhere were a great help in getting my lower end done!
I was able to use a swivel socket for the bolts on the oil pan and then able to torque them ALL to spec properly...a small cost for something that's such a massive pain to get to and work on!
I have a nice piece of coat hangar wire for checking the oil pan gasket against the bellhousing and making sure that the gasket is seated properly...worked like a charm!
01-02-2013, 04:46 PM
#27
5th Gear
Join Date: Nov 2011
Posts: 5
Likes: 0
Received 0 Likes
on
0 Posts
zerMATT951,
Thanks for the reply. I am supporting the car by the rails now and only mentioned some additional support under the a-arms if needed by my question below.
My specific question was regarding the disassembly of the crossmember itself. It looks lie there are about 8-10 bolts (can't remember) that hold the crossmember together and that if these are removed, the center section of the crossmember will drop down. If this is possible, it looks to me like this might be a simpler approach, not requiring any disassembly of the front suspension, per se.
01-02-2013, 05:43 PM
#28
Addict
Lifetime Rennlist
Member
Lifetime Rennlist
Member
zerMATT951,
Thanks for the reply. I am supporting the car by the rails now and only mentioned some additional support under the a-arms if needed by my question below.
My specific question was regarding the disassembly of the crossmember itself. It looks lie there are about 8-10 bolts (can't remember) that hold the crossmember together and that if these are removed, the center section of the crossmember will drop down. If this is possible, it looks to me like this might be a simpler approach, not requiring any disassembly of the front suspension, per se.
Thanks for the reply. I am supporting the car by the rails now and only mentioned some additional support under the a-arms if needed by my question below.
My specific question was regarding the disassembly of the crossmember itself. It looks lie there are about 8-10 bolts (can't remember) that hold the crossmember together and that if these are removed, the center section of the crossmember will drop down. If this is possible, it looks to me like this might be a simpler approach, not requiring any disassembly of the front suspension, per se.
The stock crossmember has no "center section" as you mentioned in your first post, hence the confusion. As long as you have the car supported at the frame rails, you should be able to drop the center section out to access the oil pan. You could add additional support at the control arms themselves, but with the 3-piece in there, I doubt even that would be necessary and those additional jack-stands would just be in the way.
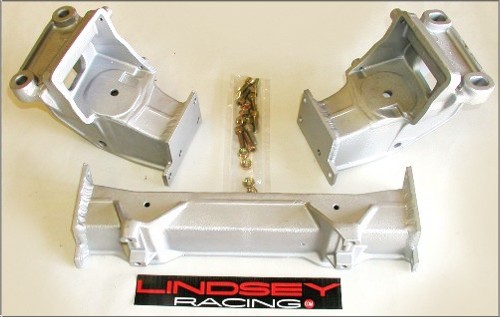
http://www.lindseyracing.com/LR/Part...OSSMEMBER.html
 01-03-2013, 05:22 AM
#29
Nordschleife Master
Thread Starter
Drop out the center section and you can take the pan off. You still need to take the crossover off though. It does not save much time, maybe 45 min or so but will save you having to get a wheel alignment which makes it well worth it. The big pain in the butt is taking the steering rack out. The 2-piece (v-band) crossover is what will save you the most time.
I am glad you guys find these posts helpful, it's why I take the time to take the pictures!
I am glad you guys find these posts helpful, it's why I take the time to take the pictures!
09-30-2013, 09:29 PM
#30
Rennlist Member
im going to be doing this soon and wanted to clarify. Once Ive cleaned both matting surfaces of the con-rod and bearing cap, do i also coat them with assembly lube and put the new bearings and then coat the new bearings in assembly lube?