When you click on links to various merchants on this site and make a purchase, this can result in this site earning a commission. Affiliate programs and affiliations include, but are not limited to, the eBay Partner Network.
I'm sure this is terrible forum etiquette, as I've posting the same thread on the 968 forum, but I know there are a lot of very knowledgeable and experienced folks on this forum, so I'm posting the same thing here. I have a track event (Track Night In America, at Harris Hill Raceway near Austin) in three days, and I'm on the last few steps of my massive torque tube replacement project on my 968, so I could really use some help wrapping this up:
I managed to get the transaxle installed by myself last weekend, and am trying to get the coupler sleeve onto the driveshaft. I've gotten the splines aligned to the point when the coupler engages the driveshaft, but the fit is quite tight. Using a pry bar, I managed to slide the coupler far enough onto the drive shaft where the holes for the front pinch bolts are behind the section between the large window in the torque tube bell housing, and the laughably small hole on the torque tube. But in this position, there is no longer anything on the coupler to grab onto with a pry bar or any other tool, including a punch, so it's kind of stuck in no-man's land. Does anyone know of any tricks, or special tools (purchased or fabricated) that I can use to slide the coupler the last inch or so so I can insert and tighten the pinch bolts? Hopefully I will have figured something out by the time someone responds, but I find it helps when I get stuck with something to walk away for a few minutes to clear my head, which is what I'm doing now. Thanks in advance.
Edit: I just learned that Porsche changed the design of the coupler for the 968 to make it clamp better, but apparently it is also much harder to get on and off, so maybe my struggle is unique to the 968.
Last edited by Cloud9...68; 05-09-2021 at 03:55 PM.
FWIW, getting the coupler in place is the second thing I do when installing the transaxle. I put a couple bolts in place to generally locate the transaxle, and then move to the coupler. You want as much freedom of movement on the transaxle as you need to align the coupler correctly. When it is aligned, it slides into place with very little force required. Again though, this is on a 944 turbo, hopefully your 968 is similar.
Last edited by 87944turbo; 05-10-2021 at 11:01 AM.
Reason: spelling
That's good advice - Constantine from Black Sea Research recommended the same thing. I will probably end up loosening the four bolts that hold the transaxle to the torque tube bell housing to give me more degrees of freedom to help align the transaxle input shaft to the drive shaft. I have a friend on the way over to help, as I think this job would be much more efficient with two people.
That did the trick, although it was quite a struggle, and required a longer crow bar (24", vs. the 18" bar I was using), and several hours of two of us attacking this thing with everything we had.
But now I have a new problem - after working OK initially, it is now almost impossible to shift gears with my freshly rebuilt transaxle. Please see my post on the 968 forum if you're interested and think you might be able to offer some help, as this problem has me, and the owner of the shop that did the rebuild, baffled. Thanks.
Last edited by Cloud9...68; 05-13-2021 at 02:21 PM.
Well glad I could help with the first problem. I have had some fight me and others I can slide into place by hand.
That's interesting about the gear shifting. Is that an issue with every gear? I would hope that it is an issue with the linkage somehow. You "should" be able to shift it into gear by hand with the linkage disconnected and pushed forward. At least I have been able to do that on the half dozen or so I have had in and out of cars. Again, thse were 944 turbo or 944 transaxles, but would expect the same to apply to the 968 trans as well. At least that would tell you if the problem is internal to the trans itself.
If it helps, I can throw up a quick video of what I am talking about. I have a 951 trans hanging out in the garage.
Thanks - yes, it is now an issue with every gear. Initially it worked fine, but after just a few miles, I noticed it was getting difficult to find 2nd, but it quickly deteriorated to the point where it's excruciatingly difficult to get it into any gear. So it would make sense that something in the linkage was not tightened properly, and it worked its way loose as I was driving, so that movement in the shift lever is "wasted" on whatever in the linkage is loose, instead of moving the gears. And yes, I can shift it into gear at the transaxle by hand with minimal effort, even with the linkage still connected. The fact that I have an aftermarket short shift kit is complicating the troubleshooting, because I don't know if the kit is somehow defective (although it worked perfectly before I sent the transaxle out for its rebuild), or if something else is wrong. Would you mind posting a picture of the linkage of the 951 transaxle you have out of your car so I can compare it to mine with the short shift kit? Thanks.
Are you sure that the main bolt from the shift rod to the linkage is there? The pointed one that goes under the rubber boot, engages with a dimple in the linkage arm. Is usually safety-wired or Loctited into place . . .
I was going to take a quick video, but I don't have anything attached to the input shaft on that spare trans. But from you response above, I think you understand what I am talking about. One thing you might want to check are the two bolts that secure the shifter to the torque tube. I have had these work loose on me and made shifting difficult as every time I would try to shift, the base of the shifter was moving back and forth, using the connection between the shift rod and the shifter itself as a pivot. May not be your issue, but something to consider.
@Droops83: Yes, the main bolt attaching the shift rod to the linkage is secure.
@87944turbo: Those bolts were the first things I checked, and they are secure as well.
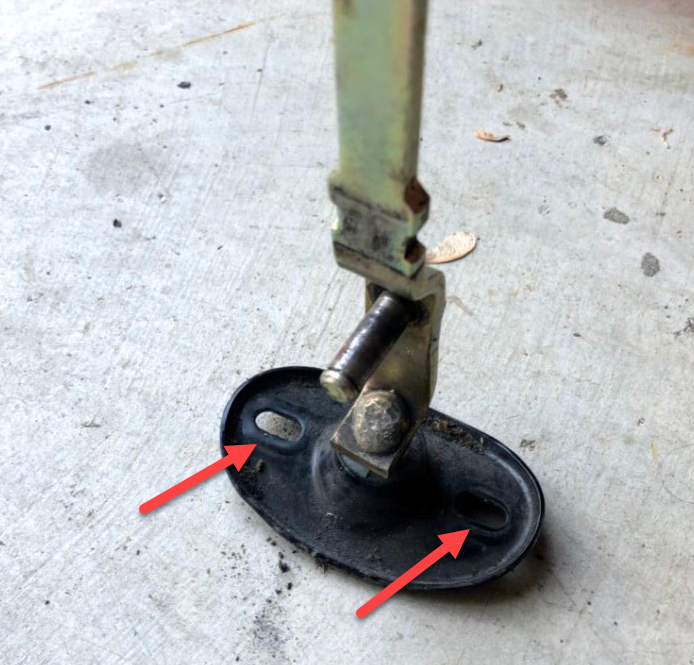
But I've found the problem. The tapered set screw (red arrow below) that secures the shift lever (not sure the correct terms for these parts - see pictures below) to the shifter rod that goes into the trans was not seated into the dimple inside the rod, which was allowing the assembly to rotate around the rod:
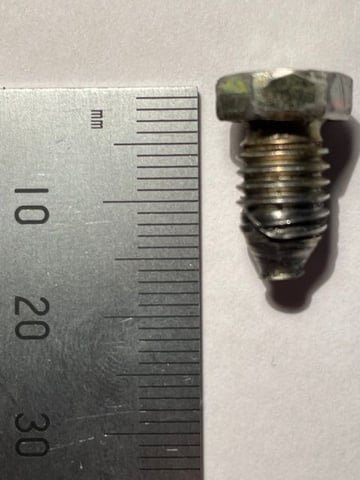
You can see some nicks in the rod where the tip of the set screw was knocking against it, instead of being seated securely in the dimple. You can see in the top picture that the set screw was only screwed in a couple of threads deep. Oddly, the set screw was very tight, but this is probably because the thread had become very mangled, and its tip had gotten very worn down, as you can see in the picture below:
Fortunately, the threads in the plate the set screw is screwed into are in excellent condition, so it looks like all I need is a new set screw, and this long torque tube build/super bearing/heavy duty drive shaft install/transaxle rebuild project will finally come to a conclusion. Would you guys recommend putting some loctite on the new set screw? If so, which grade? Thanks.
Last edited by Cloud9...68; 05-15-2021 at 03:53 PM.
Second on blue loctite. Will keep it from backing out but can be removed with a bit of extra pressure with hand tools.
Safety wire would also be good but a bit of work involved to drill the bolt and safety wire it in the correct way to not let it back out.
Before mounting the new tapered bolt, would test fit it into the dimple (without block) and see how much it engages inside the dimple. Seems a bit shallow and maybe a *slight* deepening with the proper sized drill bit would help secure it better inside the dimple. Just a thought from my view of the pictures.
Others can chime in if this is a bad idea. You can also check with the trans axle rebuilder for his thoughts on this idea.
Last edited by Constantine; 05-17-2021 at 12:02 PM.
I could swear that bolt had a hole right from the factory for safety wire. But I have lost that bolt many times.. it�s easy to make one if need be. A grinding wheel and keep a cup of water next to you cause it gets hot when grinding! .. +1 for blue loctite.
Thanks - I've never used safety wire before, so I googled it, and it looks like a suprisingly complicated operation, starting with drilling a small hole in what is probably very hard metal in the form of the bolt. I think I'll go with the blue Loctite, and keep en eye on it. I rotate my tires after every track event (I'm running a square setup), so as long as I have it up on my lift, I'll take a look at the bolt to confirm that it is snug.
I think the dimple in the shift rod is a little deper than it looks in the picture. I'm sure that it's also very hard steel, and it's in a very hard-to-reach location, so I don't think I'd have much luck trying to make it deeper. I suspect it had been stuck in a mostly-backed-out position for some time, and still shifted fine, so I think once I have it securely seated, it will be good. I ordered a new set bolt from Paragon Products this morning, so hopefully I'll have it by the weekend.

 05-09-2021, 02:49 PM