When you click on links to various merchants on this site and make a purchase, this can result in this site earning a commission. Affiliate programs and affiliations include, but are not limited to, the eBay Partner Network.
I'm not a huge fan of wraps in general but one of the big benefits of all this body work is straightening out all of the panel fitting and gaps. Unfortunately a wrap wouldn't improve that area.
Is anyone strongly opposed to the decal hood crest as used on the RS cars? Obviously not period correct but I love the streamlined look under the clearcoat. I think paired with the turbo cup mirrors it would be fitting.
Spoke with the bodyshop owner again today. Work starts on Monday, 4/30 and he'll be sending me pictures throughout the process. Hope to have a few posted next Monday.
regarding the hood crest. I think it looks great and won't be chipped when someone tries to steal it. I believe the hood is not flat though and has two holes.
I know your mechanic trusts this guy but I would be hesitant to have someone dismantle my car before deciding on price.
Also whenever I deal with a body shop on a car I care about, I always tell them that I will be inspecting it carefully and any drips/flaws etc will need to be redone before I pick it up. This way they do the job right the first time. Most body shops deliver bad final product with drips, dust etc in the paint, cause most people don't even notice.
How long does he expect it to take? Ask him to save some paint for touch up.
GOOD LUCK! look forward to seeing finished product.
Definitely appreciate the words of caution. Still waiting for his call - he said he would be following up with me by midweek (today) with next steps etc. He also promised to take pictures throughout the process. I mentioned to him numerous times that attention to detail is very important to me and that any overspray, incorrect gaps etc would need to be fixed before the car leaves his shop. We also agreed upon my maximum budget and he said he would not surpass it for the job (including new seals). He said he doesn't let anything leave his lot unless it's perfect and he warranties all his work (said it would take 6-8 weeks). I'm also confident that my mechanic would not have recommended him to me if there was a chance that he would cut corners.
ALL of that said, I'm still definitely on-edge not having my car for roughly 8 weeks and at the prospect of spending a lot of money.
Here is the specific list of items I wanted him to pay close attention to:
Paint the car with Glasurit L027 (Porsche Guards Red 1986 944 Turbo)
Repair driver-side headlight fitment and gaps (previous accident was repaired here)
Remove headlight washers and replace with Porsche caps. (I can drop these off when ready for paint)
Remove and reapply texture guard on lower sills (driver and passenger side)
Remove and save hood crest. Replace with Porsche decal and clear over. (part no. 996-559-211-90Buy Here)
Hi Everyone,
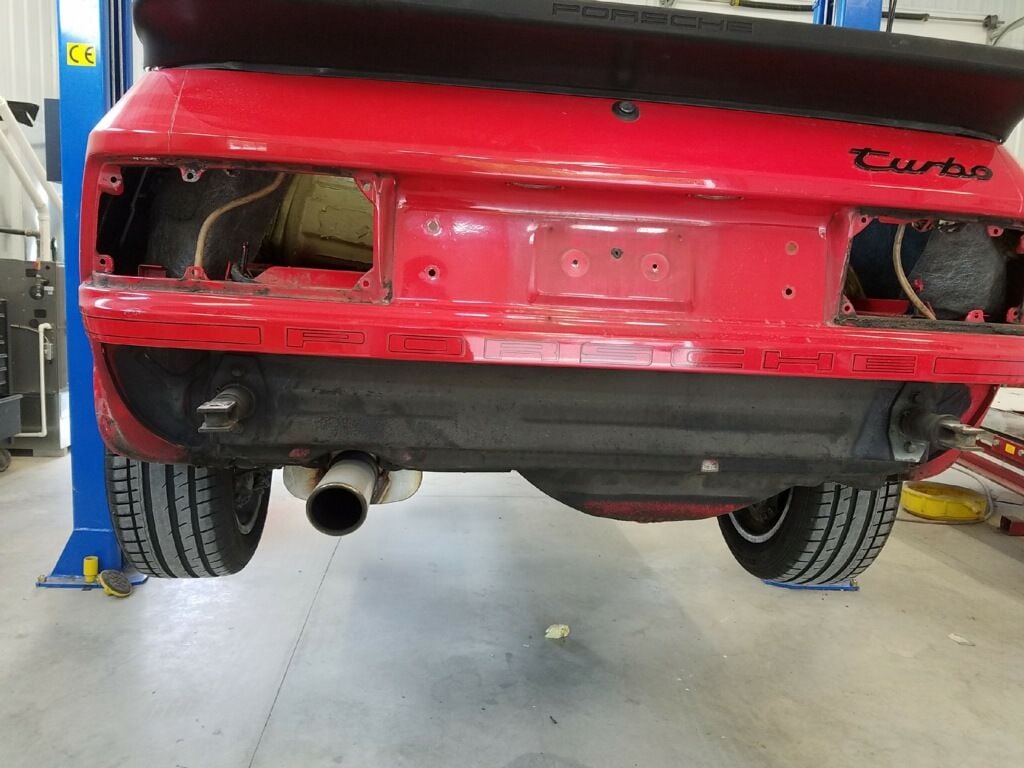
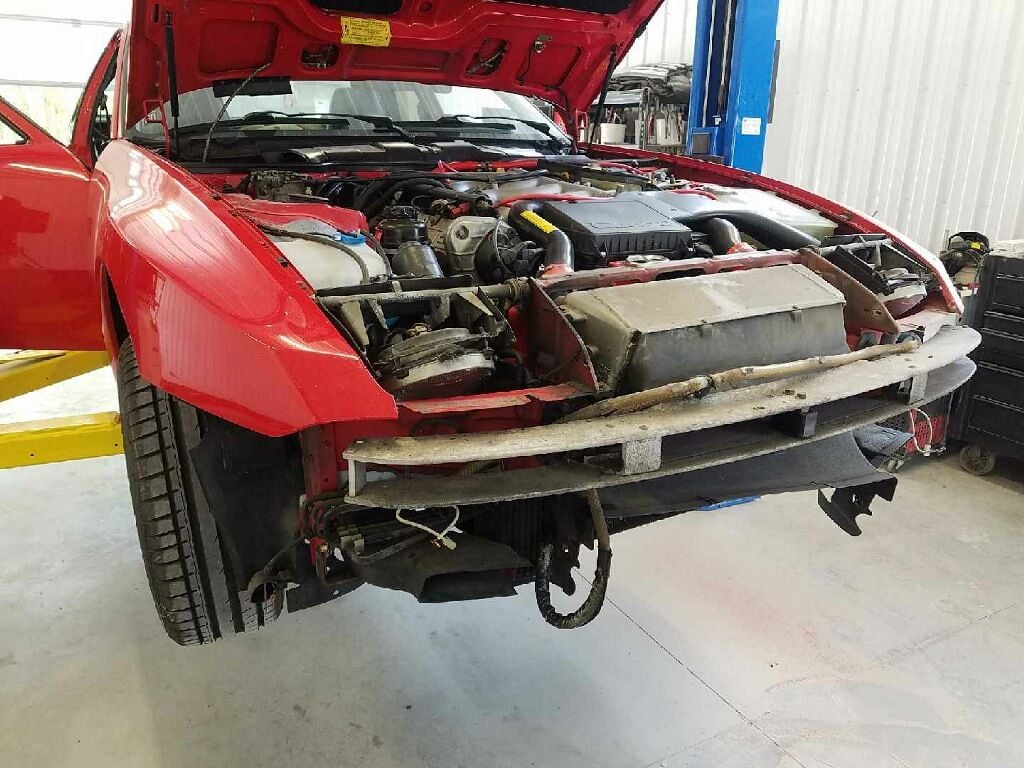
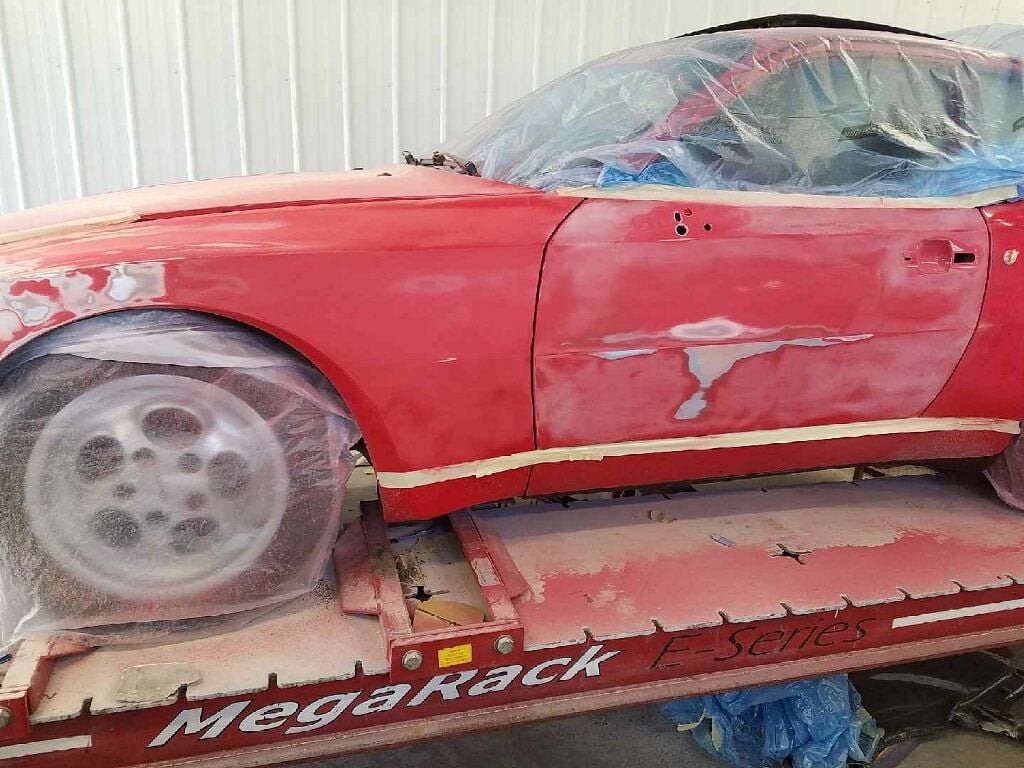
Received an update from the shop today with a few pictures. Disassembly has begun and you can see where it took some previous damage to the driver side front quarter panel. Asked for more pictures as the project progresses.
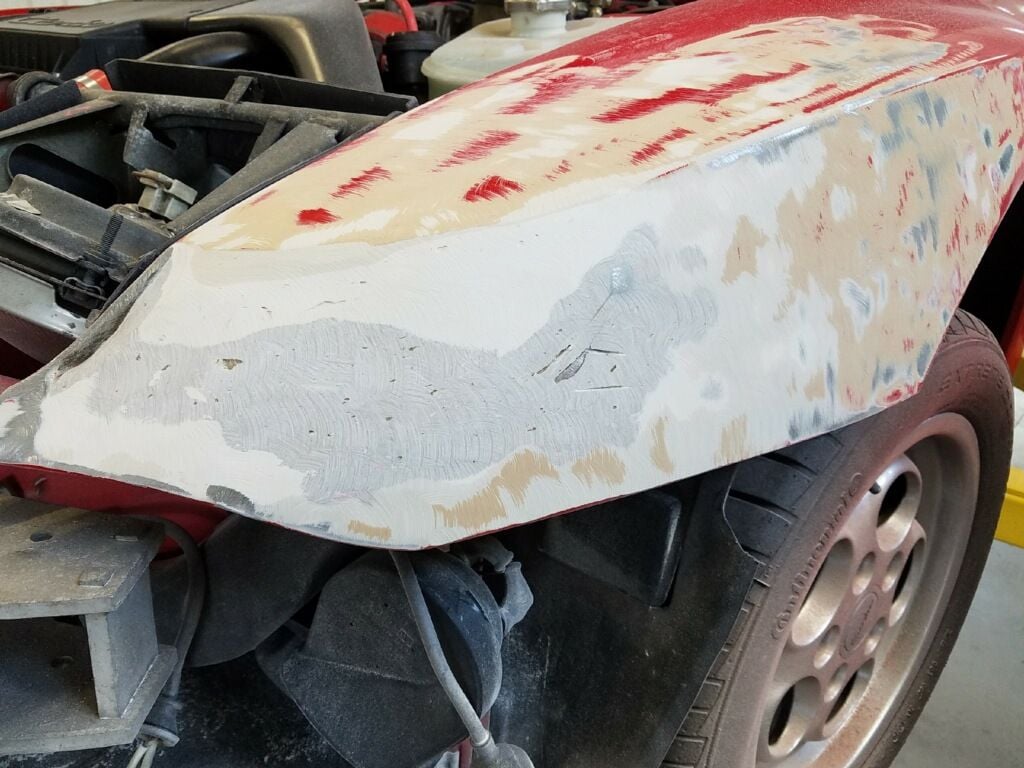
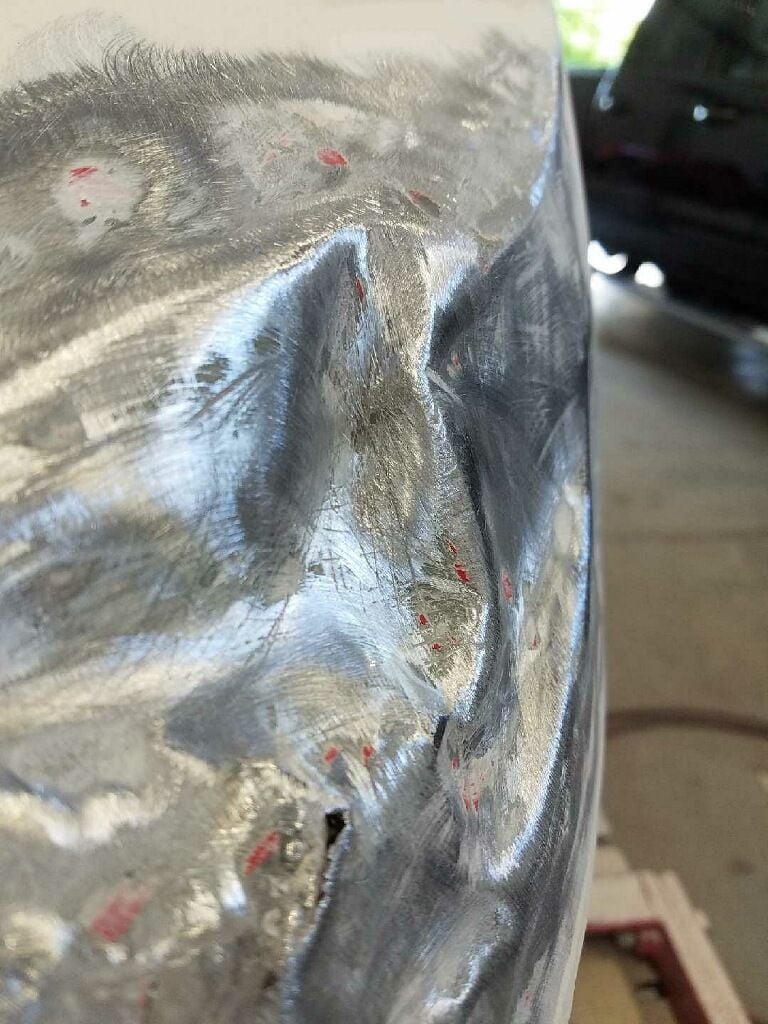
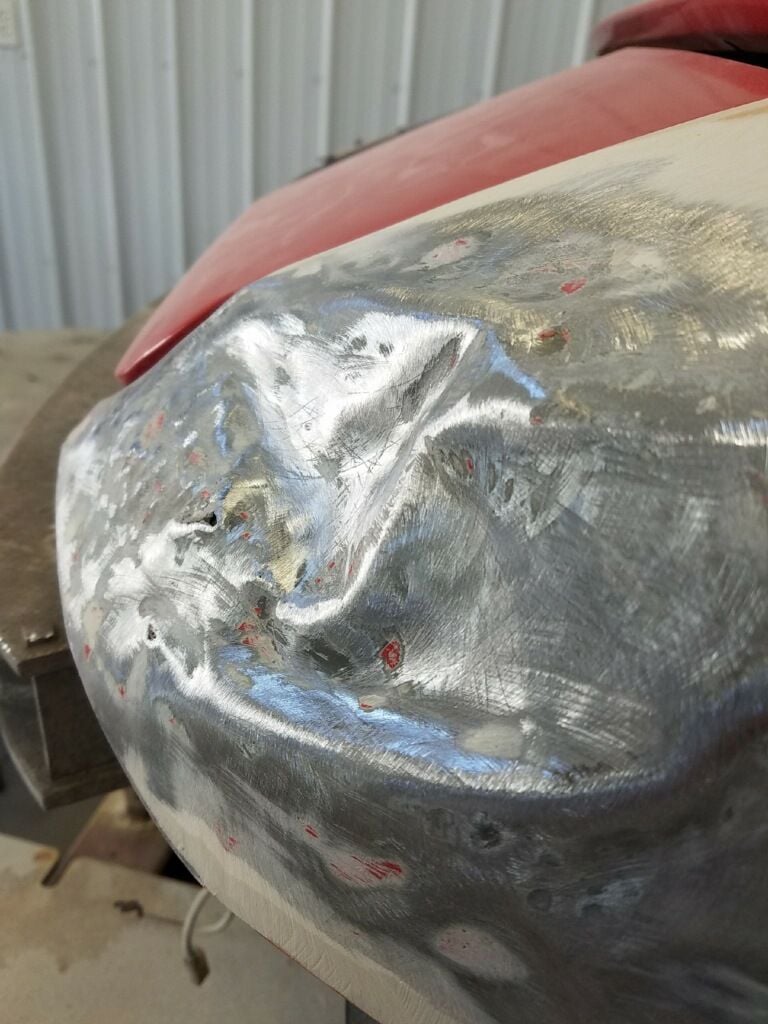
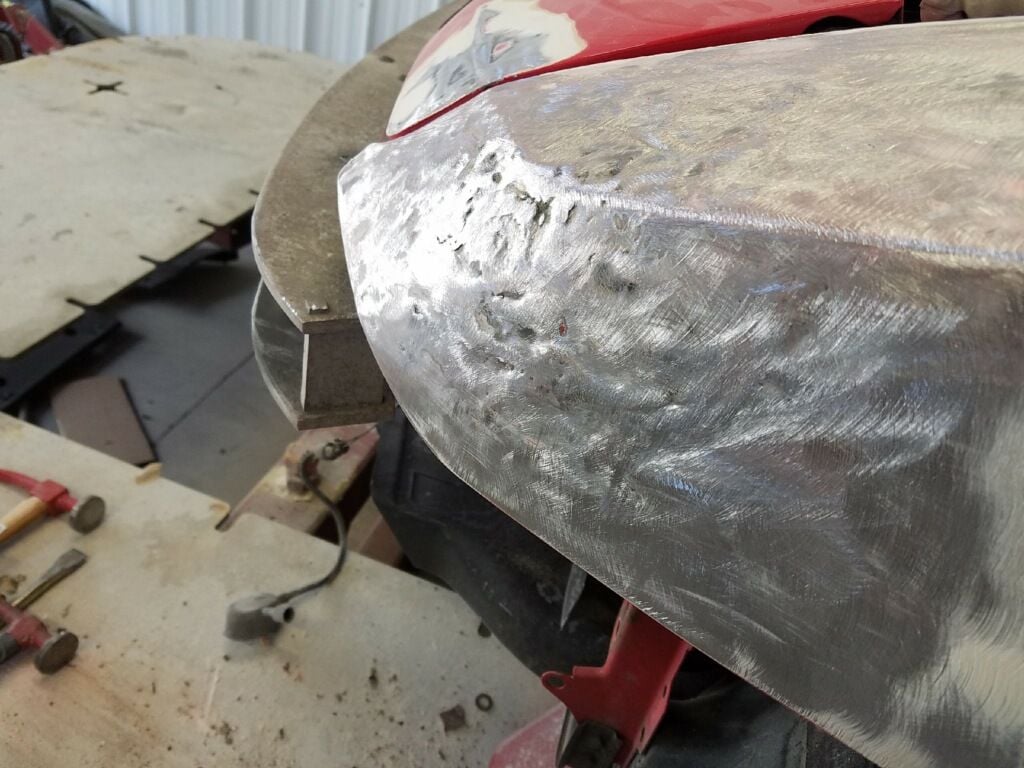
A few more WIP shots. Turns out the driver side fender damage was very poorly smoothed over with filler. The metal represents the accident damage with the filler remove and then the re-shaping after.
Wow that mess was filled and it looked smooth? Crazy. Nice progress!
Yep! The shop owner said, they took such great care to get the paint right but I have no idea why they wouldn't straighten the panel and properly repair it. Shocked the paint held up at all with that mess underneath.
I wish I could tell him to delete the sunroof but that would introduce a lot more $$$ into the equation.
And yep, sadly the previous work is the level at which some shops are satisfied that they have "done you right".
The car I have at my home shop had a left rear quarter "replaced" at one time in it's life.
They cut the panel in 3-4 spots and just intersected it into the good parts of the original 1/4.
When I got all the filler off, you could have put a stack of three nickels in a gap between the 1/4 panel and the upper rear valence above the tail light.
I know you don't want to step on anybody's toes, but if they are open to listen to you, you should buy this and bring it by there.
I have seen some products that shops use and they never harden...., years after paint work you can press the rocker with your finger nail and punch/crack through the paint.
This mimics the exact factory texture https://www.tat-co.com/Products/Repa...oat-Chip-Guard
I use the white.
Apply primer right after cure and scuff/sand primer right before sealer or color.
You cannot wait too long because product will only retain adhesion if scuffed (which you don't want to do- takes off texture peaks) if you apply primer outside recommended window.
Lightly sanding the primer over the texture (I used red 3M pad with soap and water) prior to sealer/color will give the mechanical adhesion necessary.


 04-16-2018, 02:01 PM


")
