When you click on links to various merchants on this site and make a purchase, this can result in this site earning a commission. Affiliate programs and affiliations include, but are not limited to, the eBay Partner Network.
I recently finished top end engine work myself to the car (first time ever).
After dealing with a couple of things, I felt the car was driving smoothly (I did a about 20 miles after the last fix of the lower balance shaft gear assembly).
I decided the car was ready for the first real drive of ~100 miles.
35 miles into the ride, suddenly the engine cut while waiting at a junction. trying to re-ignite, I see I have no power even for the warning lights
I push the car to the side of the road, open the hood and and I see that the battery is hot and the cables to it are also hot.
I disconnected the battery and in order to limp back home, I disconnected the main cable to the starter and from the starter to the alternator.
After I did that, I took a friends battery and was able to start the car by pushing it and limp back home.
Today, I started troubleshooting:
1. took of the starter and put it for rebuild
2. In the process of taking out the alternator and also going to get it rebuild (both are 30 years old)
3. take out the thick plus cable going from the battery to the starter and get it re-isolated or even rebuild
4. same for the alternator to starter cable
5. Tighten the the ground point in the bell-housing which was touched in the engine work I did last month
* One thing to mention, I think there was a ground cable mounted to the intake manifold bolt, which I connected to the bell-housing point. Does this make a difference?
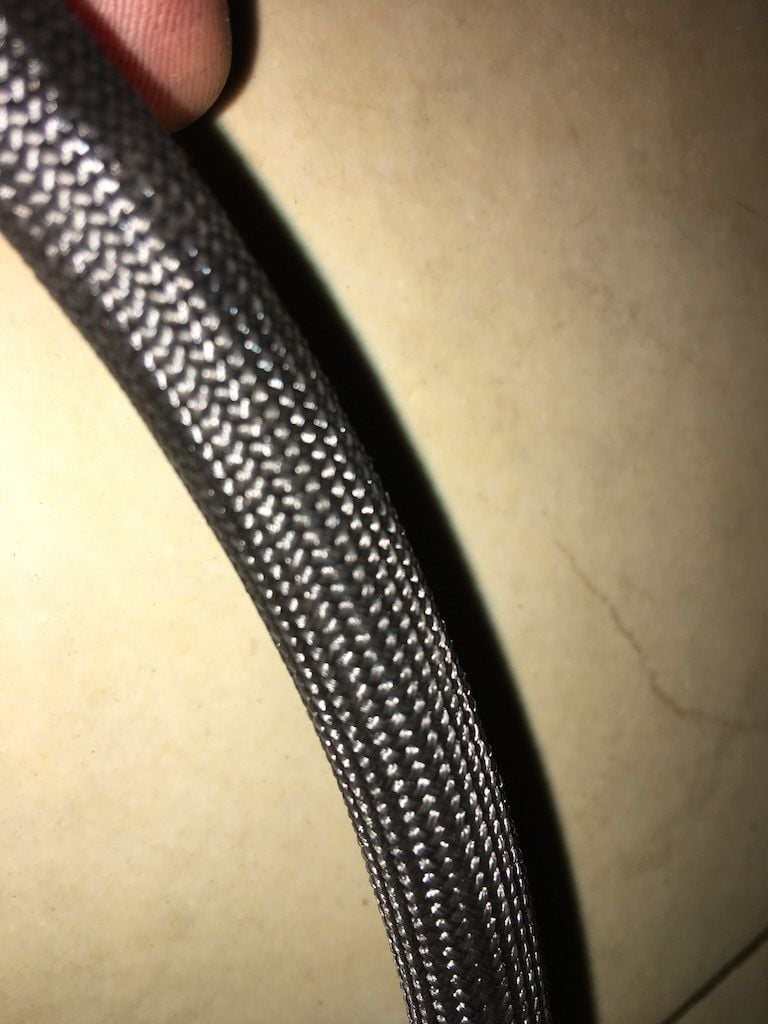
a couple of inches after this point double isolation starts.
I guess that during my work, it moved an inch or two so that the single isolation section was too close to the turbo.
Plus of course... 31 years old isolation dried from the heat...
suggestion:
Every one of my cars I buy "Fire Sleeve" and slide all the main cables. Essentially its a protective sheath that shields the cable from heat. ( This inside is like fiberglass fire retardant and resistant to 1500F These cars generate allot of heat with Turbos, crossovers Ect. It keeps the cables isolated as well as the coating on the wire cool. I purchase it by the foot at a local shop that does fittings/lines Ect. It comes in all different Diam.
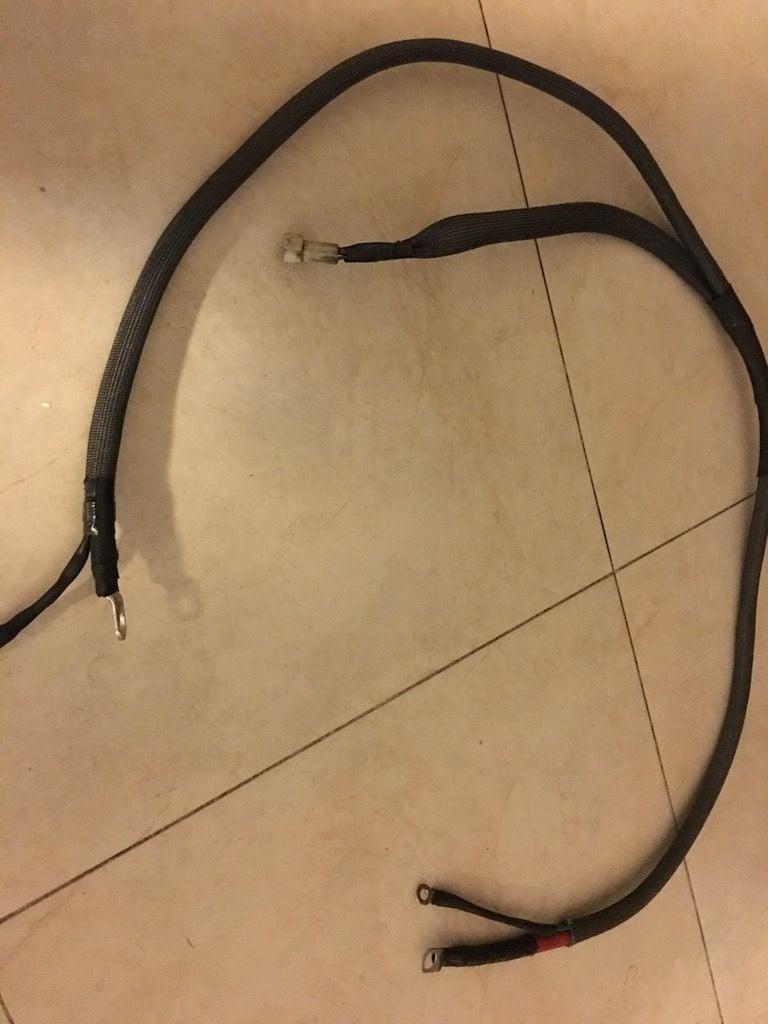
Does anyone have a diagram or photos of how the battery => starter and Starter => alternator cables are routed?
When I pull them out, the one from the battery was hanging on the firewall all the way to just above the starter and there it went down fairly close to the crossover pipe I believe.
The one from the alternator was going under the intake manifold next to its support bracket and then going to about the same direction down to the starter as the former did.
It almost touched the very hot exhaust of the turbo.
I guess they might have moved slightly during the work I did and I want to ensure I do not get a rerun of these scary moments I had.
Finished putting everything back together (cables, starter & alternator).
The car start quicker than ever before.
Also charging indicates close to 14V - up until now I have not seen it goes above 13V. I thought it was dirty ground connections on the instrument gauge...
I do have a new problem though, The car runs fine up to about half throttle, but if I try to press any harder, I get hesitation and the engine does not rev quickly. it happens in any gear and even in neutral.
My first suspicion is vacuums leak, but I re-tighten all clamps I touched during the journey to the alternator and not luck yet...
Post a photo or diagram you used for others in the future.
I have not found a useful diagram, so I tired to reverse engineer the route from photos I have seen.
I will try to grab some photos when I get to the car. In the meanwhile, here is a description of how I routed it:
Battery plus to starter:
Battery compartment => rubber grommet in firewall hole => Along side firewall through the zip ties => straight down just near the Inspection hole in the bell-housing => Starter.
The last section is the most important as both Westgate and Turbo Exhaust pipe are close by. I made sure it was far enough from both and I also tried to ensure it will not touch the starter heat shield
Alternator to Starter & ignition line connectors:
This cable has kind of a Y shape to it. I started from the firewall side just above the bell-housing (exactly where the first line goes down). This is where I located the Y junction of the cable.
From there, the two thinner lines with the plastic connector end goes along the firewall through the zip ties to the other side of the connector which should be above the brake booster.
The other side of the Y junction should follow the same router down as did the prior cable from the battery plus and terminate at the starter.
Now we are left with the side that goes to the alternator (easy to trace by the blue thin line - the charging indicator from the alternator I believe.).
I routed it as follows:
firewall side just above the bell-housing => below the intake manifold along side the vacuum lines there as far as possible from the turbo (defiantly on the passenger side of the bracket that supports the intake manifold to make sure it will never touch the turbo hot side) => below the water and vacuum pipes near the J-boot and up over the alternator rear plastic cover => through the rubber grommet => Alternator terminals
I know it long, but I hope it helps.
I will try to support it with photos later today or tomorrow.
Way back in 2001, following a ton of engine bay work, my 951 caught fire. About 2" of the lead going to the starter grounded out on the bell housing causing the insulation to light off. I suspect it lead to the main harness catching fire, quickly followed by the hood insulation. The main charging/power circuit is not fused so if it does ground and the engine is running, you get the whole 120A or so from the alternator into your 0/2 gauge cable.
I recall seeing the insulation cracking off when I put it back together. At the time, I was young(er) and dumb(er) and didn't think twice about it.
The forums got to watch a full rebuild happen over the course of 3 years and I got a rather large amount of experience with these cars. A nice man named Dan (IceShark) developed the modern fiberglass covered harnesses (engine, power, aux) that you can buy pre-made today to prevent this same failure. Mine has kit #1 and after 15+ years, its as good as new.

 11-05-2017, 11:10 AM