Notices
944 & 944S Forum 1982-1991

CUP MIRRORS.

Thread Tools
 
Search this Thread
 
Old 04-19-2017, 05:58 PM
  #1  
ARTUNAGER
7th Gear
Thread Starter
 
ARTUNAGER's Avatar
 
Join Date: Apr 2017
Posts: 7
Likes: 0
Received 0 Likes on 0 Posts
Default CUP MIRRORS.

Hello amigos!
I been reading things here allways on the 944 & S2 forum, It is amazing how much you can learn from here guys, many thanks to all for sharing so much info...amazing!!

I have 2 S2 projects one is almost ready to be back on the road and another one imported from UK so LHD to Spain where we live, I do not know what to do with this Uk one yet..

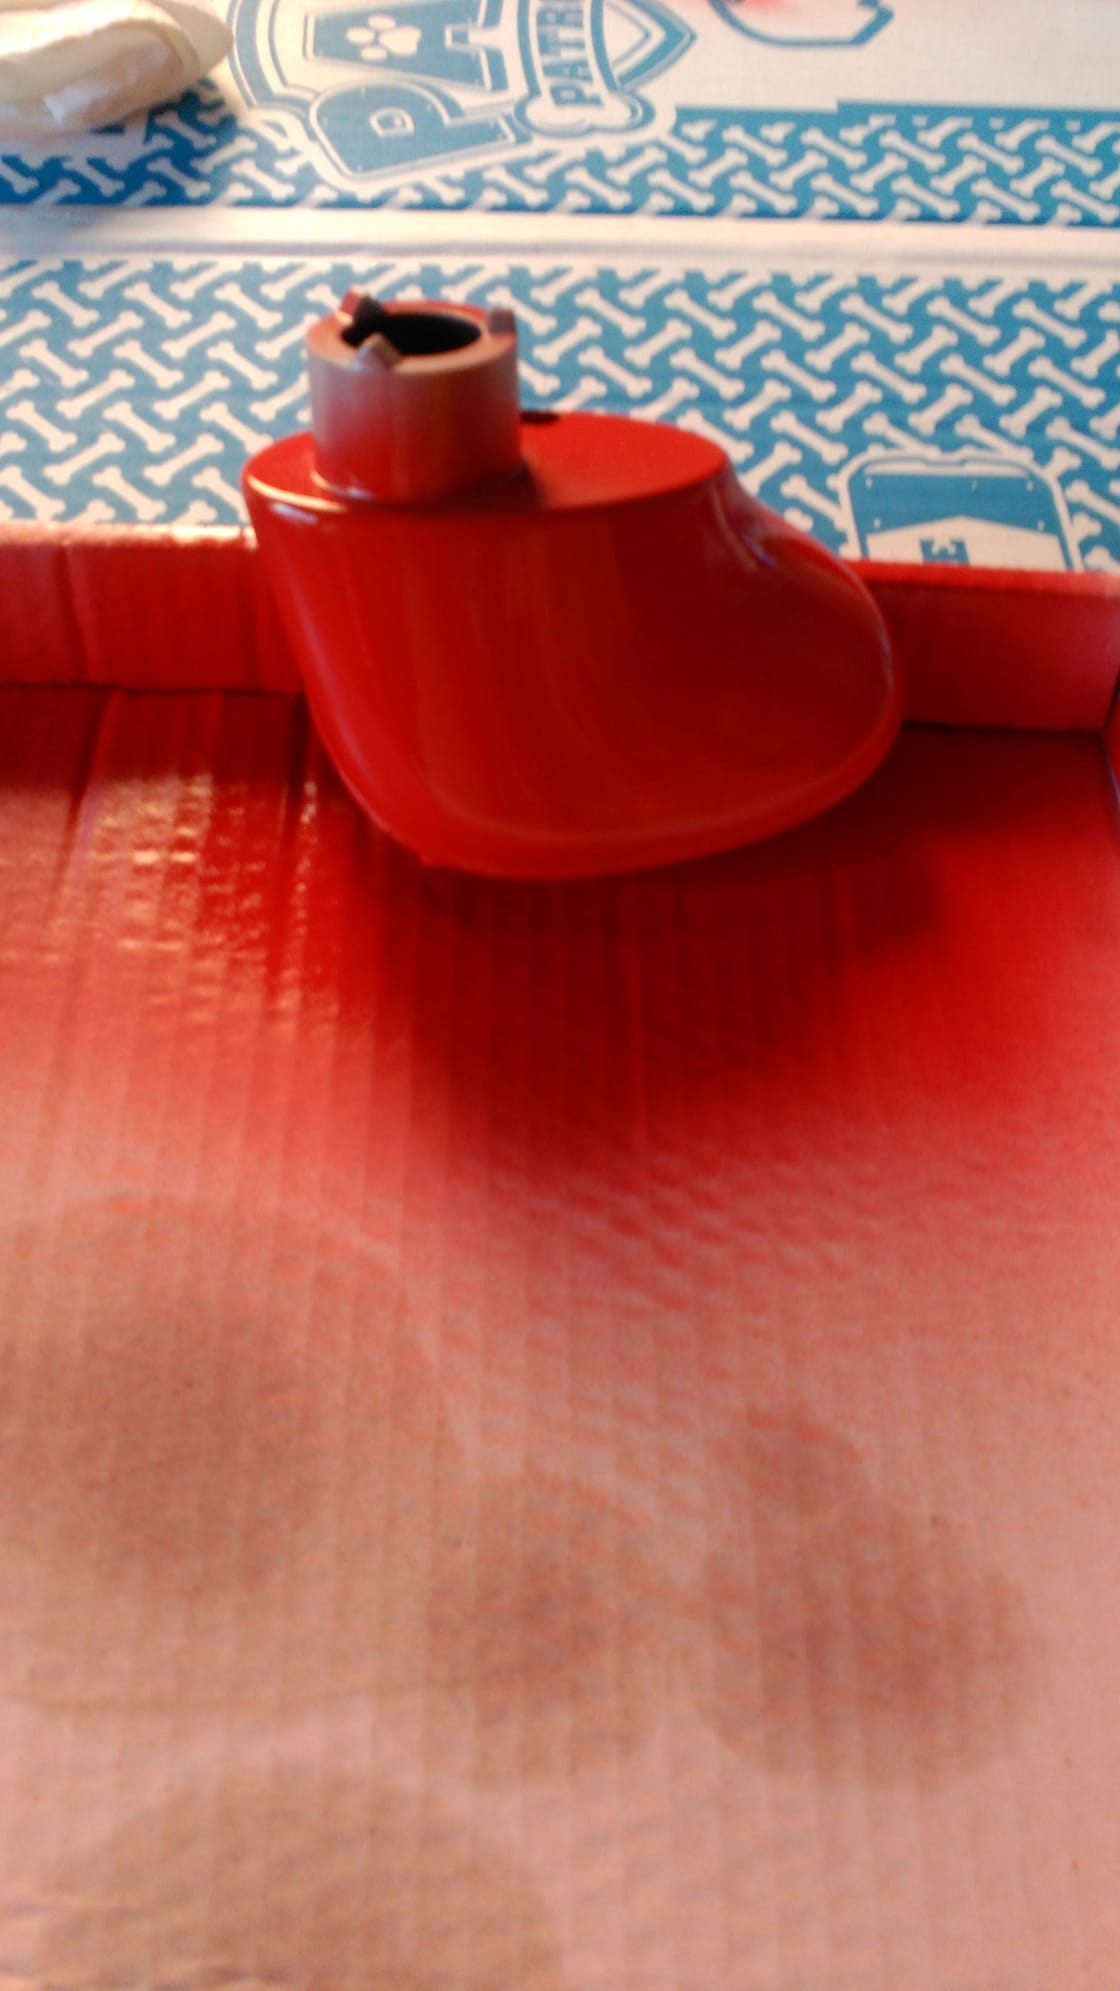
My question with your permission is, how in the world do I do to assembling the base of the Cup mirrors to the top bit "the housing" for the electric motor and so on...I have got a full set with all the parts original but no way I can put them together...it must be some trick or some way to do it...

Hopefully somebody can give me some hint (pictures will be even much apreciated of course!)

Thanks a lot.

Art.
Old 04-19-2017, 06:06 PM
  #2  
ARTUNAGER
7th Gear
Thread Starter
 
ARTUNAGER's Avatar
 
Join Date: Apr 2017
Posts: 7
Likes: 0
Received 0 Likes on 0 Posts
Default

Some pics of the boy...


Engine bay, all is pretty much new I been in the right time and right place and was offered this beauty as the owner couldn't continue with his project...I changed the color on the top cover, I love black and red combination...
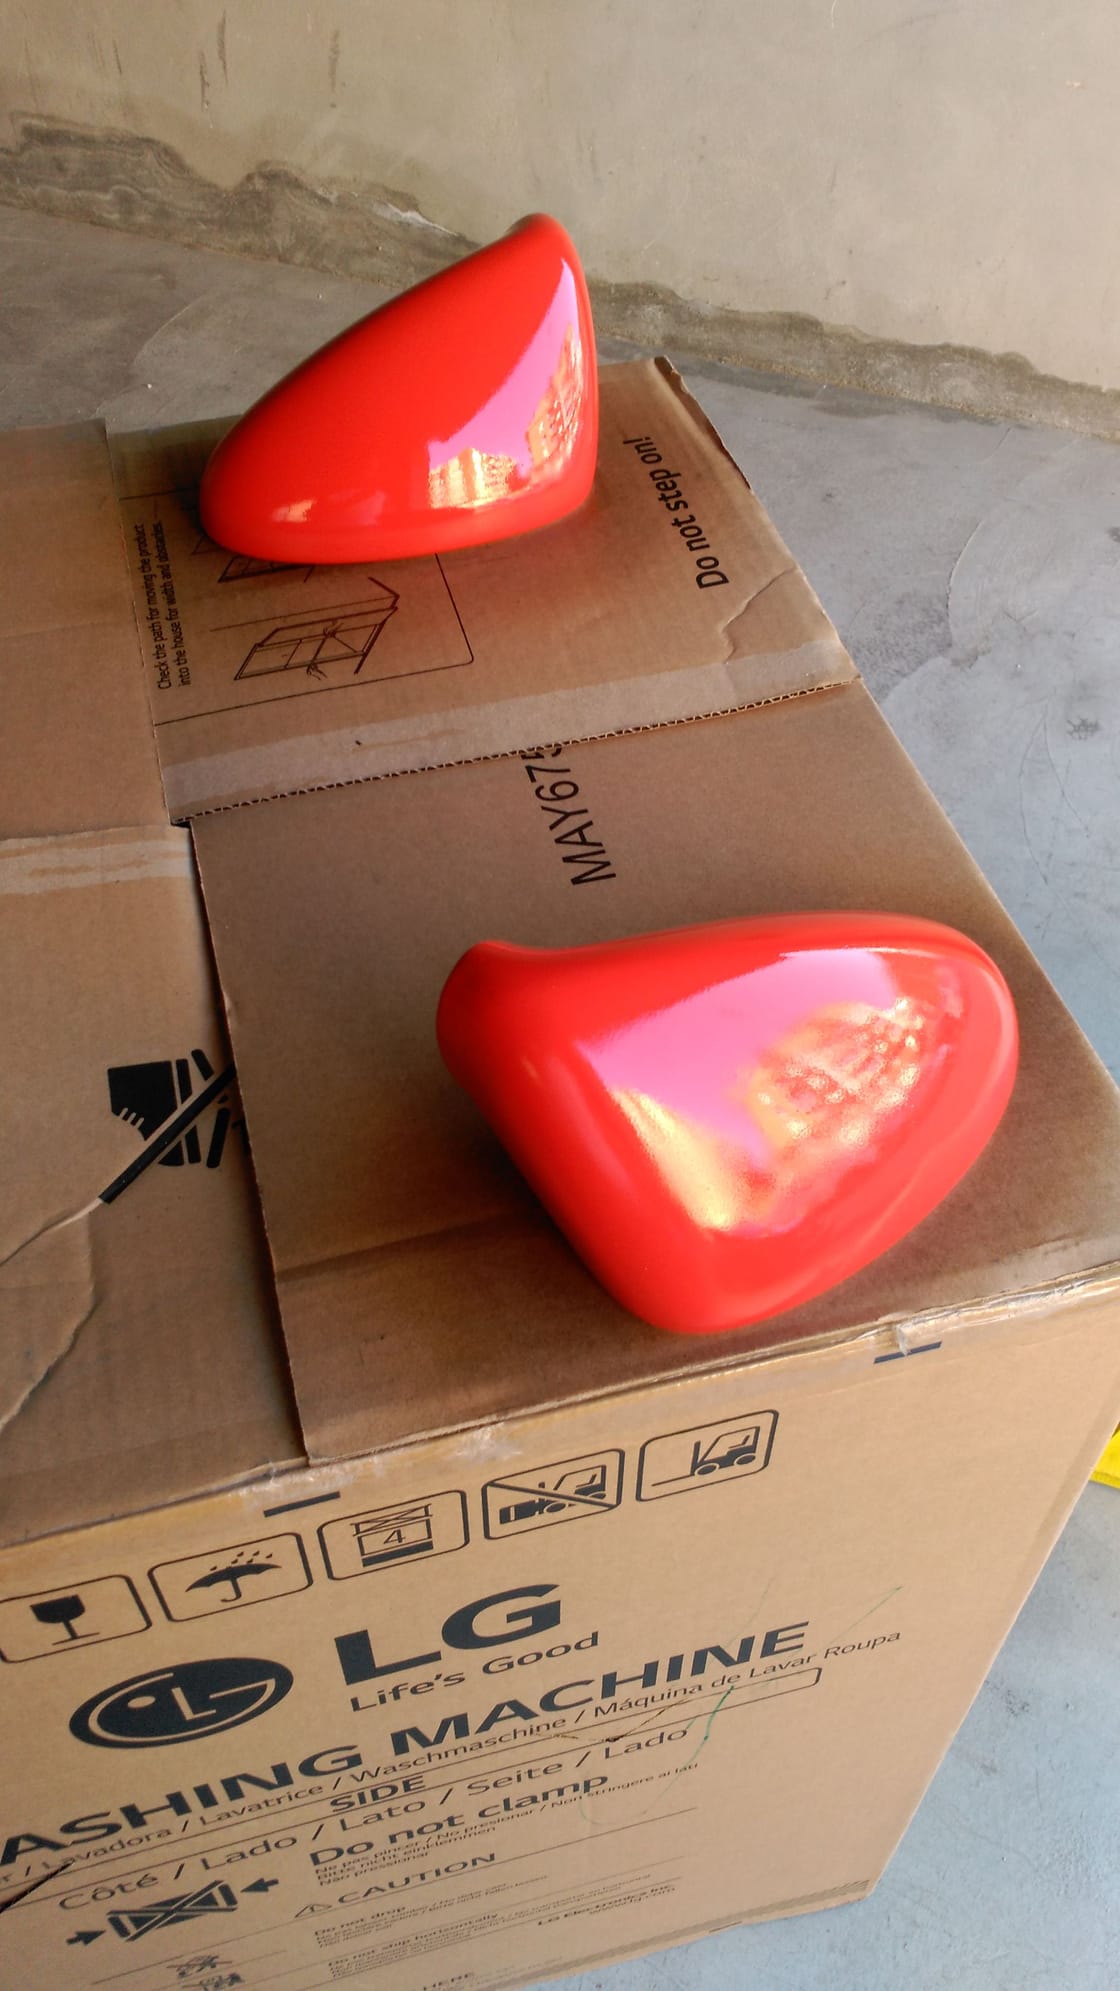


The Cup mirror...


Base of the Cup mirror


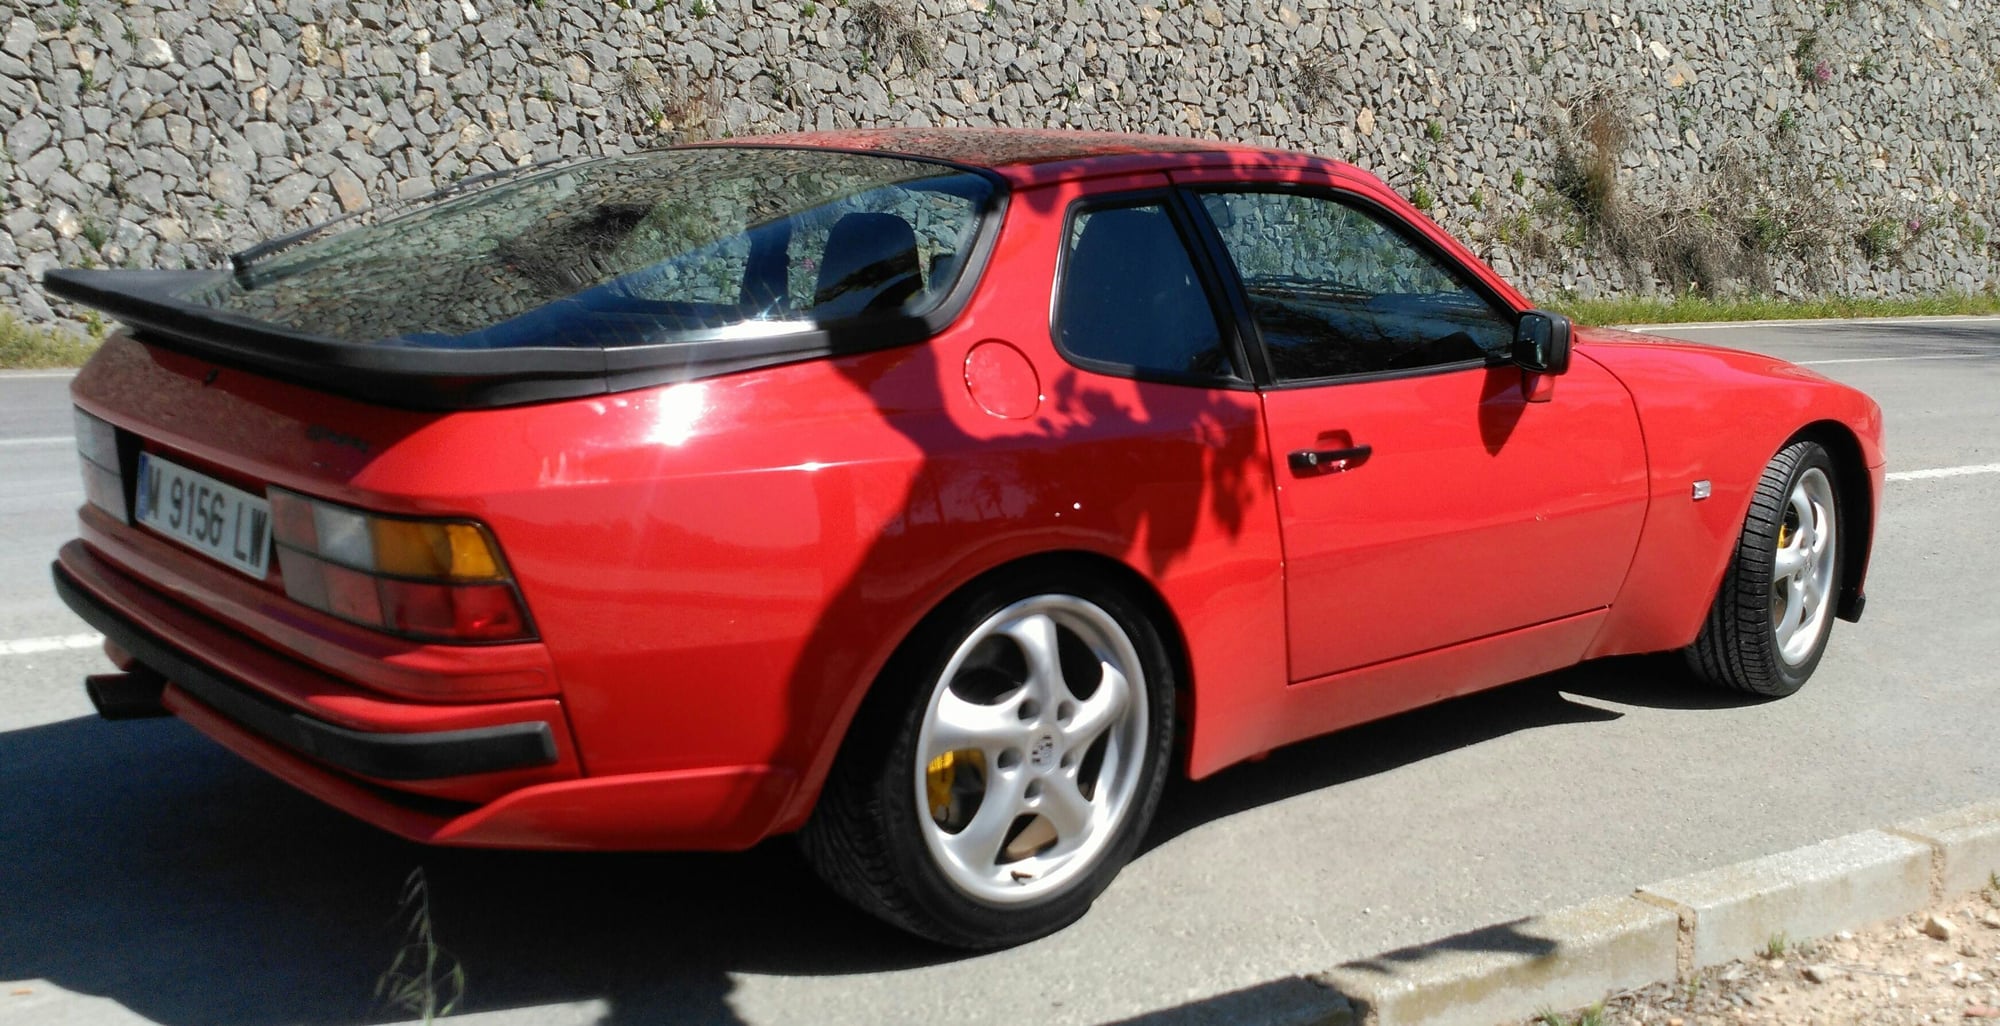
The Red Boy with standard flag mirrors...the car just been polished few weeks ago...


View from the rear...look at dat a**s!!
Old 04-21-2017, 05:20 PM
  #3  
H.F.B.
Pro
 
H.F.B.'s Avatar
 
Join Date: Jul 2013
Location: Germany
Posts: 550
Received 99 Likes on 55 Posts
Default

Welcome, nice car!
Here is how the WSM suggests doing it.


But I made my own tool which allowed me to assemble it in a much more easier way. I could post a picture of it tomorrow, if you still need.
Old 04-21-2017, 05:44 PM
  #4  
ARTUNAGER
7th Gear
Thread Starter
 
ARTUNAGER's Avatar
 
Join Date: Apr 2017
Posts: 7
Likes: 0
Received 0 Likes on 0 Posts
Default

So gratefull for your reply H.F.B.! Honestly.

Many thanks! The car is been under a deep mechanical restoration I will post more stuff when have time.

I will love to see that picture, is no rush at all.

I think I understand what is saying, but will love to see that tool.

Many thanks!!
Old 04-21-2017, 06:01 PM
  #5  
H.F.B.
Pro
 
H.F.B.'s Avatar
 
Join Date: Jul 2013
Location: Germany
Posts: 550
Received 99 Likes on 55 Posts
Default

Originally Posted by ARTUNAGER
So gratefull for your reply H.F.B.! Honestly.

Many thanks! The car is been under a deep mechanical restoration I will post more stuff when have time.

I will love to see that picture, is no rush at all.

I think I understand what is saying, but will love to see that tool.

Many thanks!!
Great, I'm looking forward to see your progress.
Will post my mirror tool tomorrow.
Old 04-22-2017, 05:00 PM
  #6  
H.F.B.
Pro
 
H.F.B.'s Avatar
 
Join Date: Jul 2013
Location: Germany
Posts: 550
Received 99 Likes on 55 Posts
Default


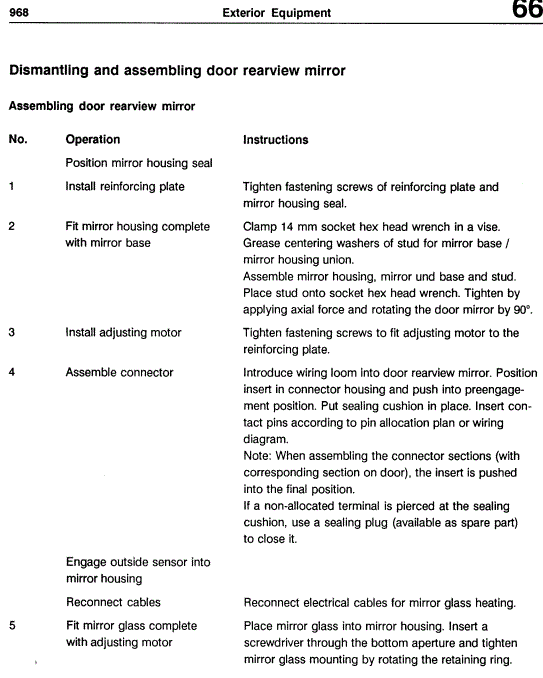
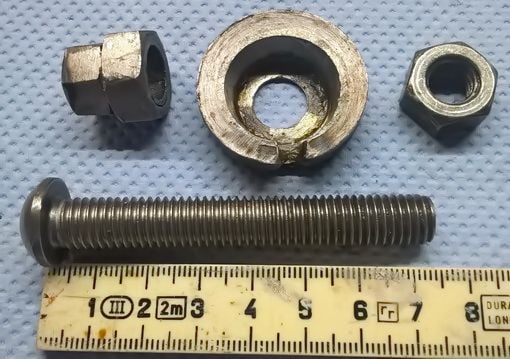
968 diy mirror tool.
M10 allen bolt
M10 nut
Weld together a wrench size 14mm and 17mm nut and drill a 10.5 mm hole.
Weld a special washer 34mm OD, 20mm ID, 11mm ID, 9mm height.


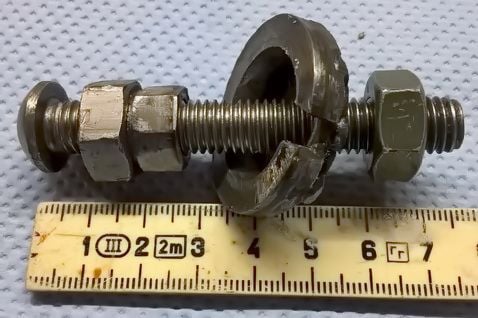
Insert the allen bold and the welded nut into the mirror bold and the mirror base.
Then assemble the rest. You'll find out how it works.
Old 04-22-2017, 07:37 PM
  #7  
mikec944
Instructor
 
mikec944's Avatar
 
Join Date: Aug 2003
Location: Bel Air, MD
Posts: 186
Likes: 0
Received 0 Likes on 0 Posts
Default

This is the method I have used. Post #'s 10 and 15.

https://rennlist.com/forums/944-turb...tallation.html
Old 04-23-2017, 07:59 AM
  #8  
ARTUNAGER
7th Gear
Thread Starter
 
ARTUNAGER's Avatar
 
Join Date: Apr 2017
Posts: 7
Likes: 0
Received 0 Likes on 0 Posts
Default

Many thanks guys!!

Will try this when back home next week.

Really appreciated.
Old 04-25-2017, 05:58 AM
  #9  
JET951
Drifting
 
JET951's Avatar
 
Join Date: Nov 2005
Location: Sydney Australia
Posts: 2,638
Received 83 Likes on 48 Posts
Default

If that fuel pressure gauge is still on you're engine ( fuel injector rail ) , do not leave it there as they will eventually leak / burst & the resulting fire will not be want you want

They are only meant to be an inexpensive test & then remove item
Old 04-25-2017, 06:07 AM
  #10  
ARTUNAGER
7th Gear
Thread Starter
 
ARTUNAGER's Avatar
 
Join Date: Apr 2017
Posts: 7
Likes: 0
Received 0 Likes on 0 Posts
Default

I got the car like this, good input will remove it then...

Thanks!!
Old 04-25-2017, 09:21 AM
  #11  
culture
Rennlist Member
 
culture's Avatar
 
Join Date: Sep 2003
Location: Maryland, USA
Posts: 449
Received 9 Likes on 7 Posts
Default

fantastic looking engine bay. very nicely detailed car.
Old 05-13-2017, 08:11 PM
  #12  
ARTUNAGER
7th Gear
Thread Starter
 
ARTUNAGER's Avatar
 
Join Date: Apr 2017
Posts: 7
Likes: 0
Received 0 Likes on 0 Posts
Default

Thanks folks!!

Finally went home and put the parts together, I used a M12 or M10 Bolt, clamped to the vise and used 3 nuts to lock it from turning then did the 90º turn and voilá!! Job done!! Now time to save some bucks for the mirrors...so pricey here!!


Thank you guys and enjoy the rest of the weekend!!


Quick Reply: CUP MIRRORS.


All times are GMT -3. The time now is 10:33 AM.