When you click on links to various merchants on this site and make a purchase, this can result in this site earning a commission. Affiliate programs and affiliations include, but are not limited to, the eBay Partner Network.
I'm looking at the picture and I see what you're doing wrong. The belt is so loose that you gone past the X90-X97 range and the needle took another trip around the dial. It looks like the hundreds needle is between 0 and 1 range. Tighten the belt so the hundreds needle is in 9 to 0 range. When you have it right the belt should have about a 1 or 2mm deflection between the shoes. From the picture it looks like 6-8mm deflection. Definitely use the tool. The twist method is very subjective. And the correct timing belt tension for a 944 is a bit tighter than you think and the balance shaft belt is a lot looser than you would think also.
Not a fan of K&N stuff.
Last edited by marc abrams; 06-23-2018 at 12:06 PM.
Reason: Spelling
Thank you for the advice, but that picture is from the instructions on the Arnnworx website. I haven't had a chance to take a photo of mine yet and was just using that for a reference, though it looks exactly like that on my car.
Also, the belt cannot be tightened the way you are describing. Maximum tension on the tension pulley only takes it to 29 on the gauge, and the belt can barely be twisted at all at that point, no more than twenty degrees, so it's way too tight.
Completely loose with the belt falling off the loop takes it to 72 on the gauge. One of us is watching the gauge while the other adjusts the tension, and it never passes zero. I tried contacting Bruce Arnn again, but still no luck; my e-mail is still not getting through and the contact section of his site is still under construction. Maybe my gauge is just calibrated differently.
We're going to finish it this weekend. Our only option is the twist method, following Clark's Garage instructions, so we're going to do it slightly tight and recheck it every thousand miles for the first five thousand miles. Same goes for the balance shaft belt. If all goes well, I'll retake the readings using the Arnnworx gauge and just use that as a reference from now on.
Okay, it's been a little while, but I thought I should give an update on the vehicle.
We put everything back together and used the twist method to check both belts. We hand-rotated the engine two full turns, checking all of the marks we made and the factory marks with each rotation to ensure that nothing was out of sync. We reconnected the battery cables, and the car cranks just fine, but does not start. We double-checked everything we had worked on, particularly the starter since it was removed to install the flywheel lock, and everything looks fine with one minor exception.
I have two bolts left over, both 10 millimeter hex-head short bolts. They're identical to the ones used to hold the belt cover on the motor, but we checked the holes and they're all filled by bolts. There was another component that used a couple, but it's full too.
The distributor cap is clean, the coil is getting power, and there is fuel in the fuel rail, so we know the pump is working. However, there is no spark from the spark plugs. We tried removing two different ones, and neither throws a spark when it's gapped with a screwdriver. The car was running perfect when we parked it, so this is something new.
I did some online research, particularly with Clark's Garage, and found a lot of people having trouble with the DME relay with similar problems. I've ordered two brand new ones to test it. I also found a broken plug at the top of the firewall for the oxygen sensor, but it appears it the cable is fine; just the housing is broken. I ordered a new one anyway and will likely install it when once I have the car running again if it runs rough. Once I've driven the car up and down the road a bit, I plan on rechecking the belts one more time with the Arnnworx tool to see if it was just a fluke.
If anyone has any other ideas or tips regarding using the Arnnworx tool, checking the belts by hand, where those two extra bolts may be from, or with why the car is getting power but not sparking, I would greatly appreciate it. Thank you!
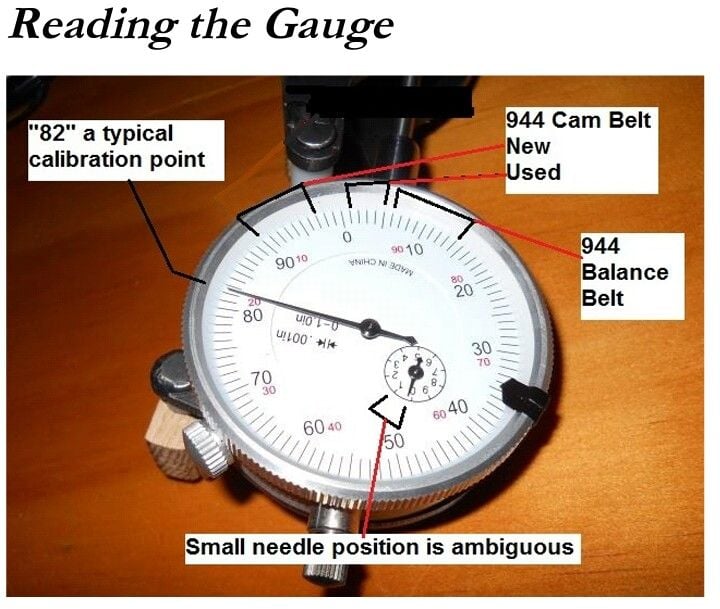
Just to make sure you're reading the gauge correctly, as it can be a bit confusing at first:
What marc abrams was saying about reading the gauge is that you should look at the small dial that reads 0-9. A reading of "90" on the gauge means that the small needle is pointing straight at 9 and the large needle is pointing at 0, while a reading of "97" on the gauge means that the small needle is pointing between 9 and 0 and the large needle is pointing at 7. If you read just the large needle, you'll get very misleading readings. I hope for the sake of mystery resolution that it's just a misinterpretation of the gauge.
I'll be looking for those extra two bolts as I button up my own belt change tomorrow. I have an S, though, so it'll be a bit different and possibly not very useful to you. And yes, the DME relay can quietly fail and cause a no-start condition like you described. I had one fail on me after driving a bit and parking, and the car just would not start. No pressure, no spark, no nothing. New DME relay, and it fired right up. (and then caught fire, but that was unrelated. Replace your fuel hoses!)
You may have come across this in your research, but it's worth mentioning here that there's a way to jump the contacts on the DME relay to force it to work. I haven't done it myself, but the info is a quick search away.
I'm not sure that's quite how it works on the gauge. When I put it on my belt, the smaller dial never reads past 7, thus making my tension between 77 and 73. There's no way I could crank it up into the nineties. Also, in the instructions, it says to disregard the smaller gauge and focus on the larger one. In addition, using your method, the difference between 77 and 73 is enormous. At 77, the belt is falling off and the tensioner is completely loose. At 73, it's tight enough to practically play music on it and can hardly be twisted at all, let alone to 90 degrees. It wasn't a bad guess, though.
I saw how to jump them on some of the instructions on forums dealing with the DME relay, but the relays were only $11 each and I didn't have the tools to jump the old one. Thank you for the advice, though. I appreciate it.
Shoot. The only other thing I can think of is snapping the gauge between readings, but it sounds like you've read the instructions more than a few times. I'm also assuming that the large needle doesn't make a full revolution between loosest and tightest settings; is that correct? Is it possible that the gauge is sticking internally?
As for those two extra bolts, are they possibly from the upper timing belt cover just underneath the water pump? I know you said all the bolt holes are plugged with bolts, but those two under the water pump are hard to see. I wound up with two extra bolts today, and that's where they wound up going. Hope that helps...
Thank you for the reply. Yes, we made sure the gauge is not making a full revolution between tightest and loosest. Loosest, with the belt coming off and the tensioner at minimum is 72. Tightest, with the tensioner at 180 degrees from the loosest position and the belt ready to play a tune, is 29. The gauge doesn't seem to be sticking at all. It makes a smooth motion when adjusted, and it aligns perfectly with the metal bar provided when adjusting it.
The belts seem to be at the proper reading, and even Clark, before he passed, of Clark's Garage made some posts about it. He was saying the twist method was all right on the newer belts and that the gauge was more recommended for the older, eighties belts which weren't as durable and more prone to expansion during use. I'll just use that advice, but I'll still check with the tool when we check the belts again in a few thousand miles.
As for another update, my DME relays arrived, and I replaced the old one, which was the original German unit, with a Uroparts model. Sadly, the car still will not start. I can hear the fuel pump kicking on when I crank it, and there's fuel in the fuel rail, so I know it's getting fuel and the issue isn't the DME relay. It's just not getting spark. I may have to move this to another thread since it's unrelated to this one.
You're using the gauge wrong. You should not be using the small needle at all. That's why when you read the directions it's says X97. The X represents the hundreds value of the little needle that we ignore. Being a machinist myself that uses these gauges daily I still like to reference the small needle. What I mean by this is I put the Cal bar in and twist the outter ring of the gauge to read whatever number your Cal bar is. These are the outter numbers on the gauge to where the big needle position is with the Cal bar installed. Then I look at the little needle to reference the hundreds position. Let's say it reads between 0 and 1 for example. Now remove the Cal bar and install the gauge on your belt. This is where I like to see that the little needle is pointing between 0 and 1 like it did with the Cal bar in. All this tells you is that you're reading the gauge within the same hundreds revolution of the gauge. I do this because if the belt was over tightened enough to get a full revolution of the gauge you could actually be reading it .100 off. Then you need to rotate the crank counter clockwise to get the slack to the upper side very slowly and see where the big needle reads on the outter numbers of the gauge ignoring the little needle.
I have been very busy and haven't updated this in awhile, so time for some good, if confusing, news:
I actually found a local mechanic who knows these Porsches and works on a variety of higher-end vehicles. I told him that it wasn't starting and the DME relay was replaced. He suggested I look into the engine speed and reference sensors, as they can also cause the car not to start if one or both have failed.
I looked up the instructions on Youtube and Clark's Garage for testing these sensors, borrowed a multimeter, and proceeded with the test. Using the Youtube test of pulling the DME connector and testing resistance with the multimeter resulted in an "open loop" reading, stating that the connection was not being completed. I tried inserting paper clips into the pin holes and checking it that way as the pins on this multimeter are very short. Still no success.
I tried the Clark's Garage method of testing the resistance at the plugs on the back of the motor. They should read between 600 and 1600 ohms, and the result was 1090 ohms from both sensors, right where it should be. I plugged both sensors back in and, when plugging the top one in, heard a faint, electric whine, like when starting an old desktop computer. I was going to leave the car for later, but I decided I should put it all back together. I plugged the DME connector back in, heard a slightly louder electric whine.
I thought to myself, "why not?", plugged in the battery, got in the car, said a quick prayer to God, cranked it, and the engine fired right up!
It ran a little rough at first, and I could hear the lifters clicking quite loudly as they tried to get oil again. I let it run for about four minutes, shut it off, and let it cool down. I checked the oil, and it's still full, so I started it up again, and now it runs perfect. No belt squeals, no clicking beyond the ordinary old four-cylinder sound, and no oil leaking on the exhaust manifold, or anywhere else that I can see.
So, success! The car runs again, doesn't leak, and the belts seem to be doing fine using the twist method. Maybe just one of the sensor plugs or the DME connector was loose? Or perhaps I cleaned out the pins by trying to jump them with the paper clips? Who knows? I'm just happy my car is running again so I will be able to put it on the road and enjoy it a bit before winter. Thank you all for your help with this. I appreciate it more than you could know.
The test method you used is the best way to do it. Check the sensors from the DME. If open, unplug and plug back together. Re-read the sensors from the DME. Start the car, enjoy!
 06-23-2018, 10:20 AM