'87 Intake Removal, Repairs, Installation Procedure (w/pics)
 01-27-2009, 12:41 AM
#106
Rennlist Member
Thread Starter
Join Date: Sep 2007
Location: Ridgecrest, California
Posts: 1,363
Likes: 0
Received 143 Likes
on
28 Posts
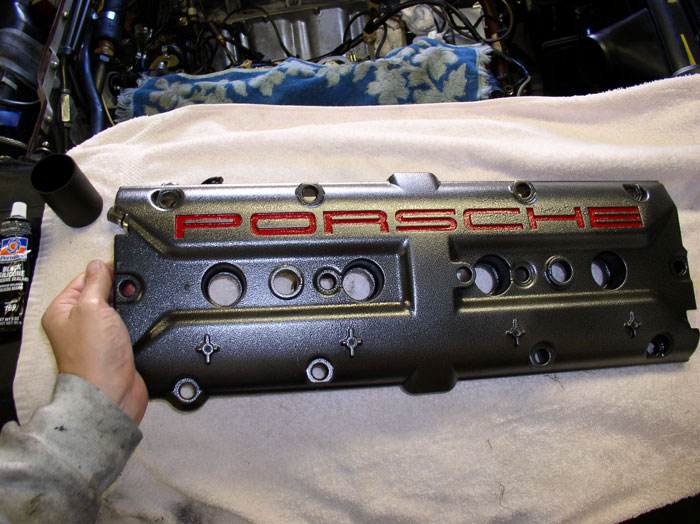
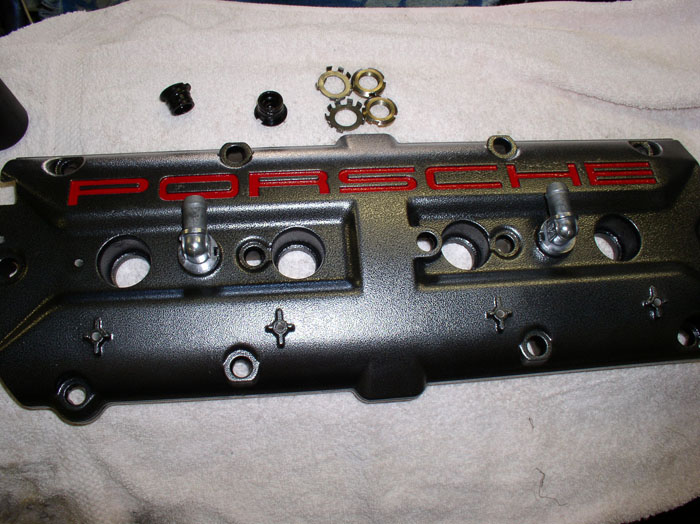
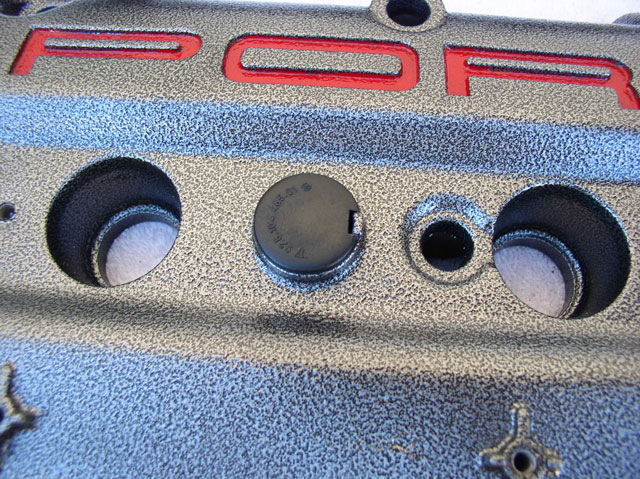
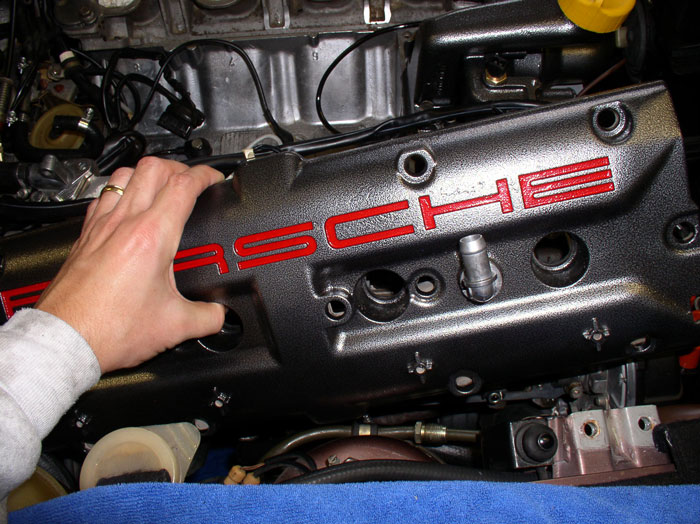
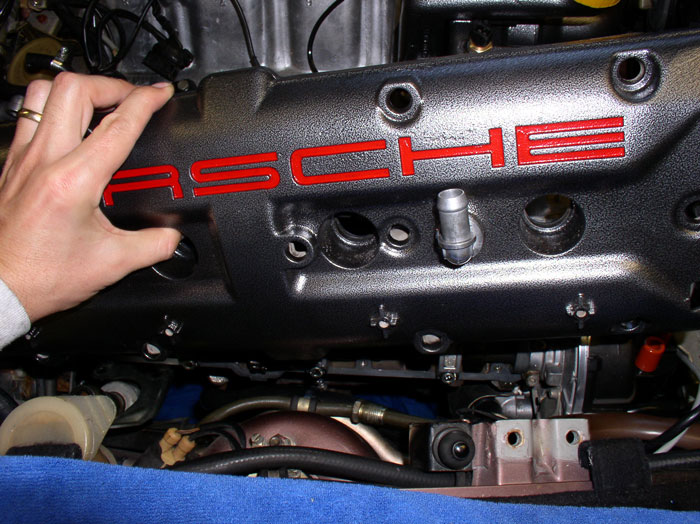
Next, you can prepare the cam covers for installation now that the detail paint has dried. The cam cover should look like this - no "accessories" installed yet.
First, remove the old o-rings from the driver's side cam cover plugs.
Also remove the old o-rings from the passenger side PCV elbows.
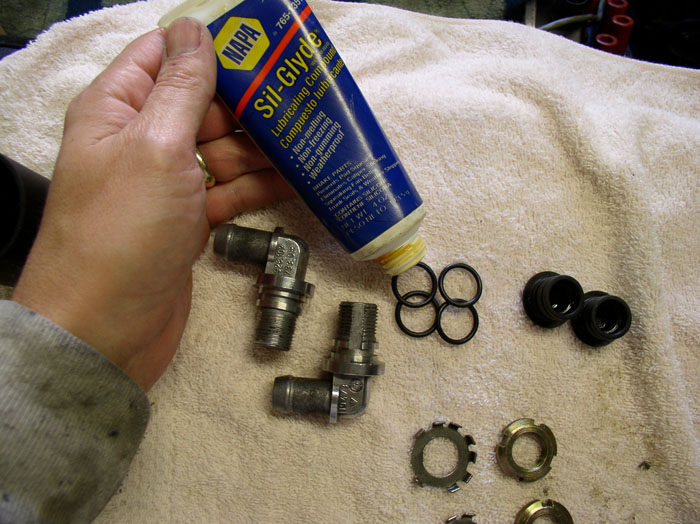
Clean the parts. Here's a shot of the hardware parts that will be installed.

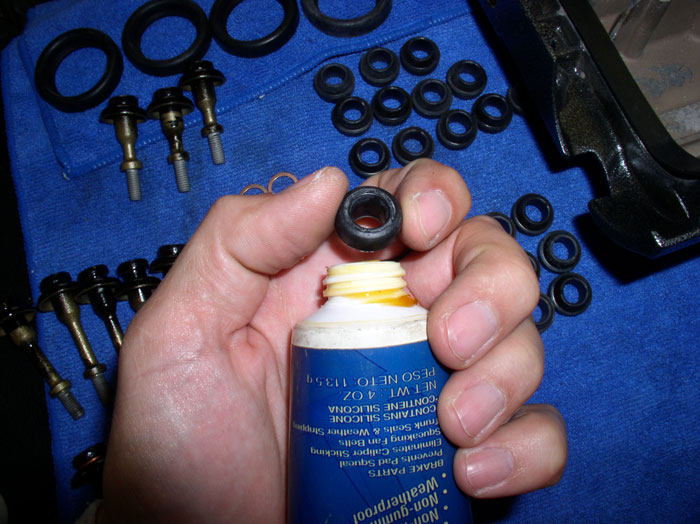
Next, I lubricated the four new o-rings with a light coat silicone lubricant. This will aid installation of the o-rings onto the elbows and plugs and will also aid installation of the plugs and elbows into the cam cover. If you use a silicone lubricant, make sure it is O2 sensor safe. Even small amounts of silicone in the combustion system can cause O2 sensor failure. This particular brand of lubricant doesn't state anything about being O2 sensor safe so I'll have to live with my newbie lesson learned here - but you don't have to. Motor oil is a safe and easy alternative to use on the o-rings since they will come in contact with motor oil anyway during the course of performing their job.
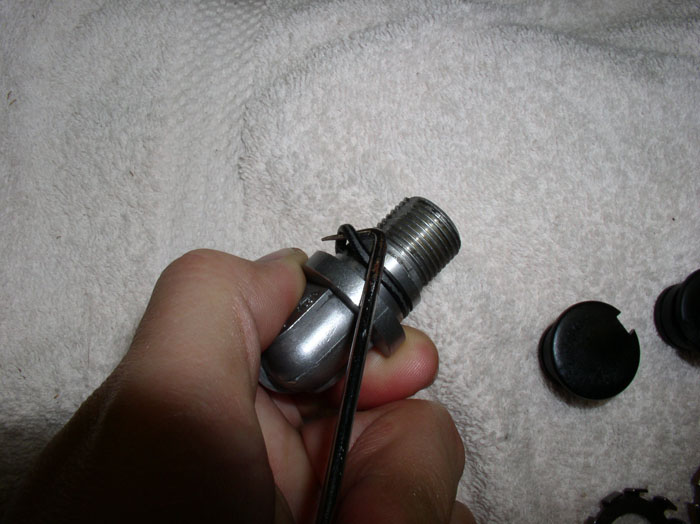
Slide the o-ring onto the threads of the elbow and position it in the groove as shown. Wipe off excess lubricant. Repeat for the other elbow.
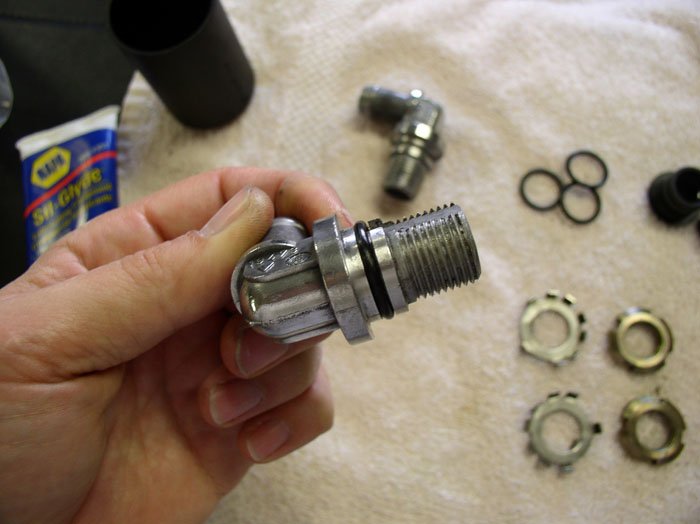
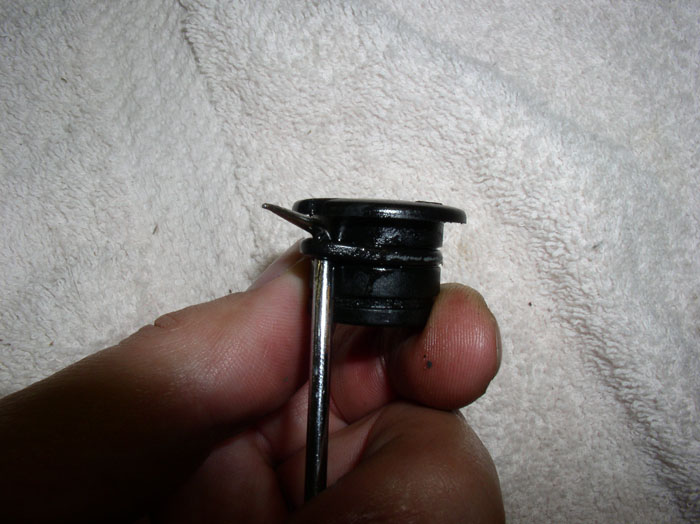
Slide the o-ring over the plug....
....until it rests in the upper goove as shown. Repeat for the other plug.
Insert the PCV elbows into the passenger cam cover. If you're not sure which cam cover is the passenger side, look at the 4 small threaded holes at the bottom half of the cam cover (two are pictured below). The passenger cam cover will have two threaded holes toward the right-hand end of the cam cover (near the end of the word "Porsche"). The other two holes do not have threads. The Driver's side cam cover has the two threaded holes near the front of the cam cover (near the beginning of the word "Porsche"). These threaded holes are for the spark plug harness clamps to mount to the cam covers. Also note the elbows are keyed to a notch on the cam cover.
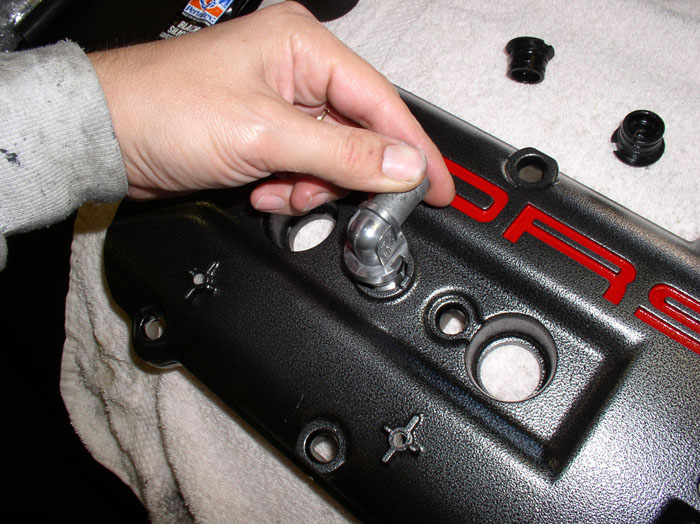
Install both elbows at this time.
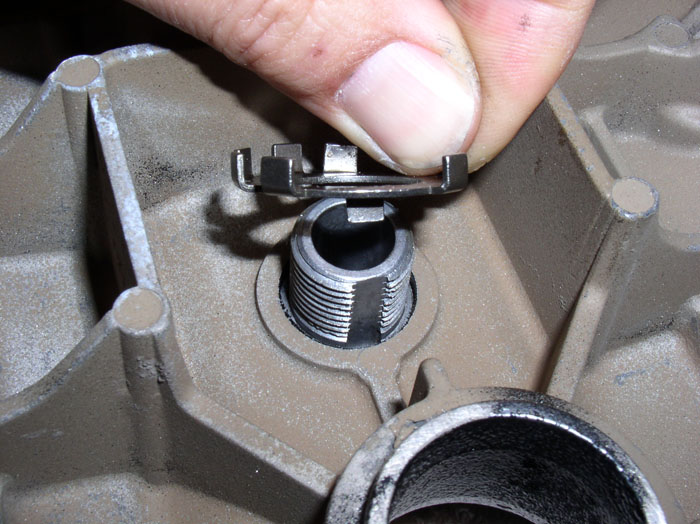
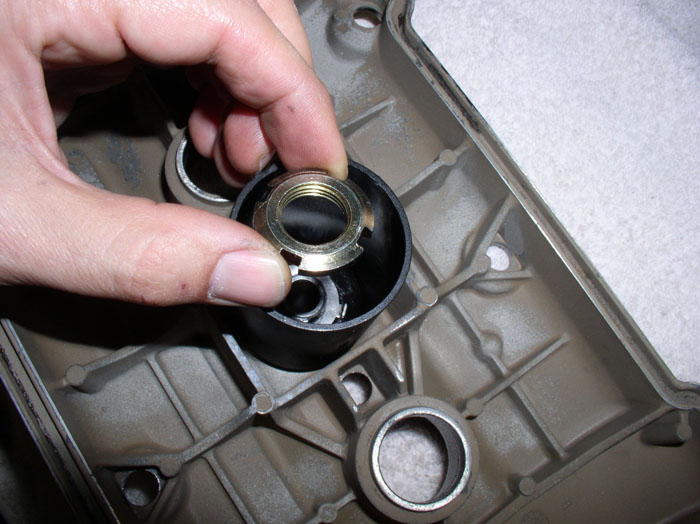
Flip the passenger cam cover over. First, install the locking tab washer on the front PCV elbow. The washer is keyed - ensure the key tab is lined up with the slot in the threads as shown.
Next, install the notched lock nut and....
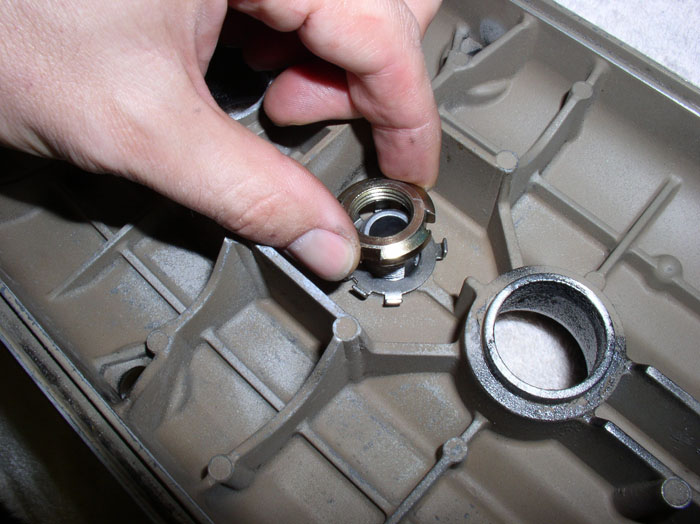
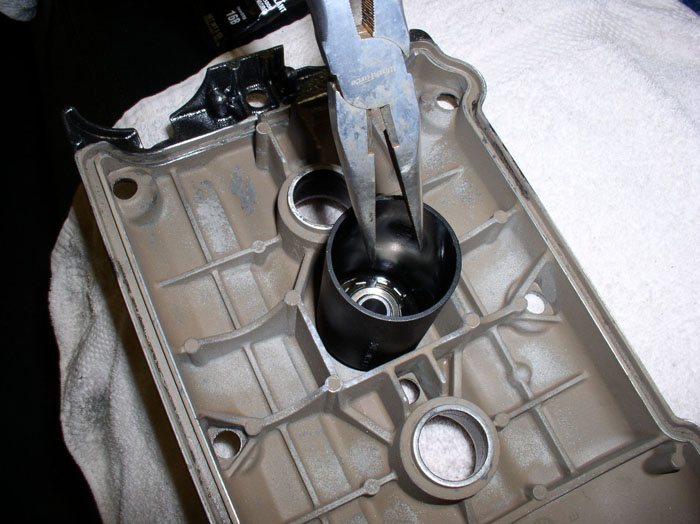
....tighten down using a pair of pliers. I used needle nose pliers to grip the notches in the lock nut. Tighten the nut until one of the notches lines up with the locking tab that was used previously to lock the nut down. You can spot the previous locked tab by the bent shape from prying it loose from before.
Use a screwdriver to bend the tab back into the notch in the lock nut.
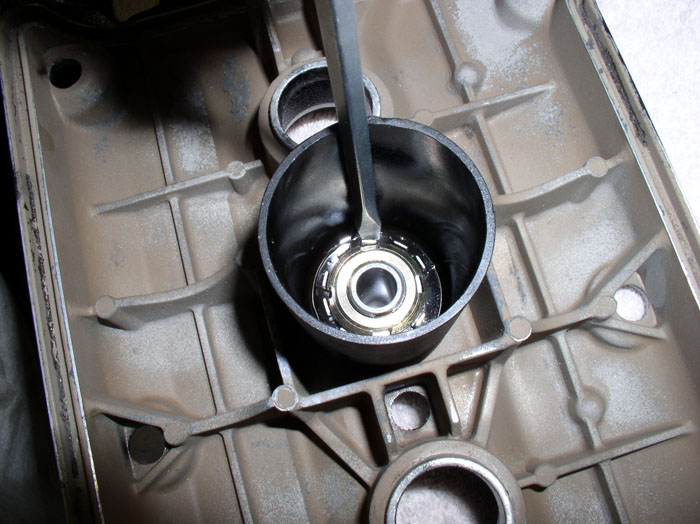
Here's a shot of the front PCV elbow locked down.
continued......
First, remove the old o-rings from the driver's side cam cover plugs.
Also remove the old o-rings from the passenger side PCV elbows.
Clean the parts. Here's a shot of the hardware parts that will be installed.
Next, I lubricated the four new o-rings with a light coat silicone lubricant. This will aid installation of the o-rings onto the elbows and plugs and will also aid installation of the plugs and elbows into the cam cover. If you use a silicone lubricant, make sure it is O2 sensor safe. Even small amounts of silicone in the combustion system can cause O2 sensor failure. This particular brand of lubricant doesn't state anything about being O2 sensor safe so I'll have to live with my newbie lesson learned here - but you don't have to. Motor oil is a safe and easy alternative to use on the o-rings since they will come in contact with motor oil anyway during the course of performing their job.
Slide the o-ring onto the threads of the elbow and position it in the groove as shown. Wipe off excess lubricant. Repeat for the other elbow.
Slide the o-ring over the plug....
....until it rests in the upper goove as shown. Repeat for the other plug.
Insert the PCV elbows into the passenger cam cover. If you're not sure which cam cover is the passenger side, look at the 4 small threaded holes at the bottom half of the cam cover (two are pictured below). The passenger cam cover will have two threaded holes toward the right-hand end of the cam cover (near the end of the word "Porsche"). The other two holes do not have threads. The Driver's side cam cover has the two threaded holes near the front of the cam cover (near the beginning of the word "Porsche"). These threaded holes are for the spark plug harness clamps to mount to the cam covers. Also note the elbows are keyed to a notch on the cam cover.
Install both elbows at this time.
Flip the passenger cam cover over. First, install the locking tab washer on the front PCV elbow. The washer is keyed - ensure the key tab is lined up with the slot in the threads as shown.
Next, install the notched lock nut and....
....tighten down using a pair of pliers. I used needle nose pliers to grip the notches in the lock nut. Tighten the nut until one of the notches lines up with the locking tab that was used previously to lock the nut down. You can spot the previous locked tab by the bent shape from prying it loose from before.
Use a screwdriver to bend the tab back into the notch in the lock nut.
Here's a shot of the front PCV elbow locked down.
continued......
 01-27-2009, 01:14 AM
#107
Rennlist Member
Thread Starter
Join Date: Sep 2007
Location: Ridgecrest, California
Posts: 1,363
Likes: 0
Received 143 Likes
on
28 Posts
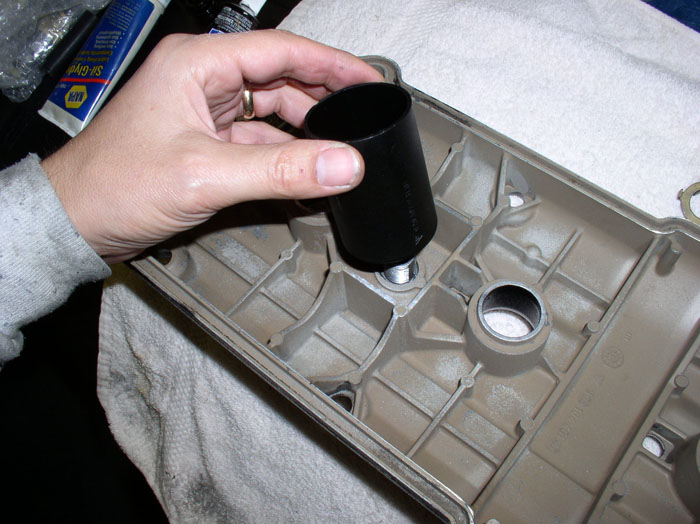
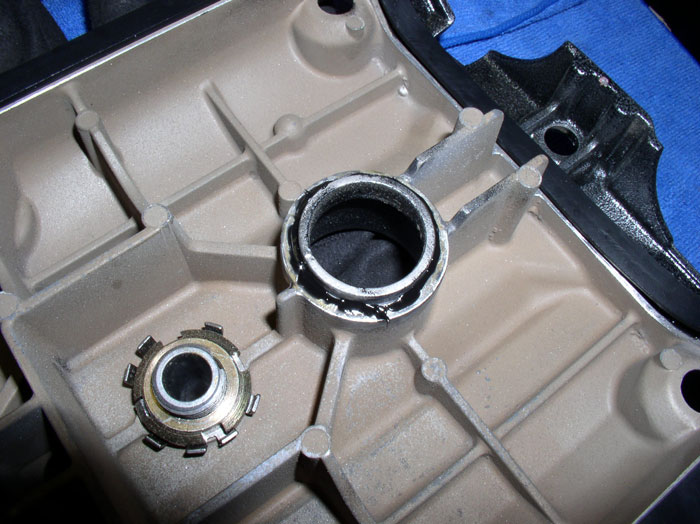
Now for the rear PCV elbow. The rear elbow has a metal cylinder that fits over the top of it. Install the cylinder as shown.
Place the locking tab washer over the elbow threads in the same manner as the forward elbow just completed - ensuring the downward metal tab is lined up with the slot in the side of the PCV elbow threads.
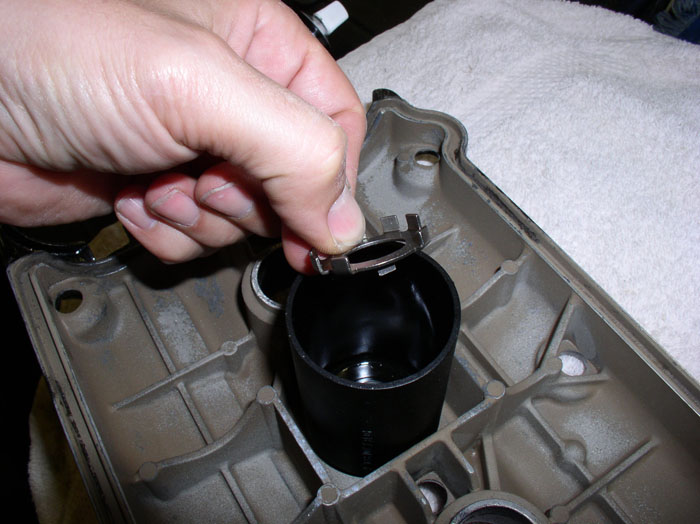
Next, install the notched lock nut.
Use the needle nose pliers to tighten the notched nut down.
As before, line up the notch with the previously bent washer tab and bend the washer tab over into the notch in the lock nut.
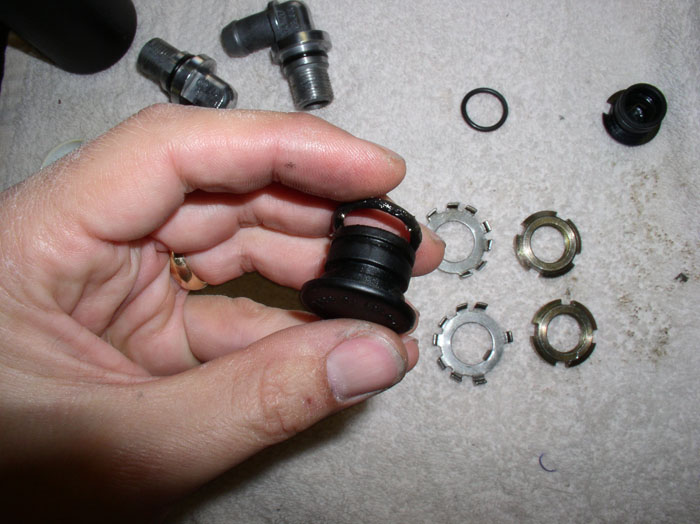
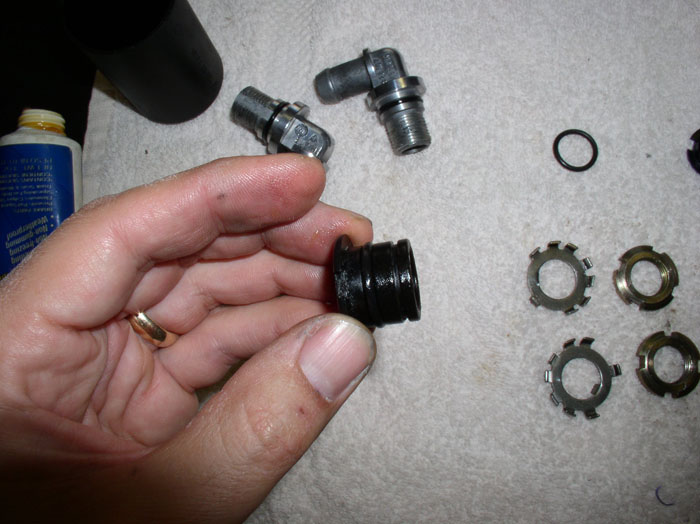
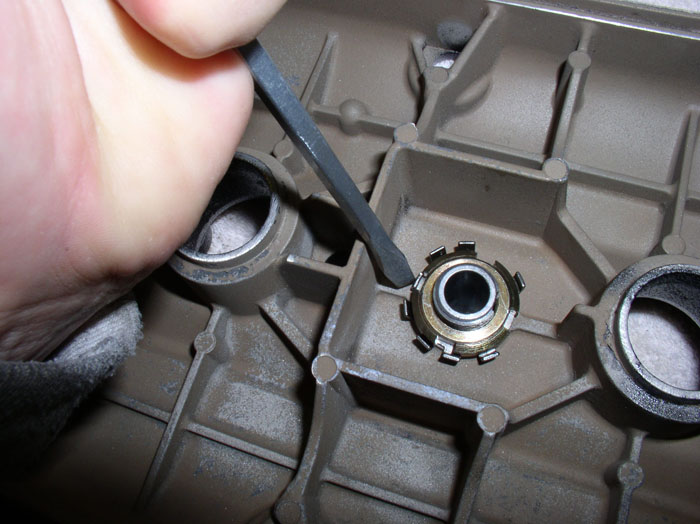
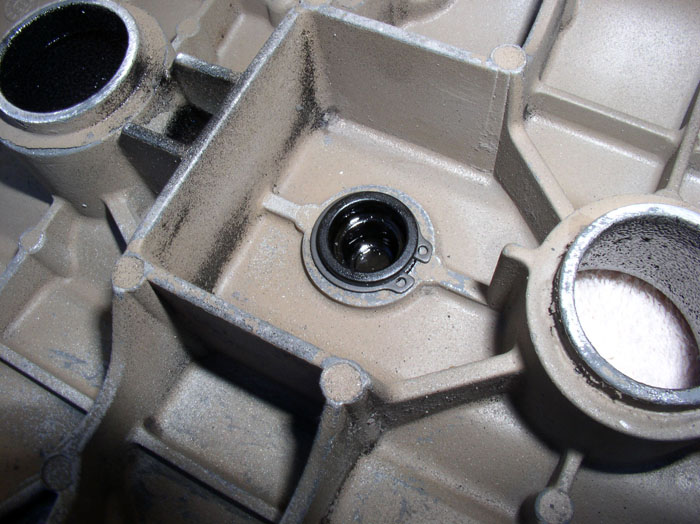
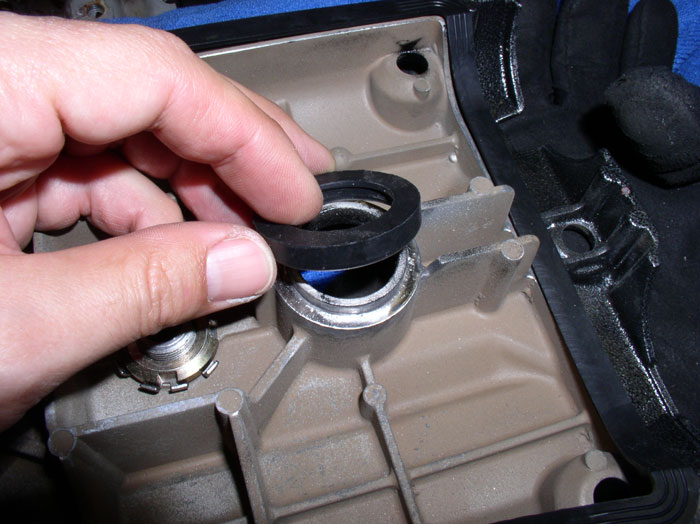
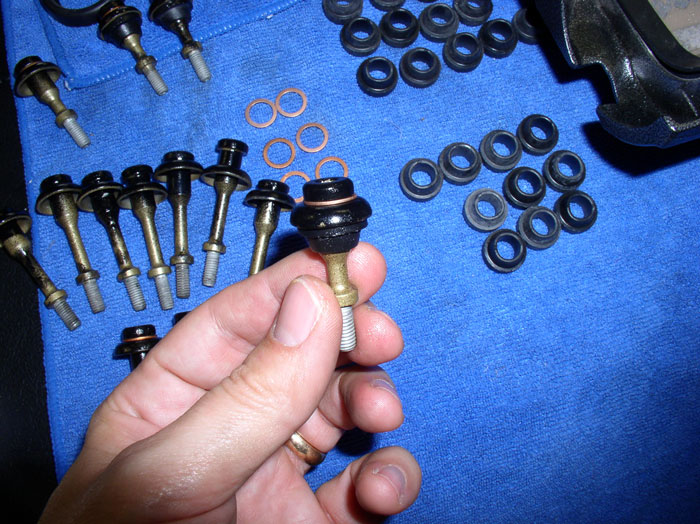
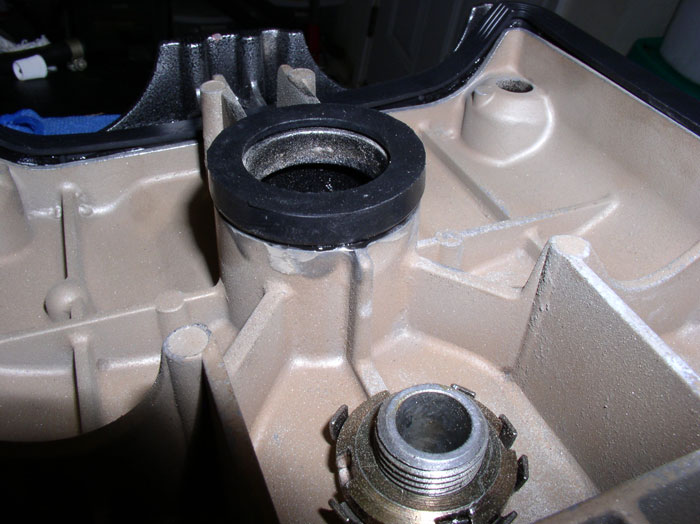
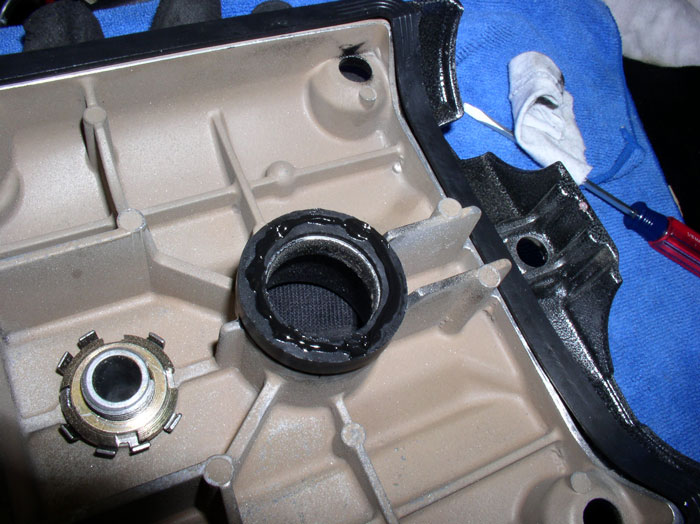
Now for the driver's side cam cover plugs. Both plugs also have a keyed notch that lines up with the tab on the cam cover. Install as shown.
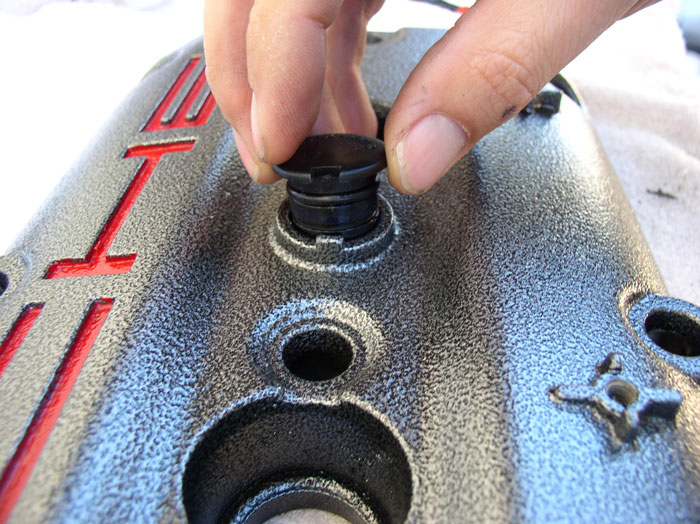
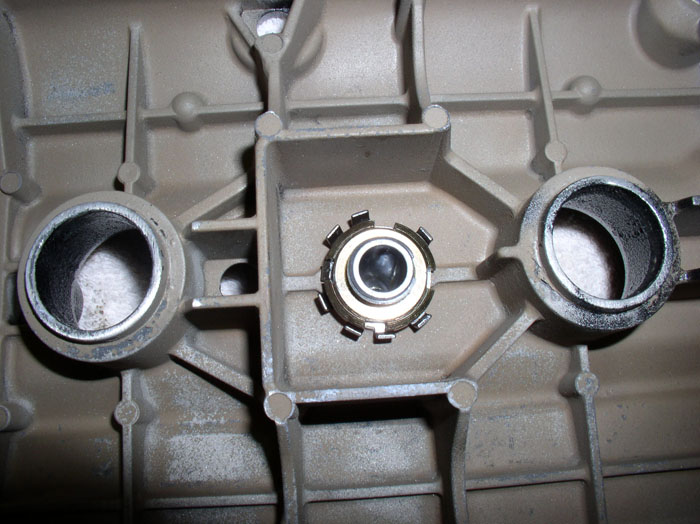
Press the plug down until it is fully seated. Install the other plug as well.
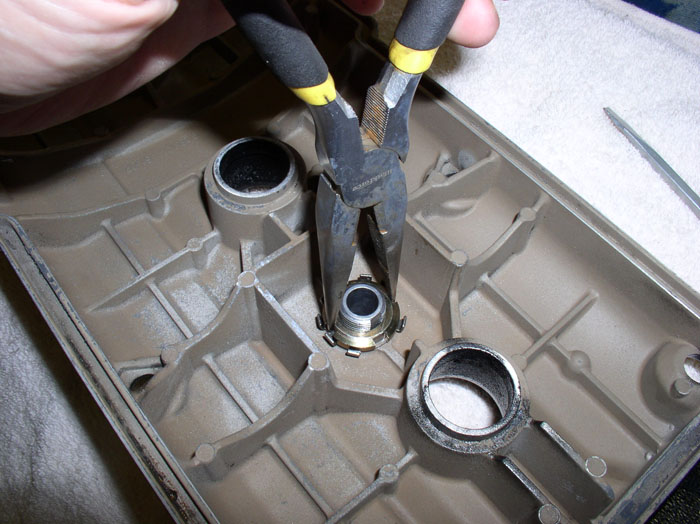
Flip the cam cover over and install the circlip that secures the plug. Use an appropriate sized circlip pliers as shown.
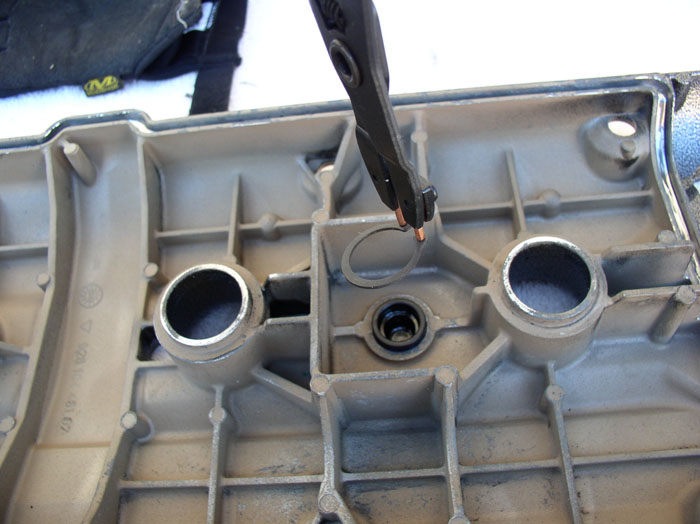
Ensure the circlip is fully seated in the bottom groove in the plug as shown.
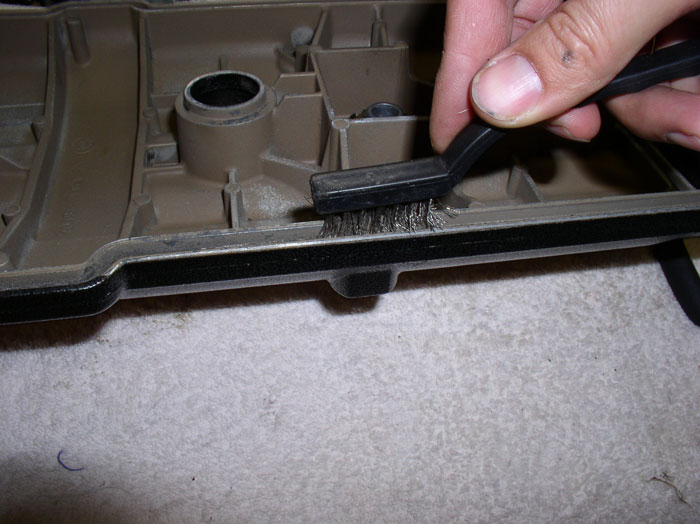
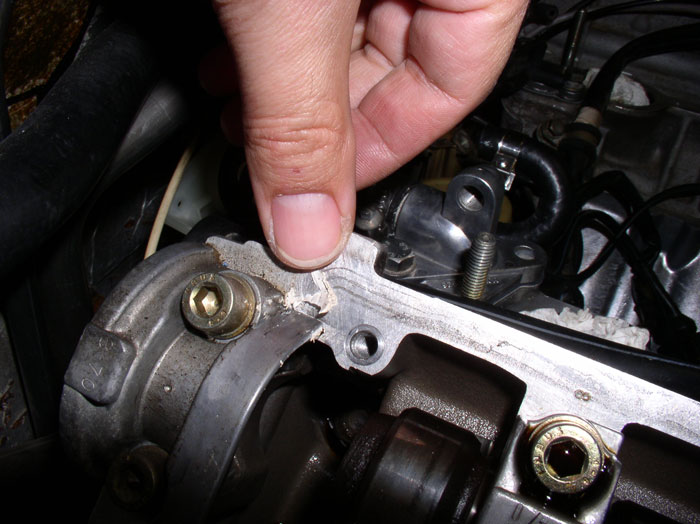
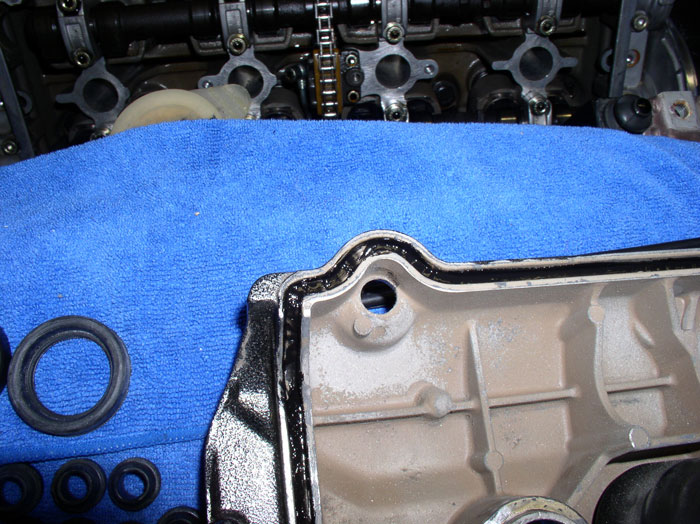
Next, clean the cam cover gasket groove. Mine had remnants of what looked like silicone sealant all along the bottom of the groove. I assumed this was to aid in holding the gasket in place during installation. Also, clean the gasket seat for the spark plug gaskets on the underside of the cam cover. After cleaning these areas, wipe down the underside of the cam cover to remove any loose chips or dust. Compressed air or a damp cloth works well.
Then clean the mating surface on the cylinder head. I found remnants of the white silicone-like sealant in the 4 corners of the cam cover mating surfaces. These four corners are identified in the service bulletin as areas that need a shot of sealant when installing the new gasket and cam cover.
Once I removed the old sealant, I wanted to remove any oily residue from the head mating surface. The best way to do this is spray brake cleaner on a clean rag/towel as shown.
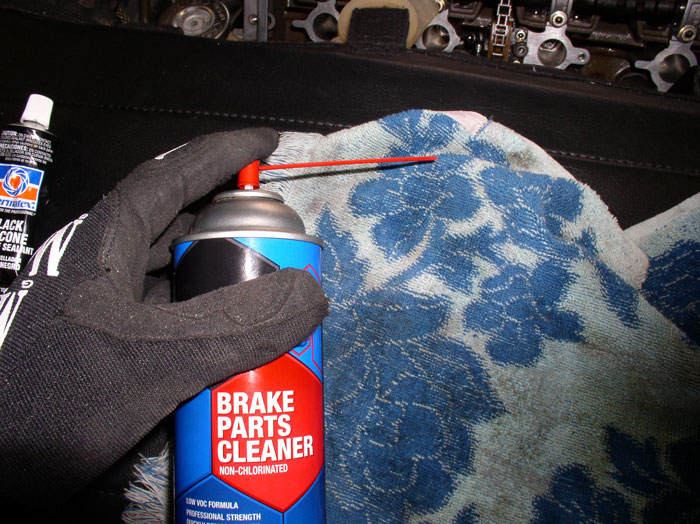
Then wipe the section of towel with cleaner on it over the mating surfaces. Repeat this procedure for the other cylinder head.
Next, sort out the cam cover bolts and umbrella washers for each cam cover. There are 13 bolts for each cover - 4 small ones and 9 longer ones.
continued......
Place the locking tab washer over the elbow threads in the same manner as the forward elbow just completed - ensuring the downward metal tab is lined up with the slot in the side of the PCV elbow threads.
Next, install the notched lock nut.
Use the needle nose pliers to tighten the notched nut down.
As before, line up the notch with the previously bent washer tab and bend the washer tab over into the notch in the lock nut.
Now for the driver's side cam cover plugs. Both plugs also have a keyed notch that lines up with the tab on the cam cover. Install as shown.
Press the plug down until it is fully seated. Install the other plug as well.
Flip the cam cover over and install the circlip that secures the plug. Use an appropriate sized circlip pliers as shown.
Ensure the circlip is fully seated in the bottom groove in the plug as shown.
Next, clean the cam cover gasket groove. Mine had remnants of what looked like silicone sealant all along the bottom of the groove. I assumed this was to aid in holding the gasket in place during installation. Also, clean the gasket seat for the spark plug gaskets on the underside of the cam cover. After cleaning these areas, wipe down the underside of the cam cover to remove any loose chips or dust. Compressed air or a damp cloth works well.
Then clean the mating surface on the cylinder head. I found remnants of the white silicone-like sealant in the 4 corners of the cam cover mating surfaces. These four corners are identified in the service bulletin as areas that need a shot of sealant when installing the new gasket and cam cover.
Once I removed the old sealant, I wanted to remove any oily residue from the head mating surface. The best way to do this is spray brake cleaner on a clean rag/towel as shown.
Then wipe the section of towel with cleaner on it over the mating surfaces. Repeat this procedure for the other cylinder head.
Next, sort out the cam cover bolts and umbrella washers for each cam cover. There are 13 bolts for each cover - 4 small ones and 9 longer ones.
continued......
01-27-2009, 02:24 AM
#109
Addict
Lifetime Rennlist
Member
Lifetime Rennlist
Member
having done some documenting like this years ago for my webiste, i want to just say i appreciate the time and effort your taking to show everyone this and other things you have done. Its time consuming enough doing the procedures, but then to take the time to get good pics...take notes...keep it in sequence....then sit down and put it in a presentable format is even more of a chore!
Thanks

if you have a webpage for all this stuff I'd like to add it to my home page
Thanks
if you have a webpage for all this stuff I'd like to add it to my home page
01-27-2009, 04:25 AM
#110
Under the Lift
Lifetime Rennlist
Member
Lifetime Rennlist
Member
if you have a webpage for all this stuff I'd like to add it to my home page
01-27-2009, 10:22 AM
#111
Rennlist Member
Thread Starter
Join Date: Sep 2007
Location: Ridgecrest, California
Posts: 1,363
Likes: 0
Received 143 Likes
on
28 Posts
Great catch. I double checked my tube of silicone lube and it does not state anything about being O2 safe. Although I was careful to remove excess lube from the o-rings, it's an unecessary risk to use the type of lube I used when motor oil would have worked fine here since the o-rings will come in contact with oil anyway. Or use an O2 sensor safe silicone lube. I'll edit the post to include using an O2 sensor safe lube or just motor oil on the o-rings. THANKS for reading, asking the question, and for helping to improve the quality of this post.
01-27-2009, 02:54 PM
#112
Nordschleife Master
http://www.pbr.com.au/products/repla...ncillary.shtml
Not sure if you get PBR stuff in the US?
01-27-2009, 04:37 PM
#114
Rennlist Member
Hello Dave,
Great catch. I double checked my tube of silicone lube and it does not state anything about being O2 safe. Although I was careful to remove excess lube from the o-rings, it's an unecessary risk to use the type of lube I used when motor oil would have worked fine here since the o-rings will come in contact with oil anyway. Or use an O2 sensor safe silicone lube. I'll edit the post to include using an O2 sensor safe lube or just motor oil on the o-rings. THANKS for reading, asking the question, and for helping to improve the quality of this post.
Great catch. I double checked my tube of silicone lube and it does not state anything about being O2 safe. Although I was careful to remove excess lube from the o-rings, it's an unecessary risk to use the type of lube I used when motor oil would have worked fine here since the o-rings will come in contact with oil anyway. Or use an O2 sensor safe silicone lube. I'll edit the post to include using an O2 sensor safe lube or just motor oil on the o-rings. THANKS for reading, asking the question, and for helping to improve the quality of this post.
01-28-2009, 01:33 AM
#117
Rennlist Member
Thread Starter
Join Date: Sep 2007
Location: Ridgecrest, California
Posts: 1,363
Likes: 0
Received 143 Likes
on
28 Posts
At this point, you're ready to install the cam covers. I started with the passenger side. Since this was my first experience re-installing the cam cover, I decided to do a dry fit first - like a dress rehearsal - just to make sure I could manuever the cover with gaskets in place. I would recommend the same if this is your first experience. Start by dry-fitting the cam cover gasket into the channel as shown.

Then set the spark plug gaskets in place as well.
Manuever the cam cover into place noting the angle that works best. Once you're satisfied, remove the cam cover from the cylinder head and remove the gaskets from the cam cover.
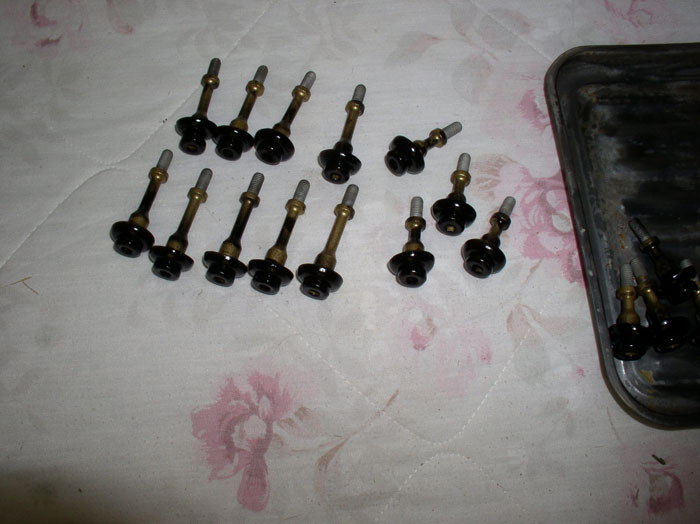
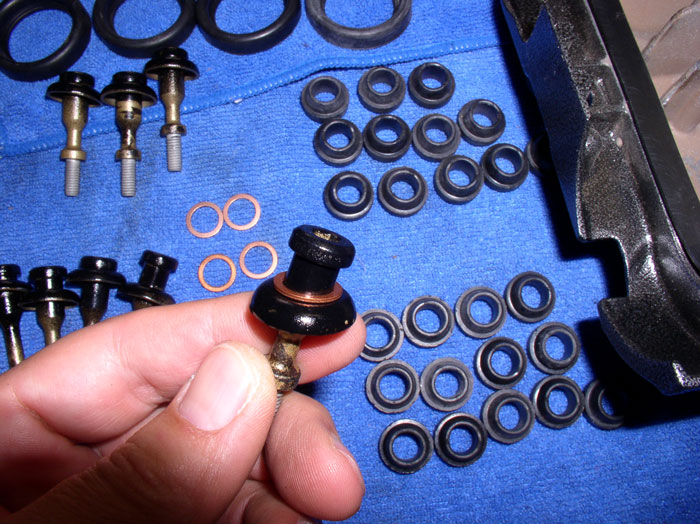
The gasket set for the cam covers should come with 12 sealing rings for the cam cover bolts - six seals for each cover. The sealing rings are to be installed on the bolts at the locations depicted on the picture below. All bolts on the bottom row get the seals (which includes 2 short bolts and 2 long bolts) and the 2 end bolts on the middle row (both are long bolts). According to the service bulletin, these seals help provide additional clamping pressure on the cam cover to the cylinder head. Based on their location, these 6 bolts would appear to have the most contact with oil and therefore would benefit from the extra clamping pressure. Thanks to an insightful observation from Dave C. and Bill Ball, Porsche seems to have been inconsistent with the use of the sealing rings especially in later year S4s. Most '87s have the sealing rings and even '88s but after that, the sealing rings are not commonly found on '89s and non-existent on 90+. Therefore, if your cam cover has never been taken off since the factory installation, it's best to note which bolts had the sealing rings (if any) and ensure the seals go back on the same bolts. If your cam covers have been taken off by previous owners/mechanics and the seals don't show up in the following recommended pattern, I would recommend placing the seals in the pattern as instructed by the service bulletin - especially if its an '87.
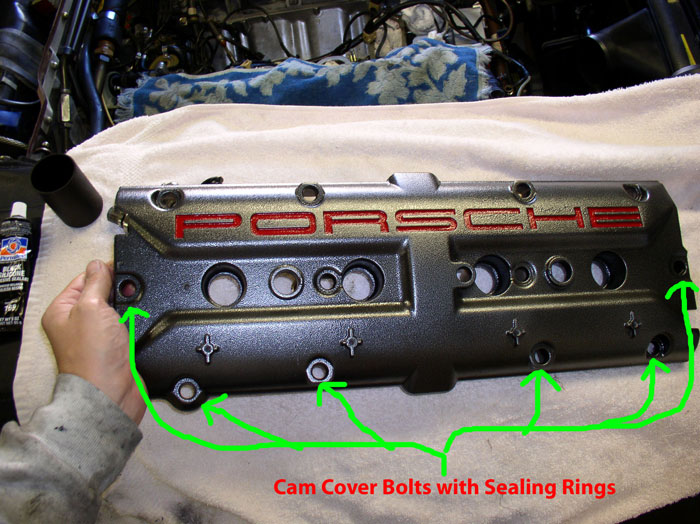
Pre-assemble the 6 bolts with the sealing rings as shown. Two short bolts and 4 long bolts get the seal.
Next, you can lubricate the thrust washer (rubber cam bolt bushings). Thanks to some great tips from forum members, you have several options on what kind of lubricant to use. Some available choices are PBR Rubber Grease (thanks, Hilton), Super Lube Synthetic Grease or Vasaline (thanks, Bill), silicone lube that is sensor safe, or plain old motor oil. What ever you use, apply it sparingly and ensure it's sensor safe (for silicone based lubricants).
The prepared bolts should look like this when ready to install (for the 6 with seals). Pre-assemble all 13 bolts for the passenger cam cover.
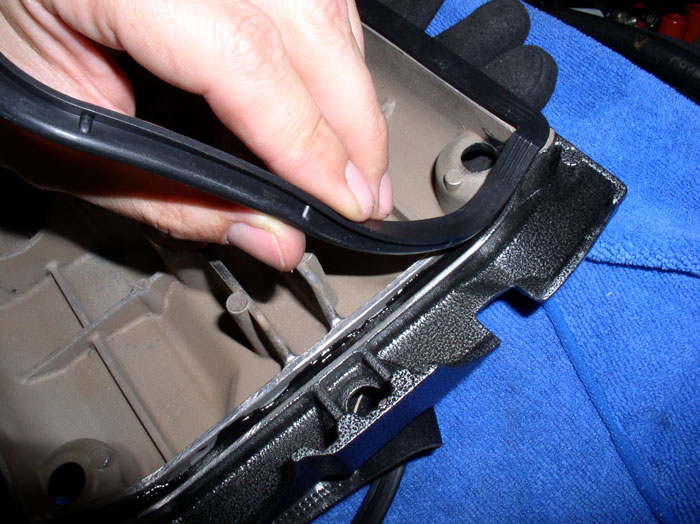
Next, prepare the cam cover with gasket. Since my cam cover and old gasket showed signs of a rubber-like sealant/adheasive used in the channel, I followed the example and applied a light coat of sensor safe gasket maker (Permatex, Ultra Black) in the channel as shown.
Then carefully lay in the gasket ensuring the moulded parts of the gasket match with their counterparts on the cam cover.
My spark plug seals that came out also had the same type of sealant/adheasive on them so I followed the example again on these gaskets. Apply a small amount of the same sensor safe gasket maker on the cam cover seat for the spark plug gasket.
Install the spark plug gasket. Repeat for the other 3 spark plug gaskets.
My old spark plug gaskets also had adheasive/sealant applied to the top surface of the gasket. So I followed suit. I could not find anything in the WSM that gives this instruction (or instruction on using the adheasive/sealant on any of the cam cover gaskets - only on the 4 corners of the cylinder head mating surface). Therefore, I would put it in the category of personal preference but not required. I liked the idea of having the adheasive/sealant on the cam cover side to help retain the gaskets on installation. I'm not sure if having the adheasive/sealant on top of the spark plug gaskets provides benefit.
Next, apply a dab of the sensor safe gasket maker in the four corners of the cylinder head mating surface as shown. The bottom two corners are a little tricky due to the angle and limited space to see.
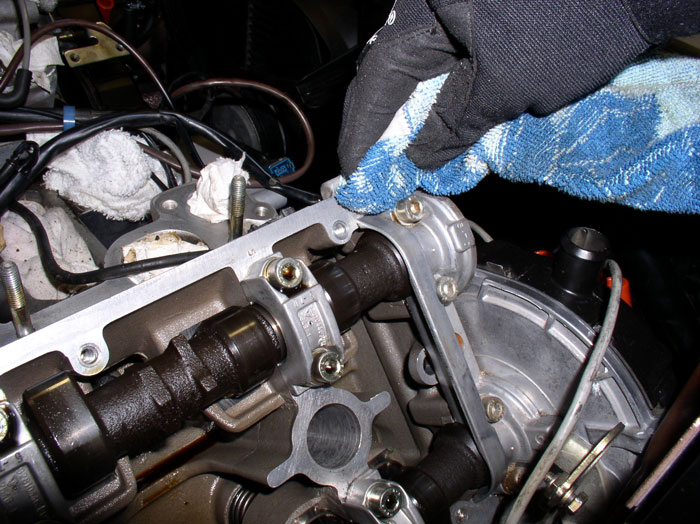
Now, manuever the cam cover into place as you did in the dry run. Make sure the gaskets all mate up to their mating surfaces on the cylinder head. On this passenger installation, I didn't catch the fact that I had somehow dislodged the gasked from the left side (rear of the engine end) of the cam cover. I had put everything put back together and when I started the engine, it ran like crap. Traced the vacuum leak to the cam cover gasket - huge leak. Had to take the cam over off and reseat the gasket and re-install. All better after that.
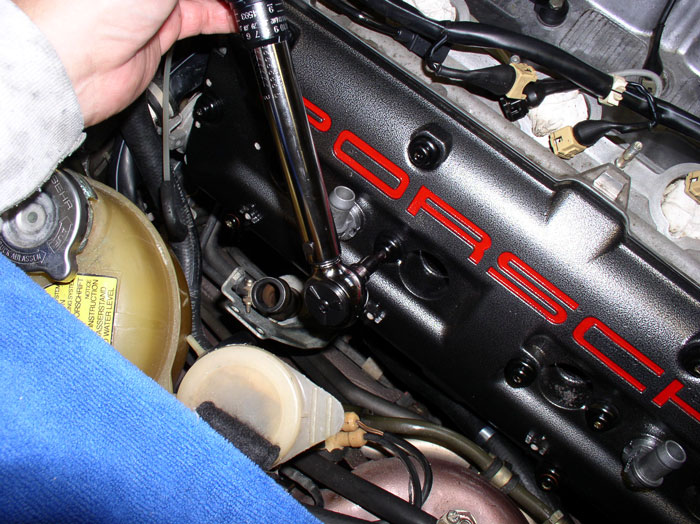
Begin installing the cam cover bolts you pre-assembled. Install the 6 with sealing rings as previously discussed. The 4 smaller bolts go in the 4 corners of the cam cover. Finger tighten all the bolts first. Then, follow up with the torque wrench. I started with the torque wrench in the middle row and worked outward. Torque the bolts to 7 ftlbs or 84 inch pounds - I had to use the inch pound torque wrench for these. After the middle row, I did the top row and finally tightened the bottom row. On the passenger side bottom row, I could use the torque wrench on the rear 2 bolts. I had to use the allen key wrench on the front 2 bolts and had to guess at the torque value. Next time, I'm going to buy and use a flex head gear wrench with 5mm allen bit - should go a lot easier - thanks for the tip Dave C., Rob Edwards, and Chris!
continued.....
Then set the spark plug gaskets in place as well.
Manuever the cam cover into place noting the angle that works best. Once you're satisfied, remove the cam cover from the cylinder head and remove the gaskets from the cam cover.
The gasket set for the cam covers should come with 12 sealing rings for the cam cover bolts - six seals for each cover. The sealing rings are to be installed on the bolts at the locations depicted on the picture below. All bolts on the bottom row get the seals (which includes 2 short bolts and 2 long bolts) and the 2 end bolts on the middle row (both are long bolts). According to the service bulletin, these seals help provide additional clamping pressure on the cam cover to the cylinder head. Based on their location, these 6 bolts would appear to have the most contact with oil and therefore would benefit from the extra clamping pressure. Thanks to an insightful observation from Dave C. and Bill Ball, Porsche seems to have been inconsistent with the use of the sealing rings especially in later year S4s. Most '87s have the sealing rings and even '88s but after that, the sealing rings are not commonly found on '89s and non-existent on 90+. Therefore, if your cam cover has never been taken off since the factory installation, it's best to note which bolts had the sealing rings (if any) and ensure the seals go back on the same bolts. If your cam covers have been taken off by previous owners/mechanics and the seals don't show up in the following recommended pattern, I would recommend placing the seals in the pattern as instructed by the service bulletin - especially if its an '87.
Pre-assemble the 6 bolts with the sealing rings as shown. Two short bolts and 4 long bolts get the seal.
Next, you can lubricate the thrust washer (rubber cam bolt bushings). Thanks to some great tips from forum members, you have several options on what kind of lubricant to use. Some available choices are PBR Rubber Grease (thanks, Hilton), Super Lube Synthetic Grease or Vasaline (thanks, Bill), silicone lube that is sensor safe, or plain old motor oil. What ever you use, apply it sparingly and ensure it's sensor safe (for silicone based lubricants).
The prepared bolts should look like this when ready to install (for the 6 with seals). Pre-assemble all 13 bolts for the passenger cam cover.
Next, prepare the cam cover with gasket. Since my cam cover and old gasket showed signs of a rubber-like sealant/adheasive used in the channel, I followed the example and applied a light coat of sensor safe gasket maker (Permatex, Ultra Black) in the channel as shown.
Then carefully lay in the gasket ensuring the moulded parts of the gasket match with their counterparts on the cam cover.
My spark plug seals that came out also had the same type of sealant/adheasive on them so I followed the example again on these gaskets. Apply a small amount of the same sensor safe gasket maker on the cam cover seat for the spark plug gasket.
Install the spark plug gasket. Repeat for the other 3 spark plug gaskets.
My old spark plug gaskets also had adheasive/sealant applied to the top surface of the gasket. So I followed suit. I could not find anything in the WSM that gives this instruction (or instruction on using the adheasive/sealant on any of the cam cover gaskets - only on the 4 corners of the cylinder head mating surface). Therefore, I would put it in the category of personal preference but not required. I liked the idea of having the adheasive/sealant on the cam cover side to help retain the gaskets on installation. I'm not sure if having the adheasive/sealant on top of the spark plug gaskets provides benefit.
Next, apply a dab of the sensor safe gasket maker in the four corners of the cylinder head mating surface as shown. The bottom two corners are a little tricky due to the angle and limited space to see.
Now, manuever the cam cover into place as you did in the dry run. Make sure the gaskets all mate up to their mating surfaces on the cylinder head. On this passenger installation, I didn't catch the fact that I had somehow dislodged the gasked from the left side (rear of the engine end) of the cam cover. I had put everything put back together and when I started the engine, it ran like crap. Traced the vacuum leak to the cam cover gasket - huge leak. Had to take the cam over off and reseat the gasket and re-install. All better after that.
Begin installing the cam cover bolts you pre-assembled. Install the 6 with sealing rings as previously discussed. The 4 smaller bolts go in the 4 corners of the cam cover. Finger tighten all the bolts first. Then, follow up with the torque wrench. I started with the torque wrench in the middle row and worked outward. Torque the bolts to 7 ftlbs or 84 inch pounds - I had to use the inch pound torque wrench for these. After the middle row, I did the top row and finally tightened the bottom row. On the passenger side bottom row, I could use the torque wrench on the rear 2 bolts. I had to use the allen key wrench on the front 2 bolts and had to guess at the torque value. Next time, I'm going to buy and use a flex head gear wrench with 5mm allen bit - should go a lot easier - thanks for the tip Dave C., Rob Edwards, and Chris!
continued.....
01-28-2009, 11:02 AM
#118
Basic Sponsor
Rennlist
Site Sponsor
Rennlist
Site Sponsor
Dwayne,
You seem to be using copper crush washers for the sealing rings - is that correct or is it a trick of the light? The correct sealing rings from Porsche are aluminium not copper. Probably makes no difference or does it?
I also use the sealing rings on all the bolts. Why not?
Roger
You seem to be using copper crush washers for the sealing rings - is that correct or is it a trick of the light? The correct sealing rings from Porsche are aluminium not copper. Probably makes no difference or does it?
I also use the sealing rings on all the bolts. Why not?
Roger
__________________

Does it have the "Do It Yourself" manual transmission, or the superior "Fully Equipped by Porsche" Automatic Transmission? George Layton March 2014
928 Owners are ".....a secret sect of quietly assured Porsche pragmatists who in near anonymity appreciate the prodigious, easy going prowess of the 928."
Does it have the "Do It Yourself" manual transmission, or the superior "Fully Equipped by Porsche" Automatic Transmission?
George Layton March 2014928 Owners are ".....a secret sect of quietly assured Porsche pragmatists who in near anonymity appreciate the prodigious, easy going prowess of the 928."
01-28-2009, 11:52 PM
#119
Rennlist Member
Thread Starter
Join Date: Sep 2007
Location: Ridgecrest, California
Posts: 1,363
Likes: 0
Received 143 Likes
on
28 Posts
Dwayne,
You seem to be using copper crush washers for the sealing rings - is that correct or is it a trick of the light? The correct sealing rings from Porsche are aluminium not copper. Probably makes no difference or does it?
I also use the sealing rings on all the bolts. Why not?
Roger
You seem to be using copper crush washers for the sealing rings - is that correct or is it a trick of the light? The correct sealing rings from Porsche are aluminium not copper. Probably makes no difference or does it?
I also use the sealing rings on all the bolts. Why not?
Roger
Yes, they are the copper sealing rings. They came with the cam cover gasket set. The originals were aluminum but I assumed these were acceptable alternatives. However, I didn't ask so I'm not sure if there is a difference. They seem to be doing fine so far and torqued down with no problems.
Good question on "why not use the sealing rings on all the bolts". I'm not sure. I only had the 12 seals and didn't go to lengths to get more. Maybe something to do with requiring assymetrical clamping force on the cam cover (heavier on the edge most prone to leaking). The service bulletin specifically mentions additional clamping force resulting from using the seals. If you use rings an all the bolts and you don't have leaks, that would blow that theory. Great question - wish I had an answer. Perhaps someone else here might know.
01-29-2009, 12:36 AM
#120
Basic Sponsor
Rennlist
Site Sponsor
Rennlist
Site Sponsor
Dwayne,
Copper seals in this specific size are cheaper than the Porsche AL ones.
What makes the difference between AL and copper in these applications???
Interesting question?
I need to get my head around the need for the extra seals from the point of extra sealing or extra pressure.
Thanks,
Roger
Copper seals in this specific size are cheaper than the Porsche AL ones.
What makes the difference between AL and copper in these applications???
Interesting question?
I need to get my head around the need for the extra seals from the point of extra sealing or extra pressure.
Thanks,
Roger