'87 Intake Removal, Repairs, Installation Procedure (w/pics)


 01-19-2009, 08:37 PM
#48
Addict
Rennlist Member
Rennlist Member
Join Date: Oct 2003
Location: Gone. On the Open Road
Posts: 16,329
Received 1,543 Likes
on
1,007 Posts
On the driver's side, use the socket extension (6") and universal elbow to get at the nuts under the cable mounting bracket.
On the passenger side, one of the intake mounting nuts will require you to remove one of the allen head bolts to the side cover plate. It interferes with getting the socket on the 13mm nut. Remove the side cover plate allen head bolt with a 5mm allen head socket.
On the passenger side, one of the intake mounting nuts will require you to remove one of the allen head bolts to the side cover plate. It interferes with getting the socket on the 13mm nut. Remove the side cover plate allen head bolt with a 5mm allen head socket.
Also, for the cam covers, something like this:
http://www.sears.com/shc/s/p_10153_1...0P?vName=Tools
with hex bits and it is a LOT easier to get to the bottom cam cover bolts.
 01-19-2009, 11:14 PM
#49
Rennlist Member
Thread Starter
Join Date: Sep 2007
Location: Ridgecrest, California
Posts: 1,363
Likes: 0
Received 143 Likes
on
28 Posts
Investing in a set of flex-head gear wrenches obviates the need for u-joints and extensions. And you'll use the flex-head wrenches all the time after you're done with the intake.
Also, for the cam covers, something like this:
http://www.sears.com/shc/s/p_10153_1...0P?vName=Tools
with hex bits and it is a LOT easier to get to the bottom cam cover bolts.
Also, for the cam covers, something like this:
http://www.sears.com/shc/s/p_10153_1...0P?vName=Tools
with hex bits and it is a LOT easier to get to the bottom cam cover bolts.
Two excellent ideas for tools to make the job easier. I think these both would have helped a lot. They are going on my shopping list for my next trip to Sears. THANKS for the tip!!
01-19-2009, 11:28 PM
#50
Rennlist Member
Thread Starter
Join Date: Sep 2007
Location: Ridgecrest, California
Posts: 1,363
Likes: 0
Received 143 Likes
on
28 Posts
......just got back from a day out of town today - now I'm working on the next set of photos of throttle body leak repair - sequencing photos and converting for upload. Should have more posts this week.
THANK YOU ALL for the GREAT comments and tips!!
THANK YOU ALL for the GREAT comments and tips!!
01-19-2009, 11:40 PM
#51
Addict
Rennlist Member
Rennlist Member
Join Date: Oct 2003
Location: Gone. On the Open Road
Posts: 16,329
Received 1,543 Likes
on
1,007 Posts
01-20-2009, 12:03 AM
#52
Archive Gatekeeper
Rennlist Member
Rennlist Member
Just for the sake of oneupsmanship, make it reversible locking flex-head gearwrenches. If you're in tight enough quarters that you need a Gear Wrench AND it needs to flex, you always run the risk of loosening the fastener and then not being able to extricate the wrench and the fastener BTDT with the tensioner bolt..... If you can reverse, at least you can turn the bolt back in far enough to get the wrench out.
01-20-2009, 12:06 AM
#53
Addict
Rennlist Member
Rennlist Member
Join Date: Oct 2003
Location: Gone. On the Open Road
Posts: 16,329
Received 1,543 Likes
on
1,007 Posts
 You know. You're right. Do they make those though?
 01-20-2009, 12:10 AM
#54
Rennlist Member
http://www.gearwrench.com/catalog/wrenches/ratcheting/
Collect them all.
Dwayne, again, thanks for doing this documentation. Its so helpful.
Collect them all.
Dwayne, again, thanks for doing this documentation. Its so helpful.
01-20-2009, 12:34 AM
#55
Rennlist Member
I dreaded the thought of doing this job in the future on my '91.
Now I dread it just a little less.
Thanks for documenting this. Truly excellent work!
Now I dread it just a little less.
Thanks for documenting this. Truly excellent work!
01-20-2009, 06:56 PM
#56
Three Wheelin'

Hi Dwayne
how many fuel lines did you change with the kit from Roger?
I have a 1988 S4.
the kit came with 10 clamps. Im left with 4 extra clamps, which makes 2 more fuel lines. Also, I have most of the long fuel line left.
I changed two fuel lines behind the intake. (I heard there should be 3 ??)
then one with the fittings that connects the two fuel rails from the front.
and the last one is the one that goes over the passenger side cam cover.
01-20-2009, 10:48 PM
#57
Rennlist Member
Thread Starter
Join Date: Sep 2007
Location: Ridgecrest, California
Posts: 1,363
Likes: 0
Received 143 Likes
on
28 Posts
Hi Dwayne
how many fuel lines did you change with the kit from Roger?
I have a 1988 S4.
the kit came with 10 clamps. Im left with 4 extra clamps, which makes 2 more fuel lines. Also, I have most of the long fuel line left.
I changed two fuel lines behind the intake. (I heard there should be 3 ??)
then one with the fittings that connects the two fuel rails from the front.
and the last one is the one that goes over the passenger side cam cover.
how many fuel lines did you change with the kit from Roger?
I have a 1988 S4.
the kit came with 10 clamps. Im left with 4 extra clamps, which makes 2 more fuel lines. Also, I have most of the long fuel line left.
I changed two fuel lines behind the intake. (I heard there should be 3 ??)
then one with the fittings that connects the two fuel rails from the front.
and the last one is the one that goes over the passenger side cam cover.
Like you, I changed a total of 4 lines with Roger's kit. One with bulk hose for the fuel return hose at the fuel cooler. One was a moulded hose with tight radius that went between the rear FPD and FPR. Both of these are behind the intake. I replaced the hose between the two fuel rails at the front of the engine with the hose that already had fittings attached. And the last one was the fuel line above the passenger side cam cover with bulk hose. The '87 also had a moulded fuel return hose that is attached to the rear FPR but that I ordered seprately - it did not come with the kit. I also had bulk hose left over and extra clamps too. Hope this helps.
01-21-2009, 01:29 AM
#58
Rennlist Member
Thread Starter
Join Date: Sep 2007
Location: Ridgecrest, California
Posts: 1,363
Likes: 0
Received 143 Likes
on
28 Posts
If you tested the intake system for vacuum leaks before disassembly and found a leak at the throttle body, now is a good time to repair the leak while you're waiting for the intake and cam covers to come back from the powder coaters.
Unfortunately, I did not test mine before disassembing the intake so I discovered the throttle body leak AFTER I had reassembled everything and installed it back on the car. After pressurizing the intake to 2.5 PSI, I could hear the leak coming from the throttle body but couldn't pinpoint it. Then I used a long wooden match and waived it in the vicinity of the leak and quickly pinpointed the leak at the throttle plate bearings - the leak practically blew the match out!
So everything came off again and here's the steps I used to repair the leak. I made one interesting discovery: Roger's flappy bearings with seals are the same size as the bearings in the throttle plate body. Has anyone else tried to replace the throttle plate bearings with Roger's Flappy bearings?? The results of the repair were EXCELLENT - cured the leak! From now on, I have 4 of Roger's sealed bearings on hand for an intake job (2 for the flappy and 2 for the throttle plate).
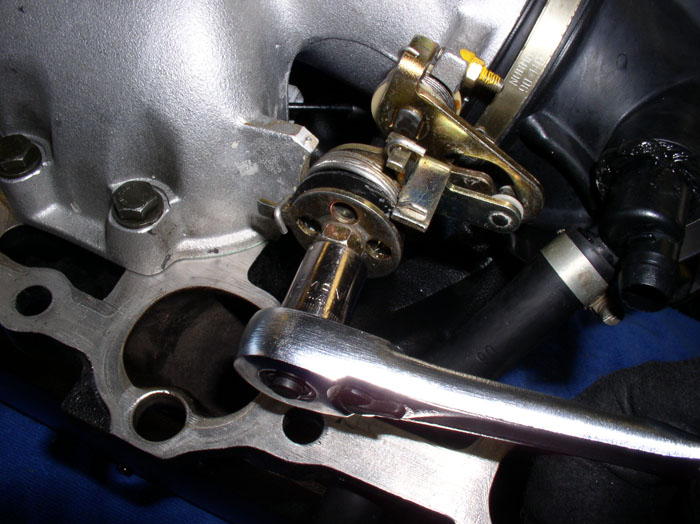
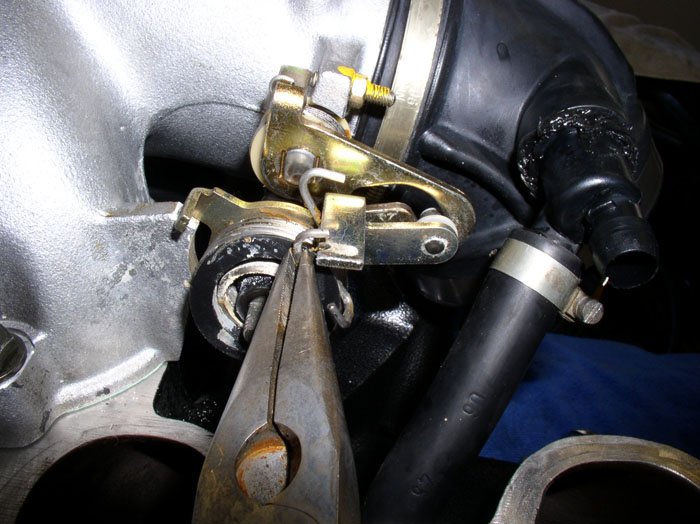
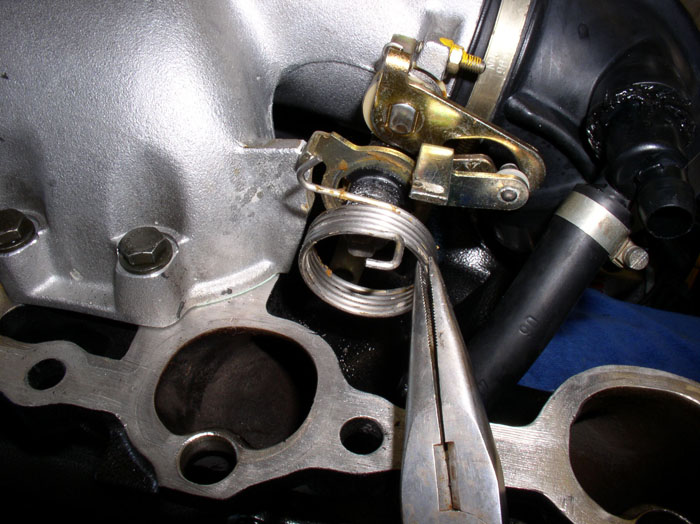
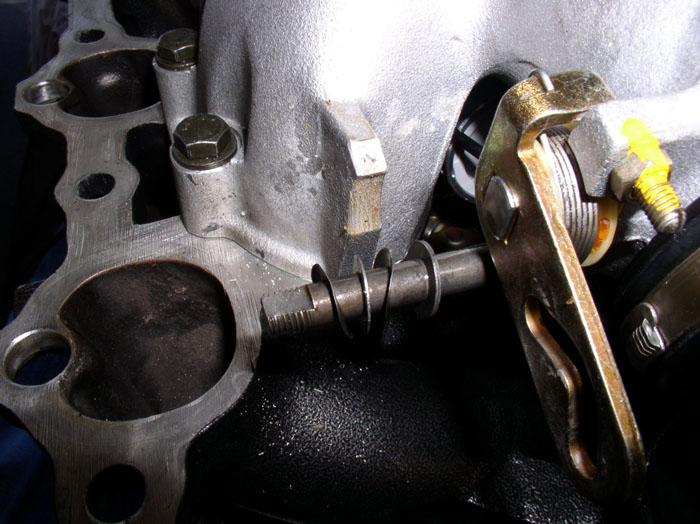
First, remove the 13mm nut and small ribbed washer underneath the nut on the end of the throttle cable spring assembly. As you disassemble these assemblies, keep the parts ordered in the sequence you removed them to ease re-assembly.
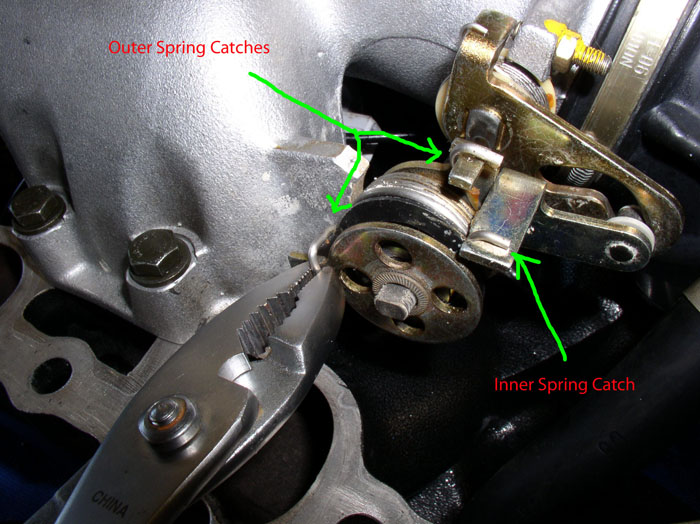
There are 2 springs on this assembly. An outer spring (heavier spring) and an inner spring (lighter, smaller spring - not fully visible). The outer spring catches are identified below as well as one of the inner spring catches. In order to remove the outer metal plate, use pliers to grasp and "unhook" the outer spring from the catch as shown and remove the metal plate.
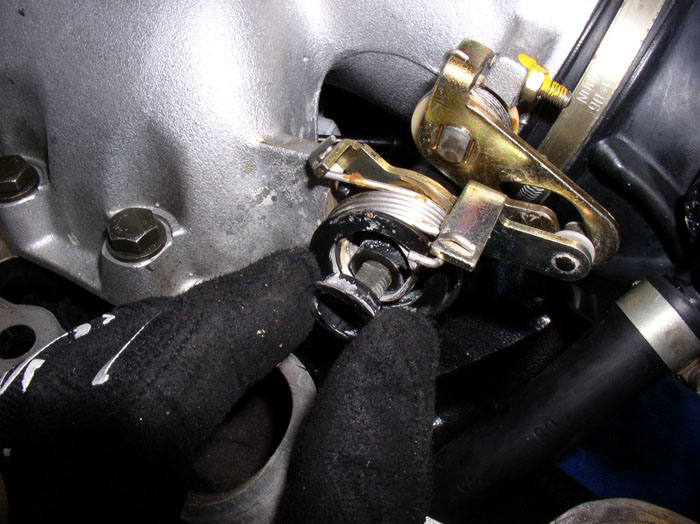
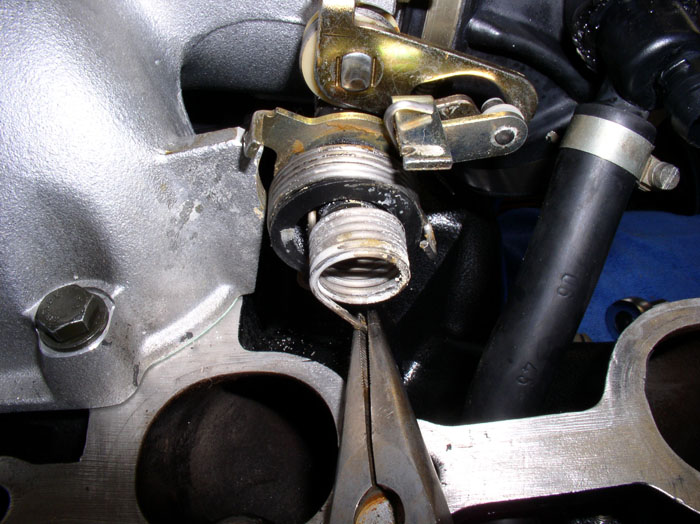
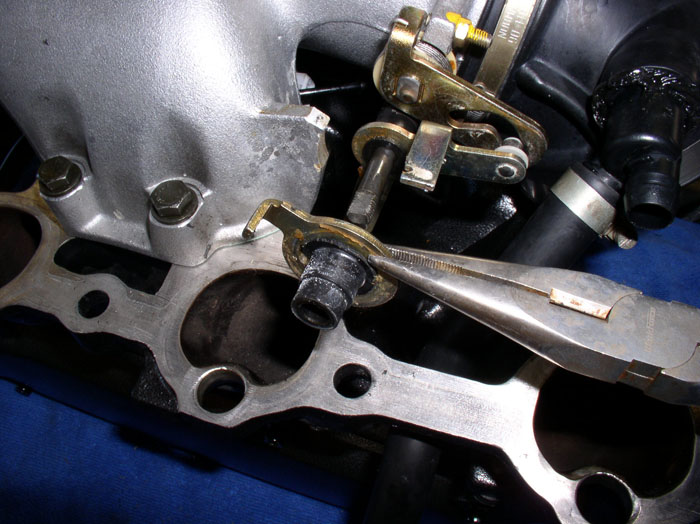
Under the metal plate, you will find a small plastic retainer - remove it. Note the inner spring now visible.
Next, remove the other outer spring catch with pliers as shown.
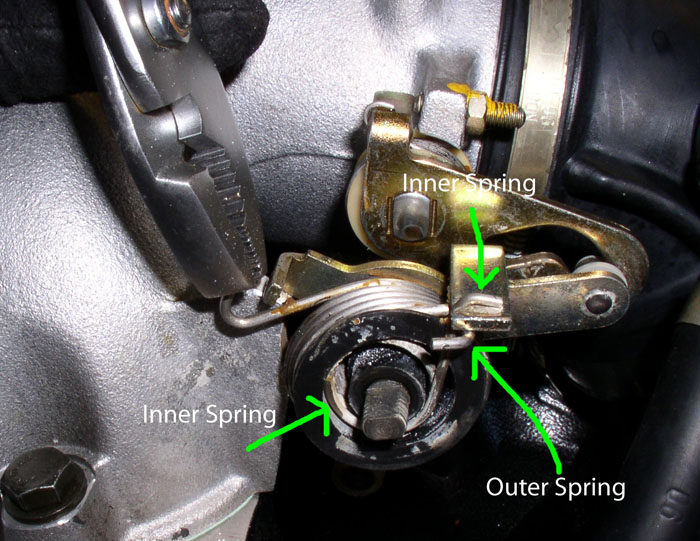
Then remove the inner spring catch using pliers as shown.
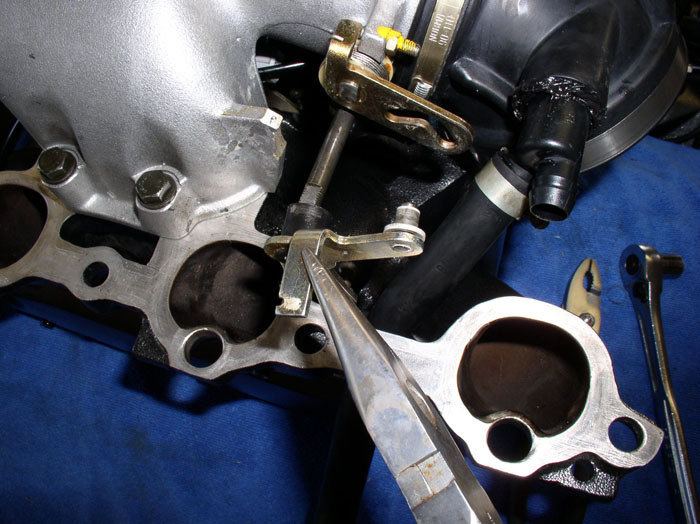
Grab the inner spring with pliers and rotate slightly clockwise to release the catch at the other end and pull out the spring.
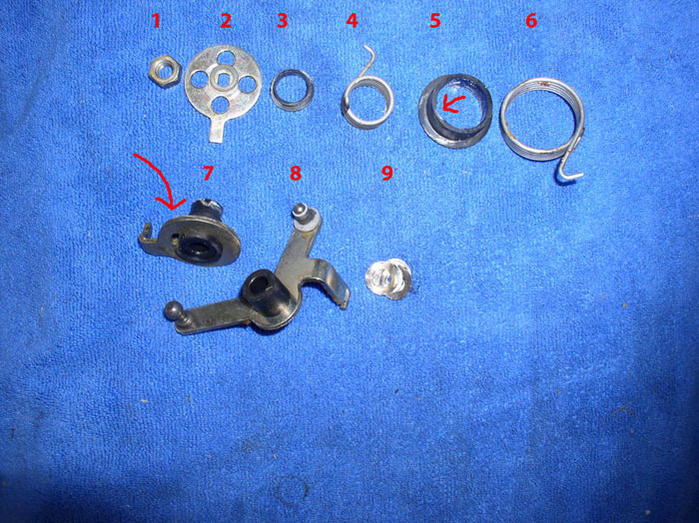
The next assembly should be one piece indicated by the arrows - metal plate, outer spring, and plastic spring carrier. My plastic spring carrier was broke and separated from the metal plate. If yours is still intact, all three of these pieces may come off as a unit. If it's broke like mine, remove them individually starting with the plastic spring carrier as shown.
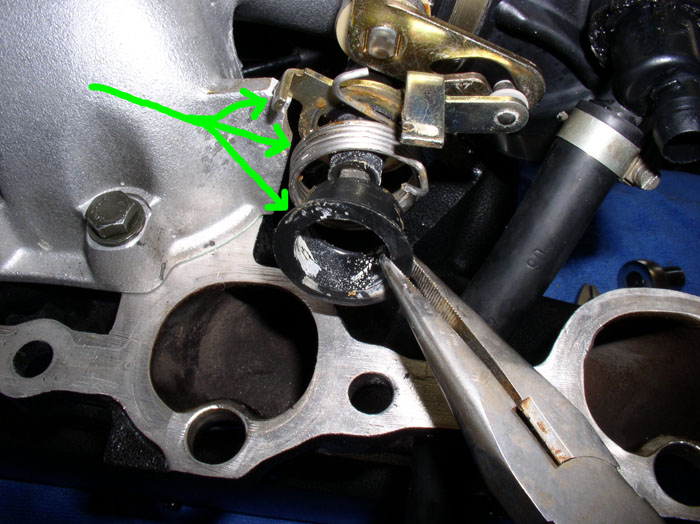
This is what the correctly functioning (i.e., not broke) unit should look like (minus the outer spring).
Remove the outer spring....
...And the metal plate.
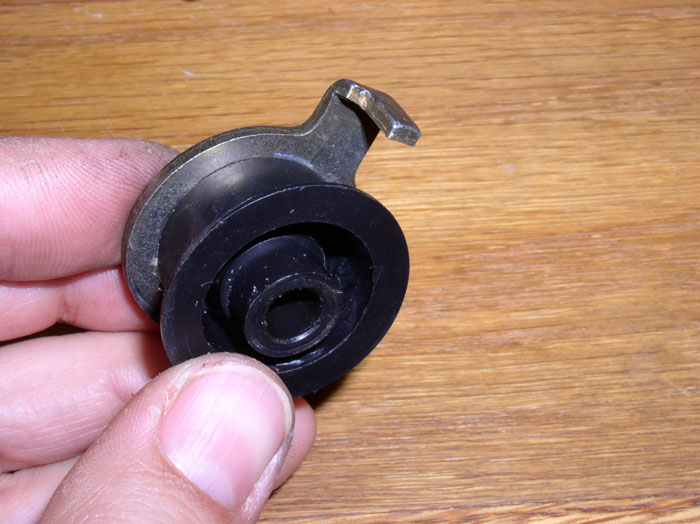
Remove the throttle cable lever arm.
Note the lever arm has a small plastic bushing that rides inside the throttle plate arm. Keep track of this piece and be carefull not to loose it. I kept it on the lever arm the whole time.
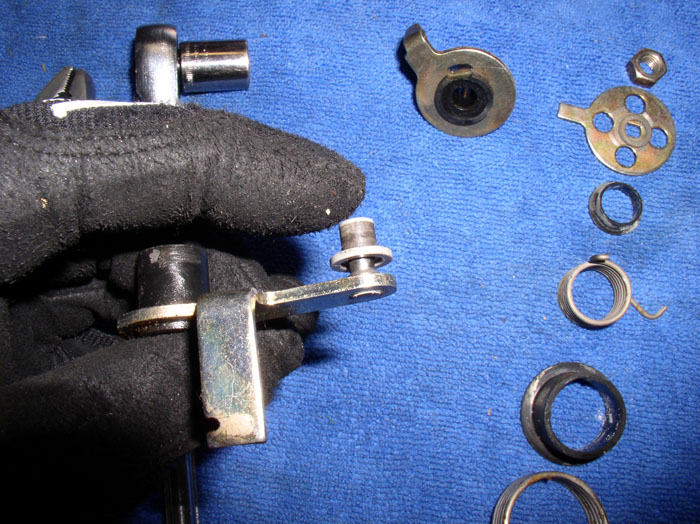
Remove the 4 washers on the spring shaft. Note the order as shown. There are two spring washers and two flat washers.
Here's the order of the parts that were taken off. Also note that item 5 and 7 were originally one piece with the spring (item 6) mounted on the plastic carrier. Also note the arrows on 5 and 7. The plastic spring carrier (#5) has a small notch in it that mates up to the small opening on the metal plate it's supposed to be attached to (#7). The notch and the opening are for the inner spring (item #4) to hook to. We'll look at this more closely upon re-assembly.
continued.....
Unfortunately, I did not test mine before disassembing the intake so I discovered the throttle body leak AFTER I had reassembled everything and installed it back on the car. After pressurizing the intake to 2.5 PSI, I could hear the leak coming from the throttle body but couldn't pinpoint it. Then I used a long wooden match and waived it in the vicinity of the leak and quickly pinpointed the leak at the throttle plate bearings - the leak practically blew the match out!
So everything came off again and here's the steps I used to repair the leak. I made one interesting discovery: Roger's flappy bearings with seals are the same size as the bearings in the throttle plate body. Has anyone else tried to replace the throttle plate bearings with Roger's Flappy bearings?? The results of the repair were EXCELLENT - cured the leak! From now on, I have 4 of Roger's sealed bearings on hand for an intake job (2 for the flappy and 2 for the throttle plate).
First, remove the 13mm nut and small ribbed washer underneath the nut on the end of the throttle cable spring assembly. As you disassemble these assemblies, keep the parts ordered in the sequence you removed them to ease re-assembly.
There are 2 springs on this assembly. An outer spring (heavier spring) and an inner spring (lighter, smaller spring - not fully visible). The outer spring catches are identified below as well as one of the inner spring catches. In order to remove the outer metal plate, use pliers to grasp and "unhook" the outer spring from the catch as shown and remove the metal plate.
Under the metal plate, you will find a small plastic retainer - remove it. Note the inner spring now visible.
Next, remove the other outer spring catch with pliers as shown.
Then remove the inner spring catch using pliers as shown.
Grab the inner spring with pliers and rotate slightly clockwise to release the catch at the other end and pull out the spring.
The next assembly should be one piece indicated by the arrows - metal plate, outer spring, and plastic spring carrier. My plastic spring carrier was broke and separated from the metal plate. If yours is still intact, all three of these pieces may come off as a unit. If it's broke like mine, remove them individually starting with the plastic spring carrier as shown.
This is what the correctly functioning (i.e., not broke) unit should look like (minus the outer spring).
Remove the outer spring....
...And the metal plate.
Remove the throttle cable lever arm.
Note the lever arm has a small plastic bushing that rides inside the throttle plate arm. Keep track of this piece and be carefull not to loose it. I kept it on the lever arm the whole time.
Remove the 4 washers on the spring shaft. Note the order as shown. There are two spring washers and two flat washers.
Here's the order of the parts that were taken off. Also note that item 5 and 7 were originally one piece with the spring (item 6) mounted on the plastic carrier. Also note the arrows on 5 and 7. The plastic spring carrier (#5) has a small notch in it that mates up to the small opening on the metal plate it's supposed to be attached to (#7). The notch and the opening are for the inner spring (item #4) to hook to. We'll look at this more closely upon re-assembly.
continued.....
01-21-2009, 02:20 AM
#59
Archive Gatekeeper
Rennlist Member
Rennlist Member
Jiminy Christmas Dwayne, your timing on this throttle body is perfect- I have a sizeable leak under my intake above 3 psi but can't pinpoint it- all the rubber and vacuum lines are seated fine- I wonder whether it's the rubber sealed bearings. Don't think I've ever seen the throttle body disassembly discussed, let alone illustrated and outlined in a Dwaynesque fashion.
The REAL trick will be to find part #'s for all those plastic bits that don't exist in PET when I break them taking mine apart.....
The REAL trick will be to find part #'s for all those plastic bits that don't exist in PET when I break them taking mine apart.....
01-21-2009, 12:18 PM
#60
Chronic Tool Dropper
Lifetime Rennlist
Member
Lifetime Rennlist
Member

Dwayne--
I'm planning to do my intake soon for hose refurb and painting. I really appreciate the amount of time and effort needed to do the job, and know that it takes somewhere near 2x that time when you have to stop, clean everything and scrub your hands, take some pictures, then on to next step. Your efforts are very much appreciated!
I'm planning to do my intake soon for hose refurb and painting. I really appreciate the amount of time and effort needed to do the job, and know that it takes somewhere near 2x that time when you have to stop, clean everything and scrub your hands, take some pictures, then on to next step. Your efforts are very much appreciated!