HVAC blower removal and clean-up + Cleaning the Evaporator
 01-28-2007, 11:38 PM
#1
Addict
Rennlist Member
Rennlist Member
Thread Starter
My heater/ac blower has been making noises for quite a while, and eventually would only run on high speed. Time to replace it and the resistor pack.
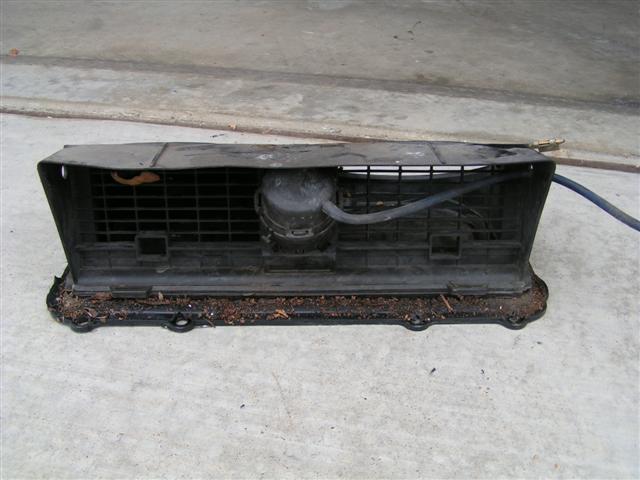
Step One: Remove hood. Easy to do, one person job. I scribed the location of the hinge on the hood before unbolting it. Here's the blower about to come out:

Step Two: Remove passenger side wiper, remove bolt (near back corner of hood), and screw (in front of lower corner of windshield) from passenger side of cowl. This allows you to lift the cowl slightly to get blower out.
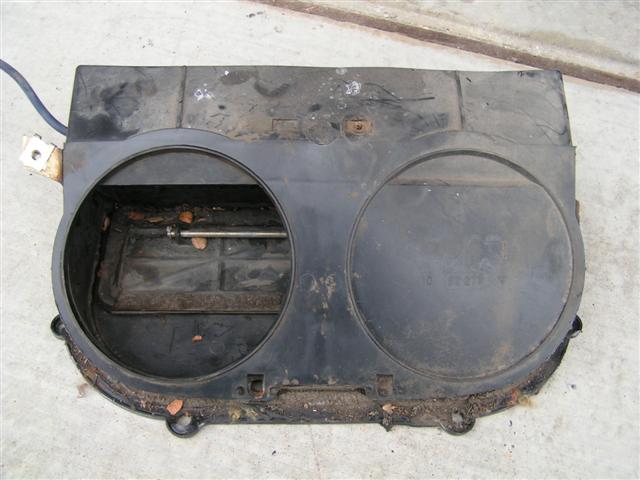
Step Three: Un-plug and un-bolt blower. There is one small bolt on front of blower, one inside the rubber boot, and one that is accessed from inside the passenger footwell. The footwell bolt is just behind the glove box, lay on your back to see it. Now you can maneuver the blower motor out, might take a little wiggling. Here's what it looks like with blower out:
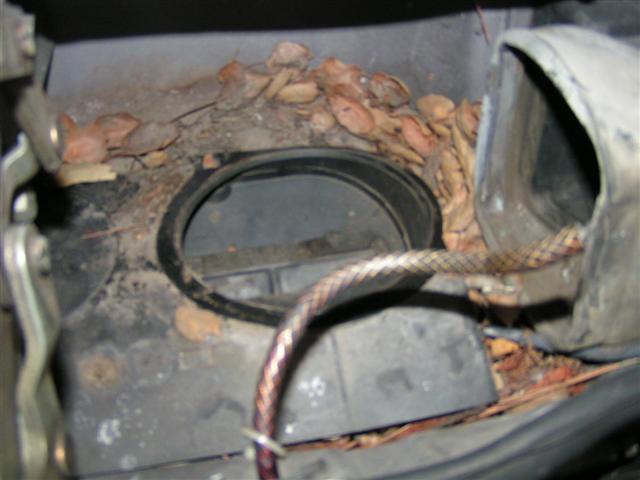
Step Four: Clean out years of accumulated leaves and crap. Here's my pile:
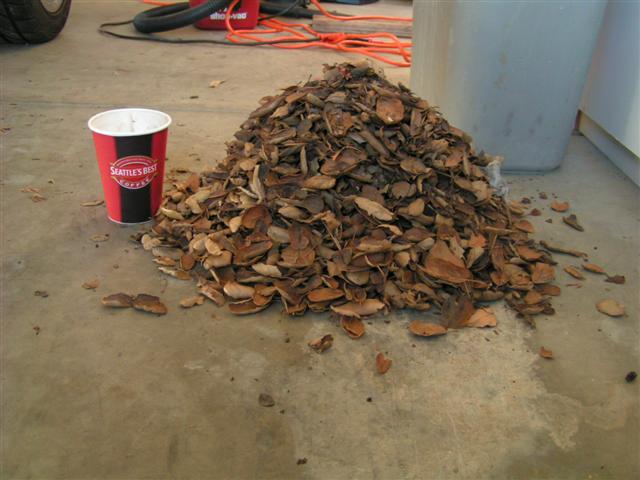
I was amazed at just how much was in there. Get your arm all the way back inside the fender, reach up under the rubber boot, and use a long screwdriver to push out the crap between the firewall and hvac-airbox. Look inside the rubber boot towards the heater/ac core for leaves and crap too. This blurry pic shows the core and resistors:

I removed the resistors, and wasn't surprised to find this:

Time for a new resistor. I'll also try to repair/replace the vacuum actuator for the footwell flap which hasn't been working either.
Overall, this is a simple job (so far). The old blower makes a horrible squeeking noise, the replacement is nice and quiet. I'll need to get a replacement resistor and check out the vacuum actuator before putting it all back together next weekend.
Rich
Step One: Remove hood. Easy to do, one person job. I scribed the location of the hinge on the hood before unbolting it. Here's the blower about to come out:
Step Two: Remove passenger side wiper, remove bolt (near back corner of hood), and screw (in front of lower corner of windshield) from passenger side of cowl. This allows you to lift the cowl slightly to get blower out.
Step Three: Un-plug and un-bolt blower. There is one small bolt on front of blower, one inside the rubber boot, and one that is accessed from inside the passenger footwell. The footwell bolt is just behind the glove box, lay on your back to see it. Now you can maneuver the blower motor out, might take a little wiggling. Here's what it looks like with blower out:
Step Four: Clean out years of accumulated leaves and crap. Here's my pile:
I was amazed at just how much was in there. Get your arm all the way back inside the fender, reach up under the rubber boot, and use a long screwdriver to push out the crap between the firewall and hvac-airbox. Look inside the rubber boot towards the heater/ac core for leaves and crap too. This blurry pic shows the core and resistors:
I removed the resistors, and wasn't surprised to find this:
Time for a new resistor. I'll also try to repair/replace the vacuum actuator for the footwell flap which hasn't been working either.
Overall, this is a simple job (so far). The old blower makes a horrible squeeking noise, the replacement is nice and quiet. I'll need to get a replacement resistor and check out the vacuum actuator before putting it all back together next weekend.
Rich

The following users liked this post:
Dmhager (12-23-2021)
01-29-2007, 12:58 AM
#2
Team Owner
Rich before you bolt that blower back together i would suggest that you remove the lower half of the blower box and reseal it with some 3M strip caulk the hardest part of the job is done, also check the blower box for a leaking vacuum pot now is the time to replace it, Stan
By the way is you car always parked under trees? I have never seen that big a pile of leaves come out of a cowl
By the way is you car always parked under trees? I have never seen that big a pile of leaves come out of a cowl
01-29-2007, 11:14 AM
#4
Team Owner
By the way great pictures and a wonderful writ up thanks for taking the time, if you do a reseal would you also include the pictures from the lower half of the blower box?? Thanks again, Stan
 01-29-2007, 12:26 PM
#6
Craic Head
Lifetime Rennlist
Member
Lifetime Rennlist
Member
Rich,
Cool write-up and pics. I need to do this too. One thing I might add as a WYAIT is the hood liner. This is the only other job that I need to do while the hood is off and can be done in a relatively short period of time. So if anyone is going in for one, they might want to consider the other.
Cool write-up and pics. I need to do this too. One thing I might add as a WYAIT is the hood liner. This is the only other job that I need to do while the hood is off and can be done in a relatively short period of time. So if anyone is going in for one, they might want to consider the other.
01-29-2007, 01:24 PM
#7
Addict
Rennlist Member
Rennlist Member
Thread Starter
As Stan mentioned, I'll pull the lower portion of the blower box. Hopefully the old sealant will let go easily.
The leaves were from the P.O. The car sits in the garage at my house. Everyone should try to clean out this area regularly, as there is a water drain in the firewall. If this drain is clogged with crap, the water will accumulate and eventually my leak throught the box seal, into the passenger footwell and onto the electrical panel.
Rich
Trending Topics
01-29-2007, 01:33 PM
#8
Addict
Lifetime Rennlist
Member
Lifetime Rennlist
Member
Also, get a toothbrush..or the likes, reach in and gentley scrub the face of the evaporator. A brush attatchment on a vacuum works good if you can get it in there. There will be 18years of debris..fuzz..dust and dirt wedged on it. Think of your clothes dryer fuzz trap after 18years!! Your blower airflow will increase dramatically! You also may be able to get a blast of air INTO the center vent area from a compressor and blow the debris off the face. either way make an attempt to clean it after the steps you have taken already! 
01-29-2007, 01:50 PM
#9
Addict
Rennlist Member
Rennlist Member
Thread Starter
Tony's right, the face of the evaporator is dirty/dusty with grime. A toothbrush is a good idea, and I'll remove the center vent to see if I can get my air compressor to "back-flush" the evap. Hmmm, maybe stick the shop-vac hose in the front section while I blow the compressed air through the center vent.....
Rich
Rich
01-31-2007, 06:17 PM
#10
Addict
Rennlist Member
Rennlist Member
Thread Starter
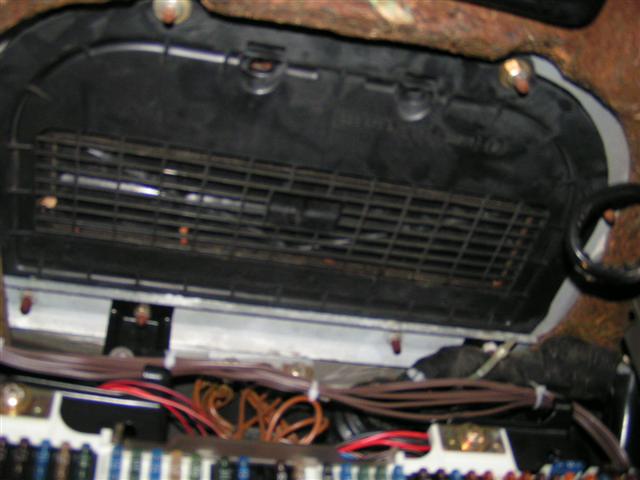
Today I removed the HVAC airbox in the passenger footwell. First, disconnect the battery, as you will have to un-bolt and move the fuse panel. Remove the wood panel, both top and bottom sections. Then unscrew the fuse panel to allow it to move. The airbox is held in place by several 10mm nuts above the fuse panel. The fuse panel is attached to a metal support bracket, which has to be un-bolted at the top and bottom. This allows the bracket to be adjusted out of the way of the airbox. Once the airbox nuts are removed and the fuse panel/brackets are moved out of the way, the airbox is removed downward into the passenger footwell. Mine was sealed with a fair amount of black caulking, so I used a metal putty knife to carefully break the seal. The airbox can then be carefully pushed down into the footwell. Here's some pics:
Lower/bottom section of HVAC airbox above fuse panel
Airbox removed, you can clearly see the bolts that hold the airbox in place.
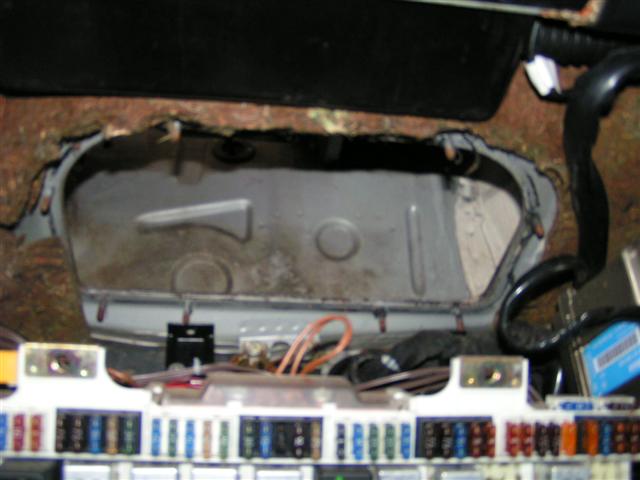
Looking down from front of windshield into footwell

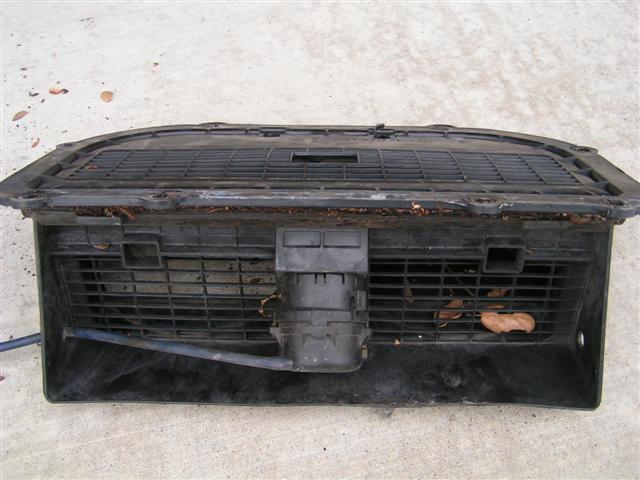
Here's the airbox after removal. The hvac blower bolts to the top, over the hole
This is the rear of the airbox, showing the vacuum actuator. The box must be removed in order to access the vac actuator. Mine does't work, so it's getting replaced.
Another shot of the rear of the airbox, turned upside down
A couple notes:
I was able to remove the old black caulking from the airbox, and will reseal with some new caulking.
Clean out the area around the airbox, as I mentioned in the previous post, BEFORE you remove the airbox. Otherwise, that huge pile of leaves would have fallen down onto the fuse panel.
Once I get the replacement parts, I'll detail the re-assembly.
Rich
Lower/bottom section of HVAC airbox above fuse panel
Airbox removed, you can clearly see the bolts that hold the airbox in place.
Looking down from front of windshield into footwell
Here's the airbox after removal. The hvac blower bolts to the top, over the hole
This is the rear of the airbox, showing the vacuum actuator. The box must be removed in order to access the vac actuator. Mine does't work, so it's getting replaced.
Another shot of the rear of the airbox, turned upside down
A couple notes:
I was able to remove the old black caulking from the airbox, and will reseal with some new caulking.
Clean out the area around the airbox, as I mentioned in the previous post, BEFORE you remove the airbox. Otherwise, that huge pile of leaves would have fallen down onto the fuse panel.
Once I get the replacement parts, I'll detail the re-assembly.
Rich
02-03-2007, 11:19 PM
#11
Addict
Rennlist Member
Rennlist Member
Thread Starter
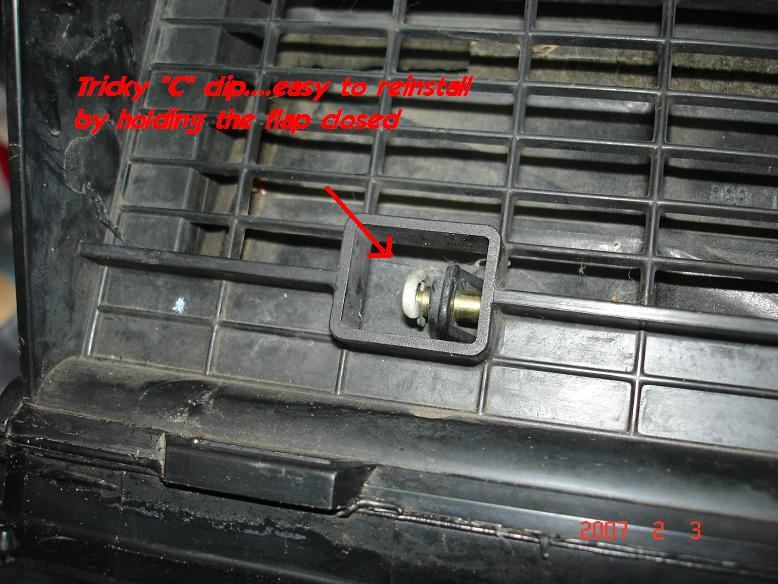
Today Brian (IcemanG17) stopped by to help put everything back together. His airbox flap vac actuator is also kaput, so we'll do this job on his car in a couple weeks. First step was to remove old vac actuator and install new one. The old one connects to the flap via an internal arm and a metal rod on the flap.
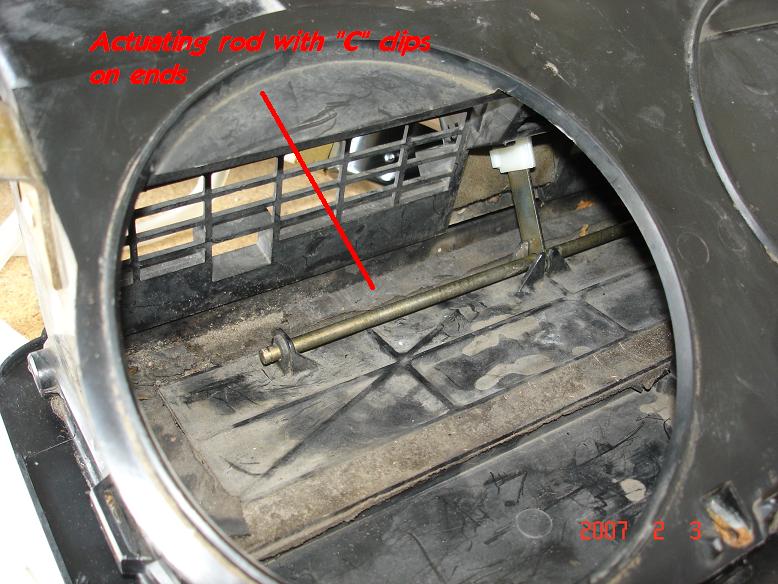
The rod has a couple "c" clips that need to be removed, then the rod can slide off the actuator arm. Remove actuator and install new one in reverse order. The "c" clip in the closed end of the airbox can be installed by pulling open the flap and installing clip from the rear of box. There is even a convenient hole for this.
Next, apply new sealant to the airbox lip ( I used black silicone sealant), and carefully lift into place. It's much easier with an extra person to lift/hold it from above. The new resistor was of the later style, so I modified the plug wiring as detailed in the Nichols site (basically remove plug #8, and move plug #6 to the #8 spot). We tested everything before installing the fan. etc., and found everything worked correctly.

Time to button everything up, while Brian tested and corrected the vac lines on the hvac head unit. I seem to have a leaking defrost vac actuator, but now the airbox/recirc flap works. We even re-installed and lined up the hood. Thanks for the help Brian!
Rich
The rod has a couple "c" clips that need to be removed, then the rod can slide off the actuator arm. Remove actuator and install new one in reverse order. The "c" clip in the closed end of the airbox can be installed by pulling open the flap and installing clip from the rear of box. There is even a convenient hole for this.
Next, apply new sealant to the airbox lip ( I used black silicone sealant), and carefully lift into place. It's much easier with an extra person to lift/hold it from above. The new resistor was of the later style, so I modified the plug wiring as detailed in the Nichols site (basically remove plug #8, and move plug #6 to the #8 spot). We tested everything before installing the fan. etc., and found everything worked correctly.
Time to button everything up, while Brian tested and corrected the vac lines on the hvac head unit. I seem to have a leaking defrost vac actuator, but now the airbox/recirc flap works. We even re-installed and lined up the hood. Thanks for the help Brian!
Rich
02-03-2007, 11:37 PM
#12
Addict
Rennlist Member
Rennlist Member
Rich,
Thank you for posting the pics and the steps, very helpful. I know I will be doing this job eventually as well, resistor seems to overheat at times. Still can't believe how many leaves came out of there!
Thank you for posting the pics and the steps, very helpful. I know I will be doing this job eventually as well, resistor seems to overheat at times. Still can't believe how many leaves came out of there!
02-04-2007, 01:21 AM
#13
Team Owner
by the way you dont have to remove the flap control rod . Just open the white connector on your new vacuum actuator and the clamp will be able to be transferred to the old actuator arm its really easy to do this instead of removing the flap unless your going to replace the foam seal on the flap door
02-04-2007, 02:18 PM
#14
Race Director
Originally Posted by Mrmerlin
by the way you dont have to remove the flap control rod . Just open the white connector on your new vacuum actuator and the clamp will be able to be transferred to the old actuator arm its really easy to do this instead of removing the flap unless your going to replace the foam seal on the flap door
I was thinking about this.......so in theory you could replace it in the car without pulling the entire grate? Just remove the blower-hood and do it from there....??
Rich
No problem......I had to post about it myself (shocker)......Mines next!!