S4/GT/GTS Brake Light Upgrade Mod
 01-27-2007, 08:21 PM
#1
Drifting
Thread Starter

I'm working on adding some additional brake lights to my 90' S4.
The stock tail light assembly has only one brake light. However, each assembly has three tail lights. Only one of the tail lights works also as a brake light.
So, my plan is replace the two single filament sockets with new dual filament type sockets.
You could just buy some tail light harnesses from Porsche, but each harness only includes one dual filament socket, so you'd have to buy four harnesses to get enough socket to do both sides. That approch would be very expensive.
So I'm modifying a low cost socket for another vehicle to make it fit the 928. These vehicle specific sockets are about $5-$10 each at auto parts suppliers.
Here's a photo of my first prototype sockets installed.

 01-27-2007, 08:44 PM
#4
Drifting
Thread Starter
I have already figured out how to defeat the bulb control module. In this thread, I posted the "how to":
https://rennlist.com/forums/showthre...t=bulb+control
https://rennlist.com/forums/showthre...t=bulb+control
01-27-2007, 09:03 PM
#6
Owns the Streets
Needs Camber
Lifetime Rennlist
Member
Needs Camber
Lifetime Rennlist
Member
Had pondered the same mod with LED bulbs since I've been upgrading the rear cluster to LED's.
Looking forward to seeing the final mod.
Saw a 996 brake the other day and Porsche seem to like using the 2 inner-most lights as brake lights.
Ernest (NYC)
Looking forward to seeing the final mod.
Saw a 996 brake the other day and Porsche seem to like using the 2 inner-most lights as brake lights.
Ernest (NYC)
01-28-2007, 12:53 AM
#7
Chronic Tool Dropper
Lifetime Rennlist
Member
Lifetime Rennlist
Member

Originally Posted by borland
I'm working on adding some additional brake lights to my 90' S4.
<<...>>
So I'm modifying a low cost socket for another vehicle to make it fit the 928. These vehicle specific sockets are about $5-$10 each at auto parts suppliers.
<<...>>
So I'm modifying a low cost socket for another vehicle to make it fit the 928. These vehicle specific sockets are about $5-$10 each at auto parts suppliers.
Can you share more info on what sockets you used or what car they are built for? Part no. would be cool. My thinking is that I can enable the ROW rear fog light function with the correct dual-filament socket and bulb as a replacement for one of the single-filament parts.
Trending Topics
01-28-2007, 01:01 AM
#8
Drifting
Thread Starter
The tail light harnesses I'm using are from:
1993-1995 Mercury Villager, or
1993=1995 Nissan Quest
Any automotive parts store should sell them, however NapaOnline may have the best price (online price of $10.59). here:
http://www.napaonline.com/MasterPage...Socket+Harness
Napa price is for a package of two harness, which is four sockets. That's enough to do two tail lights.
Here's how to modify them to fit the S4/GT/GTS tail light assembly:
Remove the tubing and connector housing as shown.

With a sharp razor knife like shown, trim the straight tab. The trick is to cut the plastic like cutting slices of bread. Thin slices, not big cuts, working your way along.
Note: The following photos show the before and after plugs side by side.

Now start trimming the tabs that will hold the socket in the lamp assembly. Trim from the side shown, until you get to the dimension shown on the caliper.

Keep going, do the same for the other side. Then, trim them down some more to the width shown here.

Finally, you need to carefully cut the inside edge to achieve this clearance:

Now for the gasket. I'm using 2 mil thick closed-cell foam. They sell this stuff at crafts stores in 8-1/2x11 sheets in various colors. About $1 sheet.
I used a socket to draw the inside diameter. Using scissors, cut the inside, place the gasket on the prepared socket, and cut the outside diameter.

That's it. Later I'll detail the wiring harness.
---------
Update - Here's an update showing how to convert the dual filament socket to single.

I purchased the BA15s socket can from autolumination.com (part number 62-29, $2.49USD each). These just fit the plastic plastic housing without any modification.
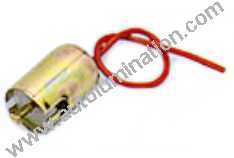
Here's the back sides showing the dual and single filament sockets. Notice how both versions have three wires. The single filament socket has two ground wires (brown).

This diagram shows how the factory wiring harness routes the ground wires to each bulb socket. Notice how the single filament sockets require two ground wires.

So, the single filament wiring with two ground wires can be added with a single length of 18 gauge stranded wire, with the insulation cover removed on the length (3/4").

The wire is routed through the two holes, while the bare wire is wedged between the plastic housing and the metal can. Make sure you grease (dielectric) the red wire where it slips through the black rubber seal in order to accomodate good movement of the center contact with the bulb.

1993-1995 Mercury Villager, or
1993=1995 Nissan Quest
Any automotive parts store should sell them, however NapaOnline may have the best price (online price of $10.59). here:
http://www.napaonline.com/MasterPage...Socket+Harness
Napa price is for a package of two harness, which is four sockets. That's enough to do two tail lights.
Here's how to modify them to fit the S4/GT/GTS tail light assembly:
Remove the tubing and connector housing as shown.
With a sharp razor knife like shown, trim the straight tab. The trick is to cut the plastic like cutting slices of bread. Thin slices, not big cuts, working your way along.
Note: The following photos show the before and after plugs side by side.
Now start trimming the tabs that will hold the socket in the lamp assembly. Trim from the side shown, until you get to the dimension shown on the caliper.
Keep going, do the same for the other side. Then, trim them down some more to the width shown here.
Finally, you need to carefully cut the inside edge to achieve this clearance:
Now for the gasket. I'm using 2 mil thick closed-cell foam. They sell this stuff at crafts stores in 8-1/2x11 sheets in various colors. About $1 sheet.
I used a socket to draw the inside diameter. Using scissors, cut the inside, place the gasket on the prepared socket, and cut the outside diameter.
That's it. Later I'll detail the wiring harness.
---------
Update - Here's an update showing how to convert the dual filament socket to single.
I purchased the BA15s socket can from autolumination.com (part number 62-29, $2.49USD each). These just fit the plastic plastic housing without any modification.
Here's the back sides showing the dual and single filament sockets. Notice how both versions have three wires. The single filament socket has two ground wires (brown).
This diagram shows how the factory wiring harness routes the ground wires to each bulb socket. Notice how the single filament sockets require two ground wires.
So, the single filament wiring with two ground wires can be added with a single length of 18 gauge stranded wire, with the insulation cover removed on the length (3/4").
The wire is routed through the two holes, while the bare wire is wedged between the plastic housing and the metal can. Make sure you grease (dielectric) the red wire where it slips through the black rubber seal in order to accomodate good movement of the center contact with the bulb.
Last edited by borland; 09-22-2011 at 08:52 PM.
02-10-2007, 12:44 AM
#10
Drifting
Thread Starter
Here's some pictures of the wiring harness modifications...
factory harness Black wire is the brake light, connect that to the two green wires.
factory harness Red and Green wires are tail lights, connect them to the orange wires
factory harness brown wires are ground, connect them to black.


factory harness Black wire is the brake light, connect that to the two green wires.
factory harness Red and Green wires are tail lights, connect them to the orange wires
factory harness brown wires are ground, connect them to black.
Last edited by borland; 09-22-2011 at 03:03 PM.
02-10-2007, 12:53 AM
#11
Drifting
Thread Starter
Some photos of the LEDs in operation.... Left side is the LEDs, right side is stock incandesant bulbs. In all cases, the tail lights are on.
Photos don't show well. The camera is more sensitive to orange light.
Basically...
- TAIL LIGHTS are equally bright as incandesant
- individual BRAKE LIGHTS are less bright than the incandesant, but now with with more brake lights, it actually looks brighter overall.
- With the garage door closed and the car inside, the three LED brake lights project more light on the door than the one incandesant brake light.
- LED lights are true red in color, no orange cast like the incandesant
- just for fun, I used my camera to make a movie of the brake lights operating on/off. Very notice able how fast the LEDs come on and go off as compared with the incandesant. Fun to move frame by frame and see the difference.

Here's the LEDs I'm using:
http://cgi.ebay.com/ebaymotors/1157-...4787QQtcZphoto
The 3 watt Luxeon 1157's that I sampled were too bright on low which may not be safe for brake lights.
Right now, I don't think I'm ready for LED turn signals. They aren't bright enough for me. I think you really need 5 watt Luxeons, and only 3 watt Luxeons are available now. They must be coming, cause they are already selling flashlights with the 5 watt luxeons
http://cgi.ebay.com/120-lumens-5-Wat...QQcmdZViewItem
I should have the right side modified by the end of the weekend. Rain is expected.
Photos don't show well. The camera is more sensitive to orange light.
Basically...
- TAIL LIGHTS are equally bright as incandesant
- individual BRAKE LIGHTS are less bright than the incandesant, but now with with more brake lights, it actually looks brighter overall.
- With the garage door closed and the car inside, the three LED brake lights project more light on the door than the one incandesant brake light.
- LED lights are true red in color, no orange cast like the incandesant
- just for fun, I used my camera to make a movie of the brake lights operating on/off. Very notice able how fast the LEDs come on and go off as compared with the incandesant. Fun to move frame by frame and see the difference.
Here's the LEDs I'm using:
http://cgi.ebay.com/ebaymotors/1157-...4787QQtcZphoto
The 3 watt Luxeon 1157's that I sampled were too bright on low which may not be safe for brake lights.
Right now, I don't think I'm ready for LED turn signals. They aren't bright enough for me. I think you really need 5 watt Luxeons, and only 3 watt Luxeons are available now. They must be coming, cause they are already selling flashlights with the 5 watt luxeons
http://cgi.ebay.com/120-lumens-5-Wat...QQcmdZViewItem
I should have the right side modified by the end of the weekend. Rain is expected.
 02-11-2007, 07:25 PM
#14
Drifting
Thread Starter
Here's the final result with LEDs on both sides..... more inpressive in an antimated GIF...

----------Update ------------------
I later replace the LEDs with 7 watt units. Here's a shot of my seven brake lights (7 watt each ). Photo taken at a distance of 30 feet. They appear amber to my digital camera, however they are deep red in color.

There's no mistaking from behind when I hit the brakes.
----------Update ------------------
I later replace the LEDs with 7 watt units. Here's a shot of my seven brake lights (7 watt each ). Photo taken at a distance of 30 feet. They appear amber to my digital camera, however they are deep red in color.
There's no mistaking from behind when I hit the brakes.
Last edited by borland; 04-24-2011 at 11:44 PM.

